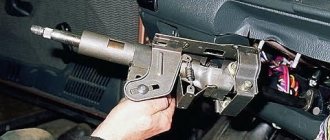
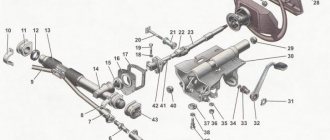
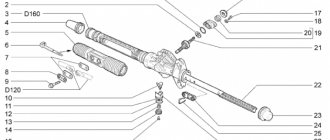
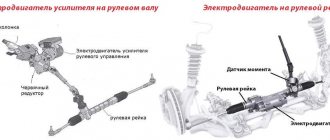
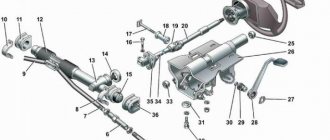
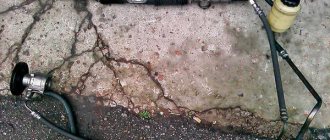
First, let's figure out how the EUR differs from the power steering. These units are structurally completely different. Without going into details, the main unit of the latter is a pump driven by the crankshaft, which is combined into one unit with a number of other parts, and everything is connected to hydraulics. Now let's figure out how the electric power steering works? The EUR consists of an electric motor, a steering shaft with a torsion bar, several sensors and an electronic control unit (ECU), and therefore its operating principle is significantly different from that of a hydraulic booster.
Operating principle of electric power steering (EPS)
The EUR works as follows:
- The driver turns the steering wheel;
- The torsion shaft begins to twist;
- Sensors record this, as well as a number of other parameters;
- The ECU analyzes the received data;
- Upon completion of the analysis, the ECU sends a command to the electric motor so that it creates the necessary compensation force.
Electric power steering advantages and disadvantages
EUR and power steering are constantly compared with each other. Many copies have already been broken in discussions, but the reality is that power steering appears less and less in modern passenger cars, although it is not losing its position in the truck segment (and will not give up, why - see below).
So why has the electric booster gained such popularity? There are several reasons:
1) It also works when the engine is turned off (power steering - no);
2) It has smaller dimensions than a hydraulic booster;
3) Requires almost no maintenance;
4) It practically does not create a load on the engine, which helps to save a little fuel;
5) In conditions of negative temperatures it works more reliably than power steering.
However, it also has certain disadvantages:
1) The EUR is structurally more complex and therefore more expensive;
2) In some cases, the ECU may issue incorrect commands (a good example is the story with the 1st generation Lada Kalina);
3) It has less operating power and is therefore suitable only for passenger cars;
4) When driving for a long time on a bad road, it may overheat and turn off for a while until it cools down.
Preparation for installing the EUR on a VAZ 2110
First of all, you should find a garage where you will carry out all the work if you don’t have one. Then go to the auto store and purchase all the necessary materials:
- Wiring for electric amplifier;
- Intermediate steering shaft from Lada Priora;
- Steering wheel for the “ten” of the new model or from the “Lada Kalina”, column cover (optional if you carefully remove the old one).
Tools you will need:
- Screwdrivers (flat and Phillips);
- Ruler;
- Bulgarian (optional);
- Drill;
- Drill for metal.
How to install the EUR on a VAZ 2110: step-by-step photo repair
So, when everything is ready, you can start installation.
1) Take the purchased wires and remove the standard terminal from the block, then install it into the block on the harness.
2) The terminal that comes off the harness is installed where the wire was adjacent to the block (standard). All these manipulations are needed so that the standard wire can be passed between the harnesses. By the way, the wire from the blocks is 50A, and the fuse must correspond to this power (you can take it from a Chevrolet Niva).
3) Next, arm yourself with tools and start removing the steering column cover, ignition switch and steering column switches. Proceed with care; the casing is fragile and may crack.
5) Compare the length of the old and new intermediate shafts. Depending on the results obtained, it will be necessary to adjust the plate and shaft. This is where a ruler comes in handy. It is better to write down the dimensions.
6) The shaft is adjusted by turning it; this must be done on a special machine, so you will have to contact specialists.
7) The plate is adjusted by re-drilling some holes to a greater depth. This is not difficult to do, fortunately the shaft is hollow inside. You will also probably need to trim the corners of the plate with a grinder and put spacers between it and the body.
 Try installing the EUR assembly with the plate and steering rack. It is likely that the standard rack bolt will not fit and will have to be replaced with a smaller one. This will entail the need to install a homemade limiter to keep the shaft stationary.
9) Install the switches (or rather, their central part).
11) Remove the dashboard and locate the red pad. Then drag the wiring from the EUR into the space under the panel.
13) The same manipulation must be carried out with the gray wire (it is also from the red block).
14) The wires pulled out under the hood must be connected like this: black to “–”, and pink to “+”. That's all, all that remains is to put back the casing and steering wheel.
Adjustment after installation
After reassembly, it may turn out that some defects remain. Perhaps they will be completely indifferent to you, but if you decide to do everything perfectly, the following additional work may be required:
- Align the steering wheel if it is crooked after installation;
- Remove all excessively large gaps between the steering column casing and the front panel;
- Install the EUR diagnostic sensor;
- Replace the cracked steering column casing with a new one if necessary.
In addition, it is important that you will have to slightly adjust your driving style - at first it may seem that the steering wheel turns very easily. It’s also not worth “putting” the car into a turn, since the force on the steering wheel with an electric steering system is weaker than with power steering, or even more so without it.
Is the electric power steering repairable and what is the price?
If suddenly the electric power steering fails for some reason, it is useless to contact the service center, since this part is non-repairable and therefore can only be replaced as an assembly. So, self-repair of the EUR is carried out strictly at your own peril and risk, because any unqualified intervention in its design can easily lead to an accident with a probability of death.
Now let's talk about the price of the issue. Installing an EUR, let's face it, will cost a considerable amount. Judge for yourself:
- A new EUR, depending on the region of delivery, will cost about 13,000 - 18,000 rubles. It can be ordered either through online stores, with subsequent delivery by mail to any city, or directly from the factory;
- You can save money by purchasing a used part, costing around 2000 - 6000 rubles. Look for advertisements on the Internet, newspapers, etc., but remember that you are buying a pig in a poke.
If we talk about other parts, without which it is impossible to install, they are also not cheap:
- Intermediate steering shaft, adapted for installation of electric power steering - from 2000 rubles. and more;
- Bracket for installation - approximately 1,000 rubles;
- Wiring for the electric amplifier - approximately 1,500 rubles;
- If the car has a carburetor, then you will also need a speed sensor simulator - this will cost around 1,500 rubles.
Conclusions and recommendations
What conclusion can be drawn from all of the above? On the one hand, installing an electric power steering system on a VAZ-2110 has many positive aspects, the main one of which is much more comfortable handling, which is especially noticeable if your car did not have any power steering at all. You will be less tired while driving, and when you hit a large hole, the steering wheel will not tear out of your hands as if it were alive, which increases traffic safety. In addition, you will not need to regularly monitor the fluid level and worry about leaks, as is the case with power steering.
On the other hand, an electric amplifier is a very expensive pleasure, especially in current times of crisis. Yes, and installing it is quite difficult, not counting the fact that it takes a lot of time.
In addition, the power steering is completely irreparable, and if it breaks, then the car is laid up, while with a leaking power steering you can drive for a while until a new one is purchased. Whether it’s worth putting an EUR in your top ten is up to you to decide. That's all for today. See you again!
Many have probably heard that in the VAZ 2110 you can install electric power steering from Priora . Is it difficult to install the EUR from Priora on a VAZ 2110 with your own hands ? What is the price of the EUR from Priora and where can I order ? I tried to answer all these questions in this article.
There are two types of mechanisms that make steering easier: power steering (hydraulic power steering) and electric power steering (electric power steering).
- In general terms, power steering is : a pump driven by the crankshaft pumps oil or a similar fluid, and through a rather complex set of small parts in and outside the rack and fluid pressure helps to rotate the steering wheel.
- The EUR is simpler : an electric motor, a torsion bar, a pair of sensors and an ECU. Principle: the torsion bar is twisted, the torque is read by the sensor, and the electric motor applies a little Newton meters of force to the output shaft.
Pros of EUR:
- During operation, the power steering does not require intervention/maintenance, unlike the power steering (it is at least worth keeping an eye on the oil and tubular connections).
- The electric motor of the EUR works only when it is necessary to turn the steering wheel (when the torsion bar begins to twist), in a stationary position it practically does not work, nor does it work after reaching a certain speed prescribed in the ECU. Power steering, unlike its brother, works constantly, its motor constantly spins at the knee and threshes fluid, even if the car is standing without a driver.
- In cold weather, the EUR performed better. It doesn't need to warm up like the power steering.
Disadvantages of EUR:
- The EUR is weaker. Although on light cars, like our dozens, this is practically not noticeable.
- EUR - 9715 rub. (21700-3450008-01)
- Promval - 1000 rub. (21100-3401092-10)
- Plate - 800 rubles and above
- Wiring - 1500 rub.
- Steering wheel and casing VAZ 2170 - 2000 rub. (11180-3402015-00, 21700-3403065/3116-00)
The total price of a new set will cost you approximately 15,000 rubles.
Where to buy a set of EUR Priora for VAZ 2110? You can order in Kaluga from the factory directly. In the online store “Everything for Auto”
———————————————————————————————————— At disassembly I purchased a Viburnum steering wheel with a small bonus
I bought an EUR, here it is in a box, a control unit, markings of the EUR itself
The pads are the same as on the 10th EUR
Papers included with EUR
Then I bought a drain from Priora with a tricky mechanism
I measured the length of the drain shafts. The difference was 4 cm with an error on the larger side. The length was 25.5 cm in the most expanded form. So, taking into account the experience of the installers, that the drain shaft must be shortened by 3 cm, nothing needs to be lengthened, it seems
Then the ordered wiring arrived
This is what the blocks look like, that is, there will be no need for any twists, I removed the terminal from the block, inserted it onto the block in the harness and inserted the free terminal of the harness into the place where I removed the standard wire, it is already set to 50A
EUR connectors and harness blocks in them
As for the wiring too - you can do without a special harness - all you need to do is run two power wires from the battery with a cross-section of 4 squares, a 50 A fuse from Shnivy, the rest is all low current - to the tachometer, to the speed sensor, + 12V after the 3Z, ground, to -line and wire to the control lamp.
But since there was not enough adapter plate and it was unknown when it would arrive, I decided to cut it out myself. We take the workpiece, mark it and cut it out with a jigsaw. Thickness approximately 4mm.
We remove the casing, switches, ignition switch.
Next, unscrew the bolt on the rack, remove the steering rack, and see how much less stock has been adjusted
We adjust the plate in place
We put the shaft on the EUR, we put the EUR in place and we see that the shaft is too small. It fits literally 1 mm onto the rail, I had to take it off and think about it. It was not possible to distort the drain shaft, since it was hollow and had to be chemically mixed with the plate and priorol. Prioral has undergone changes in this part
Well, I had to re-drill the plate in order to drive the EUR deeper, this did not give much benefit, I installed spacers between the plate and the body. So the EUR is installed, the shaft has more or less climbed onto the rail, but not completely, the bolt cannot be inserted. I had to take a smaller bolt and clamp it to death and sculpt a limiter onto the shaft so that the cardan could not slide back in any way.
Next we hook the central part of the switches
The next step is wiring. You need to stretch two wires to the battery from the passenger compartment; you need to pull them through the left fender; to do this, open the fuse box and look for the bundle of wires going under the hood. We remove the washer reservoir, take the wire and stick it into the wires. From here it comes out.
We attach the wires to the other end and pull them into the engine compartment
We remove the instrument panel, pull out the red block, drag the wiring into the under-panel space and remove the orange wire from the red block.
We attach the block that came with the wires to it. We connect it to the EUR wiring, with the orange wire (this is the 1st leg in the EUR block, +12V power supply) And we poke the end with the bare terminal of the EUR wiring into the place of the standard one in the red block.
We do the same with the gray wire of the red block. The gray end (this is the 3rd leg of the EUR control block, the signal from the speed sensor) and with the brown-red white block (this is the 2nd leg of the EUR signal block, the low-voltage signal from the tachometer)
Well, everything seems to be ready, attempt No. 1 Start. We turn the steering wheel and see - never mind. I swear at the manufacturer and myself for a long time, then we calm down and remember that the power ends are not connected. We go to the battery and connect the pink one to PLUS and the black one to MINUS.
Attempt number 2 - my pants are full of joy. Spins with one finger.
The position of the steering wheel is comfortable for me. You have to get used to the EUR, don’t lean into corners out of old habit, but you get used to the good stuff quickly.
Well, finally a good plate has arrived. I welded the washout to the required length using the stock shaft as a donor and bought a casing. Here's what happened: The length of the shaft is 27.8 cm
The junction of two shafts (prioro inserted into the drain and welded)
It was necessary to make some modifications in order to maintain the height adjustment, we had to grind down the edges
I placed spacers between the plate and the body, resulting in a distance from the steering wheel to the floor 51 cm to the seat 21 cm
Having completed it, we put it in place and close it with covers. After installation it turned out like this: In the upper position
In the lower position, I then tied the wires, ignore them.
There is a gap, we need to think about something.
This is what remains from the old management
The casing is defective; there was a tape recorder control. A steering wheel with a dozen of a new sample and a casing for it, a stock shaft for the 10th rack, a guarantor.
Review of Skoda Kodiak 2017. Price in Russia. Photo, video
The presence of an electric booster on a VAZ 2110 car allows you to improve the quality of response to changes in the angle of rotation of the steering wheel, improve maneuverability and controllability. The practice of drivers proves that with an electric booster they feel more confident.
An important advantage is that with electric assistance you have to apply less force to enter a turn and make a maneuver. This has a positive effect on a person’s condition during long trips.
FakeHeader
Comments 108
I have this problem on my Priora. In short, I go to work, get into the car, start it, warm it up, start to move away and the EUR turns off, and only by the end of the evening it doesn’t seem to work for me. I decided to check the charging and this is what happened: with the engine running 13.9, with a stove 13.7, with dimensions and a stove 13.5, with low beam and with a stove and dimensions 13.3 and all together and the high beam in general 13, I think that’s why the EUR turns off because it doesn’t have enough power, I think There's something wrong with my generator, who knows?
Technical characteristics of the electric power steering: - rated supply voltage 13.5V; — maximum current consumption no more than 55A; — current consumption in the absence of torque on the input shaft is no more than 0.5A; — maximum compensating torque (at a shaft rotation speed of up to 360 degrees/sec., vehicle speed 0 km/h, load torque on the output shaft 35 Nm) — 24 Nm (12.9 kgf at R steering wheel = 190 mm), which corresponds to the control force on the steering wheel driver 6Nm (3.2kgf at Rsteering wheel = 190mm); — the moment of resistance to shaft rotation when the EMUR is not working is no more than 0.8 Nm; — total weight no more than 9.3 kg; — operating temperature range -40…+65С; — operating supply voltage range 10.8…15V.
Didn't you read the errors with a scanner? There are a lot of codes for eur.
Temporal parameters of the light code: duration of the initial pause – 2 seconds; long signal duration – 2 seconds; short signal duration – 0.5 seconds; the duration of the pause between signals is 0.5 seconds; Pause duration between codes – 2 seconds
Code decoding 1 long 1 short System OK 1 long 2 short No engine speed signal 1 long 3 short Malfunction of torque sensor 1 long 4 short Malfunction of engine EMUR 1 long 5 short Malfunction of steering shaft position sensor 1 long 6 short Malfunction of engine rotor position sensor EMUR 1 long 7 short Malfunction of the vehicle's electrical system (below 10V or greater than 18V) 1 long 8 short Malfunction of the EMUR control unit 1 long 9 short Malfunction of the vehicle speed sensor
Description of EMUR fault codes read from internal memory using a special scanner.
C1011 Vehicle engine speed signal circuit, no signal C1012 Vehicle speed sensor signal circuit, no signal C1013 Vehicle on-board voltage below the minimum threshold C1014 Voltage at the ignition switch below the minimum threshold C1021 Voltage of the main terminal of the torque sensor C1022 Voltage of the control terminal of the torque sensor C1023 Incorrect signal of the main and /or torque sensor control terminal C1024 Torque sensor, no signal C1031 Steering shaft position sensor, main signal circuit fault, or out of range C1032 Steering shaft position sensor, control signal circuit fault, or out of range C1033 Steering shaft position sensor, no power C1041 Engine Rotor Position Sensor, Phase A Circuit Malfunction or Out of Range C1042 Engine Rotor Position Sensor, Phase B Circuit Malfunction or Out of Range C1043 Engine Rotor Position Sensor, Phase C Circuit Malfunction or Out of Range C1044 Engine Rotor Position Sensor Sequence Incorrect C1045 Motor rotor position sensor, lack of power C1050 Short to ground in power circuits C1051 Motor, excess current through phase winding A C1052 Motor, excess current through phase winding B C1053 Motor, excess current through phase winding C C1054 Motor, open phase windings C1055 Motor, open circuit of phase winding A C1056 Motor, open circuit of phase winding B C1057 Motor, open circuit of phase winding C C1058 Motor, short circuit of phase windings C1059 Short circuit of motor phase A winding C1060 Short circuit of motor phase B winding C1061 Short circuit of motor phase C winding C1070 Fault not recognized C1 071 Control unit, RAM error of the electronic unit C1072 Control unit, ROM error of the electronic unit C1073 Control unit, error EEPROM of the electronic unit C1074 Relay of the electronic unit C1075 Control unit, excess temperature of the radiator C1076 Supply voltage of the ECU elements is below the minimum threshold C1077 Voltage on the power capacitors is below the minimum threshold C1078 Charging time power capacitors C1079 The current of one of the phase windings is above the maximum threshold C1080 Breakdown of at least one of the upper power transistors
A little history
Only 12 years later, in 2002, domestic engineers from Novosibirsk University began developing a Russian electric amplifier. After the completion of the project, the unit was refined and tested for several years at the AvtoVAZ plant.
New device
The engineers' task was to create a worthy analogue to foreign amplifiers, to provide the unit with the necessary advantages, durability and reliability. At the same time, unlike imported analogues, our electric amplifiers were much cheaper.
Today, these devices are produced by the Berdsk Electromechanical Plant, located in Russia and a subsidiary of AvtoVAZ.
Main advantages of the first ES
The electric amplifier would not be so in demand and popular without the obvious advantages that it brought along with its appearance. The strengths of this steering system include:
- The unit operates even when the power unit is turned off;
- The unit allows partial fuel savings, which has a positive effect on fuel consumption;
- Handling is improved in all components;
- Reliability of maneuvers at the highest level;
- Excellent safety record with regular use.
What is power steering VAZ 2109
On the first models of VAZ 2109 cars, power steering was not installed. The driver has to mount the unit additionally. It consists of two parts:
- The source of energy, its role is played by a hydraulic pump.
- The execution mechanism, which is usually combined with . The general view of the device is shown in the photo.
Before mass use of the device, manufacturers tested the car, which showed:
- When moving the car with numerous turns in a limited space, it rotated easily; it was necessary to turn it at a smaller angle than in a car without power steering.
- When driving around the city, after a little skill, the driver only gets pleasure from driving the car.
Tip: When turning the steering wheel at a larger angle than the driver expects, the power steering allows the steering wheel to be turned to the desired angle, the car will easily fit into a smaller radius.
- When driving on a free area, the number of steering wheel turns is three and a half from one stop to the other, with the hydraulic booster three and one third are enough.
- A change in the steering gear ratio led to more precise vehicle control.
- The steering works well at very low speeds in parking mode. Very little effort is applied to the steering wheel.
- Excellent results were obtained when moving at extreme conditions. Increasing speed resulted in a slight increase in steering effort, but feedback was good.
How to install power steering on a VAZ 2109
Instructions on how to install power steering on a VAZ 2109 indicate what is needed:
- Purchase a power steering kit, with all the components: a pump, a special steering gear, a pulley, a hydraulic cylinder, an expansion tank and hoses that can withstand high pressure.
- The pump fixation bracket is installed on the BC head. When installing it, the product needs to be modified: it is unscrewed, the ears for its fastening are sawed off, the far right mount is sawed off so that it does not interfere.
- Instead of the generator, the pump itself is mounted on a bracket.
- The crankshaft pulley is being replaced; the pump will be driven through it.
Advice: It is necessary to take into account that the drive should not go through the chain, but only through the belt.
- The steering gearbox is being replaced.
Tip: When installing a new gearbox, you will need to modify the place where it will be mounted. To do this: a hole is cut in the front end shield and the bipod is modified.
- A location is selected for the expansion tank so that it does not interfere with other parts of the engine.
- The hydraulic cylinder is installed according to the instructions included in the power steering kit. Each device manufacturer has its own installation features.
- The entire system is connected by high-pressure hoses and is well fixed.
Tip: It is necessary to ensure that the hoses cannot rub against other elements located under the hood.
- A special one is poured into the expansion tank.
- The system is being pumped. In this case, the steering wheel turns all the way left and right; if necessary, you need to add oil to the expansion tank.
- When the liquid stops leaving, you need to replenish the oil level to the top mark of the tank.
- On a VAZ 2109 car, the installation of the hydraulic booster ends with bleeding the system.
The advantages of the VAZ 2109 with hydraulic booster can be seen in the video.
Operating principle
The ECU is a modular design built into the steering column. The module itself includes two main components:
- Electrical unit of synchronous nature;
- Controller.
It is important for VAZ 2110 owners to install such a system if they want to use wide wheels that differ from the factory ones by several sizes. And in general, if you want to feel real comfort and enjoy driving, and not turn the steering wheel with all your might, install an electric booster. He will react to even the slightest touch.
Complete with steering wheel
Although this is against the rules, now you no longer have to hold the steering rim with both hands. The car will become more than obedient and controllable when moving with one hand.
Numerous tests have shown that cars with powertrain are safer on the roads.
Technical specifications
When installing the EU on your VAZ 2110, it is important to take into account its technical characteristics. The node has certain requirements in this regard. Therefore, for the “ten” you should choose a device that corresponds to the parameters specified in the table.
Parameter
Index
Maximum torque compensation
Amount of current consumed (at Mmax 35 Nm and steering wheel rotation speed of 360 degrees in 1 sec)
Operating temperature range
from -40 to +85 degrees Celsius
Electronically controlled motor
With three passes
Made from 40X steel
Made from carbon fiber grade UPA 6/30-2
After familiarizing yourself with the specified parameters, you can choose the electric booster that suits your car. Do not forget that this is an electrical unit, so you should work with it very carefully.
Installation benefits
If you decide to install a modern electric booster on your VAZ 2110, you need to find out in advance what benefits you will receive from such manipulation. This will further convince you of the correctness of the decision.
- Installation does not require extensive experience or knowledge. Do it yourself in a few hours of work.
- The unit requires a small amount of electricity to operate. This will not negatively affect the condition of the battery or other components of the car.
- EU has no negative impact on the environmental friendliness of exhaust.
- Positively affects parametric indicators.
- Does not require complex and regular maintenance during operation. Install it and enjoy the comfort.
- Under low-temperature conditions, the electric booster works better than the hydraulic booster.
Some people believe that the operation of the electric booster is slightly weaker compared to the hydraulic booster. But in practice and on our roads you will not feel this. Therefore, this only drawback is more than controversial.
»
Differences between EUR and power steering
These are completely different units. To understand the main differences, it is enough to study the hydraulic booster. Its main component is a pump driven by the crankshaft, it is integrated with other parts. The operating principle of the hydraulic booster is based on hydraulics.
As for the electric power steering, it is driven by an electric motor. Its design also includes an electronic control unit, a steering shaft with a torsion element and sensors. The EUR works according to a different scheme:
- When the steering wheel rotates, the torsion shaft twists;
- Special sensors record changes in the position of the shaft and send data to the electronic control unit;
- After analyzing the information, the unit sends commands to the electric motor;
- As a result, the unit creates the necessary force or facilitates turning the steering wheel.
Electric power steering device
Car enthusiasts often argue which option is preferable for the “ten”. In fact, power steering is an obsolete unit that is being actively removed from modern passenger cars. The electric booster works even when the engine is turned off and weighs less than the power steering. The main advantage over “hydraulics” is reliability - the electric unit requires virtually no maintenance. There is less load on the engine, and as a result, less fuel is also needed. The EUR is also good for our conditions because it functions well at low temperatures.
But the electric booster also has its drawbacks. Its design is more complex than that of “hydraulics”, hence the high price. Sometimes the electronic control unit sends incorrect commands, this was especially felt by the owners of the first generation Kalina. If you drive for a long time on a poor-quality road surface (or lack thereof), the EUR may turn off for several minutes due to overheating.
Preparation for installation
Alas, not every “ten” has a native electric amplifier. But this is not a problem, since the unit can be installed with your own hands. The work is not very difficult, because if you follow the instructions, you can do everything yourself perfectly.
At the preparation stage, you should purchase and prepare tools and materials in advance:
- New electric booster;
- Plate;
- Wiring kit;
- Promval;
- Cover and steering wheel;
- Set of different screwdrivers;
- Drill;
- Ruler.
Since we are talking about an electrical device, all kinds of oils and lubricants are not required here.
Installation
When everything is ready and you are ready to work, you can begin installing the power supply.
- Remove the standard terminal from the block and insert it into the block on the harness.
- Now the free terminal, which comes off the harness, is placed in place of the standard drive adjacent to the block. This will allow you to pass the standard wire between the two harnesses. The wire coming from the blocks has a rating of 50 Amps.
- Next, disconnect the shaft casing, and then remove the ignition switch. Be sure to separate the switches. This stage is carried out carefully and slowly so that the casing does not crack.
- Unscrew the steering rack mounting bolt and remove it.
- Measure the length of the hole. If necessary, use a trim plate. We recommend recording the received parameters.
- An electric amplifier must now be installed in the vacated area.
- Please select the correct size shaft as it will not fit on the steering rack. To adjust the shaft, you will need a plate and a regrind for the shaft from Priora. By the way, when installing power units, elements from the Priora model are excellent. Take note of this.
Disassembling the unit
- After adjusting the plate, drill a larger recess than there is now. The shaft is a hollow structure, so any metal drill can easily cope with the task.
- The plate is placed on the amplifier and the resulting depth indicator is checked. If everything fits, secure the structure with a small bolt.
- Put all the switches back in place and start working on the wiring.
- It is necessary to remove two wires from the interior that go directly to the battery. This is done through the left wing.
- Remove the washer fluid reservoir and take a piece of wire. It will be needed to secure the wires leading to the battery. They are attached to the end of the opposite one, passed and pulled through both at once.
- Remove the instrument panel and remove the red colored block. Carefully tighten the wiring into the under-panel space.
- Now he removes the orange wire from the red box.
Visual amplifier
- The red block is attached to this wiring and combined with the wiring from your electric amplifier. Don’t forget to place the end of the wiring with the “bare” terminal from the amplifier onto the free standard wire located in the red block.
- The operation is performed in a similar way with the gray wiring, which is also located in the red block. It is pulled into its regular place and secured with terminals.
- Next, we move to the battery, securely fix the black negative wire to the pink positive wire.
- All that remains is to connect all the wiring from the power unit and start it up.
- At this point, the installation is almost complete. You should definitely assemble all the components, return the components to their original positions - switches, casing, steering wheel, etc.
Working with wiring
Customizing the EU
Fitting includes the following activities:
- Steering wheel alignment;
- Elimination of all gaps formed between parts;
- Reducing the length of the power cable;
- Checking the installation of LED diagnostic sensors for the EU;
- Replacement of worn or damaged elements if necessary and available.
Fit
After completing the work, sit behind the wheel and carefully inspect the front of the operations performed. Start the car and test the new steering wheel in action. Be sure to put the panel and steering wheel in order and clean the surfaces. After this, you can begin direct operation.
Detailed guide to installing electric power steering
Buying an electric amplifier today is not a problem; all you have to do is go to any specialized store. The design features of the “seven” allow the installation of an electric amplifier from the Lada Priora. But before you purchase this unit, you need to take into account that for installation you will need to make or additionally buy a cardan, as well as an adapter plate. We will not describe the entire process in detail, because if you understand what we are talking about, then the instructions below will be enough for the correct and complete installation of the system (the author of the video is the Anton Mariyan channel).
If you are faced with the need for installation for the first time, then it would be better to seek help in this matter from qualified specialists. After all, if you make mistakes, getting rid of malfunctions can be problematic, so if you lack experience, it is better to immediately entrust this matter to professionals.
So, here's how the installation procedure works:
- First, you should completely de-energize the on-board network to prevent a possible short circuit during repair work. To do this, simply open the hood and disconnect the terminals from the battery.
- Next, you will need to remove the protective cover from the steering wheel. To do this, simply unscrew the bolts that secure the two parts of the cover.
- At the next stage, the old steering cardan is removed, as well as the installation of a new part, which comes with the purchased system.
- After completing these steps, you will need to use a drill to drill holes to fix the electric amplifier. Depending on the design features of the new EUR, the holes may be different, so at this stage you need to use the installation instructions that should come with the kit.
- Once the holes are drilled, the electric amplifier must be fixed.
- Next, the wires from the speed and speed sensors are connected. When connecting, be careful - you cannot allow the presence of bare wires in the electrical circuit, so all cables must be carefully insulated.
- After completing these steps, the power circuit of the unit is connected; remember that the electrical circuit must include a safety element.
- Actually, at this point the process of installing the electric booster system can be considered complete. All you have to do is reinstall the protective steering wheel pads and tighten all the bolts that were unscrewed earlier. Then the battery terminals are connected and the functionality of the system is checked. If problems arise with the operation of the electric amplifier, you need to check the correct installation and also make sure that you did not make mistakes when connecting the wires. As practice shows, one of the main reasons for the incorrect operation of the ESD is incorrect wiring.
Price issue
Wanting to install an EU on a VAZ 2110, many car owners are interested in how much the installation will cost them.
We cannot say the exact prices of such services at car services, since each service station has its own pricing policy. If you plan to do the installation yourself, then we suggest that you familiarize yourself with the approximate price list for everything that you will need during the work process.
There is always a desire to modernize your favorite car, so installing EPS (electric power steering) on a VAZ 2110 will be a good tuning of your car.
Types of power steering
If you decide to equip your car with an amplifier, then you have several options - expensive and cheaper:
- Power steering for the VAZ 2107 is a more expensive option. Such a system consists of a pump, supply lines, a pipe and a reservoir for working fluid. In this case, the working fluid is oil, which is under pressure in the system. The installation procedure is quite complex, like the design of the system itself, and the car owner will also have to periodically maintain the system. As practice and prices on the automotive market show, there is no point in installing such a unit, since its cost is almost half the price of a used 2107.
- A cheaper and more suitable option for the “seven” is an electric booster. In practice, this unit allows you to cope well with the load placed on it, especially since its installation is simpler. In fact, the electric power steering works on the “seven” almost as efficiently as the hydraulic booster. It should be noted that the main advantage of such a system is the absence of the need for regular maintenance. The EUR on a VAZ is connected to the on-board network, since its operation requires 12-volt voltage.
Passing technical inspection and certificates
Before installing the ESD on your G7, you should think about passing a technical inspection. The fact is that installing such a device means making changes to the design of the vehicle, which will result in difficulties when passing maintenance in the absence of appropriate certificates. To avoid any problems, it is necessary to install the product in a certified VAZ car service center. In addition, you need to obtain the appropriate documents: a certificate from the manufacturer and the service where the installation was carried out. If you have all the necessary papers, then you can pass the technical inspection without any nuances. If conflict situations arise, the inspection station staff must request a written refusal indicating the reasons.
Despite the apparent complexity of such a device as electric power steering, its installation and connection will not take much effort and time. You need to prepare a mechanism kit with the necessary tools, and then follow the step-by-step instructions according to which you can install and connect the device.
Why not hydraulic?
There are two types of power steering:
- Electromechanical.
- Hydraulic.
When the hydraulic power steering operates, high oil pressure is created in the system. The design of the hydraulic booster consists of supply pipes, a pump, a special reservoir and working fluid. The pump creates oil pressure, which affects the entire mechanism, making it much easier to turn the wheels.
Therefore, turning the steering wheel will be much easier. In general, the design of a hydraulic booster is very complex, installation takes a long time, and all mechanisms need to be regularly maintained. Only in this case will the hydraulic booster work perfectly.
If the car does not have a hydraulic booster installed, it is very difficult to install it. You will have to purchase additional parts, as well as make very serious changes to the steering mechanism. It is for this reason that it is not advisable to install a hydraulic booster on the “seven”.
