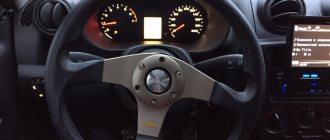
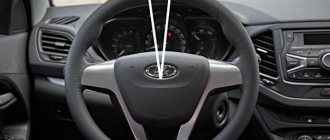
Electric power steering for modern cars has already become an integral part of them. On the Russian market it was first installed on the Lada Kalina car ( VAZ 1118). The electric booster added both a lot of positive emotions and a lot of negative ones. Failure of this unit occurs quite often on the first samples. Our guest today was no exception – a car from the Lada “Kalina” family (Fig. 1).
The situation is quite typical: the client complains that sometimes the electric power steering turns off and the electric power steering warning light comes on, but after driving along some hole or rails, the electromechanical power steering (EMUR or EPS) resumes its operation.
This situation is very annoying, because not only the owner uses the car, but also his wife. It is much more problematic for a woman to turn the steering wheel without electric power assistance.
We start the car, and the electric power steering fault light actually lights up and it becomes quite difficult to turn the steering wheel. It is imperative to deal with this problem.
We connect the diagnostic scanner and connect to the EMUR control unit.
On the monitor screen we see the following error: C1044 – incorrect sequence of the rotor position sensor. What is a rotor position sensor and where is it located?
Let's take a break from our malfunction for a moment and touch on a little theory. Let's understand the EMUR device and what main parts it consists of. Let's consider all its parts separately.
Design EMUR Kalina 11186-3450008-00
- Steering shaft
- Electric motor
- Electronic control unit
- Torque sensor
- Rotor position sensor
We remove the EMUR. On the nameplate (Fig. 7) there is article number 11186-3450008-00 manufactured by Aviaagregat, Makhachkala.
Remove the steering wheel, steering column switches and ignition switch. To get to the torque sensor , you must first remove the electric motor. We unscrew the bracket with 4 bolts, the cardan shaft, the lock nut and the 3 bolts securing the electric motor.
This is what we got (Fig. 12)
Next we pull out the shaft.
We take out the torque sensor (Fig. 17), having previously unsoldered the wires from the board (Fig. 16).
Design of an inductive torque sensor.
The inductive sensor consists of two concentric cylinders with holes (perforation slots), which are fixed to the shaft and rotate with it. And two concentric coils with primary and secondary windings, fixedly inserted into the EMUR housing. We will not go into various terminology, but let’s put it simply: an alternating current with a frequency of 20 kHz is supplied to the primary winding, and if we apply force to the shaft (that is, we begin to rotate the steering wheel), then a voltage “+” or “-” appears on the secondary winding depending on the direction of rotation, and the magnitude of this voltage is directly proportional to the applied torque (force). Thus, the electronic control unit (ECU) determines with what force you rotate the steering wheel in one direction or another.
So, we’ve dealt with the torque sensor, let’s move on to the next one, namely the rotor position sensor (Fig. 20), which is located on the back cover of the electric motor.
The EMUR of the Lada "Kalina" uses a 3-phase switched inductor (brushless) motor. In order for it to start rotating in one direction or another, the electronics must understand what position the rotor is currently in and, after determining the position, apply voltage to certain stator windings at the right moments. To determine the position, a rotor position sensor (RPS) is used.
Diagram and design of an optical rotor position sensor.
3 optocouplers located at an angle of 120 degrees - LED (LED a,b,c) and photodiode (PD a,b,c), correspond to the location of the motor stator windings phases A, B, C. A disk is installed on the motor rotor, and when it rotates Photodiode a, b or c is triggered. In this way, the electronics determines the current position of the rotor.
Next, let’s look at the electronic control unit EMUR (Fig. 23), we won’t say anything special about it, we’ll just look at the photo of the board itself.
Well, we have sorted out the EMUR device, let’s return to our malfunction, with which the owner of the Kalina car came to us. What needs to be done to make everything work as it should? A fairly common malfunction with this modification of the EMUR is poor soldering of the optocouplers on the rotor position sensor board. It is enough to simply solder all the contacts of the optocouplers (Fig. 24) to revive the EMUR, which we hastened to do.
After soldering the board, we assemble everything in the reverse order and start the car. Hurray. The EMUR fault light went out and the steering wheel began to rotate very easily.
We have a scanner to check parameters and read fault codes, but what should a simple motorist who does not have this equipment do? How to count errors without a special scanner? It's quite simple.
In order to read the self-diagnosis codes of the Kalina EUR you need to:
1) With the ignition off, short the 6th contact of connector X2 of the EMUR control unit to ground, or short-circuit contacts 6 and 7 (Fig. 26). There is no 6th pin in connector X2, so we installed a piece of white wire there and connected it to the 7th pin (ground).
Let's look at the EMUR circuit for a more detailed understanding.
Latest model of Kalina
Lada Kalina cars are equipped with electric power steering. Its design is very simple, it consists of one block, so even on a standard vehicle, the EUR can be installed without any problems. It contains no liquid, which means it is easy to maintain. But it is worth paying attention to the experience of foreign manufacturers who try not to install ESD in their cars. This mechanism has a special feature: it can operate at both low and high speeds. The second option is undesirable, since the slightest movement of the steering wheel can cause the car to drift into a ditch or to the side of the road.
Causes of EUR failure
This is a useful car unit
The main cause of the malfunction lies directly in the electric amplifier. When the ignition is turned on, a self-diagnosis of the system occurs, which the mechanism does not pass. As a result, the EUR is simply turned off, and this affects the ease of driving. Repairing the device can cost a pretty penny, so if the car is still under warranty, it is better to have it serviced by a dealer. If the amplifier fails completely, turn off the power. In this case, the torque will be received by the steering rack, bypassing the electromechanical amplifier.
Another frequently occurring malfunction is a breakdown of the speed sensor. This sensor is responsible for the operation of the electric booster at different speeds. The power steering operates at full power only when driving at very low speeds. When accelerating, the force created by the amplifier on the rack decreases. The speed sensor is responsible for this operating algorithm. It is not difficult to replace it yourself, so repairs will cost a small amount.
If the speed is higher, then the EMUR works less, since it is not needed. For this reason, on Kalina with electric power steering, control at high speed is the same as in the “standard” model without this device. If the speed sensor connected to the speedometer fails, the electric power steering control unit receives incorrect data. As a result, the power steering switches off, and the driver sees a yellow indicator on the dashboard, notifying about an error in the electric booster.
But unexpected repairs and system failure can be avoided. It is enough to undergo diagnostics in a timely manner. It will show all the problems that are present in the car components. This is the easiest and surest way to get rid of problems. If the EUR breaks down, you will have to remove it and carry out repairs or replacement. It is dismantled with the steering column. To do this, you will need a 13 mm wrench, a Phillips and a flathead screwdriver.
Before starting dismantling, it is necessary to install the wheels in a straight position and remove the negative terminal from the battery.
General diagram of electrical equipment of Kalina
On the electrical circuit of the Lada Kalina model, the pinout of connectors is carried out in several stages. According to the factory drawings, the general position of the elements is initially revealed, then each node is deciphered separately.
- Right front headlight assembly.
- Sensor indicating the position of the hood lock.
- Powering the horn.
- Starter terminal block.
- Battery power cables.
- Generator working unit.
- Voltage supply terminal for the wiper drive.
- Left head optics contact block.
- Right door lift chip.
- Likewise for the glass lift gearbox.
- Output to driver's door speaker.
- Driver's door lock drive.
- Windshield washer reservoir motor.
- Overboard temperature meter sensor output.
- Standard ECM connection connector.
- Same as 12 for the front passenger.
- Indicator of the remaining brake fluid in the expansion tank of the system.
- Same as 11 for the front passenger.
- The front passenger door power window switch, located in the driver's control unit.
- Driver's door window lift key.
- Lock button.
- Power supply for the lift gearbox for the front passenger door.
- Input of the mounting assembly.
- Anti-theft control unit.
- Likewise for signaling.
- Pinout on the dashboard.
- Right turn.
- Glove compartment lighting.
- Glove box light switch.
- Stop key switch.
- Anti-theft ignition switch terminal.
- Headlight design.
- Supply current to the steering column lever connector.
- Left turn signal.
- Right rear speaker block.
- Rear right door electric lock drive.
- Window window heating unit.
- Reverse blocking.
- Hazard breaker.
- Adjusting the stove fan.
- Auxiliary resistor for the stove.
- Stove motor.
- Power supply for rear left speaker.
- Rear left door lock terminal.
- Power supply for fuel pump and float.
- White reverse lamp switch.
- Stop button.
- Cigarette lighter power supply.
- ZX blocking – solenoid power supply.
- Chips for a tape recorder or speaker system.
- Illumination of used ventilation and stove.
- Supplying voltage and signals to the EUR.
- Interior lighting lamps.
- Rear right lampshade.
- Power to the trunk lid lock.
- Cargo compartment lighting drive.
- State license plate illumination.
- Auxiliary stop lamp.
- Directly heated windshield.
- Cargo compartment illumination lamp.
- Left stern light.
The following is the pinout of the first generation Kalina wires for each section individually. This was done due to the increased complexity of the main circuit, where all elements of the on-board circuits are indicated at once. An inexperienced user will not be able to navigate the generalized instructions.
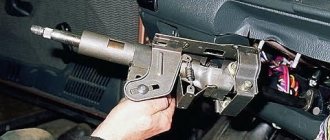
Removing the electric amplifier
The first step is to get rid of the steering column switches. After this, disconnect all connectors with wires from the dashboard. If it is necessary to dismantle the ignition switch, you need to unscrew 3 screws using a Phillips screwdriver. Next, remove the lower cross member of the dashboard. After this, press the clamps on the wiring harness blocks and disconnect them from the EMUR control unit. And only now can you disconnect the block directly from the steering column switches.
How is the unit located in the car?
The bracket is secured with 4 nuts that need to be unscrewed. After this, the entire steering column is carefully lowered to the floor. Locate the bolt securing the cardan to the steering shaft. Unscrew it with a 13mm wrench, while holding the nut from turning in the same way. The bolt is removed and the terminal connection is loosened using a strong flathead screwdriver. Carefully remove the intermediate shaft. It is recommended to mark with a marker the location of the shafts and gears relative to each other. Next, the necessary repairs to the electric power steering are carried out and assembly of the unit begins.
Be careful not to damage the wiring during dismantling. Mark the location of the shafts and gears as accurately as possible so that later there will be no inconvenience when turning the steering wheel. Installation of the EUR is carried out using the same tools, only in the reverse order. The most important thing is to align all the marks on the shafts. The help of a partner will not be superfluous.
Place the lower joint on the gear shaft in advance. First, connect the intermediate cardan directly to the steering gear shaft, then, using a 13-mm wrench, unscrew the nut designed to tighten the intermediate shaft. Remove the bolt and carefully disconnect the upper hinge from the lower one. The first step is to install the lower hinge, after which the shaft is rotated until the hole in the upper hinge is located for the bolt in the lower part of the shaft. Now all that remains is to connect the hinges and tighten them with a bolt. After this, connect the wire blocks and install the facing panels.
ESD error on the dashboard
The on-board computer will signal a malfunction of the EUR
Owners of a Kalina car with installed electric power steering enjoy pleasant and convenient control, but run the risk of encountering a problem - the “European Power Steering Error” light comes on. The reason for this may be either a complete failure of the system or its incorrect operation. It is worth noting that the sensor glows yellow, not red. This means that you can operate the car without a working Lada Kalina electric power steering, taking certain precautions.
You will have to apply more force to the steering wheel if you turn off the EMUR completely. This can be done quite simply by removing the fuse that supplies power to the control unit. If the power steering does not work or some strange phenomena are observed in its behavior, it is better to remove the fuse and undergo a complete diagnostic of the vehicle systems, which will show the cause of the breakdown. Driving without electric power assistance can be challenging. Out of habit, the steering wheel seems too tight, but in reality it is the same as on the Kalina “standard” configuration.
There are two reasons for EMUR failure: a malfunction of the speed sensor or a breakdown in the control unit. The first problem can be solved very quickly; this can be done even in a garage. In the second case, you will have to remove the control unit and contact an experienced electrician to install a new one. If the warranty is valid, you must show the car to specialists at a car service center.
If you still want to remove and install the control unit yourself, all you need is a Phillips screwdriver. First, all plastic panels under the steering wheel are dismantled to facilitate access to the unit. And do not forget that the battery should be disconnected, this will avoid problems with the electrical wiring. The plastic cover, which is located at the bottom of the panel, is secured with three bolts. They need to be unscrewed and the cover removed.
Lighting control modules (LCM) 344.3769, 345.3769. Pinout.
Lighting control modules (LCM) 344.3769, 345.3769. Pinout.
Connection : block 1118-3724500. Applicability : Lada Kalina (1117, 1118, 1119).
Lighting control module Lada Kalina.
Lighting control modules 344.3769, 345.3769 are designed for switching electrical control circuits for external lighting, front and rear fog lights, adjusting the level of illumination of controls and instruments, and controlling the angle of the light beam of automobile headlights.
Numbering and assignment of contacts.
Contact
| Purpose | |
| G | to the gearmotor of the headlight range control |
| 56b | to the gearmotor of the headlight range control |
| 58b | to backlight sources |
| 31 | "Weight" |
| Xz | + 12 V (from terminal “15” of the ignition switch) |
| 56 | to the low/high beam headlight switch |
| 1 | from rear fog lights |
| 2 | to the rear fog lamp relay |
| 3 | from the front fog lights (only for MUS 345.3769) |
| 4 | to the front fog lamp relay (only for MUS 345.3769) |
| 58 | to side lamps |
| 30 | + 12 V (from terminal “30” of the ignition switch) |
Main characteristics.
Rated voltage , V: 12.
Rated load:
- Active: 2 mA pin G, 0.001-0.1 A pin 2 (load is switched to pin 31).
- Inductive, at 100 mH: 0.15 A pin 4.
- Tube: 35 W (3.3 A) pin 58b, 10 A pin 56 and pin 58.
Viewing surface color : black.
Character color : white.
Symbol backlight color : light green.
Indicator illumination color : rear fog lights - yellow, front fog lights - light green.
What a driver needs to know about EMUR
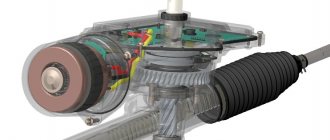
Electric power steering on Kalina serves to increase driver comfort. With its help, you can easily turn the steering wheel with one finger, even in a stationary car. This is convenient and practical, since parking with such a system turns out to be much easier and safer. The electric amplifier device includes:
- brushless electric motor;
- gearbox;
- Control block.
The electric motor is located under the steering wheel. A worm is installed on its shaft, which meshes with a plastic gear. The electronic unit controls the operation of the entire system using data that provides:
- torque sensor;
- speed sensor;
- crankshaft speed sensor.
After collecting data, the control unit regulates the supply voltage that is supplied to the electric motor. The lower the vehicle speed, the more voltage is supplied to the electric motor.
The lamp indicating a malfunction of the electric booster on Kalina lights up as soon as the ignition is turned on. After starting the engine it goes out. This is normal operation of the system, but if it breaks down, even after starting the engine, the lamp continues to light.
Reasons for failure of the electric amplifier.
- There is no signal from the speed sensor.
- Critically low voltage in the on-board network.
- The permissible engine speed has been exceeded.
- Control unit malfunction.
To repair the power steering, the steering wheel and part of the torpedo are removed
In the first three cases, failure of the EUR on Kalina can be eliminated quite simply. You need to either tighten the alternator belt or apply less force when pressing the accelerator pedal.
A malfunction of the control unit is a reason to visit a diagnostician who will conduct a quality inspection and identify the breakdown. Moreover, some problems can be fixed by an electrician, but some turn out to be fatal, and only replacing the entire unit will help.
The purpose of the ESD, as is known, is to provide more comfortable driving. Relatively not so long ago, domestically produced cars began to be equipped with this type of power steering. What is the electric power steering on a Lada Kalina car, what malfunctions are typical for it and how to replace the unit, read below.
Components of electric power steering and how it works
On a Lada Kalina car, the electric power steering is a special unit that is connected to the steering system and allows for soft and smooth operation of the steering wheel. Due to the fact that the car has an installed electric amplifier, the traction when turning the steering wheel will be of better quality, and accordingly, the driver will need to exert less effort.
As for the design of the device itself, according to the standard it consists of:
- First of all, the electric power steering circuit includes an electric motor;
- An equally important component is the control unit;
- gear device;
- The system is also equipped with three controllers - torque, speed, and crankshaft rotation.
Designation of all elements of the electric power steering system on Kalina
The Kalina electric power steering system, as you can see, is generally simple in design. Despite its simplicity, even such a device makes it possible to obtain all the necessary data and provide easier vehicle control. An on-board computer is used to monitor the operation of the unit. It should be noted that the node itself does not always function. It comes into operation when the number of revolutions reaches 400 per minute and turns off if the vehicle speed is more than 60 km/h.
In accordance with the connection diagram, such restrictions make it possible to ensure the most optimal properties and enable the driver to control Kalina in the interval considered the most difficult. In addition, such features were introduced by the manufacturer for safety reasons. After all, when driving at high speed, the operation of the electric power steering rack is more dangerous. As we have already reported, the use of this unit makes the steering wheel more sensitive, and accordingly, this can lead to certain risks when driving at high speed. So when driving at a speed of more than 60 km/h, the device turns off automatically, making the driver’s overall movement in the car safer.
Video
This video shows how to repair the steering mechanism on Kalina.
Knock in Kalina steering rack. How to remove.
Installation of Kalina steering rack.
Repair of the steering column gearbox and the RR itself on Priora, Kalina, Grant.
How to install a steering rack from Kalina 2 to Kalina 1.
Steering rack for Lada Kalina Sport with a gear ratio of 3.1 instead of 4.02.
Do-it-yourself repair of the steering rack, but not Kalina, but Daevoo Sens / Daewoo Sens.
Kalina control rack - VAZ 11183 Kalina rack repair
Have you ever had a chance to monitor knocks and noises from the side? Probably it happened. They changed the control tips, changed the ball tips, even changed the springs with support bearings, but does the knocking continue? It's time to tug, make sure there is free play and start sorting out the rack. In this article I will talk about repairing the VAZ 11183 rack , but the development is identical to all other VAZ front-wheel drive racks.
The most interesting thing is that these motherfuckers from AvtoVAZ do not fundamentally change anything except the gearbox housing, I bought a repair kit 2110-2112, the rack is listed in catalogs as 2110, but the splined part is longer than 2110, and the gearbox is slightly different, so just change Unfortunately, 11183 for 2110 will not work, although 2110 costs 2500 in my town, and 11183 5500 costs 6000 rubles. The difference per pocket is very noticeable.
Well, it doesn’t fit and doesn’t fit, so we give the engineers a hard time and start disassembling it. Unfortunately, there won’t be a photo for the article, because I was up to my elbows in mud and didn’t want to wash myself for the sake of pictures, but I’ll try to describe everything carefully.
Removing the steering mechanism.
1. For convenience of work in the future, and so as not to climb into the interior with stains, unscrew the bolt securing the splined connection from inside the cabin (you will see it near the floor of the control shaft).
2. We lift the car on a lift, throw it down, and knock out the control tips from the steering knuckles.
EUR malfunctions and subsequent device diagnostics
As mentioned above, installing electric power steering on Kalina involves using a device that is quite simple in design. Accordingly, repairing a unit and identifying faults in general is not a particularly complicated procedure. But it should be noted that the EUR connection diagram itself, namely the location of the node, was not particularly well chosen by the manufacturer. This is because the EUR is installed under the heater radiator. So when using a car in the winter season, the unit will be affected by different temperatures, in particular, their differences.
This is what largely influences the breakdown of the unit and, as practice shows, in fact this happens quite often. Failure of the electric power steering is associated with problems in the operation of the vehicle and the appearance of various malfunctions.
As a rule, mechanism failure is caused by:
- lack of impulse from the speed controller;
- failure of the system control unit;
- the voltage in the vehicle’s on-board network is too low;
- the permissible unit speed threshold has been exceeded.
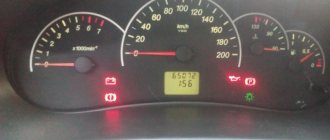
At the bottom right there is an indicator in the form of a steering wheel with an exclamation mark - it indicates a malfunction of the EUR
These factors, as practice shows, contribute to mechanism failure. As for diagnostics, it is carried out by the Kalina control unit independently during the startup of the unit and analysis of the serviceability of all systems. If any of the components does not transmit the corresponding signal, the control unit automatically adds it to the list of inoperative devices. The relevant information can be seen on the control panel. In particular, if we are talking about the failure of the EUR, then an orange indicator in the shape of a steering wheel with an exclamation mark will appear on the tidy.
In accordance with the service instruction manual, the manufacturer claims that the problem of the unit malfunction should be resolved in the near future. Therefore, the car owner needs to drive at a reduced speed to the nearest maintenance and repair station. But this is all official data; in fact, things are somewhat different.
As a rule, the appearance of an indicator on the control panel does not imply the need for repair; usually its appearance indicates a malfunction in the operation of the unit. This could be either a malfunction in the power supply circuits or a breakdown of one of the controllers. As practice shows, in most cases the appearance of a light bulb on the panel does not affect the functioning of the unit as a whole (the author of the video is the CompsMaster channel).
In fact, the problem is considered to be a breakdown in which the steering sensitivity is too low. Malfunctions of this kind usually appear quite often and, as a rule, they need to be resolved immediately. Otherwise, ignoring the problem can lead to dire consequences. To quickly solve the problem, you first need to remove the fuse located to the left of the steering wheel. Thanks to this, you can get to the nearest service station for repairs.
VAZ employees claim that the EUR cannot be repaired. If it breaks, it should be replaced!
List of faults in the heating circuit
If the owner of LADA Kalina suspects the presence of any deviations from the normal functioning of the heating system, then the diagnostic procedures below will be required.
- The first step is to make sure that there is a sufficient amount of antifreeze in the cooling circuit.
- Next, check the integrity of the fuse.
- We make sure that the fan speed regulator is working properly.
- A weak air flow through the deflectors indicates the need to check the condition of the filter component.
- If there is no warm flow into the cabin when the engine is warm, then there may be air pockets in the cooling system or the dampers in the air ducts are jammed.
- A faulty temperature sensor will cause only hot or, conversely, cold flow to enter the cabin.
- Among the common reasons is depressurization of the LADA Kalina cooling system. Sometimes this may be due to the loss of tightness of the heater radiator itself. At the same time, antifreeze will enter the cabin, giving itself away as a specific smell and wet decorative floor covering. In order to detect a leak in a timely manner, it is necessary to monitor the level in the expansion tank frequently.
Replacing the electric power steering
The procedure for replacing a unit in a Lada Kalina car should be carried out exclusively by experienced specialists. If the warranty period for your vehicle has not expired, then, of course, you need to contact an authorized dealer to fix the problem. If the car is no longer under warranty, and, as you know, the cost of repairs can be quite high, you can try to solve the problem by replacing the unit. But before we move on to eliminating it, it is necessary to take into account that the replacement procedure itself is not particularly simple. So if you do not have the technical knowledge, experience and skills in carrying out this task, then it is better not to even attempt it.
Always remember that incorrect actions during repairs can lead not only to complete failure of the system, but also to quite complex and expensive repairs of the unit. So installation of an electric amplifier should be carried out only after you have studied all the components, parts and features of the system. In this case, first of all, you need to familiarize yourself with the connection diagram of the node. To dismantle the system, you will have to partially disassemble the center console, namely the panel installed under the steering wheel. You will need to disconnect all the wires that go to the node.
As practice shows, installation of a new unit in most cases may not be necessary, since the problem can usually be solved by carrying out preventive measures. In fact, one of the most common problems in the operation of a unit is knocking. This knocking noise usually occurs when turning the steering wheel and in most cases it is accompanied by a squeaking noise. To solve a problem of this kind, it will be enough just to lubricate the unit. If this does not help, then you will need to perform more thorough diagnostics or replace the unit.
Sorry, there are no surveys available at this time.