VAZ starter brushes
It’s quite a common situation - the car won’t start after half a turn. Now, instead of the usual roar of the engine, only plaintive creaks and squeals of the starter are heard from under the hood. It is necessary, regardless of your desire, to begin diagnosing the starter. Our instructions will help with this. You should not immediately remove and disassemble the starter itself. There may be a break in the electrical circuit or a broken contact, so check the circuit elements and the ignition switch, as well as the battery charge. If the wiring is good and the battery is normal, only then remove the starter. Perhaps replacing the VAZ 2109 starter brushes will solve the problem, so start with them and do not rush to completely disassemble the starter. It is important to know how to identify a malfunction, so everything is in order.
Disassembling the starter for VAZ 2108, 2109, 21099 cars
To carry out repairs, maintenance or replacement of parts, the starter must be removed from the engine and disassembled. Let's see how to do this quickly - without wasting extra time and effort, using the example of disassembling starter 29.3708, widely used on VAZ 2108, 2109, 21099 cars. Necessary tools
- Slotted screwdriver (Phillips screwdriver)
— Wrenches (open-end or socket) for 10, 13 and 17 mm
— Retaining ring puller (optional)
Preparatory work
The procedure for disassembling the starter 29.3708 VAZ 2108, 2109, 21099
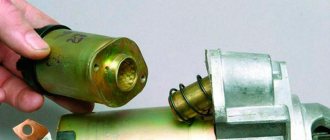
— Remove the traction (retractor) relay
To do this, use a 13 mm wrench to unscrew the nut securing the tip of the starter winding output, and disconnect the tip from the contact bolt of the traction relay. Using a slotted screwdriver (screws for a Phillips screwdriver or a 10 mm wrench can also be used), unscrew the three screws securing the relay and disconnect it from the starter housing.
Remove the starter traction (retractor) relay
At the same time, we remove the relay core earring from engagement with the tip of the drive lever (Bendix).
Remove the solenoid relay core
— Remove the protective cover of the starter brush assembly
To do this, use a slotted (Phillips) screwdriver to unscrew the two screws securing it.
Removing the starter rear protective cover
Disconnect the cover from the starter housing. Underneath there is a rubber ring-gasket.
Remove the sealing ring of the protective cover
— We remove the axis of the starter drive lever (Bendix)
To do this, use pliers to squeeze the whiskers of its latch and use them to remove the latch from the hole on the axle. We knock the axle out of the hole in the starter housing. To knock out the axle, you can use a nail of a suitable diameter and a hammer.
We remove the bendix axis (starter drive)
— Remove the Bendix travel limiter ring
We knock it down with light blows of a hammer (you can use a 17 mm open-end wrench).
We knock down the bendix limit ring
We remove the retaining ring located under it with a puller or simply pry it off with a slotted screwdriver.
Remove the bendix travel limiter retaining ring
— Unscrew the two long screws holding the two halves of the starter housing together
To do this, you need a 10 mm wrench. We take out the bolts and separate the halves. If they do not separate, lightly hit the front half with a hammer.
Unscrew the starter housing pinch bolts
— Remove the starter drive (Bendix)
Remove the rubber plug from the slot in the front of the starter housing. Using a screwdriver, disconnect the legs of the drive lever from the protrusions on the drive itself.
Removing the starter drive ("Bendix")
We push the bendix forward and take it out.
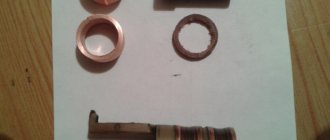
Drive parts ("Bendix")
— Disconnect the armature and the starter housing
To do this, pry it up with a screwdriver and remove the locking half-ring on the armature shank. We also remove the washer located under it.
Remove the armature shaft retaining ring
If it is necessary to remove the stator windings, unscrew the screws securing them to the starter housing.
Remove the armature and starter stator windings
— Remove the brushes
If it is necessary to remove the brushes, unscrew the screws securing them and remove them.
Removing the starter brushes
Notes and additions
— Another starter 5712.3708, installed on VAZ 2108, 2109, 21099 cars, has a slightly different design, and its disassembly differs from disassembling the starter 29.3708.
Source
How to find out if starter brushes are worn out
Replacing the brush in the VAZ 2110 starter
There is no need to immediately start disassembling the starter; first you need to dismantle it and check it by starting it separately from the car. Its condition, that is, its functioning, should be determined. In such a situation, the wire is detached from the terminal and connected directly to the “plus”. If the motor runs, then most likely the problem is a faulty power relay. If the engine does not start, you should pay attention to the condition of the brushes.
Note. You can identify wear or warping of brushes using simple experiment. When checking the starter separately, it is recommended to evaluate its performance. In some cases, the starter works well in one position, but when turned to one side, contact is lost. This phenomenon can be easily argued. Starter brushes with normal length are pressed against the commutator so that there is a small gap between the brush holder and the spring.
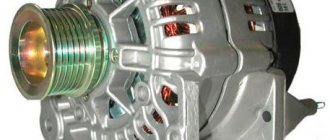
Replacing brushes on the VAZ 2110 starter
When they wear out, the spring rests tightly against this brush holder, and contact will be ensured due to the influence of weight. If the position of the motor changes slightly, the contact immediately disappears. This phenomenon can also occur when the brushes become warped and become stuck in the brush holder.
Note! To remove the starter on a VAZ “tenth” model, you need to use an overpass, an inspection pit or a lift.
- The starter is fixed to the gearbox using two nuts, one of which is located under the engine compartment. For safe repair work, you must first disconnect the wire from the “-” terminal of the battery.
Replacing starter brushes for VAZ 2110
- After this, the crankcase protection is removed. In the engine compartment, you can unscrew the top nut to secure it. The wire leading out the traction relay is detached under the machine. Using a 15-size wrench, unscrew the bottom nut and remove the starter (see Repairing the VAZ 2110 starter - we do it all ourselves).
- When the starter is dismantled, it becomes possible to check it further. The device should be installed on a level place and the battery should be connected to it.
Note. The body is rotated on the surface; if the work stops or continues jerkily, this may indicate a malfunction of the brushes. Due to such vibrations, they can fall out of the brush holders, touching the commutator, and the parts will not be long enough to ensure normal operation. Then you cannot do without disassembling the starter.
- The body of the device with two covers is fastened together using two tie rods. Therefore, you first need to unscrew a couple of nuts on these studs and remove the front cover with the gearbox. Next, remove the back cover with the brush holder on which the brushes are placed. Since the brush holder is fixed to the rear cover with 2 bolts, they need to be unscrewed. Use a screwdriver to dismantle the brush retainer with pressure springs, only after that they can be easily removed from the brush holder itself.
- Replacing worn starter elements is relatively easy, you just need to act carefully. New parts are mounted in the grooves, the repaired brush holder is placed on the commutator. The springs are inserted into place and fixed. In such a case, the brushes should not be allowed to warp; they should be pressed evenly.
Note! The brushes do not need to be installed tightly; when properly positioned, they are held loosely in the grooves of the brush holder.
- The documentation for the machine does not indicate the exact length of these parts, so you can use brushes from other models. Despite this situation, it must be taken into account that the distance from the outlet of the element to the functioning edge can be no less than 0.35 centimeters. A lower value indicates a mismatch between the brushes.
- The exact length of the elements is not fixed because the collector wears out over time. If the wear is small, then when replacing the brush it should be cleaned well with sandpaper. With a larger parameter, it can be processed in a workshop on a specialized machine.
Note! The length of the brushes will depend on the diameter of the commutator ring.
Since the price of brushes is affordable, experts recommend replacing the brush holder as a complete assembly. In such a situation, you can get rid of the difficult procedure of fixing and balancing the brushes separately, while the repair process itself will go much faster. On the other hand, if spare parts are already available, it is advisable to use them.
Note! Copper-graphite or graphite brushes can be smoothed with a file, and the length will be selected through practice.
Finding these spare parts for a domestic car is not difficult in every auto repair shop. The price of starter brushes is approximately 50 rubles for the entire set. As for the complete brush block, it will cost about 100 rubles. Thus, we can conclude that the overpayment will be insignificant.
Self-change brushes
VAZ 2110 starter brush
Even a novice auto mechanic can replace the brushes on the starter. To do this, you need to carry out a series of simple sequential manipulations. So:
- The cable is detached from the starter terminal; the screws securing the covers of both the shaft and the collector are dismantled.
- The cover and seal ring, retaining ring, gasket and other seal ring are removed.
- The bolts that connect the manifold cover to the body are removed, and the cover is dismantled.
- The brush holder assembly is removed. The brushes are pushed out by springs, but are still held in place by several wires.
How to replace brushes on the VAZ 2108, 2109, 21099 starter
Starter brushes on VAZ 2108, 2109, 21099 vehicles will have to be replaced if problems arise in its operation or their wear limit has been reached (6 mm).
For example, the starter does not turn on after turning the key in the ignition switch (clicks of the retractor relay are heard, but there is no result) or it “shoes” (turns too slowly).
Using the example of starter 29.3708 of VAZ 2108, 21081, 21083, 2109, 21091, 21093, 21099 cars, we will independently replace the brushes. Before replacing the brushes, we do a quick check.
Necessary tools, spare parts and accessories
Slotted and Phillips screwdrivers (medium size)
Fine sandpaper
Rags and white spirit
Preparatory work
— We clean it from contamination
How to replace starter brushes for VAZ 2108, 2109, 21099 cars
The design of the starter 29.3708 allows you to replace the brushes yourself without completely disassembling it.
— Remove the protective casing (cover) of the rear part of the starter
To do this, use a slotted screwdriver to unscrew the two screws securing it. Remove the casing and the rubber O-ring under it.
Remove the protective casing from the back of the starter 29.3708 by unscrewing the two screws securing it with a Phillips screwdriver
— Remove the brushes
Using a slotted screwdriver, unscrew the screw securing the tip of the brush wire. Remove it and the tip.
Removing the old brushes from the starter
Move the pressure spring to the side using a slotted screwdriver and remove the brush from the guide.
Remove the starter brush from the guide
Repeat the removal procedure for the remaining three brushes.
— Cleaning the collector
If necessary, clean the collector. The starter shaft commutator to which the brushes are pressed must be clean and with little wear (to ensure electrical contact). We clean it with fine-grained sandpaper and wipe off dirt with a rag soaked in white spirit.
The commutator surface can be accessed by removing one of the brush pressure springs. Through the resulting opening, press the sandpaper against the commutator and rotate the shaft. We wipe it in the same way and finally blow it out.
Replacing VAZ starter brushes
The process of replacing brushes will not take more than 20 minutes. All you need to do is unscrew the contact wires of each of the elements on the brush holder, and connect new ones in the same way.
Next, each starter brush 2110 or 2109 is placed in its seat on top of the pressure spring. When this is done, the brush assembly must be mounted on the commutator. To do this, the brushes are alternately recessed inside the cell, and the armature is rotated in one direction. After this, we assemble the starter using the reverse algorithm. Before installing the starting device, we check it as described above. If the starter works, it means you did everything right.
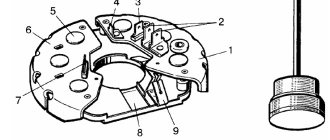
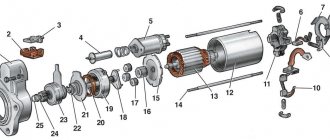
Design and operating principle
To understand the features of the repair, you must first study the design of the starter and understand how it works for the benefit of your car.
Let's start with the design. It includes four main nodes.
Knot
Peculiarities
It transmits direct current through four brushes
Freewheel with gear
A clutch or bendix drives the flywheel of your car's engine.
Serves to extend the bendix with gear when turning on the electrical appliance
Ensure easy rotation of the clutch, rotor, and gear. One bushing is located inside the starter, and the second is in the clutch housing.
Having familiarized yourself with the starter diagram, you can discuss the principle of its operation.
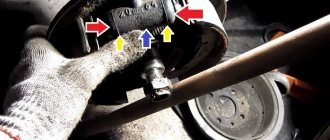
Removing the starter
We begin dismantling the starting device by disconnecting the ground wire from the battery. For greater convenience, it is better to place the car on the inspection hole and remove the engine protection. It is easier to remove the device from below.
Next, we find the starter and disconnect the traction relay power wire from it. After this, unscrew the nut securing the positive wire (key set to “13”). Using a “15” wrench, unscrew two (for “nines” three) bolts securing the starter to the clutch housing. We dismantle the starting device. As you can see, the process is quite simple and does not require any special skills.
Typical faults
It is better to start diagnosing the starter even before you remove it.
After dismantling, some signs of failure, by which the source of the problems can be determined, can no longer be determined.
Signs of a faulty element include:
Checking the dismantled unit
Before blaming the starter for everything, take the time to look under the hood and check the condition of the terminal contacts and connectors. Also pay attention to whether everything is ok with the battery. Only after this can you start working on the starter.
Diagnostics
To carry out diagnostics, arm yourself with a conventional tester with voltmeter mode.
- Connect the battery terminals to the poles of your measuring device. You will need an assistant to drive.
- After connecting the terminals to the voltmeter, look at the readings of the device. If the battery is working properly, the data will be 11-13 V.
- Turn the ignition key and at this moment measure the voltage. If the losses are only 1-2 Volts, then the starter works normally and does not show resistance.
- If the voltmeter parameters decrease by 2 times or more, the reason is in the starter. Or rather its bushings or brushes.
- Remove the starter and check the relay. Connect the battery terminals to its terminals on the body and transfer it to 12 V. If the overrunning clutch moves in the front cover, then the relay works perfectly. If not, replace it.
Repair
Next, you have to check the condition one by one and take appropriate measures to eliminate problems with the following components of the starter:
Now let's talk about everything one by one.
Brushes
First, assess the current condition of the brushes. In most cases, they are the source of problems with the starter.
Anchor
If all is well with the brushes, the next suspect is the anchor.
Overrunning clutch
Parallel checking of the overrunning clutch with the armature will allow you to replace the latter at the same time.
To gain access to the clutch you will have to remove the armature from the front cover. At the same time, change it if necessary.
Bendix or overrunning clutch
Traction relay
Replacing the traction relay is necessary if, when voltage is applied to its terminals, the overrunning clutch does not extend. Sometimes the VAZ 2109 is equipped with collapsible relays. But it’s still better not to repair it, but to replace it with a new relay.
Bushings
Excessive wear on the bushings often impairs the performance of the starter. This is due to the material from which they are made - brass, bronze or copper. Contact with stronger metal causes wear.
When putting the starter back together after repair, the most significant advice is to clean the surfaces from contamination. This will significantly extend the service life of the repaired unit and avoid breakdowns in the near future.
Be prepared for the fact that attempts to repair the starter will not give the expected effect. In this case, it is better to replace it completely or contact a trusted car service.
Source
Malfunctions and repair of starter traction relay
The traction relay is located on the front cover of the starter and is designed for short-term engagement of the starter shaft with the flywheel ring. It is this, and not the starter itself, that most often fails. In addition to the wiring and contact problems discussed above, the most common traction relay malfunctions are:
- burning of contact bolts (nickels);
- short circuit or break in the winding;
- mechanical damage.
The main sign of relay failure is the absence of a click when turning the key in the ignition switch. It means that:
- the electromagnet did not work;
- the relay contacts did not close;
- no voltage is supplied to the starter.
In such a situation, after checking the wiring and contacts, the relay should be removed from the starter and diagnosed. This is done as follows:
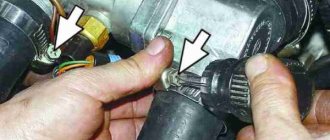
- Using a 13mm wrench, unscrew the nuts securing the power wires to the relay contact bolts.
- Disconnect the control wire connector.
- Using a slotted screwdriver, unscrew the three screws securing the traction relay to the front cover.
- Disconnect the relay from the cover.
- We inspect the relay and if we detect mechanical damage or burning of the contact bolts, we replace it with a new one.
- If there is no visible damage, we continue checking and connect the relay directly to the battery. To do this, we find two pieces of wire with a cross-section of at least 5 mm2 and with their help we connect the terminal of the control wire to the negative of the battery, and the relay body to the positive. At the moment of connection, the relay core should retract. If this does not happen, the relay needs to be changed.
Video: checking the VAZ 2106 traction relay using a battery
https://youtube.com/watch?v=jYrORsLBDE0
Replacing the traction relay is quite simple. To do this, simply install the new device in place of the old one and tighten the three screws securing the relay to the front cover.
Thus, diagnosing, dismantling, disassembling and repairing the VAZ 2106 starter is not very difficult even for an inexperienced car owner. Carefully following the instructions of professionals will allow you to do this quickly and efficiently.
Gearbox or rotary starter for VAZ 2109?
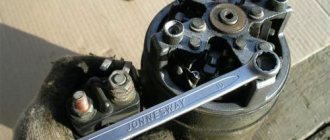
Today I will tell you with my own example about the differences between gearbox and rotary starters! For a long time I suffered with this rotary starter, installed back in 1998 in Togliatti on the AvtoVAZ assembly line. Owners' suffering, as a rule, begins under certain circumstances)) For example, when the battery is several years old and there are problems with the power supply or ignition system. That is, when the carburetor overflows or there is a slight malfunction of the distributor, when it’s already difficult to start (and you have to go to work), then our battery comes to the rescue in getting through the day =) We tried to start. There was just a little bit left and should have been “grabbed”, but the battery died =( And then psychosis, hatred of everything in the world, despair. Everyone knows this!
This is my old starter. Rotary. Renovated 5 times already.
I got a car from my dad relatively recently. Previously, I could not influence her fate and for some reason I was not interested in how and what was going on with dad. He lived in Budennovsk, I lived in Moscow. But now...
While closely studying our and non-our automobile industry, I learned that modern cars have gear starters. Well, I bought myself a brand new shiny ZIT starter.
Well, now about the differences.
— What can I say about the stock starter that was installed in the VAZ 2109 in those years. Well, for starters, it's rotary.