A misfortune once befell me - a short-term grinding noise in the starter area after starting the engine. It was decided to replace the bendix. Yesterday I got around to it and removed the starter from the car.
The Bendix or starter drive is a unit consisting of a clutch with a gear and a fork connected to a solenoid relay. The clutch is also called an “overrunning” clutch. Three types of starters were installed on VAZ 2114 hatchbacks: 29.3708, 423.3708. and also 5712.3708. The first two differ only in the shape of the fork, as well as in the design of parts not related to Bendix. And the starter 5712.3708 is a modern device equipped with a gearbox. The seating dimensions of all starters do not differ in any way. On any car, including the VAZ-2114, replacing the Bendix begins with dismantling the starter.
Detecting and eliminating bendix failure
Bendix often does not break spontaneously. Noise and characteristic clicks when starting the engine warn that the mechanism will soon deteriorate. Naturally, you should not delay repairs, because not only the overrunning clutch will break, but also the flywheel crown, the repair of which requires more serious and lengthy intervention. One way or another, repairing a Bendix requires certain skills and knowledge, which you will now learn. Before direct replacement, you need to purchase a VAZ 2114 starter bendix, the price of which varies depending on the authenticity and quality of the part. I would advise purchasing spare parts from reliable and trusted suppliers.
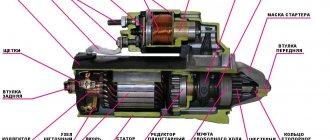
Diagram of a gear starter VAZ 2113, 2114, 2115 - 8 valves
Starter parts
: 1 – drive side cover; 2 – sealing gasket; 3 – lever bracket; 4 – traction relay anchor; 5 – traction relay; 6 – “negative” brush; 7 – gasket; 8 – back cover; 9 – brush clamp; 10 – “positive” brushes assembled with a connecting busbar; 11 – brush holder; 12 – stator; 13 – anchor; 14 – tie rod; 15 – armature shaft support; 16 – central gear; 17 – planetary gear; 18 – drive shaft with carrier; 19 – internal gear; 20 – sealing ring; 21 – drive shaft support with liner; 22 – retaining ring; 23 – drive assembly; 24 – restrictive ring; 25 – retaining ring.
We change Bendix on a VAZ-2114 with our own hands
The Bendix or starter drive is a unit consisting of a clutch with a gear and a fork connected to a solenoid relay. The clutch is also called an “overrunning” clutch. Three types of starters were installed on Lada 114 hatchbacks: 29.3708, 423.3708. and also 5712.3708. The first two differ only in the shape of the fork, as well as in the design of parts not related to Bendix. And the starter 5712.3708 is a modern device equipped with a gearbox. The seating dimensions of all starters do not differ in any way. On any car, including the VAZ-2114, replacing the Bendix begins with dismantling the starter. We will look at this operation now.
The following video shows how a starter behaves with a faulty bendix.
Preparing to replace the bendix: removing the starter on a VAZ-2114
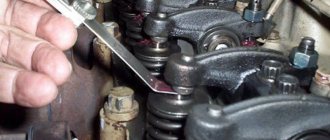
The starter can be accessed from above or from underneath. Let's consider the second option: roll the car into the pit and use the handbrake. Next, use a 10mm wrench to unscrew two screws from the bottom (photo 1) and two screws on the side members.
Finally, the screws on the cross member are unscrewed (photo 3) to remove the engine splash guard.
Disconnect the negative terminal from the battery - you will need a 10mm key.
On a VAZ-2114, you can replace the bendix in one way - remove the starter.
The location of the starter under the hood is marked with a red arrow.
- Unscrew the nut securing the power wire to the starter (photo 1). Remove the terminal and also disconnect the block with the control wire (photo 2);
Installation is carried out in reverse order.
The appropriate key size is “13 mm”.
Repair of starters 29.3708 and 423.3708
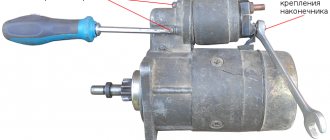
Use a screwdriver to unscrew the screws securing the solenoid relay. Then the relay is removed - its armature is disconnected from the plug.
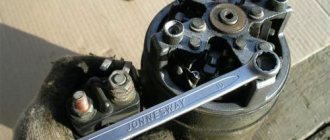
Taking a tube of suitable diameter, knock the upper retaining ring off the shaft. Then remove the lower retaining ring using special pliers. The top ring must also be removed.
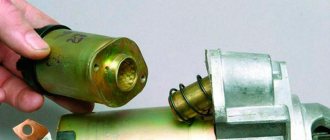
The body is disassembled: the protective cover is unscrewed, the stopper and all washers are removed, then two nuts are unscrewed and the rear casing is removed.
Disconnect the rotor and stator
Next, being careful, dismantle both brushes and remove the brush holder. As a result, what remains is an “assembly” consisting of parts: rotor, front cover, bendix.
Now you need to remove the plastic fork stop from the cover. The rotor is then pulled back.
The Bendix assembly with the fork is easily removed from the cover. Installation of the unit is carried out in the reverse order.
How to disassemble the bendix itself
Remove the retaining ring - here you need pliers again. Then the disc and thrust washer can be easily removed. The result is shown in the photo.
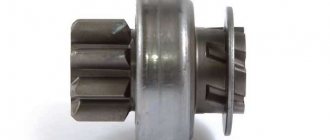
Bendix parts separately
Finally, the coupling and fork are simply pulled off the bearing. There shouldn't be any problems.
When installing a new bearing or a new fork, you don’t need to skimp on lubricant. LITOL-24 is suitable here.
Update for starter 29.3708
Above we discussed how starter 423.3708 is disassembled. For the 29th model, everything looks more complicated:
- The relay is mounted on three screws, not two;
- The fork is fixed to the axle, and this axle is removed before knocking out the ring over the bendix;
- To remove the bendix, you need to separate the bearing and fork. To do this, bend the fork eye with a screwdriver.
Points 2-3 are illustrated by one photo.
The 29th model is more “complicated”
How to assemble a freewheel in a pile
Yes, some people have this problem. I encountered it myself when I took it apart for the first time. Having flared the bendix with a screwdriver, it was problematic to press the top cover onto the body. She “played” from the blows of the hammer and did not want to fix herself.
Therefore, turning the gear down, I clamped the clutch in a vice. I drove the overrunning clutch housing into the cover as deeply as possible, but without fanaticism. Then, with a millimeter punch, I folded the edges of the lid. The work was troublesome, but it gave results - after the repair it sat like a factory one. After the usual tapping with a hammer, it could be removed by hand, but here it is “tight.”
Second option. Invite the “Bulgarian’s wife” again. We make small cuts along the edges of the lid in small increments. In the coupling body, you can use a grinder to deepen and enlarge the lowest groove. After this, we put on the lid and punch the resulting teeth into this groove. Instead of a punch, you can use a piece of rod, the main thing is that it does not bend under the blows of a hammer.
It is important during assembly to correctly assemble all parts of the Bendix in the required sequence and not to lose springs or washers.
Some craftsmen grab the top cover by welding and clean up the welding areas. Others use sealant to securely fix the cover to the Bendix body after it has been repaired.
Quick repair of Bendix starter 5712.3708
If the starter has been removed, remove the solenoid relay from it by unscrewing the two screws on the housing. Then the four pins are unscrewed and the cover can be moved forward. Everything here looks simpler than in starters of “early” models.
The goal is to dismantle the drive with gearbox
Remove the plastic stop. Then we remove the drive assembly - here it consists of a bendix and a gearbox.
On starters of the “new” model installed on the VAZ-2114, the bendix must be replaced strictly according to the instructions: first remove the gearbox cover, then the three gears, and only then can you knock off the retaining ring.
Removing the gears from the gearbox...
The three axes of the gearbox must be located on a flat surface. Then, taking a hammer and a mandrel, carefully knock down the upper retaining ring.
Dismantling “extra” elements
Both the top and bottom rings will need to be removed from the shaft. Everything here differs little from the starters of the first models.
Finally, you need to remove the plug. The side fastening tab is bent with a screwdriver. This operation is difficult to perform - there is a risk of breaking the plastic.
Removing the plastic plug
There is only one operation left: the bendix without a fork is pulled up from the shaft. We wish you success.
Source
What is Bendix, and in what cases is it required to be replaced?
Bendix is a clutch used to engage the starting electric motor and flywheel when starting the engine. Externally, the element is an oblique gear and is located on the starter shaft. At the moment it is triggered, it moves forward with the help of a solenoid and connects to the flywheel.
When the power supply stops, the gear returns to its place, disconnecting from the flywheel. The amplitude of movement of the clutch is about 10 cm. The bendix is protected from excessive displacement by locking rings.
Signs of a malfunctioning clutch are clearly visible, so the question of how to check the starter bendix usually does not arise. The “symptoms” of a malfunction include:
- a grinding noise in the flywheel area when trying to start the engine;
- the starter rotates idle, without transmitting torque to the flywheel;
- a characteristic knocking sound at the moment the solenoid relay is activated, after which the shaft does not rotate.
» alt=»»> A faulty gear is usually not repaired, but replaced. Repairing the element is possible, but such actions are not justified in terms of financial and time costs. Therefore, if the coupling breaks, it must be replaced. If you still want to repair it, a detailed video will be at the end of the article.
Note: if the part extends, but does not engage with the flywheel, proceed as follows: put the car in 2nd gear and manually shift it a couple of centimeters. The position of the flywheel and helical gear changes, after which starting the engine becomes possible. Before attempting to start, the car is removed from gear.
This method is not a repair method, but it allows you to start the engine and get to your home or auto repair shop.
Features of battery operation
Successful engine starting will depend on the condition and power of the battery. Many people know that such indicators as capacity and cold cranking current are important for batteries. These parameters are indicated on the marking, for example, 60/450A. Capacity is measured in Amp-hours. The battery has low internal resistance, so it can deliver large currents for a short time, several times its capacity. The specified cold cranking current is 450A, but subject to certain conditions: +18C° for no more than 10 seconds.
However, the current supplied to the starter will still be less than the specified values, since the resistance of the starter itself and the power wires is not taken into account. This current is called inrush current.
The battery supplies starting current to the starter for 5-10 seconds. Then you need to pause for 5-10 seconds for the battery to “gain strength”.
If, after attempting to start, the voltage in the on-board network drops sharply or the starter cranks halfway, this indicates a deep discharge of the battery. If the starter makes characteristic clicks, then the battery is completely dead. Other reasons may include a broken starter.
Bendix replacement
Replacing the Bendix VAZ-2110 and other front-wheel drive models begins with dismantling the starter.
- remove the “-” terminal from the battery;
- Using a 13 key, unscrew and remove the power terminal from the electric motor;
- unscrew the starter mounting bolts with a 13mm wrench (2 on top and 1 on bottom);
- remove the starter.
It is worth noting that the electric motor mounting bolts often become so sour that it becomes difficult to unscrew them. In this case, you should not try to unscrew the bolt by force. This may cause it to break. It is necessary to tap the heads with a hammer, fill them with WD-40 liquid and wait 15-12 minutes.
After this, you can try again. Another way to unscrew a soured bolt is to heat it with a gas burner.
With the electric motor removed, the retaining ring is removed from the shaft. To do this, you need to knock it out of its seat with a special mandrel (if you don’t have one, a high 15 socket will do) and remove it using pliers. After this, the part can be easily removed by hand.
The above procedure answers the question of how to remove the bendix from the starter. In general, at this point the main part of the repair can be considered complete, since replacing the bendix on the starter after the old element has been dismantled is a matter of one minute.
Price issue
Finally, it’s worth adding that Bendix is an inexpensive spare part. For example, a Bendix VAZ 2101 (as well as other “classic” VAZs) costs about $5...6, catalog number is DR001C3. And the price of Bendix (no. 1006209923) for VAZ 2108-2110 cars is $12...15. The cost of Bendix for FORD cars of the Focus, Fiesta and Fusion brands is about 10...11 $. (cat. no. 1006209804). For TOYOTA Avensis and Corolla cars Bendix 1006209695 - $9...12.
Thus, repairs are often impractical for Bendix. It's easier to buy a new one and simply replace it. Moreover, when repairing individual parts, there is a high probability of rapid failure of others.
Performance evaluation
After completing the work, you should check how the engine starts. The starting engine should run smoothly, without knocking and grinding noises characteristic of a faulty overrunning clutch. This is a sign of a high-quality replacement of the Bendix on VAZ-2109-2115 cars.
In some cases, changing the bendix is not enough. Prolonged operation of a faulty clutch leads to wear and damage to the flywheel teeth. In this case, the symptoms of failure that existed before replacing the gear may become weaker, but do not disappear completely. In such cases, it is necessary to replace the flywheel.
Source
Some recommendations for repairing and installing Bendix
In any case, before installing the starter after installing the bendix, check the entire device. It is advisable to do this at a special stand in the workshop. If this is not possible, then connect the starter to a well-charged battery. There are other important points:
- when disassembling and reassembling, pay attention to the plastic washers: they must be intact;
- when buying a new Bendix, take the old one with you: the mechanisms may have small but important differences that are difficult to remember visually;
- If you are repairing an overrunning clutch for the first time, write down the disassembly process on paper so that you can later reassemble the device correctly.
In conclusion, it’s worth adding: if you want the Bendix to work for a long time, do not run the starter for more than 15 seconds (especially in winter) - give a break for at least a minute. And lastly: a properly repaired and assembled mechanism will last for several more years without problems.
What is Bendix, and in what cases is it required to be replaced?
Bendix is a clutch used to engage the starting electric motor and flywheel when starting the engine. Externally, the element is an oblique gear and is located on the starter shaft. At the moment it is triggered, it moves forward with the help of a solenoid and connects to the flywheel. When the power supply stops, the gear returns to its place, disconnecting from the flywheel. The amplitude of movement of the clutch is about 10 cm. The bendix is protected from excessive displacement by locking rings.
Signs of a malfunctioning clutch are clearly visible, so the question of how to check the starter bendix usually does not arise. The “symptoms” of a malfunction include:
- a grinding noise in the flywheel area when trying to start the engine;
- the starter rotates idle, without transmitting torque to the flywheel;
- a characteristic knocking sound at the moment the solenoid relay is activated, after which the shaft does not rotate.
A faulty gear is usually not repaired, but replaced. Repairing the element is possible, but such actions are not justified in terms of financial and time costs. Therefore, if the coupling breaks, it must be replaced. If you still want to repair it, a detailed video will be at the end of the article.
Note: if the part extends, but does not engage with the flywheel, proceed as follows: put the car in 2nd gear and manually shift it a couple of centimeters. The position of the flywheel and helical gear changes, after which starting the engine becomes possible. Before attempting to start, the car is removed from gear.
This method is not a repair method, but it allows you to start the engine and get to your home or auto repair shop.
Bendix replacement
Replacing the Bendix VAZ-2110 and other front-wheel drive models begins with dismantling the starter.
- remove the » — » terminal from the battery;
- Using a 13 key, unscrew and remove the power terminal from the electric motor;
- unscrew the starter mounting bolts with a 13mm wrench (2 on top and 1 on bottom);
- remove the starter.
It is worth noting that the electric motor mounting bolts often become so sour that it becomes difficult to unscrew them.
In this case, you should not try to unscrew the bolt by force. This may cause it to break. It is necessary to tap the heads with a hammer, fill them with WD-40 liquid and wait 15-12 minutes. After this, you can try again. Another way to unscrew a soured bolt is to heat it with a gas burner. With the electric motor removed, the retaining ring is removed from the shaft. To do this, you need to knock it out of its seat with a special mandrel (if you don’t have one, a high 15 socket will do) and remove it using pliers. After this, the part can be easily removed by hand.
The above procedure answers the question of how to remove the bendix from the starter. In general, at this point the main part of the repair can be considered complete, since replacing the bendix on the starter after the old element has been dismantled is a matter of one minute.
The new spare part is put on the shaft, after which the electric motor is assembled in the reverse order. They put on the retaining rings, install them on the car, secure the starter itself and the power terminal with bolts, and return the removed terminal to the battery.
Note: a new element must be checked for serviceability before installation, since the quality of spare parts for VAZ cars leaves much to be desired. To check the functionality of the new element, you should put it on the shaft and try to turn it in both directions. A working clutch rotates only counterclockwise.
Setting the advance angle
If repair work was carried out on the VAZ 2105 ignition distributor or the device was replaced, adjustment is required after installing it on the car. This can be done in different ways, which depend on the conditions and the tool at your disposal. Before you begin the adjustment process, you need to know that the engine cylinders operate in the following order: 1–3–4–2, counting from the crankshaft pulley.
Control
This method will require the following tools and accessories:
- 12 V test lamp with two wires;
- key for 13 and 38 to turn the crankshaft.
The adjustment is made with the engine off and consists of the following steps:
- Remove the cover from the ignition distributor.
- Rotate the crankshaft until the mark on the pulley coincides with the middle mark on the front of the engine.
- Use a 13 key to loosen the fastening of the distributor.
- We connect one wire from the lamp to ground, the other to the low voltage circuit in the distributor.
- Turn on the ignition by turning the key in the lock and rotate the device left and right until the light bulb appears. When it lights up, fix the distributor with the appropriate fasteners.
Video: setting the ignition using a warning light
By hearsay
The simplest and most accessible option for setting the ignition is by ear. This method is especially indispensable in field conditions. The adjustment consists of the following steps:
- Let's start the engine.
- Lightly unscrew the distributor mount, holding the device from turning with your hand.
- We try to turn the distributor to one side.
- We find a position in which the engine operates at maximum speed.
- Turn the distributor slightly clockwise.
- We clamp the mechanism fastening.
Video: installing the Zhiguli ignition by ear
By spark
The sequence of actions when setting the spark advance angle consists of the following steps:
- We install the crankshaft according to the marks, as in step 2 when adjusting using a light bulb, while the distributor slider should be directed towards the first cylinder. If he is looking at the fourth cylinder, then he needs to crank the crankshaft some more.
- We remove the central cable from the distributor cover and place the contact near ground.
- We loosen the distributor fastening, turn on the ignition and turn the mechanism until a spark jumps between the explosive wire and the ground.
- We move the distributor little by little counterclockwise and find a position in which a spark will not appear, after which we secure the distributor.
By strobe
You can most accurately set the ignition timing on the “five” using a strobe light. The adjustment technique consists of the following steps:
- Lightly unscrew the distributor fasteners.
- We connect the negative contact of the device to ground, connect the plus one to the low-voltage part of the ignition coil, and attach the strobe clamp to the cable of the first cylinder.
- We start the engine and turn on the device, pointing it at the crankshaft pulley. With such actions, the mark will be visible.
- We turn the distributor and ensure that the mark from the strobe light matches the marks on the engine.
- We control the engine speed, which should be 800–900 rpm.
- We fix the adjustable mechanism.
Video: setting the lead angle using a strobe light
The serviceability of each element of the ignition system has a direct impact on the functioning of the engine.
Therefore, attention should be paid to checking them periodically. If malfunctions occur in the operation of the motor, you need to be able to find the cause of the malfunction and eliminate it. To do this, it is enough to prepare a minimum list of tools, familiarize yourself with the step-by-step actions and carry them out during the work
To do this, it is enough to prepare a minimum list of tools, familiarize yourself with the step-by-step actions and carry them out as you work.
DIY VAZ 2114 starter repair - detailed instructions
1. First of all, remove the negative terminal from the battery (rechargeable battery). 2.
Using a "13" wrench, unscrew the two upper mounting screws that secure it to the clutch housing. As a rule, there is no third bolt, but if you have one, you will need an inspection hole in order to unscrew it.
3. Remove wiring No. 1 from the connector on the solenoid relay. moving the starter forward.
4. Take the key to “13” and unscrew the fastening nut of the wire that connects the terminal of the starter traction relay to the “plus” of the battery.
5. Visually assess the condition of the flywheel teeth.
6. Using a Phillips screwdriver, remove the two mounting screws in the starter cover. 7. Unscrew the nut securing the starter winding output to the solenoid relay; to do this, use a key set to “13”.
None 10. Check the condition of the bushings.
11. To separate the starter housing, apply several light blows to the lower part of the housing with a rubber or wooden hammer. Assess the condition of the brushes.
12. Using a screwdriver, remove the Bendix ears from the fork.
13. Position the key and knock down the locking ring with hammer blows.
14. Pry out the second retaining element with a screwdriver.
Now, actually replacing the bendix itself, take a new bendix (overrunning clutch) and install it in place. Reassembly is carried out in the reverse order; before doing this, do not forget to thoroughly clean and lubricate everything (where necessary). At this point, the repair of the VAZ 2114 starter can be considered complete; install the starter in place, connect the battery and try to start the engine.
This time we’ll talk about how to diagnose and repair a VAZ 2114 starter at home. You will learn how to replace the bendix with your own hands quickly and efficiently. Signs of a starter malfunction:
Significant reduction in power; rotation of the starter does not provide the power required by the engine. The starter will need to be repaired and the relay may need to be replaced. Power outages. The starter rotates idle, that is, without rotating the engine. The retractor starter will need repair. Delays in turning off the starter. The starter does not operate after turning the ignition key. The bendix has been damaged, so to resume operation you will need to replace the starter bendix. The starter turns, but does not start the engine.
Relevant: How to remove the VAZ 2110 starter. Replacing the VAZ 2110 starter with your own hands. Repairing the VAZ 2114 starter will require you to have the following tools:
Socket wrenches for “10” and “13”. Phillips and flathead screwdrivers. Direct hands (preferably) and free time.
None 2. Using a wrench set to “13”, unscrew the two top mounting screws that secure it to the clutch housing. As a rule, there is no third bolt, but if you have one, you will need an inspection hole to unscrew it.
3. Remove wiring No. 1 from the connector on the solenoid relay. moving the starter forward.
Repair of VAZ 2114 starter. Do-it-yourself Bendix replacement4. Take the key to “13” and unscrew the fastening nut of the wire that connects the terminal of the starter traction relay to the “plus” of the battery.
Possible causes of failure
As mentioned above, gear rotation is only possible in the direction of rotation of the starter armature. If rotation in the opposite direction is possible, this is an obvious malfunction, that is, the bendix must be repaired or replaced. There may be several reasons for this:
- Reduction in the diameter of the working rollers in the cage due to natural wear. The way out is to select and purchase balls of a similar diameter. Some car enthusiasts use other metal objects, such as pieces of a drill, instead of balls. However, we still do not recommend doing it yourself, but buying balls of the required diameter.
- The presence on one side of the roller of flat surfaces formed due to natural wear. Repair recommendations are similar to the previous paragraph.
- Grinding the working surfaces of the driving or driven race in those places where they come into contact with the rollers. In this case, repair is hardly possible, since such excavation cannot be removed. That is, it is necessary to replace the bendix.
Note! It is often better to completely replace the bendix than to repair it. This is due to the fact that its individual parts wear out approximately equally. Therefore, if one part fails, the others will soon fail as well. Accordingly, the unit will have to be repaired again.
Another reason for failure is wear of the gear teeth. Since this happens for natural reasons, repair in this case is impossible. It is necessary to either replace the mentioned gear or the entire Bendix.
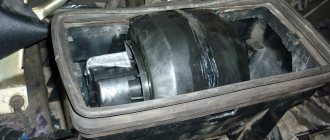
Since the starter not only experiences heavy loads, but also comes into contact with the external environment and is susceptible to irritants such as moisture, dust, dirt and oil, freewheeling can also occur due to deposits in its grooves and rollers. A sign of such a malfunction is the noise of the armature when the starter is started and the immobility of the crankshaft.
Performance evaluation
After completing the work, you should check how the engine starts. The starting engine should run smoothly, without knocking and grinding noises characteristic of a faulty overrunning clutch. This is a sign of a high-quality replacement of the Bendix on VAZ-2109-2115 cars.
In some cases, changing the bendix is not enough. Prolonged operation of a faulty clutch leads to wear and damage to the flywheel teeth. In this case, the symptoms of failure that existed before replacing the gear may become weaker, but do not disappear completely. In such cases, it is necessary to replace the flywheel.
A starter is a necessary element of a car, designed to start the engine from the ignition key. The rotation of the starter is transmitted to the crankshaft through the flywheel.
The starter is a direct current electric motor, which includes: a stator (a stationary part consisting of windings); armature (shaft in the grooves of which the collector and winding are located); overrunning clutch (gear with a mechanical device) and retractor relay.
Common starter problems and their causes
Regardless of whether 2106 or UAZ is installed, the problems are similar. If the car does not start, the VAZ 2106 is bad, first check the quality of battery charging. In addition, you should check how well the terminals are secured. If everything is fine with the charging and terminals, then the cause of problems with starting the engine may be in the starter.
The following malfunctions of the VAZ 2106 starter are possible:
- The device turns on, but the traction relay does not work: the traction wire is broken, the tips are not tightened well, there is a short circuit in the traction windings or to ground, the contacts have oxidized, the retractor armature is stuck.
- After switching on, a click occurs, the traction relay works, but the armature does not function or it rotates too slowly, the starter does not turn: the fastening bolts on the retractor are not tightened well, the brushes are worn out or stuck, the commutator plates are short-circuited or are burned out, the windings are damaged.
- When starting, the relay clicks, the armature works, but the crankshaft does not rotate: the buffer spring is broken, the clutch slips, slips out of the axle, or the clutch engagement lever is broken.
- The starter does not turn off when the engine starts: the relay or drive lever is stuck, the contacts are stuck together, the mechanism is skewed, the ignition switch return spring is faulty.
- Increased noise during startup: the unit is poorly secured, the bushings are worn, the teeth on the gears are broken.
Replacement
In order to save a little money, you can replace the starter yourself, especially since this will require the following tools:
- keys for 8 and 13;
- WD-40 liquid.
It is better to carry out work under a canopy or in a garage.
Due to the fact that getting to the starter is not very convenient, we will simplify our task by removing the air filter housing. To do this, disconnect the contacts of the mass air flow sensor, release the pipes from the body, and then use a 8mm wrench to unscrew the two bolts securing the front support brackets.
Having carried out the preparatory work, we proceed to the main thing - replacing the starter. We carry out the work in the following sequence:
- We de-energize the electrical circuit of the car by removing the “negative” terminal from the battery.
- We treat the threaded connections attaching the starter to the gearbox with WD-40.
- Disconnect the negative terminal of the solenoid relay (red wire).
- Using a 13mm wrench, unscrew the nut securing the “positive” terminal.
Using a 13mm wrench, unscrew the three starter mounting nuts.
- Remove the starter from the studs.
We carry out the work on installing a new spare part in the reverse order, lubricating the studs located on the gearbox with graphite lubricant, which will help in the future to reduce the time for unscrewing if you need to remove the starter for any reason.
Installation
- We insert the VAZ 2105 starter into the seat.
- Then secure it with three mounting bolts.
- Then you should reinstall the starter shield.
- Now the next step is to connect back all the necessary wires to the solenoid relay.
- Next, reinstall the braces (on an injection-powered car) or install the air filter housing (on a carburetor car).
- Connect the negative terminal back to the battery and you can try to start your favorite car.
Brief conclusion. Repairing a starter with your own hands is not a difficult task, but quite economical. The price of spare parts plus the price for work by craftsmen at the nearest service station is already good money. And so you will only have to spend money on spare parts. We hope this article helped you. Take care of your car, have it repaired on time, and when you really need it, it will serve you faithfully!
Source
Self-replacement of Bendix VAZ-2109
Bendix is a device without which you cannot start your VAZ-2109 or any other car. Its task is to transmit torque from the starter rotor to the flywheel crown. It includes only two parts: a gear necessary for transmitting torque, as well as an overrunning clutch that prevents the first element from rotating in the opposite direction. If any violation occurs in this system, you will no longer be able to start the car and you will need to replace the Bendix on the VAZ-2109. Today we will analyze the procedure for KZATE starters, which are used by AvtoVAZ.
What do you need for work?
Let us immediately draw your attention to the fact that Bendix cannot be repaired. Accordingly, if it breaks, then you will definitely have to spend time and money to install a new one. Fortunately, its cost is not that high, so there is no point in trying to restore something that cannot be restored. Moreover, the installation procedure for a new device is not so complicated. The main thing is to have the necessary parts and tools at hand. For work you will need:
Please note that not every Bendix will fit a specific starter. Therefore, you will need to buy a suitable part.
Progress
We start with preparatory measures. First of all, you need to disconnect the negative terminal from the battery. Replacing the Bendix will require manipulation of the electrical wiring, so disconnecting the battery is a mandatory safety requirement. Next we move on to the solenoid relay. You will see two bolts on it: upper and lower. The first is connected to a conductor connecting the relay to the battery. It will need to be turned off, here you will need a key for 13. Nearby you will notice a small wire that provides power to the winding when you turn the key in the ignition. It will also need to be turned off; just pull it slightly to the left. Next we move on to the procedure for removing the starter. On the front panel you will notice three nuts, located from top to bottom. They can also be removed using a key number 13. Dismantling is completed, the starter needs to be pulled out and prepared to work directly with it. You will need to disassemble this element, remove the non-working bendix from it and install a new one. But first things first.
After you have removed the starter, inspect it. Assess the current condition of the bushing, rotor windings, brushes and lamellas. If you notice any damage to them, you will have the opportunity to replace them immediately. Now let's move on to disassembling the device. It is performed as follows:
- The cover is fixed to the body with two bolts. Let's remove them.
- Next in line for dismantling will be the bolts securing the retractor to the starter and the nut that ensures contact with the power cable.
- You can now see the retaining ring on the rotor. We dismantle it.
- We arm ourselves with a 10mm wrench and remove the studs.
- The brushes are connected to the contacts using small bolts. The screwdriver comes to our aid.
The starter can now be separated. It will separate into 3 parts. Finally, we move on to the most important thing - dismantling the Bendix. To begin, you will need to carefully knock off the washer located on the rotor shaft. A small hammer will help you with this. There is a ring underneath that you will need a screwdriver to remove. And finally, the old bendix can be removed.
Let's start doing our own repairs
First you need to visually inspect the inside of the coupling. If there are damaged springs, they need to be replaced with new ones. This can be a problem if you live in the middle of nowhere. Local auto stores do not have repair kits. Therefore, repairing a Bendix with your own hands turns into a search for old spare parts.
If there is a hole in the cones, they can be turned upside down. But it is advisable to replace them. We check the mobility of the springs; they can “lay down” and not push out the cone.
If visually everything is in order, then the entire repair will end with a banal washing of the insides of the overrunning clutch. The main thing is to wipe the entire interior from dirt and dust . There is terrible wear on the rollers or the springs become very weakened. In this case, the bendix must be replaced with a new one or a known good one.
Bendix starter VAZ 2109
Today, the most beloved and economical car among the population of Ukraine and post-Soviet countries can confidently be called the VAZ 2109 model. Let’s look at the simplest part of this unique car - the Bendix starter - and answer the question - is it really necessary to replace it?
Those. when you try to start the car, but it doesn’t start or, say, strange sounds are heard, as if this element does not have time to come out of the flywheel. Let's try to find out or remember what the VAZ 2109 starter bendix is?
To ensure that the operation of the starter motor does not coincide in time with the operation of the car engine, the number of revolutions of which is significantly higher than the number of revolutions in the starter device, a drive gear with an overrunning clutch is used.
The fastest and most cost-effective upgrade is installing coolers
The standard heater of the VAZ 2105 does not always cope with cold winter weather.
Do-it-yourself modification of the VAZ-2105 stove will not require too much labor and money if the car owner decides to modify the standard equipment by installing coolers on the side deflectors. It is worth noting that absolutely everyone should improve the heating equipment of the VAZ-2105, since due to the irrational design, all the air entering the cabin goes down. Thanks to the installation of coolers, which are usually included with PCs, you can adjust the air flow going to the sides. Experts recommend purchasing devices that can make at least 1500 revolutions per minute. Despite the fact that a do-it-yourself modification of the VAZ-2105 stove will not require much expense and time, it will help increase the level of comfort.
Replacing Bendix VAZ 2109
To watch online, click on the video ⤵
How to replace the starter bendix for VAZ 2109-2114. More details
The starter turns, replacing the Bendix VAZ 2109 -15 Read more
How to replace bendix on a starter 2114 (with gearbox) More details
Replacing Bendix VAZ 2109 More details
How to remove and repair the starter on a VAZ 2108, 2109, 21099, 2113, 2114, 2115 Read more
BENDIX SCROLLS IN THE STARTER OF VAZ 2108-2109 - 21099 - 2115 REMOVE AND WASH TOGETHER. More details
How to replace a car starter bendix. Step-by-step instructions from AUTO HF electrician. More details
Starter VAZ 2108-09. non-gear repair. Bendix replacement Read more
Is the starter bendix slipping? Fix it yourself in a couple of minutes! Life hack Read more
Replacing the starter bushing 2108-2115 with your own hands Read more
Repair of Bendix starter VAZ. Do it yourself! More details
VAZ Replacement of Bendix on Starter More details
Features of mechanism diagnostics
The starting unit is checked using a tester. After turning on the device, the voltmeter reading should not be higher than 8V, and the current should not exceed 23A.
You can check the windings using a tester; if it lights up, it means there is a short circuit. To perform a visual inspection of the starting unit, it must be removed and cleaned of dirt (video author - Irina Kuzilova)
When disassembling the device, each part should be visually inspected. Scores and scratches can be removed using sandpaper. Broken and worn parts must be replaced. It is also necessary to replace the VAZ 2106 starter bushings if they are badly worn.
A faulty collector cannot be repaired; it is advisable to replace it. The height is checked on the brushes. More than 12 mm is considered optimal, otherwise the brushes must be replaced.
VAZ 2114 starter – connection diagram, device, technical characteristics
The starter installed on the VAZ model we are interested in is type 5712.3708.
It is a DC motor with a traction two-winding electromagnetic relay and a planetary gearbox.
The device is excited by permanent magnets. Its rated power is 1.55 kW and the current is:
The starter devices and its operation diagram are as follows:
- four permanent magnets are placed in the stator (in its housing);
- liners made of metal-ceramic material are mounted in the support and cover, in which the rotation of the armature shaft is carried out;
- the planetary gearbox imparts movement to the drive shaft from the armature shaft;
- the front end of the drive shaft rotates in a cermet bushing, which is built into the clutch housing;
- The movement of planetary gears occurs on needle-type bearings;
- when the device we are considering is turned on, the voltage from the battery is supplied through the ignition switch to the windings (there are two of them) of the traction relay, and after its contacts close, the retractor winding is switched off.
What is the design of the gear-six starter?
The VAZ 2106, produced after the 1980s, has a starter with an end manifold model 35.3708. Earlier cars from the Volzhsky plant had a different gear mechanism installed - ST-221, which was equipped with a cylindrical manifold. Their structure is approximately the same, so they are completely interchangeable.
Let's take a closer look at the design of the mechanisms that interest us, using model 35.3708 as an example. The “six” gear starter consists of the following main parts:
- field winding (i.e. stator) and housing;
- electric drive with anchor;
- three special covers;
- electromagnetic traction relay with two windings (one of them is retracting, the other is holding).
Using bolts, the starter housing is secured into one block with three covers. The armature of the mechanism we are interested in has a core, a commutator and a shaft. The last of these elements rotates in metal-ceramic bushings (there are two of them structurally provided). These bushings are pressed into the covers and must be impregnated with a lubricant. The starter drive is located at the end of the shaft. It includes a gear and a roller clutch, which is necessary to transmit torque to the flywheel.
On the front cover there is a relay consisting of a yoke, several flanges and a core. When the gear mechanism is turned on, two processes occur simultaneously: the armature is retracted, and the drive and gear mesh with the flywheel; a special contact plate closes the bolts. The result of these processes is the start of power supply to the windings of the device we are considering. As you can see, the circuit for switching on and operating the “six” starter is quite simple.
How to remove and replace the VAZ 2114 starter?
The procedure is as follows:
- the negative terminal is removed from the battery;
- the upper mounting screws (there are two of them) are unscrewed from the starter, which connect it to the clutch housing (the operation is performed with a key set to “13”);
- the starter is slowly moved forward and the wires that run from the connector on the relay (retractor) to the positive terminal of the battery are removed;
- the nut that secures this wiring is unscrewed with the same key;
- The flywheel teeth are visually assessed (perhaps their condition requires replacement of this element);
- in the starter cover, unscrew both screws using a Phillips screwdriver, and then remove the nut connecting the solenoid relay and the starter winding, and remove the washer-bracket;
- two long coupling bolts are removed using a “10” wrench and the condition of the bushings is analyzed;
- the starter housing is separated by light blows with a wooden (or better yet, rubber) hammer on its lower part and the brushes are assessed (whether they are in working order or not);
- remove the bendix ears from the bushing using a screwdriver, then knock down the first retaining ring with a hammer and a wrench, prying up the second with a screwdriver - the bendix can be dismantled and a serviceable part installed in its place.
The assembly process is carried out in reverse order.
Is it possible to fix it?
Relays for starters used in Zhiguli cars received identical parts in view of completely identical tasks. The only inconvenience is that, depending on the supplier manufacturer and the modification of the car itself, the attachment points of the units may differ slightly from each other, and some differences in internal components are allowed.
There is no point in repairing the devices; for VAZ-2107 and 2106 it is easier to purchase the entire starter assembly. But, if there are financial difficulties, you can only replace the relay. And this is the order in which you should proceed. Be sure to disconnect the battery first! The starter is installed in the car electrical network in such a way that shorting its contacts can lead to burnout of the entire car wiring.
Then remove and thoroughly clean the starter from dirt. This is necessary to ensure that random particles do not get into the electrical winding and prevent a short circuit. Now we disconnect the contact from the bolt of the traction relay, unscrew the tightening screws and remove the part.
First you need to find out where this device is located and how to remove it. The unit is cleaned from the outside. Next, find the starter relay on the VAZ 2107 and check its functionality.
Removing and replacing the starter on a VAZ 2107 - step by step... https://CarTore.ru/331-remont-startera-vaz-2107-snyatie-zamena.htmlRemoving the VAZ 2107 starter in the garage, with your own hands. Video tutorial on starter repair. As in most other cars, in the “seven” the starter is located at the bottom of the engine.
Starter activation relay VAZ 2107 https://avtoblokrele.ru/vaz/predohraniteli-vaz-2107.htmlWhere it is located. ... Cars VAZ 2107, VAZ 21047 carburetor, injector were considered. Location of the VAZ 2107 fuse box under the hood.
Starter relay in VAZ 2107, repair and its operation https://autodont.ru/jelektro/rabota-i-remont-rele-startera-na-avtomobile-vaz-2107 Car enthusiasts need to know that the starter traction relay of a VAZ 2107 car can be connected only through the on relay. It is located in the engine compartment, just where the right mudguard is.
VAZ-2107 starter relay - how to replace it? ”AutoNovator https://carnovato.ru/vtjagivajushhee-tjagovoe-rele-vkljuchenija-startera-vaz/The installed starters on the VAZ-2106 and 2107 starters are actually the same. ... The starter activation relay is located some distance from the starting mechanism itself, so you should look for it by wires.
Starter malfunctions of VAZ 2107, VAZ 2105, VAZ 2104… https://www.VazClub.com/vaz/2104-2105-2107/remont/elektrooborudovanie/starter/ustranenie-neispravnostei-startera.html7. The VAZ 2107 starter relay is faulty. 7. Clean the relay contacts. ... Disassembling the Lada 2107 starter with your own hands, checking the starter winding, removing and installing the starter on a VAZ 2104, VAZ 2105, VAZ 2107.
starter device for the VAZ 2107 car https://car-exotic.com/vaz-cars/vaz-2107-car-starter.htmlThe starter for the VAZ 2107 car is a four-brush, four-pole DC electric motor. The starter is installed on a VAZ 2107 car on the right side of the cylinder block and is secured with three bolts to...
Repair and replacement of the VAZ 2107 starter https://atlib.ru/video/remont-i-zamena-startera-vaz-2107-194 First of all, you need to figure out where the starter is located, how to get to it and how it is attached. After clarifying these important points and The starter on a VAZ 2107 is being replaced independently.
Starter relay VAZ 2107 photo https://photodomik.ru/rele-startera-vaz-2107-foto.htmlFind photo: list. You are interested in: VAZ 2107 starter relay photo. (Photos on this topic are selected here; full relevance is not guaranteed.)
Buy VAZ 2107 - Find your car on OLX! //www.google.com.ua/search?ie=UTF-8&hl=ru&q=%D0%B3%D0%B4%D0%B5%20%D0%BD%D0%B0%D1%85%D0%BE %D0%B4%D0%B8%D1%82%D1%81%D1%8F%20%D1%81%D1%82%D0%B0%D1%80%D1%82%D0%B5%D1%80 %20%D0%B2%20%D0%B2%D0%B0%D0%B7%D0%B5%202107Used cars at a low price.
Sources
- https://carnovato.ru/vtjagivajushhee-tjagovoe-rele-vkljuchenija-startera-vaz/
- https://auto-rx.ru/2016/05/14/gde-nahoditsya-starter-v-vaze-2107/