How to replace Bendix VAZ 2109?
It’s worth talking about repairing this unit right away. It is impossible, since the bendix cannot be disassembled and failed parts replaced. The price of a Bendix VAZ 2109 does not bite, so it is easier to carry out a complete replacement than to try to restore a “dead” one. To carry out repair work you will need:
- Keys for 10 and 13.
- Phillips and flathead screwdrivers.
- New Bendix VAZ (choose the manufacturer yourself, based on the starter model).
- Pliers and hammer.
That's it, now all that remains is to prepare for the repair - remove the negative terminal from the battery. In the process, manipulations will be performed with power wires that are not protected by fuses and are located close to the body elements, engine and gearbox.
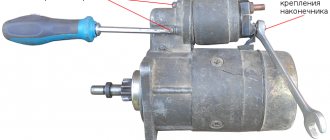
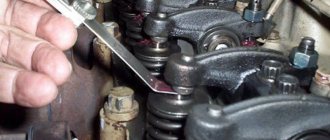
Pay attention to the VAZ 2109 starter solenoid relay; there are two bolts on it; a wire coming from the positive terminal of the battery is screwed to the top one. Remove it using a key number 13. Nearby you will find a thin wire that energizes the retractor winding when you turn the ignition key to the “Start” position. It must be turned off by pulling it towards the left wing.
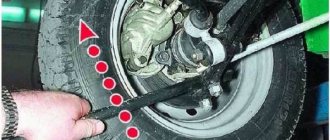
Now you need to unscrew three nuts with a 13mm wrench. They are located on the front side of the starter - below, above and in the middle. Only then can you remove the starter. Now the most difficult thing is that you need to disassemble it in order to get to the VAZ 2109 Bendix and replace it. It is immediately worth noting that it is advisable to carry out complete diagnostics and maintenance of the unit.
For example, look at the condition of the brushes, lamellas, motor windings and bronze bushing. If these elements become unusable, they need to be replaced. To disassemble the entire starter, you will need to follow these simple steps:
- Using a screwdriver, unscrew the two bolts that secure the cover to the housing.
- Unscrew the bolts securing the solenoid relay to the starter and the nut that makes contact with the power wire.
- Remove the retaining ring from the motor rotor.
- Using a 10mm wrench, unscrew the two studs.
- Using a screwdriver, unscrew the bolts that connect the brushes to the contacts.
- Disconnect the starter; it should split into three parts.
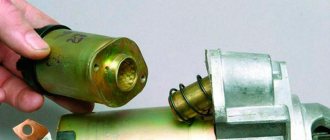
Now the most interesting part is removing the VAZ 2109 bendix. To do this, you need to take a hammer (small) and carefully knock the washer off the rotor shaft. Underneath there is a ring that can easily be opened and removed with a flat screwdriver. Only after this can you remove the VAZ bendix.
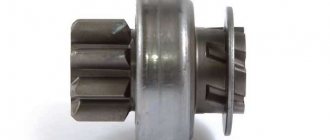
Do not lose small parts, they are very important for the normal functioning of the mechanism. Check the old bendix - try rotating the gear in one direction, then in the other direction. This is where knowledge of the properties of an overrunning clutch comes in handy! If the gear rotates in both directions, the unit must be replaced. Even if it starts to “grab” after a quarter turn, this is a sign of a malfunction.
Install the new one, apply a little grease to the rotor axle and install the ring. Now you can assemble the entire mechanism. And when the VAZ 2109 starter retractor is installed, you can even check its functionality by connecting it to the battery.
Now watch the video about replacing the Bendix on the VAZ 2109 starter:
For owners of domestic cars, self-repair or assembly of vital mechanisms is familiar and accessible; in this article we will try to improve our skill level and replace the VAZ 2109 starter with our own hands.
What do you need for work?
Let us immediately draw your attention to the fact that Bendix cannot be repaired. Accordingly, if it breaks, then you will definitely have to spend time and money to install a new one. Modern, its price is not so high, so there is no point in trying to return something that is irreparable. Moreover, the procedure for installing a new device is not so complicated. The main thing is that the necessary parts and tools are nearby. For work you will need:
- positive and negative screwdrivers;
- open-end wrenches for 13 and 10;
- hammer;
- pliers;
- spare part.
Please note that not every Bendix
will fit a specific starter. Therefore, it will be necessary to purchase a suitable part.
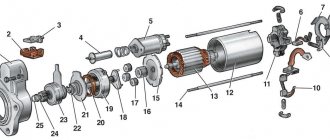
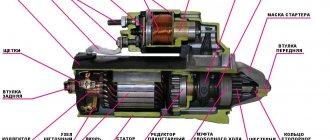
Starter circuit and purpose
On all cars, without exception, and therefore on the VAZ 2109, the starter is responsible for starting the engine, or rather, spinning the crankshaft. Essentially, it is a small electric motor. The VAZ 2109 starter device includes a movable rotor, two windings, and a bendix with a set of brushes. How does it all work? Magnetic fields of opposite values are created around the starter and rotor windings, which drives the moving element into dynamics. It is quite easy to apply voltage to the starter, but for the rotor you need an intermediary - brushes consisting of graphite and copper.
What about the Bendix starter of the VAZ 2109, this element transmits movement to the flywheel. The part consists of the following parts: a fork connecting the mechanism to the retractor relay, an overrunning clutch that ensures movement in one direction, and a gear. Many motorists are familiar with the situation when this part is erased. The slipping of the Bendix is clearly audible and indicates that the installation of a new kit is inevitable. And although the cause is often contamination of the mechanism, cleaning it is not recommended. Due to dust and soot, Bendix is subject to wear, often unevenly, and even after washing it will no longer perform its function at the proper level.
There is a gear starter and a simple one. The scheme for transmitting torque to the flywheel is excellent. The gear starter has an additional element between the armature and the bendix. Many consider this design to be more productive and less voracious. True, the gear unit is more difficult to repair.
Starter mechanism malfunctions
If any difficulties arise with starting the car, this unit is the first to be suspected, but now, knowing the design of the VAZ 2109 starter, you will quickly figure out where to look. Various sounds similar to metal grinding should also alert you; it is quite possible that your VAZ 2109 will need to disassemble the starter. The reason may lie in the flywheel, and its crown will need to be replaced. In this case, the car will most likely start, just not right away.
But if the car does not start and there are no alarming sounds, then you may have to replace the clutch. Disassemble the starter and dismantle it, try turning it in both directions. If it rotates freely, then calmly throw away the failed part. You can understand that it is necessary to remove and replace worn starter brushes installed on a VAZ 2109 by a characteristic click, after which the expected engine start will not take place.
Expert opinionRuslan KonstantinovExpert on automotive topics. Graduated from Izhevsk State Technical University named after M.T. Kalashnikov, specializing in “Operation of transport and technological machines and complexes.” More than 10 years of professional car repair experience.
Removing and connecting a new starter
In absolutely any of the cases described above, you will be faced with the need to take a closer look at the device. It should be noted that with the release of the VAZ 2109, the question of how to remove the starter became more easily resolved, because in this model the arrangement of components under the hood is much simpler. So, you will need socket and socket wrenches and an inspection hole. Now, regardless of whether it is necessary to replace only the bushings or the entire VAZ 2109 starter, it must be removed. First of all, all the wires of the traction relay are disconnected, after which the block is dismantled. Don't forget to remove the high voltage wire from the battery.
The next step is to dismantle the engine crankcase protection; to do this, simply unscrew the mounting bolts. Then the approach to the mechanism of interest to us is cleared. To remove it, you need to unscrew three nuts - two on the block and one in the engine compartment. The connection diagram for the new VAZ 2109 starter is the same, only it is in the reverse order, so it will not cause any difficulties.
Disassembly begins with the fact that you need to carefully knock down the locking and restrictive ring, and then, unscrewing the fasteners of the back cover, remove it. Now we get to the graphite brushes, stator and armature. It should be noted that there may not be a gearbox in this part, in which case the stator is taken out after the armature. If the design still includes this element, then you need to act somewhat differently. Although it is not difficult to remember how to disassemble the gear starter on a VAZ 2109 if it fails. The scheme will just work in reverse - the stator itself is pulled out first, then the armature, and the gearbox comes last.
Be careful, disassembly is often complicated by the loss of the adjusting washer installed on the armature axis, and the loss of other small parts - there are not many of them, but the absence of even one calls into question the further operation of the mechanism.
Now you can imagine how to remove, assemble, install and connect the VAZ 2109 starter; you no longer need to bother the mechanic with such issues.
Home → Device → Electrical system → Starter →
To carry out repairs, maintenance or replacement of parts, the starter must be removed from the engine and disassembled. Let's see how to do this quickly - without wasting extra time and effort, using the example of disassembling starter 29.3708, which is widely used on VAZ 2108, 2109, 21099 cars.
Required Tools
— Slotted screwdriver (phillips)
- Hammer
— Wrenches (open-end or socket) for 10, 13 and 17 mm
— Retaining ring puller (optional)
— Pliers
Preparatory work
— Remove the starter from the car engine
The procedure for disassembling the starter 29.3708
— Remove the traction (retractor) relay
To do this, use a 13 mm wrench to unscrew the nut securing the tip of the starter winding output, and disconnect the tip from the contact bolt of the traction relay. Using a slotted screwdriver (screws for a Phillips screwdriver or a 10 mm wrench can also be used), unscrew the three screws securing the relay and disconnect it from the starter housing.
Remove the starter traction (retractor) relay
At the same time, we remove the relay core earring from engagement with the tip of the drive lever (Bendix).
Remove the solenoid relay core
Read more: “Removing the traction (retractor) relay from the starter on VAZ 2108, 2109, 21099 cars.”
— Remove the protective cover of the starter brush assembly
To do this, use a slotted (Phillips) screwdriver to unscrew the two screws securing it.
Removing the starter rear protective cover
Disconnect the cover from the starter housing. Underneath there is a rubber ring-gasket.
Remove the sealing ring of the protective cover
— We remove the axis of the starter drive lever (Bendix)
To do this, use pliers to squeeze the whiskers of its latch and use them to remove the latch from the hole on the axle. We knock the axle out of the hole in the starter housing. To knock out the axle, you can use a nail of a suitable diameter and a hammer.
We remove the bendix axis (starter drive)
— Remove the Bendix travel limiter ring
We knock it down with light blows of a hammer (you can use a 17 mm open-end wrench).
We knock down the bendix limit ring
We remove the retaining ring located under it with a puller or simply pry it off with a slotted screwdriver.
Remove the bendix travel limiter retaining ring
— Unscrew the two long screws holding the two halves of the starter housing together
To do this, you need a 10 mm wrench. We take out the bolts and separate the halves. If they do not separate, lightly hit the front half with a hammer.
Unscrew the starter housing pinch bolts
— Remove the starter drive (Bendix)
Remove the rubber plug from the slot in the front of the starter housing. Using a screwdriver, disconnect the legs of the drive lever from the protrusions on the drive itself.
Removing the starter drive ("Bendix")
We push the bendix forward and take it out.
Drive parts ("Bendix")
— Disconnect the armature and the starter housing
To do this, pry it up with a screwdriver and remove the locking half-ring on the armature shank. We also remove the washer located under it.
Remove the armature shaft retaining ring
If it is necessary to remove the stator windings, unscrew the screws securing them to the starter housing.
Remove the armature and starter stator windings
— Remove the brushes
If it is necessary to remove the brushes, unscrew the screws securing them and remove them.
Removing the starter brushes
Notes and additions
— How to quickly and correctly assemble a starter — “Assembling a starter 29.3708 for VAZ 2108, 2109, 21099 cars.”
— Another starter 5712.3708, installed on VAZ 2108, 2109, 21099 cars, has a slightly different design, and its disassembly differs from disassembling the starter 29.3708.
Twokarburators VK - More information on the topic in our VKontakte group, on Facebook Twokarburators FS , in Odnoklassniki - Twokarburators OK and in Yandex Zen - Twokarburators DZ
More articles on electrical equipment of VAZ 2108, 2109, 21099 cars
— How to replace starter brushes VAZ 2108, 2109, 21099
— On-off sensor for the fan of the engine cooling system of VAZ 2108, 2109, 21099 cars
— Starter device 5712.3708 for VAZ 2108, 2109, 21099 cars
— Starter 29.3708 for VAZ 2108, 2109, 21099 cars
— The wipers do not work on the VAZ 2108, 2109, 21099
— Checking the ignition switch on VAZ 2108, 2109, 21099 cars
Main stage
It is necessary to adhere to the following algorithm of actions:
- Open the car hood.
- Remove the “-” terminal from the battery. This is necessary to avoid electric shock, since the work will involve power wires.
- Remove the “+” terminal from the top bolt of the starter solenoid relay using a size 13 wrench.
- Disconnect the nearby thin wire - pull it to the left, towards the wing. The purpose of this wiring is to energize the relay winding when the ignition key is turned to the “Start” position.
- Using a size 13 wrench, unscrew the nuts on the starter. Three nuts are located on the front of the part: bottom, middle, top.
- Remove the starter.
DIY Bendix starter repair
Repairing a starter is a troublesome task, but by doing it yourself, you can save your family budget. During operation, the starter constantly experiences heavy loads and is exposed to dust, moisture, dirt and oil, which contributes to the rapid destruction of the electric motor insulation and breakdown of the drive mechanism.
We have already written about some signs of a faulty starter and about checking and repairing the solenoid relay. Another malfunction that leads to repair of the starter is slipping of the freewheel - Bendix, which occurs as a result of contamination of the grooves and rollers. In this case, when the starter is turned on, the noise of a rotating armature is heard, and the crankshaft stands still (this is well shown in the video instructions for repairing the starter at the bottom of the page). There is no way around this without renovations.
Possible causes of failure
As mentioned above, gear rotation is only possible in the direction of rotation of the starter armature. If rotation in the opposite direction is possible, this is an obvious malfunction, that is, the bendix must be repaired or replaced. There may be several reasons for this:
- Reduction in the diameter of the working rollers in the cage due to natural wear. The way out is to select and purchase balls of a similar diameter. Some car enthusiasts use other metal objects, such as pieces of a drill, instead of balls. However, we still do not recommend doing it yourself, but buying balls of the required diameter.
- The presence on one side of the roller of flat surfaces formed due to natural wear. Repair recommendations are similar to the previous paragraph.
- Grinding the working surfaces of the driving or driven race in those places where they come into contact with the rollers. In this case, repair is hardly possible, since such excavation cannot be removed. That is, it is necessary to replace the bendix.
Another reason for failure is wear of the gear teeth. Since this happens for natural reasons, repair in this case is impossible. It is necessary to either replace the mentioned gear or the entire Bendix.
Since the starter not only experiences heavy loads, but also comes into contact with the external environment and is susceptible to irritants such as moisture, dust, dirt and oil, freewheeling can also occur due to deposits in its grooves and rollers. A sign of such a malfunction is the noise of the armature when the starter is started and the immobility of the crankshaft.
Starter mechanism malfunctions
If any difficulties arise with starting the car, this unit is the first to be suspected, but now, knowing the design of the VAZ 2109 starter, you will quickly figure out where to look. Various sounds similar to metal grinding should also alert you; it is quite possible that your VAZ 2109 will need to disassemble the starter. The reason may lie in the flywheel, and its crown will need to be replaced. In this case, the car will most likely start, just not right away.
But if the car does not start and there are no alarming sounds, then you may have to replace the clutch. Disassemble the starter and dismantle it, try turning it in both directions. If it rotates freely, then calmly throw away the failed part. You can understand that it is necessary to remove and replace worn starter brushes installed on a VAZ 2109 by a characteristic click, after which the expected engine start will not take place.
Summarize
Of all the Bendixes that I had to repair, only a small percentage did not work long enough. Spare parts for the overrunning clutch are to blame for this, or rather, their absence in our stores. Therefore, you have to “cut”, collecting one from several.
In this case, it is better to replace the bendix with a new one. But if, upon visual inspection of the disassembled coupling, all its insides are intact, then it is enough to wash them. After such repairs, the Bendix can work for several more years until everything gets clogged back with dirt.