Changing car gears is a standard process that every driver has brought to automaticity. Therefore, every step of this process should not be spoiled: the gears should be engaged the first time, and the lever should lie comfortably in the hand. Comfort will largely depend on the gearshift lever, which the driver holds most of the time behind the wheel. Replacing the gearshift knob itself is not difficult, but you need to know how to do it.
The gear shift mechanism on a Priora car changes not only due to wear: it is considered an important element of the interior. Therefore, it can be replaced with something else. For example, remove the gear knob from Priora 1 and install a part from Priora 2. Any tuning is possible - instead of a standard part, you can put any one. It can be supplied from a new car, or from any other car - modern capabilities will allow you to make an “adapter” for any lever.
Standard gear knob - article number and price
The gear knob on a Priora, the price of which is quite reasonable, differs for different generations of the car. After restyling, the internal appearance of the Priora really changed, and even the gear shift lever changed in appearance. It has become a small detail against the backdrop of all the changes, but for many the part from Lada priora 2 remains more preferable when the time comes to replace the gear shift mechanism.
Dorestyling
The pre-styling mechanism consists of the following main parts
- Gear shift lever – 2110-01703088-00, price – 200 rubles;
- Pressure plate – 2110-01703238-00, price – 30 rubles;
- Protective cover – 1111-01703200-00, price – 200 rubles.
Restyling
The restyled gear shift mechanism consists of spare parts included in the following list:
- Handle overlay – 2170-01703124-00, cost – 50 rubles;
- Gear shift lever - 2170-01703088-00, cost - 250 rubles;
- Protective cover – 1111-01703200-00, cost – 200 rubles.
Do you know about the main malfunctions of the manual transmission knob?
The device, together with the gear shift mount, is quite simple. There are several basic faults that can be corrected or simply repaired part of the box drive. Malfunctions of the gear shift knob include the following:
- External signs of wear. The part itself can wear out quite well, lose its color and become “greasy”. This is unpleasant, because this appearance ages the interior, and the lever itself becomes unpleasant to hold in your hand.
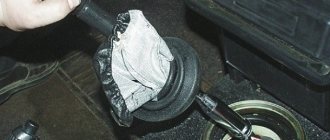
- Torn cover. The cover will collect all the dust along with small grains of sand so that they do not get inside. If the cover breaks in at least one place, all the dust will fall down. It will interfere with the standard operation of the Priora gearbox mechanism, so that over time, signs of a malfunction of the large mechanism will appear.
- The gearshift knob dangles like a play. First of all, such play interferes with correct and quiet gear shifting.
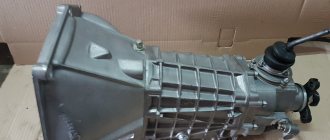
Design and differences of a cable-driven gearbox
Unlike a conventional gearbox, the cable-driven gearbox has received some improvements and upgrades.
In order to understand how everything works, let’s compare a standard gearbox labeled VAZ-2180 and the new VAZ-2181:
- To reduce the vibration generated by the traction drive gearbox, cables from the manufacturer Atsumitec were installed.
- To reduce the effort for shifting 1st and 2nd gears, the manufacturer installed multi-cone synchronizers.
- The clutch size has increased to 215 mm.
- Due to changes in the transmission design, the starter had to be positioned along the engine rather than the gearbox.
- To facilitate gear shifting, it was necessary to reduce the bevel angle of the synchronizer teeth from 125 degrees to 100.
- To eliminate oil leaks, the designers moved the gear selection mechanism to the top. But this nuance gave impetus to the development of a new switching scheme and design changes.
- The volume of lubricant poured has decreased from 3.3 liters to 2.2 liters.
- A selector plate is installed, which allows you to change gears more clearly.
- The transition from mineral oil to semi-synthetic oil has been completed.
- To prevent accidental reverse gear, a special lock was developed.
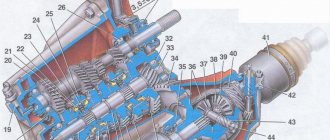
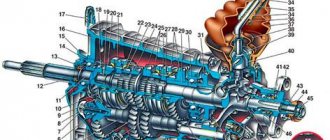
The main elements and components that go into the design of the new gearbox can be seen in the figures below:
- main drive drive gear;
- secondary shaft;
- input shaft;
- fifth gear shift fork;
- third and fourth gear shift fork;
- reverse light switch;
- clutch housing;
- gear shift mechanism;
- central lock.
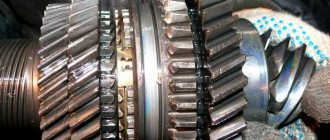
1 – first gear gear; 2 – intermediate rings; 3 – blocking ring; 4 – synchronizer clutch; 5 – synchronizer clutch hub; 6 – clamp; 7 – second gear gear.
1 – gear selector levers; 2 – selector grid pin; 3 – selector grid; 4 – reverse locking mechanism; 5 – central three-dimensional plate.
Thus, the manufacturer decided to improve and modernize the gearbox, which was unreliable and had a lot of problems. Due to the new improved system, vibration in the body and gear knob has been reduced. The gears switched on, started more clearly, and the huge backlashes disappeared.
Catalog numbers and production
As you know, analogues of gearboxes are rarely produced, and even more so for domestic cars.
Therefore, for the Lada Granta cable-driven gearbox there is one catalog number - 21810-1700012-00.
Removing the gearshift lever handle:
- To make this procedure easier, you will need to first follow the shift lever removal instructions above.
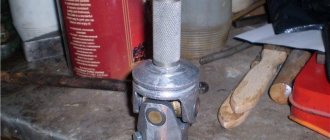
- Once the lever is removed, clamp it in a vice.
- We wrap the neck under the handle with tape and install an open-end wrench on the tape at “32”.
- Lightly hit it with a hammer from below in order to knock the handle with the holder away from the lever.
- When the handle comes out a little, remove the tape and remove the handle, first pressing the latches on the holder with a thin screwdriver. Tip: Be careful, as there is a spring under the handle, do not lose it.
- Install in reverse order.
Replacing the scenes on a VAZ 2107
It was necessary to write which gearbox is 4 or 5 speed. If there is a 5th mortar, then there are no problems at all, because the slide can be removed as an assembly, but if there is a 4th mortar, then there really is a spring that can fall. When I was doing repairs, I took a wire hook in advance, unscrewed the drawstring, pulled it up and hooked this spring with the hook. Assemble in the reverse order, but instead of a hook it is better to take a string - it will be easier.
You'll start to take it apart and you'll see everything. Everything is just there
Here's a little instruction. ru/ — remove spaces
Shift lever squeak and other problems
From all of the above, it is clear that this part is one of the most important in the entire gearbox, and if it fails, then driving such a vehicle becomes life-threatening. The most common reasons why such an emergency can occur are either mechanical damage or the consequences of incorrect operation. Here are a few breakdowns that you can easily detect on your own.
You should know that the gear shift knob should move freely, without jamming. If difficulties arise in performing this action, most likely the spherical washer or ball joint has failed. They need to be replaced urgently. The creaking of the gear shift lever also indicates a malfunction. If spontaneous shutdown occurs, then you should definitely check the spring; it is quite possible that it simply jumped off.
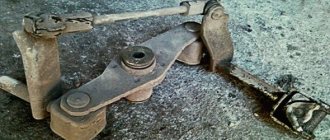
Why do you have to repair the gearbox link?
Failure of the link can be caused by many factors. Different car models are equipped with different types of mechanisms
First of all, it is important to understand what can cause this structure to fail. Sometimes the reasons may lie in your driving style, which will have to be changed if you want to use the car further and longer. Most often, problems with gearbox elements are caused by:
Most often, problems with gearbox elements are caused by:
- abrupt gear changes, unnecessary effort, significant load on the mechanism during vehicle operation;
- installation of a low-quality backstage - even in a store, sometimes you can buy not an original spare part, but a fake;
- incorrect installation of the part - if there is a misalignment of even a couple of millimeters, the entire assembly can fail after just a few hundred kilometers;
- displacement during operation, causing uneven loads and pressure on the elements of the unit, the application of forces to change gears;
- failure of nearby parts - often the working elements of the rocker are located in close proximity to the transmission and are exposed to the influence of parts located nearby.
The cause of failure of this complex but fragile unit can be any mechanical impact. Therefore, regular maintenance and inspection of the gearbox is the key to trouble-free driving and avoids additional costs for repairing the gearbox rocker. Early diagnosis of the problem and taking preventive measures are more effective and less expensive than repairing a failed structure.
In most cases, the link does not break suddenly; this is only possible if it is subject to unexpected mechanical damage. Most often, the weak points of the assembly, such as plastic connectors, hinge joints, bearings and other elements, depending on the design of the scenes, will gradually fail.
An impending breakdown can be judged by the following signs:
- difficulties when switching certain gears, the need to apply force to move the gearshift lever to the required position, the feeling of an obstacle when moving the transmission handle;
- the appearance of a crunching sound when changing gears, louder when engaging first and reverse gears (this is due to the fact that the need to engage them occurs after the car has stopped, and in silence the sounds are heard better);
- vibration of the selector lever while the car is moving (this sign may indicate problems with the gearbox, but may be associated with the design features of the vehicle);
- difficulty in switching gears, possible slippage when driving, inability to shift caused by blocking the lever path, blocking of individual transmission functions;
- inability to change gears, jamming of the mechanism - this problem does not arise very rarely and certainly requires a visit to a car service center, since the car cannot move independently.
The latter case will require delivering the car to the station on a tow truck or in tow with the clutch constantly depressed. If the second gear is jammed, an independent trip to the service station is possible
The main thing is to exercise extreme caution while driving, otherwise you can burn out the clutch.
Above we have listed the main symptoms of malfunctions that indicate the need to repair the gearbox. Having noticed them, you should contact a service station for repairs as soon as possible.
WE ELIMINATE VIBRATION
Now you need to carefully inspect the bushing externally, after all, it is precisely because of it that the gearbox lever 2115 rattles. If there is any external damage that is too obvious and signs of wear, then you may have to look for a new part so that you do not have to repeat these manipulations in the future . Now let’s figure out what operations need to be carried out in order to understand how to adjust the rocker on a VAZ 2114:
- We remove the outer plastic braid of the bushing to free its iron body.
- Now we need to see if there are any signs of friction on it. Their presence will indicate that the size is incorrect. They will be especially pronounced if the sleeve is slightly longer than necessary. If this is confirmed, then these extra millimeters are the reasons why the VAZ 2115 gearbox lever rattles. In this case, you need to try on how much excess is in the hole and simply grind it off with a file, usually there are only 1-2 millimeters there.
- Now you need to select some kind of gasket according to the shape of the part, or simply wrap it with electrical tape so that it fits into place more tightly and then does not move.
So it became clear how to eliminate the rattling of the VAZ 2114 gearbox lever and why this generally happens. After our simple manipulations, the vibration should completely disappear, now the lever will always be in a calm state.
The described methods do not require any special knowledge and can be performed by an ordinary person in his garage with a minimum set of suitable tools.
VAZ 2107 box repair
Removing and replacing the VAZ-2107 stove with your own hands
Before starting work, you should thoroughly clean the outer surface of the gearbox and wash it with kerosene.
Important: before repairing the VAZ 2107 gearbox, it is necessary to drain the transmission oil from it. It's easier to do this before removing it from the car.
Further actions are performed in the following sequence:
- Remove the clutch fork from the gearbox.
- Remove the rubber coupling flange from the gearbox output shaft.
- Unscrew and remove the cross member securing the gearbox.
- Remove the speedometer drive.
- Remove the reverse lamp switch.
- Remove the cuff from the ball joint of the gearshift lever.
- Unscrew the nuts securing the gearshift lever housing cover to the rear wall of the crankcase.
- Remove the housing and gasket from the studs.
- Unscrew the nuts securing the gas exhaust pipe.
- Remove the mounting bracket and remove the mounting bolt.
- Unscrew the 5 nuts of the gearbox rear cover with a 13mm wrench.
- Unscrew the 10 nuts of the bottom cover with a 10mm wrench.
- Remove the cover along with the gasket.
- Unscrew another rear cover nut.
- Press in the 1st and 2nd gear rods using a screwdriver.
- Tapping the rear cover, remove it from the gearbox along with the gasket.
- Remove the plug for the reverse gear and 5th gear block (repairing the 5th gear of a VAZ 2107 often involves replacing worn gears or bearings).
- Remove 5th gear and reverse gear.
- Place the rear cover on wooden blocks and press out the 5th gear block bearing.
- Remove the sealing gasket.
- Press the oil seal out of the front gearbox cover and remove it with pliers (if it needs to be replaced).
- Remove the spring ring from the gearbox shaft.
- Unscrew the bolt securing the front bearing and remove it along with the washers.
- Unscrew the gear bolt
- Move the 5th gear fork and remove the gear block.
- Clamp the gear block in a vice.
- Remove the secondary shaft washer.
- Unscrew the cover bolts and remove the cover together with the gasket.
Important: repairing a VAZ 2107 gearbox involves mandatory replacement of all gaskets with new ones. Therefore, before work you should stock up on a set of gaskets.
- Remove the springs and fixing rods from the crankcase holes.
- Remove the retaining balls using a rubber bulb (by creating low pressure in it).
- Remove the 5th gear and synchronizer from the output shaft.
- Remove the ring.
- Remove the 5th gear clutch by sliding the shift fork.
- Remove the reverse idler gear from the axle.
- Remove the reverse and 5th gear shift rod, shift fork and rod bushing.
- Unscrew the bolt securing the rod.
- Pull out the locking pin.
- Release the locking ring associated with 5th gear.
- Remove the hub, spring washer, gear and reverse bearing from the shaft.
- Remove the front intermediate shaft bearing.
- remove the intermediate shaft.
- Remove the rear bearing ring part.
- Unscrew the bolt securing the 3-4 gear fork to the rod.
- Remove the 3-4 gear rod and fork.
- Pull out the locking pin.
- Unscrew the fastenings of the 1-2 gear fork.
- Remove the rod and fork of 1-2 gears.
- Unscrew the screws securing the secondary shaft bearing plate using an impact screwdriver.
- Pull the bearing out of the crankcase.
- Remove the input shaft.
- Remove the roller bearing from the shaft.
- Pry off the retaining ring of the secondary shaft intermediate bearing and remove the bearing.
- Remove the secondary shaft.
- Unscrew the nut and remove the reverse axle.
- Remove the 3-4 gear synchronizer and the hub shaft spring washer from the shaft.
- Remove the stabilizer clutch hub and 3rd gear.
- Press the secondary shaft out of the gear.
- Remove the shaft gear bushing and remove the gear and 1st gear synchronizer.
- Remove the 1st-2nd gear clutch hub and the synchronizer clutch.
- Remove the 2nd gear and bearing race.
- Remove the Belleville washer.
- Press the secondary shaft out of the bearing race.
- Pull out the retaining ring and 4th gear spring.
- Continue repairing the VAZ 2107 gearbox (5 mortar), disassembling other gears.
- Replace all worn parts with new ones.
- Reassemble the gearbox by performing the steps in reverse order.
Gearbox lever VAZ 2107: device and diagram, how to remove and install the handle
The VAZ 2107 gearshift lever is a simple but important part in the car interior. The lever allows the driver to change gearboxes directly. This unit is considered relatively reliable on these models, however, due to the age of many machines, system breakdowns or malfunctions cannot be ruled out.
Location and design of the VAZ 2107 gearshift lever
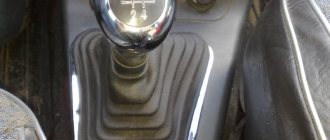
The VAZ 2107 gearshift lever is located directly in the central part of the cabin in the classic place at the bottom.
This model’s unit is made of a steel tip with a plastic knob; the length of the lever reaches 40 cm, which is clearly atypical for modern cars.
Such a long length is due to the archaic design, the low location of the tunnel relative to the driver’s seating position, and also partly due to the rear-wheel drive of the car.
Over time, the knob wears out and becomes unusable, as it is made of mediocre quality plastic. Therefore, many owners replace them with non-standard elements of various shapes.
At the same time, the positive side of the design and device of this unit is the absence of vibrations on the lever, which is a big drawback of other AvtoVAZ models.
In terms of design, the lever is a classic representative of 70s technology, since the internal part is attached to the rocker, there is no cable, switching occurs by switching the bushings and moving this rocker. Subsequently, the rocker transmits torque to the remaining clutch units and directly to the gearbox.
Moving the flywheels and changing torque changes the transmission. The inner part and structure of the handle is covered with a rubberized casing, which also tends to wear out quite quickly. It is with the help of this part that the driver changes gears depending on the road situation, in accordance with the diagram located on the knob of the unit.
How to change the gearshift lever on a VAZ 2107 with your own hands
The need to replace the VAZ 2107 gearshift knob can be caused by various reasons. Thus, as a result of natural wear, the internal bushings and part of the lever may become unusable, and accordingly, shifting gears will become difficult.
Heavy gear shifting, a pronounced crunch and extraneous sounds in the area of the casing are the first signs of a malfunction. Since the bushings and hinges are made of fairly fragile plastic, breakage is only a matter of time. It is quite rare that the lever itself breaks on the side visible from the interior along its length.
This phenomenon may occur due to excessive mechanical stress on the handle or an accident, as a result of which the mechanism will be broken.
Most often, removal of the VAZ 2107 gearbox lever is required as a result of wear of the knob or internal parts, as well as the casing, which, with intensive handling, wears out over 60-70 thousand kilometers.
At the same time, it is quite possible to change the gear lever of a VAZ 2107 yourself.
To do this, you will only need a small set of screwdrivers of various shapes, and also in case of troubleshooting, you will need a repair kit for the VAZ 2107 gearbox lever along with keys for 12, 10 and 14.
Attention! The repair kit is a set of plastic bushings and hinges, which are located in the internal part of the unit and most often fail. Also, in some cases, such a kit includes a special lubricant, which is used to treat new parts for better articulation and subsequent operation.
How to remove the gear knob VAZ 2107
The procedure for removing the VAZ 2107 gearbox lever consists of several stages:
- First you need to put the lever in neutral gear. And the car itself is on the hand brake.
- Then it is necessary to dismantle the protective casing, which is located directly on the floor tunnel itself. To do this, use a screwdriver to pry up the plastic latches and remove the casing through the lever.
- After this, separate the knob from the lever if it is necessary to change it. This part is firmly attached to the handle, and to dismantle it it is necessary to apply quite a lot of force. When installing a new part, in some cases silicone grease or sealant is used to seal.
- Then it is necessary to dismantle the lever itself, which is secured to the system using two bolts with 12-head heads. With bolts, the handle is attached to the rocker and the rest of the clutch system. After separating this part, you can continue disassembling the system if necessary. The rocker is removed by separating the bushings and hinges, also using a Phillips screwdriver. The damaged lever is subsequently replaced with a new one, like the rest of the damaged elements.
How to assemble a VAZ 2107 gearshift lever
Assembly of the unit occurs in the reverse order, also in several stages:
- After using the repair kit and replacing used parts, reassembly must be done, starting with the gearshift bushings. They are located behind the casing and the rocker directly in the floor tunnel in the car interior. The bushings are attached to the hinges with the obligatory use of silicone grease. This substance is necessary to eliminate mechanical damage that occurs as a result of mechanical friction.
- After this, you need to secure the new lever to the rocker using a 12mm wrench by screwing two bolts. Also, after securing the joints, they can be treated with lubricant.
- After securing the handle, it is necessary to mount the casing, securing it to the standard mount in plastic latches. This procedure must be carried out with caution, since the standard fasteners and places for latches are quite fragile and can easily break off if handled carelessly.
How to install the gearshift lever on a VAZ 2107
Installation of a new mechanism with similar or non-standard dimensions is carried out according to the same algorithm that is carried out when repairing a unit.
However, in the case of installing non-standard equipment, it is necessary to take into account the mounting points, which will have to be modified by installing additional fastenings. When installing, it is necessary to center the new element when attaching it to the rocker.
To do this, it is also necessary to move the gearbox to the neutral position and bolt the rocker to the lever, aligning it in the center relative to the axis of the rocker.
How to move the gearshift lever to a VAZ 2107
Moving the unit to another location is extremely rare, as it requires significant intervention in the design of the drawstring itself, as well as the handle. Most often, the lever is shortened and the rocker is moved closer to the driver.
Also, when converting a car into a sports car, changes are made to the design: the rocker is replaced with cables, and the lever is replaced with a sports car, which requires a radical redesign of the entire gear shift scheme.
SWITCH MECHANISM
In the old box it is located at the bottom and bathes in an oil bath. After spending the night in the cold, the oil thickened, making it difficult to change gears for the first few kilometers. In addition, at the bottom of the box there were clamps for the rods and reverse forks, a reverse light switch, and a gear selection seal - all of these are potential sources of leakage. Sealants and other materials, of course, helped, but the problem was radically solved only by moving the mechanism upstairs.
The new mechanism is a separate module. It can be installed last and removed if necessary without disassembling the box. This is technologically advanced not only in production, but also in repair. Already at the concept stage developed by the VAZ team, a selector grill appeared in it, clearly repeating the gear shift pattern and setting the lever stroke when selecting gears. The mechanism includes a lock against accidental reverse gear, which is only accessible from neutral.
Having embodied the concept in metal and made it work correctly, the unit was sent for fine-tuning to the German company (Scha¨ffler), which has long been engaged in the engineering and production of engine, transmission and chassis parts. One of the most interesting changes proposed by foreign experts is the so-called three-dimensional central plate instead of several return springs and locks. Its spatial shape is calculated by a complex computer program, and the manufacturing equipment requires high precision. After all, the central locking ball walks along this plate, and it is this plate that sets the necessary forces when turning on and selecting speeds.
The characteristics of the mechanism were selected on the original simulation stand. The tester sits down on the seat and begins to go through the gears, while the automatic system imitates the shift pattern, forces and lever strokes implemented on a specific production car. You can also upload your own settings. Don't like an overly tight lever? A couple of taps on the keyboard and the effort is reduced. So, step by step, we selected the optimal settings for the “eighty-one”. The computer processed the data and produced parameters for constructing an accurate mathematical model, according to which those very tricky central plates were made.
Manufacturers and prices of analogues
Gear shift levers are also produced by other manufacturers:
- Sphere AutoBra 2138-K (together with a leatherette cover, with red inserts) – 390 rubles;
- Sphere AutoBra 2138-SR (together with a leatherette cover, completely black) – 390 rubles;
- Sphere AutoBra 2140-CH (together with a leatherette cover, black, perforated surface) – 450 rubles;
- Sphere AutoBra 2141-Sr (together with a leatherette cover, the lever itself is gray) – 400 rubles;
- Azard KPP-00132 (black set with genuine leather frame) – 480 rubles.
How to change the gear knob on a Priora
In order to remove the gearshift knob on a Priora, as well as to carry out any replacement or modification operations with it, it is necessary to dismantle the control system. So, for example, you can change a part by installing the version developed for Vesta. But the easiest way is to replace it with a standard part: you don’t have to make any modifications.
We remove the Priora gearshift knob, following the standard algorithm:
- Tighten the handbrake so that the Priora is locked in place;
- Remove the cover - just lift it to the top;
- It is better to heat the plastic part with a hairdryer and use a screwdriver to remove the sign with the painted speeds;
- Having rested a piece of a pre-prepared square at the bottom of the lever, use an adjustable wrench to make a stop so that the part goes up.
Watch this video for more details:
To remove the gearshift lever on a VAZ 2110, follow these instructions:
- Remove the engine splash guard.
Disconnect the ball joint from the lever or remove it altogether.
We hold the extension with a “24” wrench and use a wrench of the same size to unscrew the extension nut.
Next, knock out the bolt and remove it.
Using two “19” keys, unscrew the nut from the bolt that secures the lever to the body.
We remove the lever from the bracket, having previously knocked out the bolt.
The next step is to remove the washer from the stretcher, as well as the lever.
Behind the large washer on the extension there are three washers for adjusting the angle for the longitudinal inclination of the steering axis.
To unscrew the brace from the cross member of the front suspension, use a pair of 24mm wrenches, unscrew the nut, remove the washer and remove the brace from the silent block.
Adjusting washers can also be installed on the extension at the front.
To replace the silent block of the lever, you need to press it out in a vice with pieces of pipe. Before installing a new silent block, you need to moisten it with soapy water to make it easier to press it back into the lever.
The silent block is knocked off the guy wire with a chisel.
The second one is dismantled in the same way.
We press the new silent block into the cleats and, striking the drift, press it to the end (the diameter of the drift is 8 mm). We place the drift in the windows in layers of rubber (there are 3 of them).
- Assembly is carried out in the same reverse order. All connections are tightened only when the car is on its wheels.
We remove manual transmission 2181 on our own — Lada Granta, 1.6 l., 2013 on DRIVE2
Well, the moment has come when it needs to be repaired after installing the lock, everything goes wrong. I came from the south and inspected the seals, there was a barely noticeable stain from the seal, a month later there was a puddle on the protection and half of the gearbox housing, running from both seals. A vibration appeared at 100 km/h, not because of the wheels, but just in the gearbox, which is why the seals ground out. In general, I don’t have money for the service, I pick it myself. The plans include replacing all bearings, adjusting the preload in the differential, seals and 2nd gear synchronizer.
Today I managed to do a lot and it was only in 3 hours.
We remove the battery, air filter housing, corrugation, disconnect the air flow sensor and adsorber connectors
remove the plate under the battery 2pcs, disconnect the connectors from the reverse and speed sensors, remove the shift cables from the movable ball-shaped joints and then the plate securing the cables.
disconnect the clutch cable, remove the starter,
hang out the front of the car, climb down
This is how I found her a week ago
then drain the oil from below, unscrew the plate at the flywheel
now you need to remove the drive somehow
you will also have to remove the left lever, on the right we unscrew only the ball
We knock down the drive by additionally unscrewing the rear engine mount
Don't forget to unscrew the nut with the rod going to the manifold
We also unscrew the bolt of the lower fastening of the ignition module; it is screwed into the gearbox.
Remove the last support to the body, 3 nuts and 2 bolts in the cushion. Having previously supported the engine with a jack. Well, unscrew the last 3 bolts from the block, 2 on top and 1 on the front. After which you can remove the gearbox.
Removing the gearbox
Price: 10,000 ₽ Mileage: 38,500 km
Page 2
Well, the moment has come when it needs to be repaired after installing the lock, everything goes wrong. I came from the south and inspected the seals, there was a barely noticeable stain from the seal, a month later there was a puddle on the protection and half of the gearbox housing, running from both seals. A vibration appeared at 100 km/h, not because of the wheels, but just in the gearbox, which is why the seals ground out. In general, I don’t have money for the service, I pick it myself. The plans include replacing all bearings, adjusting the preload in the differential, seals and 2nd gear synchronizer.
Today I managed to do a lot and it was only in 3 hours.
We remove the battery, air filter housing, corrugation, disconnect the air flow sensor and adsorber connectors
remove the plate under the battery 2pcs, disconnect the connectors from the reverse and speed sensors, remove the shift cables from the movable ball-shaped joints and then the plate securing the cables.
disconnect the clutch cable, remove the starter,
hang out the front of the car, climb down
This is how I found her a week ago
then drain the oil from below, unscrew the plate at the flywheel
now you need to remove the drive somehow
you will also have to remove the left lever, on the right we unscrew only the ball
We knock down the drive by additionally unscrewing the rear engine mount
Don't forget to unscrew the nut with the rod going to the manifold
We also unscrew the bolt of the lower fastening of the ignition module; it is screwed into the gearbox.
Remove the last support to the body, 3 nuts and 2 bolts in the cushion. Having previously supported the engine with a jack. Well, unscrew the last 3 bolts from the block, 2 on top and 1 on the front. After which you can remove the gearbox.
Removing the gearbox
Price: 10,000 ₽ Mileage: 38,500 km
www.drive2.ru
How to dismantle the gearbox lever of a VAZ 2107
If you had problems with play in the bushings, then you need to purchase a repair kit for the VAZ 2107 gearbox handle in advance and after dismantling it.
Before starting work, prepare a screwdriver.
Before reinstalling, fully assemble the rod and bushings, slide it onto the lever, and push down sharply to seat it in place.
If you need to completely replace the rocker, then add a 10mm wrench to the screwdriver (preferably a socket or socket):
- remove the decorative panel;
- unscrew the boot;
- use a 10mm key to unscrew the mechanism;
- remove it from the box.
After repair or replacement, assembly is performed in the reverse order.
The quality of bushing repair kits leaves much to be desired and the backlash of the rod remains quite large, so some, instead of plastic and rubber bushings, simply select a simple hose according to size and attach it to it.
The easiest way to eliminate rattling gear lever is to install a spring
The simplest solution would be to install a spring that will hold the gearbox lever and prevent it from vibrating and making an unpleasant rattling sound. The best part about this modification is that we don’t have to disassemble anything! The photo below shows how to install the locking spring (and they also say that you can wrap the gearshift lever with a medical tourniquet along with the spring for a tighter fixation).
A more reliable way to combat gearbox rattling is to install plastic or rubber washers on the gearbox axle. True, this method takes a little longer and requires a little disassembly.
In order to install rubber or plastic washers on the gearbox axle you will need:
An ordinary plastic lid from a glass jar (or any soft plastic);
- Scissors;
- Key for 10 and 13;
- File; Screwdriver.
First, you need to remove the casing from the gearshift knob and lift it up (there is no need to remove the gearshift knob itself). Then unscrew the nut by 13 (the photo below clearly shows where it is located).
Then use a Phillips screwdriver to unscrew the screw (see photo below).
After this, unscrew the two nuts by 10 (see photo below).
We remove the bolt, bushing and washers and generously lubricate them with thick lithol (photo below).
You need to cut a washer out of plastic to fit the sleeve. After this, we return the entire gearbox mechanism to its original position by adding two plastic (or rubber) washers to the small slots along the edges (photo below).
The washers, as can be seen in the photo above, must be inserted to the right and left of the bushing (the bushing will, apparently, have to be sharpened a little).
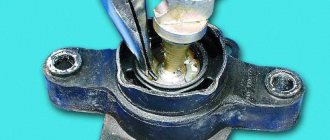
Life hack: how the gearshift knob rattles (oscillates) on a Priora
Rattling occurs due to the fact that there are too large gaps inside. The amplitude of vibrations of the internal parts increases, a knock appears along with vibration - this is how the Priora gearbox knob rattles. The remote bushing of the lever is the source of vibration. You can fix this problem in the following ways:
- Installing the washer - place an additional plastic washer between the rocker and the gear shift knob. Its parameters are an internal radius of 9 mm, an external radius of 13.5 mm. Select the plastic so that it is soft enough. This is necessary so that frosty temperatures do not destroy the bushing;
- Replacing the bushing with a fluoroplastic one. Standard – metal;
- Shortening the bushing means sharpening the gearbox remote bushing by 2 mm on both sides, and then coating the part with lubricant before reinstalling it;
- A short-stroke rocker will eliminate vibrations - the alteration will be quite serious, but switching on the desired speed will be easier, but you will have to make a lot of effort to move the lever.
Often rattling is removed using a repair kit. It will get rid of rattling if there was none before.
Material selection
The choice of material for covering is a serious and responsible matter: the driver will touch it during operation for several years. Therefore, the material should be pleasant to the touch, comfortable, wear-resistant, and breathable. The choice largely depends on the financial capabilities of the car owner and his tastes. People have different tastes: some like bright colors, others want to use almost snakeskin. Many people strive to stand out with interior decoration, to show individuality and originality.
The gear shift knob is made from different materials. Reupholstering the gear knob with leather is the best option in terms of price and quality ratio. The most popular is genuine automotive leather. It has qualities that are in many ways superior to furniture and haberdashery leather: more moisture-resistant, wear-resistant and strong. Analogs can withstand operating conditions (temperature changes, frequent contact) for no more than 2 months, automotive leather will last 5-7 years.
Perforated leather
Leather for cars has a special polymer coating that protects it from mechanical damage. In addition, thanks to the polymer layer, car leather is resistant to ultraviolet rays, chemical exposure from alcohol, gasoline, oil, endures frequent stretching longer, and the paint is highly resistant to abrasion.
An alternative to genuine leather are artificial materials: eco-leather and artificial leather. For the production of eco-leather, polyurethane is used; its composition contains 70% of the substance. Leatherette is made from polyvinyl chloride (PVC). The use of polyurethane allows eco-leather to “breathe”, which distinguishes it from artificial leather. The cost of artificial materials is much lower than natural leather, so eco-leather is gaining popularity.
The covering material can be faux suede such as Alcantara. It is a material with a rough surface, pleasant to the touch. The roughness prevents the hand from slipping. The Alcantara-covered handle looks very aesthetically pleasing. In winter, when touching the material, a feeling of warmth is created, and in summer, on the contrary, suede gives the effect of coolness.
It is possible to reupholster with rubber material with an adhesive backing. They are easy to finish and are inexpensive.
Perforated leather is most convenient, as it is softer and more elastic than smooth leather. True, the pores should be small so that dirt does not clog. Smooth leather is more resistant to wear. The thickness of the material should be from 1.2 to 1.4 mm. The color can be any - it must match the overall color scheme of the interior. The classic option is black.
Gearbox cover: price and manufacturers
Even a malfunction of such an insignificant part as the gearshift lever cover can cause quite a lot of trouble. There are several options for a box cover that can be installed instead of a torn standard one:
Autobra 2183-CH. Black, made of genuine leather – 400 rubles.
Universal options. Manufacturers often present a cover (boot) for Lada Priora along with a lever. It can be completely different: black, two-color, with or without edging. You don't always want to change everything at once, so searching for a new boot may take some time.
DIY reupholstery process
Reupholstering the interior yourself is a painstaking task that can take you more than one day. All work can be divided into several stages:
- car seat reupholstery;
- ceiling reupholstery;
- door reupholstery;
- front panel reupholstery;
- armrest reupholstery;
- re-upholstering the steering wheel and gear knob.
In order for the work to go faster and better, you should follow several general rules that apply to both large parts with complex shapes and smaller elements of the car.
- All parts must be dismantled, even the smallest and most inconspicuous ones. It may seem to you that pasting, for example, a gearshift knob can be done inside the cabin, but this is not so. The seams will turn out crooked, and the space around will be covered with glue.
- Don't forget to wash the parts and remove any old coating.
- If there is serious damage to the surface to be pasted, for example, dents or deep cracks, they must be restored. To do this, you will additionally need a special putty composition and primer for plastic.
- Leather, both natural and artificial, is an elastic material, so it must be stretched well. If you don't do this, the coating will end up sagging unsightly. To make the leather stretch better, soak it for 20–30 minutes in hot water, but not boiling water. You can determine the required temperature without a thermometer. Use water that you would bathe in yourself.
- During the process of covering the material, warm it up with a warm stream of air from a hair dryer. If you don’t have it in your arsenal, you can replace it with a powerful household one. However, this will affect the elasticity of the skin, so it is better to use a special tool.
- It will be quite difficult to perform some operations alone. So call a reliable friend for help.
When cutting material, be economical. Remember school labor lessons and crafts made from colored paper. You need to arrange the parts patterns so that there is as little empty space between them as possible. This will reduce the amount of trimming.
Upholstering the seats
To ensure that the seats are in harmony with the rest of the interior, you can simply sew covers for them. This work is perhaps one of the most difficult, since you need to be able to make patterns according to the parameters of the chairs, and also use a sewing machine. It is best to contact a car workshop for this. But if you are determined to do everything yourself, then read the instructions carefully.
- Measure the height and width of the seat cushion and backrest, as well as the headrest.
- On paper or transparent polyethylene, make patterns of the parts, taking into account all measurements. For greater accuracy, apply the polyethylene directly to the seat and trace the contours.
- Cut out the resulting parts.
- Attach the patterns to the wrong side of the material and outline them with chalk. Leave about 2-3 cm as a margin for later sewing together.
- Using sharp scissors, carefully cut out the leather pieces.
- Before sewing the elements together with a machine, process them with a hand basting stitch. This will ensure that you receive the correct form. Do not pull the parts tightly together. All you need at this stage is to combine the material to get an idea of what the finished product will look like. In case of alteration, such a seam is easy to rip out. To prevent the elements of the product from falling apart, secure them together with pins.
- Carefully try on the resulting covers. If the shape matches and no changes need to be made, start working with the machine.
- If you chose thin leather, but want your covers to be thicker and more durable, use this trick: make similar patterns from thick mattress fabric, and then sew them with leather back to back. If desired, the internal space can be filled with foam rubber. This will make the covers even softer.
- Don't forget to add hooks and garters to secure the cover to the chair.
- If the seats have airbags installed, do not sew these areas on the cover with a sewing machine. It will be much easier to rip a hand stitch.
During the fitting phase, make sure that the covers do not interfere with the operation of the seat belts.
Carefully measure the length and width of all seat components Make a pattern for the front seat, based on the diagram Make a pattern for the rear seat cushion, based on the diagram Make a pattern for the rear seat back, based on the diagram Connect all the parts as shown in the figure
Let's move to the ceiling
Despite the fact that the ceiling has a fairly large surface area, it is quite easy to cover it with material. This is due to the lack of a pronounced relief, such as on the front panel.
- First of all, remove all hanging elements from the ceiling, and then dismantle it. The dismantling principle will vary depending on the car model. This usually requires removing the front seat. The correct procedure is described in detail in the vehicle's operating manual.
- Take a stiff sponge and remove the old coating.
- The old glue will remain on the ceiling. It should also be removed. The easiest way to do this is with a degreaser.
- In order to prepare the surface for applying glue and improve adhesion, the ceiling must be sanded. Use fine grit sandpaper.
- Pasting begins from the center of the ceiling. You need to apply a 10 cm long strip of composition to the central part of the surface.
- Take a piece of material of the required length and attach it to the ceiling. Press the central part and then smooth it with a rubber spatula.
- In order to glue the rest of the skin, you need to apply glue in a similar way at intervals of 15 cm. After each strip, the material must be pressed and smoothed. Don't forget about tension. This way you will avoid sagging.
- Make sure that no folds form. When the material is completely glued, iron it further and then dry it with a hairdryer. When the glue hardens and the leather dries, the product will take its final shape.
- To complete the work, the edges need to be wrapped on the back side of the ceiling and glued, and the excess should be cut off.
Before you start gluing the ceiling, remove the old coating with a hard sponge. Apply thin strips of glue at regular intervals and stretch the material. Press the material and dry it with a hair dryer.
Due to the impressive volume of the ceiling, you may need an assistant during the process of reupholstering it. Have one person stretch the leather while the other applies glue and presses the material to the surface. This way the work will go much faster, and the result will be of better quality.
Armrest reupholstery
In the cabin, only the upper part of the armrest is visible, so it is enough to cover only it. It's very easy to do.
- Remove the armrest cover.
- The new sheathing can be glued directly on top of the old covering.
- Cut a piece of material long and wide enough to completely cover the part.
- Apply a thin bead of glue to one of the edges of the armrest and adhere the material to it.
- Heating the skin with hot air from a hairdryer, stretch it and glue the opposite edge.
- Stretch the leather over the sides of the lid and glue them.
- Cut off the excess.
Glue the skin first to the top and then to the sides
If you want to cover the side parts of the armrest with material, then you will have to make a pattern. There are two ways to do this. The first is to measure the length and width of each of the edges of the armrest, and then draw up a pattern using these measurements. The second method is simpler and more accurate; we will describe it below.
Gearbox knob trim technology
The easiest way to tighten the gear knob is. However, this process uses a certain method, which will also be useful to you when pasting the steering wheel, doors and front panel. In addition, you can use it by covering the entire armrest.
- Wrap the dismantled gear knob with cling film.
- Cover it tightly with masking tape on top in several layers.
- Use a marker to mark the locations of future seams. To do this, you need to trace the curves of the handle.
- Use a utility knife to cut the tape along the lines. If the handle has a standard shape, then you will most likely end up with two parts.
- Attach the resulting patterns to the wrong side of the material, and then trace them.
- Cut out the leather pieces and then sew them together.
- Turn the resulting product out and then pull it onto the gearshift knob. To make the leather stretch better, do not forget to soak it in hot water.
There is another method of covering this part with leather. For it you do not need to sew the material after cutting. Using a sewing machine, make stitches along the edge, retreating 3 mm into the part. The stitches can be made with threads to match the skin tone, or they can be contrasting to create a certain image. Next, you will need to place the parts on the glue, and then use a needle and strong thread to lace the resulting cover, passing the needle under the stitches.
Cut the masking tape along the lines Cut out the leather pieces Sew each piece at a distance of 3-5mm from the edge Pass the needle and thread under the stitches and pull the pieces together
There are various lacing methods: macrame, sports, herringbone and others. Choose the one that seems most aesthetically pleasing and easy to implement.
Choose the type of lacing that is most convenient for you
Improving the steering wheel
Making a pattern for re-upholstering the steering wheel is done in the same way as described in the previous section: the surface is wrapped with film, and on top with tape. Lines are drawn with a marker at the seams. They need to be done on the inside of the steering wheel, as well as on the edges of the spokes.
- The resulting parts need to be transferred to the material, retreating about 2 mm inward so that the skin does not sag. Cut out the resulting elements and then sew them together.
- Sew the edges of the parts on a sewing machine, just as described in the alternative option for covering the gearshift knob.
- Attach the cut out parts to the steering wheel. To prevent the material from creeping, place it on a thin strip of glue. There is no need to achieve strength at this stage. In any case, you have lacing in front.
- Take the needle with the thread threaded, and then, passing it under the stitches, lace the braid. You can use different types of lacing for this.
- It is best to start lacing from the bottom of the handlebar and then move counterclockwise.
- Don't forget that you are working with leather. It needs to be constantly straightened and tightened.
- Dry the completely laced braid with a hairdryer. After this, it will take its final form.
We recommend: Functions and purpose of engine oil in an engine
Cover the steering wheel with masking tape in several layers. Remove the masking tape from the steering wheel. Transfer the contours of the parts onto the material. Sew the parts together. Attach the resulting cover to the steering wheel. Pass the needle under the stitches on one side and the other of the cover and pull the sides together.
To make the interior look more stylish, use threads of the same color and the same seam for lacing the covers on the steering wheel and gear knob.
Door reupholstery
The pattern for covering the doors is also made using masking tape. Be sure to mark the locations of the door handle, as well as the window handle. You will need to cut out these areas. The patterns are traced on the material, and then the resulting parts are cut out.
- Before applying glue, all plastic elements must be thoroughly sanded and then degreased.
- Along the line bordering the glass, apply a thin strip of glue and press the material to it.
- Directing a stream of hot air onto the skin, stretch it across the entire door. Watch the holes for the handles.
- Glue the middle and edges of the product in this way.
- To make the coating adhere better, smooth it with a rubber spatula.
- Cut off the excess edges.
- When the door covering is finished, wait for the material to dry completely.
Cover the surface of the door that you will cover with tape with tape. Draw lines on the places of future seams, and then cut the tape along them. Cut the fabric in accordance with the shape of the surface to be covered. Before applying glue, the plastic surface must be sanded and degreased. Press and smooth the leather.
Front panel reupholstery (torpedo)
Reupholstering the front panel is one of the most difficult processes when upholstering the interior, so it is best to do it last. If the part has many curves, then first you need to make a pattern. This is done using masking tape, according to the same principle as when making a cover for the steering wheel and gear knob.
- Trace patterns from masking tape onto the sheathing material and add about 10 mm for the seams.
- Connect the parts with a basting stitch in the same way as you did when making chair covers.
- Try on the resulting product. If its shape matches the shape of the panel, process the seams using a sewing machine.
- Since plastic is used to make the panel, it must be sanded with a fine-grain abrasive, and then the surface must be degreased.
- Apply several strips of glue to the prepared surface and attach the resulting cover.
- Smooth out the material using rubber spatulas or rollers. Make sure all seams are in place.
- Dry the product with a hairdryer.
Cover the front panel with a thick layer of masking tape Cut out the parts from masking tape Transfer the contours of the parts onto the material and cut them out Sew the parts together and glue the material to the panel
If the torpedo has a simple rectangular shape, then the re-upholstering process can be significantly simplified and the step of making a pattern can be skipped. Simply cut a piece of material that is long and wide enough, then glue the leather to the top and stretch it over the entire panel. At the same time, help yourself with a stream of air from a hairdryer and smooth the material with a spatula.
Handle from Vesta to Priora
A detail from Vesta on Priora attracts the attention of many VAZ-2170 owners. Even analogs cannot compete with it. The insert on the gearshift lever itself is made of high-quality black mirror plastic with a silver edging. The catalog number of the standard part for the VAZ 2170 assembly is 8200-379945. Cost with dust cover – 2,000 rubles.
It is important to note that there will be no problems with installing the gear shift part - the mounting is similar. Completion of minor tuning should be indicated by a thorough check of the lever's functionality. It is better to detect the lack of “response” of the box while the car is standing still. Carry out a little diagnostics, then hit the road.
Sources
- https://avtonomnaya-gazifikaciya.ru/priora/zamena-ruchki-pereklyucheniya-peredach.html
- https://fastmb.ru/autoremont/190-kak-snyat-rychag-pereklyucheniya-peredach.html
- https://CarsUp.ru/transmissiya/sborka-rychaga-kpp-vaz-2107.html
- https://e-motors96.ru/prochee/zamena-rychaga-kpp-na-vaz-2101-vaz-2107.html
- https://moto-sol.ru/diagnostika-i-remont/kak-snjat-ruchku-kpp.html
- https://3xru.ru/kak-snyat-rukoyatku-pereklyucheniya-korobki-peredach/
Difficulty engaging second gear, video
5 convenient gear shift knobs from AliExpress
The owner of the ten may encounter the same problems as when turning on the first speed. In any case, malfunctions are due to the following reasons:
- abrasion of gear teeth. At the first stages, the speed turns on poorly, but over time it will start to crash. Therefore, surgical intervention is required;
- there is insufficient adhesion of the gear to the gear shift clutch;
- the speed is switched off when hitting uneven road surfaces. In this case, the problem is the clutch.
Sometimes, to eliminate the knockout of the second gear, it is enough to replace the clamp. If replacement does not achieve the desired result, then a major overhaul is required.
Adjustment in this case will not solve the problem. Carrying out repair work yourself is quite difficult. Unlike adjusting and replacing oil seals, major repairs require professional skills.
Nuances, video
It should be noted that the gearbox is a fairly stable component of the vehicle. Compared to other units, breakdowns occur much less frequently here. At the same time, you need to remember that for the normal functioning of the box, you should change the oil in a timely manner, and use products from trusted brands. In terms of their performance, the gearboxes are almost identical. If we are talking about front-wheel drive cars, which include the VAZ-2110, then you can use oil poured into the power unit. If we are talking about rear-wheel drive VAZs, then special oil is provided for them. Sometimes car owners notice an oil leak. This is caused by weak fastening of the box and crankcase. The problem is solved with the help of seals, as well as careful tightening of the bolts.
If problems arise with the box, first of all it is necessary to adjust the drive and replace parts that have failed as a result of physical wear.
If the car owner has the skills and experience, then repairing the gearbox of a VAZ-2110 car can be done with his own hands. In other cases, it is better to visit a trusted auto repair shop and eliminate the deficiencies after professional diagnostics.