VAZ 2114 starter repair. Do-it-yourself Bendix replacement
Further in the article we will talk about how to independently diagnose and repair the VAZ 2114 starter .
A faulty starter is characterized by the following indicators:
- A sharp drop in power due to insufficient starter rotation. You will probably have to repair the starter and replace the relay.
- Voltage surges occur.
- Idle rotation of the starter (without engine rotation). The retractor starter will need to be repaired.
- Starter disconnection is delayed.
- The starter does not operate when the ignition key is turned. This symptom is the result of damage to the bendix; to restore operation, it will need to be replaced.
- The starter turns, but the engine does not start.
Worth checking out:
- Installation of a new VAZ 2110 starter
Signs of starter malfunction
- The solenoid relay turns on but makes a knocking noise. It is possible that the relay winding has poor contact with ground. If the wiring and battery are in good condition, you need to open the cover of the starter switch in the relay and stretch or change the ground wire.
- The solenoid relay is activated, but the motor does not turn over. Remove the brush holder cover and check the brushes. In the normal state of the brush, it is pressed tightly against the commutator. If the brush is worn out, the spring will rest against the brush holder and there will be no necessary contact. The height of the brushes must be no less than 12 mm. Replace worn brushes. If there are scratches or marks, the commutator must be sanded. If there is no result, it is better to have the engine checked by a specialist; without special equipment and appropriate skills this will be difficult to do.
- The anchor does not rotate or rotates slowly. There may be a voltage drop in the electrical network. If the electricity supply is in normal condition (battery, terminals, ground wire and brushes are checked). The solenoid relay is disassembled. The contacts are checked (they may burn), the contact disk is turned over to the other side, and the contact bolts are rotated 180 degrees.
- The solenoid relay does not work:
- The armature winding of the relay has burned out, most often this occurs due to the short circuit of the winding turns. You can determine this by connecting the contacts with a screwdriver. If the result is negative, the relay armature must be replaced.
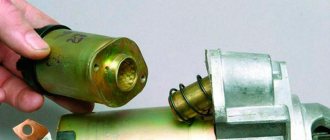
- The contacts (nickels) are burnt or oxidized. In this case, the solenoid relay is disassembled. Inside there is an armature (a metal cylinder with an internal winding), a spring and a rod. The rod and the hole through which it runs are most often clogged with oxide. Clean with fine sandpaper. The nickels may be oxidized, and their contact surface may also be burnt. Clean and replace if necessary.
When the starter is turned on, the armature rotates and the flywheel stands still:
- The freewheel (Bendix) may be slipping. It should be disassembled and replaced. If possible, repair broken parts (pushers, rollers, gears). Clean and polish the surface of the coupling.
- The buffer spring on the drive is weakened or the drive gear ring teeth are knocked down. The spring must be replaced. You can try to correct the gear, but this is temporary; a broken gear will not last long.
- When the starter rotates the crankshaft, an extraneous noise is clearly heard. The armature shaft neck and bearing bushings are worn out or have too much wear. Also, during operation, the armature can touch the outputs of the starter poles. Grind the armature shaft. Change bronze and brass bushings on the shaft, under the bearings. Tighten the screws and pole fastenings; if necessary, replace the fastening bolts.
During operation of the starter, and especially in the cold season. If the starter has not been disassembled for maintenance for a long time, condensation begins to accumulate in it over time. This will not only lead to the formation of oxide, but also to the fact that ice may form inside in cold weather. In this case, of course, you can tap the retractors with a hammer or warm up the starter housing with a torch or blowtorch. But this is temporary, not immediately, but in a month this breakdown will show itself again.
From this we can draw a conclusion. It is necessary to carry out vehicle maintenance on time (especially before the onset of cold weather), this will avoid many unnecessary problems with the car.
Didn't find the information you are looking for? on our forum.
We recommend reading:
Installing rings on a VAZ 2108 piston
VAZ 21124 for cold troit. Main reasons
How to clean the carburetor on a VAZ 2105
The car jerks when starting the VAZ 2114, several main reasons
VAZ 2107 injector how to remove the fuse box on
Ignition switch VAZ 2101. Design, diagram and description of possible malfunctions. Replacement video
VAZ cooling system pressure
The fog lights on the VAZ 2114 stopped working
The starter continues to operate after the engine starts
When the engine starts and you release the ignition key, the power supply to the traction relay stops and the bendix returns to its original position under the action of a spring.
If power continues to flow, this most likely indicates soldering of the main contacts in the solenoid.
The first thing to do is exclude the battery and generator from the list of possible causes.
Don't forget that the starter only works properly if the battery is fully (or sufficiently) charged.
Therefore, if the engine does not start, try starting it from an external power source using special connecting wires or use a jump starter.
After a successful start, it becomes clear that the problem lies in the electrical system.
Replacing the VAZ 2114 starter is required when its operation is disrupted, and without this mechanism starting the engine is almost impossible. Let's look at the causes and symptoms of element failure, and also consider step by step how to replace the starter on a VAZ 2114.
This video talks about what to do if the starter does not turn.
DESIGN FEATURES AND OPERATING PRINCIPLE
Where is the starter relay on the VAZ-2114: photo and location + video
The starter on the VAZ 2114 (5712.3708) has an operation cycle, which can be divided into four main stages:
- After turning the ignition key, the fourteenth battery in the contact chain begins to supply power to the starter and traction relay;
- The Bendix gear drive (overrunning clutch) is connected to the flywheel;
- At the moment the gear drive is connected, power begins to be supplied to the electric motor of the unit;
- The electric motor begins to spin the drive, the revolutions of which are transmitted to the crankshaft of the car, as a result of which the engine starts. When the engine speed begins to exceed the starter speed, the drive and the crankshaft are disconnected.
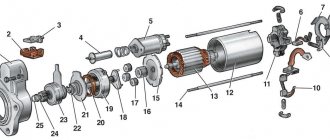
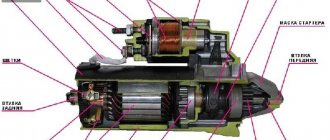
Now let's look at the design features of the fourteenth starter. In the diagram below you can see the main elements of the device.
Starter device
- Housing - is made in the form of a cast steel cylinder at the ends, closed with lids, inside which the cores and the exciting winding (stator) are located;
- Solenoid relay - consists of a movable jumper and power contacts. The purpose of the solenoid relay is to close the contacts when the ignition is turned on, as a result of which power begins to be supplied to the electric motor. Upon completion of the operating cycle, the solenoid relay disconnects the power and the device turns off;
- Bendix of the VAZ 2114 starter (aka overrunning clutch) - at the beginning of the operation of the device, the bendix is connected to the crankshaft and transmits the electric drive speed to it through the engagement gear; at the end of the cycle it is disconnected. The serviceability of the entire device depends on the normal functioning of the bendix, since if disconnection does not occur at the moment when the engine speed exceeds the speed of the electric drive, the unit will be damaged;
- Anchor - is a cast axle made of alloy steel, onto which collector plates and a core are pressed;
- Brushes and brush holders are structural elements that are necessary to supply power to the armature. Properly functioning brushes increase the power of the device's electric drive;
- The starter bushing - there are three in total: the rear and front - are pressed into the body, the third is located at the junction of the armature and the bendix. The bushings are responsible for fixing the drive shaft.
The cost of a new device varies between 3.5-5 thousand rubles, depending on the manufacturer. Owners of fourteen speak positively about devices manufactured by Eldix, KATEK and PRAMO. If you buy Bendix separately, it will cost you 300-500 rubles.
Principle of operation
The starter Bendix has a gear that contacts the flywheel of the car's engine.
In order to start the engine, it is necessary that the starter begins to rotate it at a speed of fifty to one hundred revolutions per minute. It should not rotate faster, as it is not designed for that. He can work intensely only for short periods of time. And it is for this reason that a dangerous situation may arise when the engine itself starts. In this system, everything must work accurately, since the slightest delay can result in ruin for him. In the event that the driver does not turn off the starter in time after starting the internal combustion engine, the Bendix protective element comes into operation. The speed of the car engine is much higher than the speed of the starter, so the role of the Bendix in this case is to protect the starter from the transmission of torque from the internal combustion engine to it. The bendix rotates only in one direction; it is not rigidly connected to the engine shaft; in a free state it can rotate. And at the moment when the speed of the internal combustion engine begins to exceed the speed of the starter, the clutch (another name for Bendix) rotates freely.
Structurally, the coupling has the following form: two rings, and between them there are balls or cylinders, which in turn are supported by a spring. Constructive, well-thought-out grooves on the inside of one of the rings in which these cylinders are located make it possible to create jamming when rotating in one direction, and free rotation in the other. Bendix has another common variation - the ratchet overrunning clutch. But this version is usually used on bicycles. But in order to understand the principle of operation of the Bendix, you can take a quick look at it. It is used as a drive; when we pedal, the clutch spins and the bike moves forward, and when we try to pedal in the opposite direction, the brake is applied. I hope my example is clear.
As mentioned above, the Bendix starter may have several more options. For example, the shaft on which the coupling is located has ground splines, which are also the seat of the coupling. The system of operation is the same here: when rotating in one direction, the coupling locks rigidly with the splines, and when it rotates in the opposite direction, it comes off them and rotates freely.
The only significant drawback of the Bendix starter design is its increased and very intense wear. At the same time, the nature of wear is such that very often it is necessary to replace the entire bendix and it is not possible to replace only an individual worn-out part, because all its component parts wear out approximately equally.
Bendix starter VAZ 2109: faults and repairs
Lada 2114 Snow Queen logbook 35 replacing the starter retractor relay
The Bendix of the VAZ 2109 starter plays a vital role in starting the internal combustion engine, and its failure is not painless for the entire car as a whole.
What should you do if the Bendix malfunctions on a domestically produced car - a VAZ "Nine"? The answer seems simple - replacement. However, first you need to understand the terminology.
Definition
The VAZ-2109 starter bendix consists of an overrunning clutch, a gear and a mechanical element, the task of which is to protect the starter from the teeth of the rotating flywheel. The gear transmits a rotational impulse to the flywheel, while the clutch itself rotates this same gear in one direction. Bendix suppresses noise when starting the power plant and extends the life (service) of the starter.
Part failure: reasons
Bendix is relatively reliable and often does not cause much trouble for car enthusiasts, but a breakdown cannot be ruled out. The gears and rollers can wear out - these parts experience serious loads when starting the engine and when moving off the car.
The main signs that the part is faulty:
- the engine does not start - the starter does not spin, but there are clicks;
- when the power unit is running, the bendix does not disconnect from the flywheel, that is, the starter continues to spin;
- smoke with a burning smell appears from the engine compartment;
- When you try to start the engine, you can hear the starter whirring. The engine can be started only after several attempts.
These symptoms may indicate that the Bendix needs to be replaced with a new one.
Preparatory stage
Before you begin the part replacement procedure, you need to prepare the necessary tools:
- keys for 10, 13;
- screwdriver with Phillips and flat head;
- pliers;
- hammer.
Main stage
It is necessary to adhere to the following algorithm of actions:
- Open the car hood.
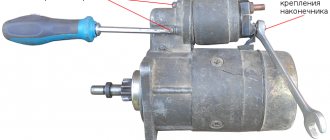
- Remove the “-” terminal from the battery. This is necessary to avoid electric shock, since the work will involve power wires.
- Remove the “+” terminal from the top bolt of the starter solenoid relay using a size 13 wrench.
- Disconnect the nearby thin wire - pull it to the left, towards the wing. The purpose of this wiring is to energize the relay winding when the ignition key is turned to the “Start” position.
- Using a size 13 wrench, unscrew the nuts on the starter. Three nuts are located on the front of the part: bottom, middle, top.
- Remove the starter.
To replace the starter bendix (it cannot be repaired), you need to disassemble the starter itself, and this is not an easy task. But nothing is impossible:
- Using a screwdriver, unscrew the two fastening bolts of the cover and housing.
- Unscrew the bolts of the clamp that secures the solenoid relay to the starter.
- Unscrew the nut in contact with the power wire.
- Remove the retaining ring from the motor rotor.
- Unscrew the two studs using a 10mm wrench.
- Using a screwdriver, unscrew the bolts connecting the brushes to the contacts.
- Disassemble the starter into three parts.
The process of replacing Bendix VAZ 2109
This stage of work is the final and most critical. Before you start, you need to know how to properly replace the starter bendix. Photos of disassembling the entire assembly as a whole (starter) will help you understand the complexities of the procedure, as they clearly demonstrate the subtleties of the process. You have to do the following:
Using a small hammer, carefully knock the washer off the rotor shaft. Unclench and remove the exposed ring using a flat-head screwdriver. Remove the bendix.
It is important not to lose small components and parts. You can try to diagnose a faulty bendix by rotating the gear in opposite directions
If it rotates freely or partially, a malfunction of the unit can be identified.
Every owner of a domestic car should know how to install a new VAZ-2109 starter bendix. There's nothing complicated about it. It is enough just to apply a small amount of lubricant to the rotor axle, and then install the ring. Next comes reassembling the starter in reverse order. After completing the installation of the starter solenoid relay, you can check the functionality of the new part by connecting the terminals to the battery.
DIY VAZ 2114 starter repair - detailed instructions
1. First of all, remove the negative terminal from the battery (rechargeable battery). 2.
Using a "13" wrench, unscrew the two upper mounting screws that secure it to the clutch housing. As a rule, there is no third bolt, but if you have one, you will need an inspection hole in order to unscrew it.
3. Remove wiring No. 1 from the connector on the solenoid relay. moving the starter forward.
4. Take the key to “13” and unscrew the fastening nut of the wire that connects the terminal of the starter traction relay to the “plus” of the battery.
5. Visually assess the condition of the flywheel teeth.
6. Using a Phillips screwdriver, remove the two mounting screws in the starter cover. 7. Unscrew the nut securing the starter winding output to the solenoid relay; to do this, use a key set to “13”.
8. Remove the washer-bracket.
None 10. Check the condition of the bushings.
11. To separate the starter housing, apply several light blows to the lower part of the housing with a rubber or wooden hammer. Assess the condition of the brushes.
12. Using a screwdriver, remove the Bendix ears from the fork.
13. Position the key and knock down the locking ring with hammer blows.
14. Pry out the second retaining element with a screwdriver.
15. Remove the bendix.
Now, actually replacing the bendix itself, take a new bendix (overrunning clutch) and install it in place. Reassembly is carried out in the reverse order; before doing this, do not forget to thoroughly clean and lubricate everything (where necessary). At this point, the repair of the VAZ 2114 starter can be considered complete; install the starter in place, connect the battery and try to start the engine.
This time we’ll talk about how to diagnose and repair a VAZ 2114 starter at home. You will learn how to replace the bendix with your own hands quickly and efficiently. Signs of a starter malfunction:
Significant reduction in power; rotation of the starter does not provide the power required by the engine. The starter will need to be repaired and the relay may need to be replaced. Power outages. The starter rotates idle, that is, without rotating the engine. The retractor starter will need repair. Delays in turning off the starter. The starter does not operate after turning the ignition key. The bendix has been damaged, so to resume operation you will need to replace the starter bendix. The starter turns, but does not start the engine.
Relevant: How to remove the VAZ 2110 starter. Replacing the VAZ 2110 starter with your own hands. Repairing the VAZ 2114 starter will require you to have the following tools:
Socket wrenches for “10” and “13”. Phillips and flathead screwdrivers. Direct hands (preferably) and free time.
None 2. Using a wrench set to “13”, unscrew the two top mounting screws that secure it to the clutch housing. As a rule, there is no third bolt, but if you have one, you will need an inspection hole to unscrew it.
3. Remove wiring No. 1 from the connector on the solenoid relay. moving the starter forward.
Repair of VAZ 2114 starter. Do-it-yourself Bendix replacement4. Take the key to “13” and unscrew the fastening nut of the wire that connects the terminal of the starter traction relay to the “plus” of the battery.
5. Visually assess the condition of the flywheel teeth.
6. Using a Phillips screwdriver, remove the two mounting screws in the starter cover. 7. Unscrew the nut securing the starter winding output to the solenoid relay; to do this, use a key set to “13”.
8. Remove the washer-bracket.
9. Using a 10mm wrench, unscrew the two long tension bolts, then remove them.
10. Check the condition of the bushings.
Repair of VAZ 2114 starter. Do-it-yourself Bendix replacement11. To separate the starter housing, you need to apply several light blows to the lower part of the housing with a rubber or wooden hammer. Assess the condition of the brushes.
12. Using a screwdriver, remove the Bendix ears from the fork.
13. Position the key and knock down the locking ring with hammer blows.
14. Pry out the second retaining element with a screwdriver.
Repair of VAZ 2114 starter. Do-it-yourself Bendix replacement15. Remove the bendix.
Relevant: How to remove a VAZ 2107 generator with your own hands Now, actually replacing the bendix itself, take a new bendix (overrunning clutch) and install it in place. Reassembly is carried out in the reverse order; before doing this, do not forget to thoroughly clean and lubricate everything (where necessary). At this point, the repair of the VAZ 2114 starter can be considered complete; install the starter in place, connect the battery and try to start the engine.
- 24techno-guide.ru
- www.drive2.ru
- vaz-remont.ru
- 7bm.ru
How to replace Bendix yourself
How to remove a VAZ 2114 gearbox, its repair and malfunctions
In the starter, important importance is given to the bendix, if it breaks down it will not be possible to start the engine. And, if a characteristic metallic sound is heard during startup, this indicates an immediate replacement of this part.
Qualified craftsmen are not recommended to even try to repair the Bendix; according to them, it is much more advisable to replace the old worn-out part with a new Bendix. Such a timely replacement of the bendix, rather than repairing it, will prevent imbalance of internal parts with the prospect of increased wear on the starter motor.
- Purpose
- Diagnostics
- Self-replacement
- Is it necessary to make repairs?
- What is the sequence of actions
Purpose
Bendix is otherwise called an overrunning clutch, which refers to the working body located in the car starter. Torque is transmitted by a gear from the starter motor to the flywheel of the internal combustion engine. But the gear cannot be in long-term engagement with the flywheel, since the starter should operate for a short time, after which it must cool down. And in order to protect the starter motor from the effects of the internal combustion engine, Bendix is designed.
Diagnostics
After all, the reason for replacing the Bendix can be not only worn-out teeth of the Bendix gear, it can also be worn-out bushings on which the starter shaft is mounted, or there may be a common reason - damage to the solenoid relay. So, in order to identify the cause of this damaged part, experience is needed. Some technicians carry out diagnostics on special stands under several loads:
- Under load;
- Without load.
And for some, it is enough to move their hand to understand the need to replace the Bendix.
Self-replacement
Replacing a bendix yourself is not as simple as it seems at first glance. To change it, even on the simplest domestic car, you will need to remove the starter, and this work can be accompanied by a number of difficult moments. Still, you can try to make the replacement yourself. So what needs to be done:
Remove the starter. To do this, open the hood and disconnect the negative cable from the battery. The car must be driven into the inspection hole. Using a wrench, unscrew the connection between the positive battery cable and the solenoid relay.
Then the two terminals are removed, paying attention to the condition of the insulation on the wires. Unscrew the bracket using a hexagon
Then, using a spanner, unscrew the bottom bolt that holds the starter. This process is quite troublesome. After this, the upper mounting bolt is turned out and the bracket is unscrewed, with the help of which the starter is attached to the block. After this work, the starter is carefully removed. By unscrewing the studs along the entire starter and those that secure the cover, separate the starter into two parts. After removing the brush assembly and rotor, it is recommended to clean all parts of the starter. Then you need to remove the retaining ring from the rotor shaft and remove the worn bendix, replacing it with a new one. Immediately check the condition of the bushings and forks. To remove the plug, you need to carefully remove the rubber plug and remove the required element. The bushing is pressed out using a head of a suitable size. If these parts wear out, they should be replaced immediately with new ones. The bushings are driven back using a hammer. It is worth remembering that the blows should not be strong and should be carried out through a special wooden lining. The starter is assembled in the reverse order, after which its functionality is checked.
Is it necessary to make repairs?
But what about Bendix repair? In principle, according to professionals, conversations about repairing this part should not even arise.
This is explained by the fact that modern machines have almost the same wear resistance of parts located in a single unit. This means that you can be sure that if one gear wears out, then after it, almost immediately, the next one will deteriorate, and so on. Therefore, it is much more practical to completely change the bendix, and besides, the cost of the part itself is low.
What is the sequence of actions
So, to change the bendix you should do the following:
- Removing the starter;
- Starter disassembly;
- Replacing the old bendix with a new part;
- Reassemble the starter in reverse order.
When starting work on replacing the Bendix, it is advisable to completely remove the battery, since even a short circuit can lead to serious consequences. If you have any questions or doubts, you should seek professional advice.
What is Bendix, and in what cases is it required to be replaced?
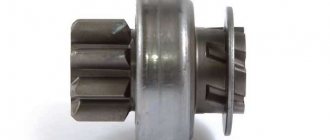
Bendix is a clutch used to engage the starting electric motor and flywheel when starting the engine. Externally, the element is an oblique gear and is located on the starter shaft. At the moment it is triggered, it moves forward with the help of a solenoid and connects to the flywheel. When the power supply stops, the gear returns to its place, disconnecting from the flywheel. The amplitude of movement of the clutch is about 10 cm. The bendix is protected from excessive displacement by locking rings.
Be sure to read
Signs of a malfunctioning clutch are clearly visible, so the question of how to check the starter bendix usually does not arise. The “symptoms” of a malfunction include:
- a grinding noise in the flywheel area when trying to start the engine;
- the starter rotates idle, without transmitting torque to the flywheel;
- a characteristic knocking sound at the moment the solenoid relay is activated, after which the shaft does not rotate.
A faulty gear is usually not repaired, but replaced. Repairing the element is possible, but such actions are not justified in terms of financial and time costs. Therefore, if the coupling breaks, it must be replaced. If you still want to repair it, a detailed video will be at the end of the article.
Note: if the part extends, but does not engage with the flywheel, proceed as follows: put the car in 2nd gear and manually shift it a couple of centimeters. The position of the flywheel and helical gear changes, after which starting the engine becomes possible. Before attempting to start, the car is removed from gear.
This method is not a repair method, but it allows you to start the engine and get to your home or auto repair shop.
Starter malfunctions
What is the approximate service life of a starter? The average value is 5 years or 120 thousand km. How long the starter lasts directly depends on the operating conditions. For example, if you drive short distances in urban areas and constantly start the engine, the starter will quickly fail.
I’ll tell you about the signs that accurately indicate a device malfunction. These are symptoms such as:
- A specific crackling sound is heard.
- There is a delay in starting the engine after the driver turns the ignition key.
- The starter motor can be heard starting, but there is no sound of the engine running.
- There is no action after turning the ignition key.
- The starter operates after the engine starts.
What possible malfunctions can occur with the starter?
- Poor contact. This is a common breakdown, and the driver can notice it when starting the engine. In this case, you should check the device's mounting and contacts.
- Magnets may fall off. This applies to modern devices. Here it is better to entrust repairs to experienced auto repairmen.
- Wear of support bushings. In this case, the armature will seem to “dangle” and there will be no full contact of the brushes with the commutator. In this case, there will be sparks, the brushes will burn and wear out. In this case, you need to replace the brushes and support bushings, and groove the commutator.
- Wear of rollers in bendix. In this case, it is towed. The bendix needs to be completely replaced.
- Solenoid relay malfunction. Most often, nickels burn. The copper melts in them, and the nickels are soldered to the contacts. In this case, even after starting the engine, the starter will continue to work. All this drains the battery a lot. Therefore, here you should disconnect the wire from the battery as soon as possible, remove the device and replace the solenoid relay.
If the crankshaft rotates slowly, the reasons for this are:
- High viscosity motor oil.
- Low battery charge.
- The wire contacts have oxidized.
If the starter runs too long, it is due to a stuck ignition switch or problems with the contacts.
If the starter does not start when you turn the key, the reasons for this may be the following:
- The battery is discharged or broken.
- There is no contact of the ground wire with the battery or between the winding and the collector.
- The anchor is worn out.
- The brushes do not adhere to the commutator.
- Solenoid relay is faulty.
- The device control connector is disconnected.
- In automatic transmission, the selector is not in position N or P.
- The gearbox switch is faulty.
If the starter rotates very slowly, this is indicated by the following faults:
- The battery does not work or is low.
- Bushings are worn.
- The wire between the battery and the starter is faulty.
- Damage to the solenoid relay.
- The stator or armature winding is faulty. The mechanisms must be replaced.
- Poor contact of the armature or stator winding with ground.
- The brushes have poor contact with the commutator due to wear or incorrect position.
- Commutator burning.
The starter works, but the engine does not:
- Overrunning clutch worn.
- Parts in the gearbox are broken.
The starter rotates together with the flywheel:
- Solenoid relay is broken.
- Failure in the contact group of the ignition switch.
There is no click of the solenoid relay:
- Low battery charge.
- Contacts or coil of the solenoid relay are burnt out.
- The contact on the positive terminal of the battery or starter has oxidized.
- There is a malfunction in the ignition switch component.
- Short circuit to ground in the coils of the solenoid relay. Here it is better to replace all the parts.
- The relay armature mechanism is stuck.
If the crankshaft does not rotate the starter armature, then the probable causes of the breakdown are:
- Towing the freewheel.
- Jamming when moving parts along the screw thread of the shaft.
- Broken clutch release lever.
- Malfunction of the clutch spring or drive ring.
If loud noises appear when starting the engine, you should check the fastening in the starter parts.
If a gear grinding noise occurs in the starter, you should check the switch contacts, the gear travel adjustment, the drive device spring, and the flywheel ring teeth. If the ring gear is damaged (it is often made of plastic), then it is better to replace it with a metal one. There is also a possibility that the solenoid relay is stuck.
Video: Checking a car starter, all methods and breakdowns
This video is suitable for beginners; an experienced mechanic talks very interestingly.
Starter operating principle
Bendix VAZ 2114 is one of the main elements of the electric starter, which is an overrunning clutch with a gear, through which rotational motion is transmitted to the engine at the moment of starting.
The entire process of the starter operation looks like this:
- after turning on the ignition, power begins to flow from the battery to the starter and its solenoid relay;
- the relay moves the bendix forward and puts its gear in contact with the engine flywheel gear;
- at the moment of engagement, the starter’s electrical circuit is turned on, its electric motor begins to rotate and thus spins the crankshaft flywheel. This sets the engine pistons in motion, the working mixture begins to ignite, and the engine starts;
- after the engine starts running, the power to the starter and retractor relay is turned off, and the bendix, under the force of the return spring, returns to its original position, leaving the clutch with the flywheel.
The contact coins in the solenoid relay are burnt
This malfunction manifests itself in the form of loud clicks when the key is turned to the start position and the key is released. In some cases, the starter may trip.
How to diagnose contact patches yourself?
Open the hood, take a screwdriver, and bridge these two terminals. If a spark jumps during the bridge and you hear the sound of the electric starter rotating, this means that your contact pins are burnt.
In this case, the car can be started with a screwdriver!
How to start a car with the starter when the contact pins burn?
In order to start the car when the contact pins burn out, you must simultaneously bridge all three contacts on the solenoid relay. Closing the two contacts under the nuts is necessary to rotate the armature, and closing the control contact so that the overrunning clutch (Bendix) engages with the flywheel.
The procedure for starting a car if the contact pins fail:
Car with manual transmission
- set the parking brake;
- turn on neutral gear;
- open the hood and prepare a flat-head screwdriver;
- turn the key in the ignition switch to the ignition on position;
- using a screwdriver, we close all three contacts on the solenoid relay (you may need 2 screwdrivers);
- After starting the engine, remove the screwdriver and drive to the repair site.
Car with automatic transmission (+variator and robot):
- install a car parking brake (for robot and variator);
- open the hood and prepare a screwdriver (possibly two);
- turn the ignition to the on position, press the brake, move the gear selector to the parking position (P);
- using a screwdriver, we close all three contacts on the solenoid relay (you may need 2 screwdrivers);
- After starting the engine, remove the screwdriver and drive to the repair site.
VAZ-2114 does not start and the starter does not turn: what to do?
The VAZ model 2114 is a fairly reliable car, but sometimes it doesn’t want to start. Not everyone knows what to do if the engine is silent and the car starter does not turn. We will describe below what reasons lead to the formation of such a problem, but we emphasize that it will take quite a lot of effort and time to eliminate any of them.
VAZ starter - specifics
If the VAZ-2114 does not start, then many look for the reason in the candles, but in the case when there is such a characteristic sign as a non-rotating starter, they should not be blamed. Let's take a closer look at the last node.
The starter installed on the 2114th Lada is, in fact, a separate electric motor that consumes direct current. A number of additional elements work in direct contact with it.
- Bendix (gear that provides clutch to the flywheel);
- overrunning clutch;
- solenoid relay.
The device is activated by the ignition switch. Whether it is electronic or mechanical does not matter. The principle of operation of the starter is quite simple. After turning the key, the ignition coil is excited, through it voltage is supplied to the unit in question, electromagnetic induction occurs there and the armature connected to the plug begins to rotate. That, in turn, pushes the bendix along the rotor shaft located directly in the electric motor until it is captured by the flywheel gear. Ultimately, the relay contacts are closed, and the current is sent to the machine engine - it starts.
The overrunning clutch has its own rather important function. Its purpose is to protect the electric motor after the vehicle’s power plant reaches a sufficient number of revolutions. As a result of the latter, a reverse force occurs that can damage the starter. To prevent this from happening, the clutch allows the bendix to rotate freely until the solenoid relay is manually deactivated by the driver.
Starter - connection diagram
Why the engine of the 2114th model does not start, while the starter does not spin, cannot be figured out until we have an idea about connecting the latter to the vehicle’s electrical supply system.
On a VAZ car, the motor of the unit in question consumes quite a lot of energy when starting. He can get it exclusively from the battery. For this reason, the charge level of the latter is a significant factor ensuring instantaneous activation of the starter.
The element is not directly connected to the battery. A large cross-section cable from the positive first goes to the solenoid relay. From it, through the contact group located inside, the starter itself is already powered. The common circuit of the VAZ includes an ignition switch, to which wires from the lock lead.
If the key is turned in the latter, then:
- the switch is activated;
- voltage goes to the solenoid relay;
- the starter starts;
- the engine starts.
The circuit also has a mounting block containing fuses.
A failure in any area can result in the starter not turning. To find out why the VAZ does not start, you need to check all the elements included in the circuit.
How to change bendix on the starter
As a rule, in order to change the bendix, you need to remove the starter and disassemble it. Depending on the machine model, the procedure may have its own characteristics. We will describe the algorithm from the moment when the starter has already been removed and to replace the bendix it is necessary to disassemble its housing:
Bendix repair
- Unscrew the tightening bolts and open the housing.
- Unscrew the bolts securing the solenoid relay, and then remove the latter. When repairing, it is advisable to clean and wash all the insides.
- Remove the bendix directly from the axle. To do this, you need to knock down the washer and pick out the restrictive ring.
- Before installing a new bendix, the axle must be lubricated with temperature grease (but without excess).
- Typically, the most difficult procedure involves installing the retaining ring and washer. To solve this problem, craftsmen use different methods - they open the ring with open-end wrenches, use special clamps, sliding pliers, and so on.
- After the bendix is installed, lubricate all rubbing parts of the starter with high-temperature grease. However, do not overdo it with the amount, because excess will only interfere with the operation of the mechanism.
- Check the starter before installation. To do this, use wires to “light” the car in winter. With their help, supply voltage directly from the battery. Connect the “minus” to the starter housing, and the “plus” to the control contact of the solenoid relay. If the system is working properly, you should hear a click and the bendix should move forward. If this does not happen, it is necessary to replace the retractor.
Bendix repair
Replacing the bendix on the starter
Some tips from experienced drivers
Here are some tips from experienced motorists that will help you avoid possible problems and inconveniences when repairing or replacing a Bendix:
- Before installing a new or repaired bendix, always check its operation and the drive of the unit.
- All plastic washers must be intact.
- When buying a new Bendix, it is advisable to have the old one with you in order to verify their identity. Often similar parts have minor differences that are not visually memorable.
- If you are disassembling a Bendix for the first time, it is advisable to write down the process on paper or put the individual parts in the order in which they are dismantled. Or use the manual with photographs, video instructions above, and so on.
Also check out
- Using a 10mm wrench, unscrew and remove 2 long coupling bolts.
- To separate the starter housing, strike the lower part of the housing several times. To do this, you can use a rubber or wooden hammer. Assess the condition of the brushes.
Worth checking out:
Take a new bendix (overrunning clutch) and install it in place. Clean and lubricate parts as necessary. Perform assembly. After this, the repair of the VAZ 2114 starter can be considered complete. All that remains is to put the starter in place, connect the battery, and start the engine.
Dismantling and replacement
To make it more convenient to replace the relay, it is recommended not to be lazy and still remove the starter itself. This will allow you to simultaneously check the condition of the starter while replacing the relay.
The removal procedure described below concerns an assembled relay, which has the ability to replace individual structural elements.
- Disconnect the negative terminal from the battery.
- Disconnect the red terminal from the relay. This is a red wire.
- Using an 8 mm wrench, unscrew the nut securing the brush assembly. You will find it behind the relay.
- Remove the contact that this nut held in place.
- Unscrew the fastening of the solenoid relay to ground. We are talking about coupling bolts.
- Next, you need to dismantle the power wire, after which the relay itself is pulled out.
- The fastening nuts are unscrewed from the end part, which allows you to remove the upper part of the relay.
- It is advisable to immediately replace the relay core with a new one.
- Install a new relay.
- Proceeding strictly in reverse order, reassemble the assembly, which will allow you to complete the replacement of the unit.
- When separating the relay into its two component parts, be sure to ensure that the core does not slip out and the spring does not jump out.
Therefore, in order to figure out whether the relay works or not, and also who is the real culprit for the violation of the functionality of the system, we will conduct several checks.
- Check the starter. Turn the ignition key. The starter should begin to turn, and the relay should make a characteristic click. If the starter is not doing its job, replace it. Relyukha has nothing to do with it in this case.
- Check the solenoid relay. To do this, there are two copper bolts on the back cover. Two contacts are attached to them. If the starter starts turning, then your relay has definitely failed and needs to be replaced. In this case, you should not remove the starter, which will allow you to get more accurate test results.
- If you have removed the starter, the test is performed slightly differently:
- Connect the retractor contact wire to the positive terminal of the battery;
- The second contact connects the starter ground and the battery charger;
- When the contacts are placed on the relay terminals, the relay should turn on with a characteristic click;
- If the operation is too slow, uncharacteristic, check the condition of the contacts. They often burn out or oxidize.
In order not to confuse what exactly has failed - the starter or the solenoid relay, there is an excellent method for recognizing the “culprit”.
- Remove the starter, connect the negative terminal of the battery to ground;
- The design of the device has copper bolts and a tongue-shaped element;
- The positive wire from the battery is connected to this “tongue”;
- If there is contact, the solenoid relay clicks and starts working;
- If not, then you will have to go to the store for a new relay.
But there is one more very important point. Even if all the facts indicate that the starter or retractor relay is not working, another unit - the ignition switch - may still be the cause of ignition problems. Take the time to check its serviceability before buying new parts.
Starter repair
To remove the starter, you will need the following set of tools:
- slotted screwdriver;
- crosshead screwdriver;
- socket wrenches (or heads) for 13 and 10.
The replacement of the Bendix VAZ 2114 itself is carried out as follows:
- Disconnect the ground terminal from the battery.
- Using a 13mm wrench, unscrew the pair of mounting screws that secure the starter to the crankcase.
- Using the same key, unscrew the nut that secures the “positive” wire to the solenoid relay housing.
- Using a Phillips screwdriver, unscrew the pair of mounting screws located in the starter cover and holding it in place.
- Remove the starter cover.
- Using a 13mm wrench, unscrew the nut securing the contact of the solenoid relay coil.
- Using a flat-head screwdriver, remove the washer-bracket (this should be done carefully).
- Using a 10mm wrench, unscrew the pair of bolts holding the halves of the starter housing together, and then remove them.
- Separate the starter housing into two halves (if you can’t do this by hand, you should stand it vertically and tap the lower part with an aluminum, rubber or wooden hammer).
- Using a flathead screwdriver, remove the bendix ears from the fork.
- Place the wrench on the shaft, then knock out the first locking ring with hammer blows.
- Remove the second retaining ring using a slotted screwdriver.
- Remove the bendix.
Dividing the starter housing in half during repairs must be done very carefully and without applying unnecessary force - otherwise it can easily be split, since it is made of a brittle alloy.
After the electric starter has been completely disassembled, you should inspect all its parts that are subject to active wear, namely:
- bushings;
- graphite motor brushes;
- Bendix gear.
If necessary (if they turn out to be very worn), they should be replaced with new ones. It is worth noting that when inspecting a Bendix, serious defects indicating its breakdown should be not only obvious chips of the teeth, but also their abrasion, loss of their original shape, which is one of the reasons for poor engagement with the flywheel gear.
In some cases, it will not be possible to visually determine the malfunction of the Bendix, since its breakdown can occur not only outside, but also inside. In this case, you should be guided by indirect signs indicating its breakdown and replace the part.
After all elements of the starter have been inspected and faulty ones have been replaced, it should be reassembled. It is performed in exactly the same order as disassembly, but in the reverse order (before reassembling, all dirt should be removed, oxides should be cleaned from the relay contacts, and moving parts should be lubricated).
Replacing the Bendix starter on a VAZ-2114: photos and videos
The Bendix or starter drive is a unit consisting of a clutch with a gear and a fork connected to a solenoid relay. The clutch is also called an “overrunning” clutch. Three types of starters were installed on Lada 114 hatchbacks: 29.3708, 423.3708. and also 5712.3708.
The first two differ only in the shape of the fork, as well as in the design of parts not related to Bendix. And the starter 5712.3708 is a modern device equipped with a gearbox. The seating dimensions of all starters do not differ in any way.
On any car, including the VAZ-2114, replacing the Bendix begins with dismantling the starter. We will look at this operation now.
The following video shows how a starter behaves with a faulty bendix.
Preparing to replace the bendix: removing the starter on a VAZ-2114
The starter can be accessed from above or from underneath. Let's consider the second option: roll the car into the pit and use the handbrake. Next, use a 10mm wrench to unscrew two screws from the bottom (photo 1) and two screws on the side members.
Down with the mudguard!
Finally, remove the screws on the cross member (photo 3) to remove the engine splash guard.
Disconnect the negative terminal from the battery - you will need a 10mm key.
On a VAZ-2114, you can replace the bendix in one way - remove the starter.
The location of the starter under the hood is marked with a red arrow.
For this:
- Unscrew the nut securing the power wire to the starter (photo 1). Remove the terminal and also disconnect the block with the control wire (photo 2); Remove the chip as in the picture
- Using a spanner or socket wrench, unscrew the three fastening nuts - with them the starter is pressed to the crankcase;
Fastening elements - The assembly can now be removed.
Installation is carried out in reverse order.
The appropriate key size is “13 mm”.
Repair of starters 29.3708 and 423.3708
Use a screwdriver to unscrew the screws securing the solenoid relay. Then the relay is removed - its armature is disconnected from the plug.
Down with the relay... and both rings
Taking a tube of suitable diameter, knock the upper retaining ring off the shaft. Then remove the lower retaining ring using special pliers. The top ring must also be removed.
The body is disassembled: the protective cover is unscrewed, the stopper and all washers are removed, then two nuts are unscrewed and the rear casing is removed.
Disconnect the rotor and stator
Next, being careful, dismantle both brushes and remove the brush holder. As a result, what remains is an “assembly” consisting of parts: rotor, front cover, bendix
Removing the stopper and rotor
Now you need to remove the plastic fork stop from the cover. The rotor is then pulled back.
The Bendix assembly with the fork is easily removed from the cover. Installation of the unit is carried out in the reverse order.
How to disassemble the bendix itself
Remove the retaining ring - here you need pliers again. Then the disc and thrust washer can be easily removed. The result is shown in the photo.
Bendix parts separately
Finally, the coupling and fork are simply pulled off the bearing. There shouldn't be any problems.
When installing a new bearing or a new fork, you don’t need to skimp on lubricant. LITOL-24 is suitable here.
Update for starter 29.3708
Above we discussed how starter 423.3708 is disassembled. For the 29th model, everything looks more complicated:
- The relay is mounted on three screws, not two;
- The fork is fixed to the axle, and this axle is removed before knocking out the ring over the bendix;
- To remove the bendix, you need to separate the bearing and fork. To do this, bend the fork eye with a screwdriver.
Points 2-3 are illustrated by one photo.
The 29th model is more “complicated”
Be careful!
Quick repair of Bendix starter 5712.3708
If the starter has been removed, remove the solenoid relay from it by unscrewing the two screws on the housing. Then the four pins are unscrewed and the cover can be moved forward. Everything here looks simpler than in starters of “early” models.
The goal is to dismantle the drive with gearbox
Remove the plastic stop. Then we remove the drive assembly - here it consists of a bendix and a gearbox.
On starters of the “new” model installed on the VAZ-2114, the bendix must be replaced strictly according to the instructions: first remove the gearbox cover, then the three gears, and only then can you knock off the retaining ring.
Removing the gears from the gearbox...
Dismantling “extra” elements
Both the top and bottom rings will need to be removed from the shaft. Everything here differs little from the starters of the first models.
Finally, you need to remove the plug. The side fastening tab is bent with a screwdriver. This operation is difficult to perform - there is a risk of breaking the plastic.
Removing the plastic plug
There is only one operation left: the bendix without a fork is pulled up from the shaft. We wish you success.
Which starter should you choose?
When choosing a new spare part, most car owners give preference to the geared version. Its advantages are that it is smaller in size, turns the engine faster even with a dead battery, and works better in winter. Of the gearbox options, everyone prefers the following companies:
- KZATE — 3600 rubles
- Eldix — 4500 rubles
- PRAMO – 4400 rubles
Try not to save money when buying a new part. As mentioned earlier, the item from the factory is considered the weak link of the car. If you buy a cheap Chinese analogue, you can return to removing the starter on a VAZ 2114 at the most inopportune moment. Read the reviews in stores in your region, this will help you identify quality brands and not fall for a fake, which will also save time and money.
Some recommendations for repairing and installing Bendix
In any case, before installing the starter after installing the bendix, check the entire device. It is advisable to do this at a special stand in the workshop. If this is not possible, then connect the starter to a well-charged battery. There are other important points:
- when disassembling and reassembling, pay attention to the plastic washers: they must be intact;
- when buying a new Bendix, take the old one with you: the mechanisms may have small but important differences that are difficult to remember visually;
- If you are repairing an overrunning clutch for the first time, write down the disassembly process on paper so that you can later reassemble the device correctly.
In conclusion, it’s worth adding: if you want the Bendix to work for a long time, do not run the starter for more than 15 seconds (especially in winter) - give a break for at least a minute. And lastly: a properly repaired and assembled mechanism will last for several more years without problems.
How to check starter bendix
If the starter bendix does not turn, then you can check its operation in two ways - visually , by removing it from the car, and “by ear” . Let's start the description with the latter, as it is simpler.
As stated above, the main function of the bendix is to engage the flywheel and spin the engine. Therefore, if at the moment of starting the engine you hear that the starter motor is spinning, and characteristic metallic clanging sounds - this is the first sign of a Bendix malfunction .
So then it is necessary to dismantle the starter and disassemble the bendix in order to inspect it in detail and determine the damage. The removal and replacement procedure is described below.
And so, the bendix was removed, it is necessary to inspect it. In particular, check whether it rotates only in one direction (if it turns in both, it means it needs to be replaced) and whether the teeth are eaten. Also check to see if the spring is loose. You should also remove the fork from the Bendix, check its integrity, signs of wear, and if necessary, replace it. In addition, be sure to check if there is any play on the armature shaft. If this occurs, then the bendix should be replaced.
Bendix repair
Do-it-yourself Bendix starter repair is possible if the rollers are worn out first, or the source of the problem is contamination or frozen lubricant.
The Bendix is assembled by rolling, and the outer race of the clutch is made of durable metal. It is difficult to flare it, so the fastest way is to carefully cut through the clip with a grinder.
Having knocked the weakened clip off the Bendix, we remove the gear, rollers and springs from it. After washing the insides, we check the absence of deep nicks in the grooves of the coupling and on the gear shank.
We inspect the rollers: the surface should be cylindrical, without signs of wear. A replacement for the rollers can be found by disassembling a roller bearing of a suitable size (bearing parameters can be found in reference books). We stretch the weakened springs a couple of millimeters or select new ones.
After assembling the Bendix dry, we check its operation by turning the gear in the direction of jamming: the rollers should block the Bendix, after turning in the opposite direction, immediately release the gear.
Before assembly, add a medium-viscosity grease to the Bendix so that it does not thicken excessively in the cold. Moreover, there should be a minimum of lubrication: its task is to protect the insides of the coupling from corrosion; excessive lubrication only gets in the way.
Performance evaluation
After completing the work, you should check how the engine starts. The starting engine should run smoothly, without knocking and grinding noises characteristic of a faulty overrunning clutch. This is a sign of a high-quality replacement of the Bendix on VAZ-2109-2115 cars.
In some cases, changing the bendix is not enough. Prolonged operation of a faulty clutch leads to wear and damage to the flywheel teeth. In this case, the symptoms of failure that existed before replacing the gear may become weaker, but do not disappear completely. In such cases, it is necessary to replace the flywheel.