The main purpose of such a thing as the instrument panel in the Lada Granta model, as in any other car, is to provide control and management of a certain set of parameters important for the normal functioning of all on-board systems while driving. The instrument panel must be as informative and functional as possible, and also fit harmoniously into the interior, creating an individual charm for the cabin. To understand everything, the instructions will help.
On the Lada Granta, the so-called instrument panel does not fall into the category of “exceptions”, because it is capable of promptly and clearly displaying information about the performance of components by displaying various parameters. This complex ensures vehicle safety while driving, as it is equipped with warning functions about the occurrence of malfunctions. To understand everything, you will need instructions.
Elements of the dashboard on the Lada Grant
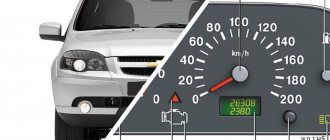
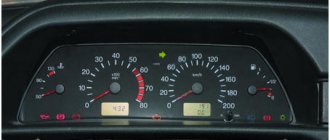
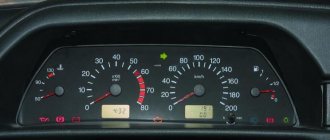
The main elements of the torpedo in Grant are the speedometer and tachometer. The large size of the dial instruments allows you to monitor the current state of transport without being distracted from the driving process.
Includes the Lada Granta dashboard and many emergency and auxiliary sensors indicating the critical level of brake fluid, engine temperature, and oil pressure. Additionally, on-board PC information is displayed on a small screen.
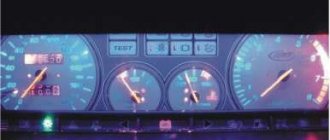
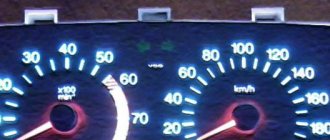
Convenient panel illumination allows you to react in time to any deviations from the norm. Green light is selected for dial gauges, red or orange for emergency sensors.
In the luxury assembly of the Grant Lada car, the dashboard is equipped with a high-quality standard computer that can display GPS maps and display auxiliary information. This element is indispensable for frequent driving not only around the city, but also outside it.
For a modern Lada Granta car, the dashboard description, which every driver needs to know, is the possible modification of the dashboard.
Functional improvements (installation of a modern on-board PC) should be carried out in professional workshops. Visual tuning can be done with your own hands. You just need to choose one of the suitable upgrade options and study the specifics of the work.
Sensors and indicators on the instrument panel
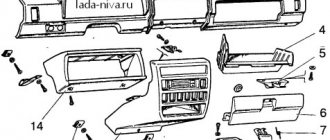
The diagram shows the location of the devices in detail:
- Tachometer.
- Engine management system malfunction indicator.
- Left turn signal.
- Low oil pressure indicator.
- ABS indicator.
- Immobilizer indicator.
- Indicator of increased coolant temperature.
- Indicator of emergency condition of the brake system.
- Right Turn Signal.
- Battery charge indicator.
- Speedometer.
- Stability control system operating mode.
- Indicator of prohibition of transition to the next gear.
- High beam headlights.
- Rear fog lights.
- Dipped headlights.
- Front fog lights.
- Resetting the odometer data for the day.
- On-board computer display.
- Indicator of open doors.
- Fuel reserve indicator.
- Tire pressure indicator.
- Electric power steering indicator.
- Driver seat belt indicator.
- Power plant signaling device.
- Airbag status indicator.
If the engine management system malfunction indicator does not go out after starting the engine, this may indicate that one of the engine components or a related system is not working.
When the low oil pressure light does not stop flashing while the engine is running, the oil pressure is too low.
The ABS warning light should go off 2 seconds after the engine starts.
The light responsible for increasing the coolant temperature stops lighting 5 seconds after the engine starts. If this does not happen, the engine may overheat. In this case, it is better to postpone the trip and identify the problem.
The activity of the brake warning indicator when the engine is running indicates that the brake fluid level is critically low.
An illuminated stability indicator indicates that the system is disabled. Its burning or flickering while driving indicates the system is active. The operation of the sensor in other cases indicates a malfunction in the car.
If the fuel reserve light comes on, then it’s time to refuel the car.
Briefly about the panel features
The combination of instruments under consideration has its own characteristics; 39 instruments “get along” with sufficient brevity, which is quite reasonable. All components will delight you with an excellent appearance. The instructions clearly show this. The car’s belonging to the domestic industry is indicated by the logo in the center of the steering wheel.
Traditionally, the main instruments are positioned as a pair: speedometer and tachometer. Due to the large numbers, it is convenient to read the data without being distracted for long from the road situation. At night, the dials will be illuminated with a gentle green backlight, which will not strain the “pilot’s” eyesight. Among the designated main instruments, the trip computer display for LADA Granta has found its niche. It allows you to quickly track fuel consumption and specific mileage.
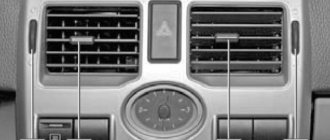
There are 4 air ducts located along the edges of the panel perimeter: a pair is concentrated in the center, and the manufacturer placed the remaining two elements at the edges.
The basic equipment will delight you with the presence of a current element of the safety system - the airbag of the same name. The instrument panel displays all this.
The central part attracts the eye with a harmoniously placed radio tape recorder. For the “Standard” and “Norma” equipment versions of the Lada Granta, there is a niche cover at the location of the device.
Its dismantling is not capable of generating difficulties for LADA Granta owners. The constructive idea is implemented in such a way that any average person can figure out the algorithm for removing it for subsequent installation of the device.
Standard on-board computer Lada Granta
1. displays the current time or (in an optional version) the gear shift prompt indication mode, as well as the automatic transmission operation indication mode
2. displays optionally total or daily mileage
3. displays outside temperature or (optional) on-board computer functions
4. displays fuel level
Instrument cluster icons Lada Granta
1. The airbag status indicator turns on in orange when the ignition is turned on and goes out after the engine starts; in other cases, the lamp is lit indicating a system malfunction; you must contact service as soon as possible, because In addition to failure in an emergency, the airbag may unexpectedly inflate
2. Power unit malfunction indicator (not used)
3. Insufficient tire pressure warning light , lights up when tire pressure drops
4. Door open indicator , lights up red if the door is open
5. Driver's seat belt warning light , lights up when the ignition is turned on if the seat belt is not fastened
6. The electric power steering status indicator (connected in an optional version), turns on in orange when the ignition is turned on and goes out after the engine starts; the lamp is lit while the engine is running indicates a malfunction of the power steering, which must be eliminated as soon as possible
7. Reserve fuel indicator indicates the need to refuel the car; do not allow the gasoline to run out completely, because this may damage the fuel pump
8. The engine management system malfunction indicator (Check Engine), turns on orange when the ignition is turned on and goes out after the engine starts; the lamp is lit after the engine starts or while driving indicates a failure of any element of the engine management system
9. Emergency low oil pressure indicator , turns on in red when the ignition is turned on and goes out after the engine starts, the lamp is lit when the engine is running and a constant (for 5 s) buzzer signal indicates insufficient oil pressure in the system
10. Coolant overheat indicator , turns on in red when the ignition is turned on and after 5 seconds. after starting the engine it goes out, the sound signal indicates engine overheating (t>115C), the signal will be repeated until the temperature drops below 110C, when the indicator turns on, it is prohibited to operate the car, otherwise it will lead to serious engine damage
11. The ABS anti-lock brake system status indicator (optional) turns on in orange when the ignition is turned on and after 2 seconds. after starting the engine it goes out; in other cases, the lamp is lit indicating a system malfunction, which should be repaired at a specialized service station
12. Immobilizer mode indicator lights up orange and displays the status of the immobilizer and vehicle security mode
13. Brake system emergency indicator , turns on in red when the ignition is turned on and goes out after the engine is started, the lamp is lit and the buzzer signal (5 turns on) when the engine is running indicates a drop in the brake fluid level below the “MIN” mark in the master cylinder reservoir, operate the vehicle with the indicator on it is prohibited
14. Battery charging indicator , turns on in red when the ignition is turned on and goes out after the engine starts, the lamp is lit or glows half-lit while the engine is running, indicates a lack of charging current due to a malfunction of the generator or voltage regulator, as well as low voltage (or break ) generator drive belt, operating the vehicle with the indicator on is prohibited; speedometer shows how fast the car is currently moving
15. The indicator of the operating mode of the exchange rate stability system (ESC) (in a variant version), turns on yellow when the ignition is turned on and goes out after the engine starts, the “ESC OFF” lamp is lit indicating the system is turned off, and lighting and flashing while driving indicates activation exchange rate stability system; in other cases, the lamp is lit indicating a system malfunction
16. High gear prohibition indicator “O/D OFF” (not used)
17. Headlight high beam indicator , indicates that the high beam headlights are on
18. Rear fog lamp switch-on indicator indicates switching on of the closed-loop motor vehicle.
19. Signal indicator for turning on the front fog lights , indicates that the PTF is turned on
20. Low beam headlight indicator , indicates that the low beam headlights are on
21. Reset button for daily mileage counter , by pressing the button, set the daily mileage counter in the liquid crystal display to 0 or select modes for displaying daily or total mileage
Designation of Lada Granta tidy icons
The following is a description and explanation of the icons on the standard Granta tidy.
| Number in order | What does it mean |
| 2 | Fault light in the internal combustion engine system. |
| 3/9 | Left and right turn signal. |
| 4 | Indication of drop in engine oil pressure. |
| 5 | ABS system fault indicator. |
| 6 | Lights up when the immobilizer is turned on. |
| 7 | The cooling system is overheating. |
| 8 | The brake system is in disrepair. You should add fluid to the RB and check the condition of the pads. |
| 10 | Battery charging indicator; if the lamp is on, the system is not charging. |
| 12 | Stability control is activated. |
| 13 | Prohibition of upshifting is used extremely rarely. |
| 14 | The high beam is activated and works normally. |
| 15/17 | Turn on the rear/front fog lights. |
| 16 | The head optics are switched to short-range mode. |
| 20 | One or more doors are unlocked. |
| 21 | The fuel level in the tank has dropped below normal. |
| 22 | The tire pressure has dropped and there may be a puncture. |
| 23 | There is a malfunction in the EUR system. |
| 24 | Requirement to fasten your seat belt. |
| 25 | Fault light in the electrics of the power plant. |
| 26 | The airbag is disconnected or its wiring is damaged. |
Exclamation mark on Granta's dashboard is on
The symbol is presented in the only indicator indicating a malfunction in the motor electrics. The lamp lights up when the ignition is turned on and goes out after the engine starts.
When an element blinks continuously or is constantly on, this indicates a breakdown. It is recommended to immediately go to a service station and have the defect repaired.
Steering wheel icon on the Granta dashboard
The pointer is responsible for indicating the operation of the power steering module. If the signal is constantly on, there is a problem with the power steering device. The steering may become “wobbly”.
The engine icon on the Grants panel came on
A yellow “check” on the dashboard indicates a malfunction in the motor. If the light comes on, immediately slow down and head to the nearest service center to find the problem and repair it.
Where is the engine temperature on the Grants panel
On the newest versions of the tidy, the indicator is displayed on the BC display. The first generation panels were not equipped with such a meter and only had an engine overheating lamp.
The easiest way to display the internal combustion engine temperature on the dashboard is to install a separate meter on a spare socket in the console. Due to the fact that the designs of non-standard devices can vary significantly, they should be installed according to the manufacturer's instructions.
The oil is burning on the Granta tidy and beeping: reasons
The car's oiler can only indicate problems inside the crankcase compartment. There is a drop in lubricant pressure here, which can cause a leak or pump failure.
Brief characteristics of the dashboard and dashboard
In general, 39 devices are conveniently and concisely placed on this panel, which is not so much. Everything looks very good. If it were not for the branded Lada badge on the steering wheel, one would get the impression that this is not a domestic car at all. By the way, the steering wheel of the car is adjustable in one or two options (this depends on the configuration of the Lada Granta).
The main instruments that the driver pays the most attention to are the speedometer and tachometer. In this version they are designed very simply and concisely. Thanks to large numbers, the data is easy and convenient to read. During night driving, a pleasant green backlight turns on, the brightness of which is not distracting at all. Soft light is another plus of this brand.
Between the two main instruments: the tachometer and the speedometer, the on-board computer display is conveniently located.
It can be used to track fuel consumption and distance traveled. The dashboard of the Lada Granta includes 4 air blowers. Their arrangement is as follows. One air duct is located on the driver and passenger sides. Two more are located in the central part of the shield.
As standard, not to mention the Lada Granta Lux, there is an airbag in the steering wheel.
There is also a multifunctional radio in the central part of the dashboard. If we talk about the Standard and Norma configurations, they also have a special compartment lid for the tape recorder.
Car owners should not have any questions about how to remove it. Everything is done in such a way that everyone can figure out how to detach the part and then install the audio system.
Video “Idea for tuning the Granta tidy”
How a tuned shield for a Lada Granta car works - see the video below (author - Sergey Sinyakov).
The dashboard in a car is a very significant element that can influence the first impression of the car as a whole.
When purchasing and evaluating a car, the buyer always pays attention to the instrument panel, its design and convenience. Not at all in vain, because the instrument panel is always in the driver’s field of vision.
The controls located on it must be correctly placed, taking into account the needs and position of the driver while driving the vehicle. In the Lada Granta, the instrument panel also plays the most important role among other interior elements.
Assessing the performance of the panel visually, it should be noted that domestic manufacturers tried harder than ever. It seems that the instrument panel on Grant meets all the driver’s requirements and desires in full. Let's look at the design and its other nuances in more detail.
Problems with the instrument panel
Errors on the Lada Granta instrument panel usually occur when it malfunctions. In this case, some of the devices fail, or the entire panel fails.
Possible options:
- The sensors on the Lada Granta instrument panel do not work correctly - for example, a light comes on when the doors are closed. This indicates that the indicator has failed, or the problem is a faulty instrument panel board. The sensor needs to be replaced, and you can try to reflash the board.
- When the sensors are working, all the indicators do not light up - most likely the fuse for the Lada Granta instrument panel has failed. It is also worth using a multimeter to check for damage to the wiring.
- One or more lamps on the panel do not light up - it is necessary to remove the panel and replace all failed elements.
- The indicator does not display the current state - for example, the high beam is on, but the light is not on. It is worth checking the contacts, the functionality of the sensor itself, and replacing the lamp.
Warning icons on the panel
The steering wheel icon can light up in two colors. If the yellow steering wheel is on, then adaptation is required, and when a red image of the steering wheel with an exclamation mark appears, you should already be concerned about the failure of the power steering or power steering system. When the red steering wheel lights up, your steering wheel will probably become very difficult to turn.
The immobilizer icon usually blinks if the car is locked; in this case, the indicator of a red car with a white key signals the operation of the anti-theft system. But there are 3 main reasons if the immo light is constantly on: the immobilizer is not activated, if the tag on the key is not read or the anti-theft system is faulty.
The handbrake icon lights up not only when the handbrake lever is activated (raised), but also in cases where the brake pads are worn out or the brake fluid needs to be topped up/replaced. On a car with an electronic handbrake, the parking brake light may come on due to a glitch in the limit switch or sensor.
The coolant icon has several options and depending on which one is lit, draw conclusions about the problem accordingly. One red lamp with a thermometer scale indicates an increased temperature in the engine cooling system, but a yellow expansion tank with waves indicates a low coolant level in the system. But it is worth considering that the coolant lamp does not always light up at a low level; perhaps there is simply a glitch in the sensor or float in the expansion tank.
Possible faults
If everything is clear with the description, then let’s move on to the malfunctions. Like any other electronic component, the Lada Granta instrument panel is also susceptible to various malfunctions.
What kind of breakdowns can occur in the operation of the control panel:
- The tidy is broken. If the shield fails, there can be quite a lot of symptoms. For example, only some or all of the devices will refuse to work. If this is the case, then the problem in this case may lie either in the power supply of the device or in its board. It is better to entrust repair problems to specialists.
- The tidy is glitchy. For example, all doors are closed and the unlocked door indicator is on, or the optics are not turned on, but the corresponding light on the dashboard is flashing. As a rule, in this case the problem lies precisely in the board (of course, if the sensors are working). If the problem is in the board, then flashing the dashboard firmware can solve it, but this option does not always help. It is possible that the electrical equipment lights are on on the dashboard due to a faulty sensor, so it would be a good idea to check its functionality.
- All devices work, but there is no backlight. If all the backlight bulbs do not work at once, then most likely the problem lies in a blown fuse or a damaged wire or connector. Checking the wiring is done using a multimeter.
- Only part of the light bulbs or one of them does not work. In this case, the malfunction consists of a burnt-out lamp; to eliminate it, the instrument panel in the Lada Granta is dismantled, after which the burnt-out lamps in it are replaced.
- The equipment indicator on the dashboard does not turn on. For example, you turn on the high beams, but the corresponding light does not light up. This may be due either to a failure of the indicator itself (the lamp is changed in the same way), or to a breakdown of the sensor. It is quite possible that there is poor contact between the light bulb and the wiring.
- Speedometer failure. The cause of the malfunction may lie in the board or speed sensor installed on the device. The situation is similar with sensors - fuel level, engine temperature. If they do not work or show incorrect values, then the problem should be looked for in the controllers themselves, wiring or board. It is possible that the devices are not working simply due to poor contact.
Typical malfunctions of the Granta liftback dashboard
- mechanical damage, which contributed to the failure of the contact board and terminals;
- exceeding the permissible voltage in the network, short circuit;
- failure of one / several sensors, which resulted in the transmission of incorrect, incomplete information to the on-board computer;
- ingress of moisture or aggressive chemical liquid, which resulted in failure;
- manufacturing defects;
- violation of installation technology;
- purchase of non-original products.
Removing and installing the instrument cluster from Lada Granta
1.
Disconnect the negative terminal of the battery.
2.
Then remove the instrument panel panel of the Lada Granta.
3.
Unscrew the screw securing the instrument cluster to the instrument panel mounting bracket.
Then carefully remove the instrument cluster from the socket by gently pulling it towards you. 4.
All that remains is to disconnect the wiring harnesses from the combination and remove it from the car.
5.
Installation of the instrument cluster is carried out in the reverse order of removal.
Tidy reset
To perform the procedure, you should scroll the shield regulator until the dial is reset to zero. If you need to perform a full reset of the panel, you need to disconnect power from the battery for 15 minutes and reconnect the wires.
The Grants panel is quite advanced and easy to understand for the driver. The indicators are intuitive, making it easier for novice drivers to learn.
Specialization : Graduated from the State Automobile University, worked for 20 years at GAZ-56, now I drive a Zhiguli.
Source
Dismantling instructions
To dismantle the device, you must follow the instructions:
- First remove the cover of the fuse box located to the left of the steering wheel.
- Unscrew the three bolts securing the plastic lining of the control panel.
- Dismantle the lining itself, and then unscrew four more bolts of the tidy. Pull it towards you.
- Next, squeeze the connector with the wires and disconnect it from the control panel.
- Dismantle the unit and repair or replace it. Assembly is carried out in reverse order.
1. Remove the cover from the unit.
2. Remove the tidy trim.
3. Unscrew the bolts and remove the shield.
Diagnostics of the instrument cluster on Lada Granta
1.
Turn on the ignition while holding the “Reset” button pressed.
All positions of the familiar areas (segments) should light up on the LCD - the LCD is being monitored. 2.
Press any of the control buttons.
The LCD should indicate the firmware version (for example, VEr 10). 3.
Press any of the control buttons. The following error codes (if any) should be displayed on the positions of the first and second lines of the LCD:
- 2 — increased voltage in the on-board network; 3 — fuel level sensor error (if a break in the sensor circuit is detected within 20 seconds); 4 — coolant temperature sensor error (if an open circuit in the sensor is detected within 20 s); 5 — outside temperature sensor error (if there are no sensor readings within 20 seconds, the LCD displays “-°C”); 6 — engine overheating (the criterion for triggering the acoustic alarm is met); 7 — emergency oil pressure (the criterion for triggering the acoustic alarm is met); 8 — defect in the brake system (the criterion for triggering the acoustic alarm is met); 9 — the battery is discharged (the criterion for triggering the acoustic alarm is met); 10—detecting an error in a data packet.
4.
Press the “RESET” button and hold it for no more than 3 seconds.
Error codes should clear to zero. 5.
Press any of the control buttons. All familiar positions should light up on the LCD, thus starting the LCD control.
Reporting a malfunction
The battery icon lights up if the voltage in the on-board network drops; often this problem is associated with a lack of battery charge from the generator, so it can also be called the “alternator icon”. On vehicles with a hybrid engine, this indicator is supplemented by the inscription “MAIN” at the bottom.
The oil icon , also known as a red oil can, indicates a drop in the oil level in the car engine. This icon lights up when you start the engine, and does not go out after a few seconds or may light up while driving. This fact indicates problems in the lubrication system or a drop in oil level or pressure. The oil icon on the panel may have a droplet or waves at the bottom; on some cars the indicator is supplemented with the inscription min, senso, oil level (yellow inscriptions) or simply the letters L and H (characterizing low and high oil levels).
The airbag icon can light up in several ways: either the red inscription SRS and AIRBAG, or “a red man wearing a seat belt,” with a circle in front of him. When one of these airbag icons lights up on the panel, the on-board computer notifies you of a malfunction in the passive safety system, and in the event of an accident, the airbags will not deploy. Read the article on the website for the reasons why the airbag sign lights up and how to fix the problem.
The exclamation mark icon may look different and its meaning will accordingly be different. So, for example, when the red (!) light is on in the circle, this indicates a malfunction of the brake system and it is advisable not to continue driving until the cause of its occurrence is determined. They can be very different: the handbrake is up, the brake pads are worn out, or the brake fluid level has dropped. A low level is precisely what poses a danger, because the reason may not only be in heavily worn pads, as a result of which, when you press the pedal, the fluid disperses throughout the system, and the float gives a signal about a low level, the brake hose may be damaged somewhere, and this is much more serious. Although, very often the exclamation mark lights up if the float (level sensor) is faulty or shorted, and then it simply lies. On some cars, the exclamation mark is accompanied by the words “BRAKE”, but this does not change the essence of the problem.
An exclamation mark can also light up in the form of an “attention” sign, both on a red and yellow background. When the yellow “attention” sign lights up, it informs about a malfunction in the electronic stabilization system, and if it is on a red background, it simply warns the driver about something, and, as a rule, explanatory text is displayed on the dashboard display or combined with other informative text designation.
The ABS icon may have several display options on the dashboard, but regardless of this, it means the same thing on all cars - a problem has occurred in the ABS system, and that the anti-lock wheel system is not working at the moment. You can find out the reasons why ABS does not work in our article. In this case, movement can be made, but there is no need to rely on the ABS to activate; the brakes will operate as usual.
The ESP icon may either light up intermittently or stay on constantly. A light with this inscription indicates problems with the stabilization system. The Electronic Stability Program indicator, as a rule, lights up for one of two reasons - either the rotation angle sensor has failed, or the brake light sensor (aka “frog”) has died for a long time. Although, there can be a more serious problem, for example, the brake system pressure sensor is covered.
The engine icon , some drivers may call it the “injector icon” or check, may glow yellow when the engine is running. It informs about the presence of engine errors and malfunctions of its electronic systems. To determine the reason for its appearance on the dashboard display, self-diagnosis or computer diagnostics are performed.
Do-it-yourself dashboard tuning in Lada Granta
A budget option for improving the appearance of the dashboard is to paint individual elements: the dashboard, air ducts. Typically, all interior plastic and control elements are made in dark gray or black. Refining them will allow you to transform the car and highlight certain parts of the dashboard.
The Lada Granta dashboard, modified in-house, as described below, will perfectly complement the interior style of the domestic car. Work on painting the panel should be carried out according to the following instructions:
1. Remove the shield from the center console.
2. Air ducts and their round frames are removed.
3. The removed elements are cleaned with a degreaser (you can simply clean the surface with a rag soaked in the solution).
4. The shield and air ducts, framing rings are coated with primer. Priming is done twice; before reapplying the composition, you need to make sure the first layer is completely dry.
5. After priming, you can apply paint to the prepared plastic. It is advisable to use a special aerosol can for application: with its help it will be easy to distribute the composition and prevent the appearance of smudges.
6. Once the paint has dried, you can coat the elements with clear varnish.
7. The dried air ducts and shield are installed on the dashboard.
The improved Grant tuning dashboard, which was described above, will look modern and attractive. This method is one of the simplest options for its modification.
Complete painting of the torpedo is a more labor-intensive task and requires removing the steering wheel and all other elements. The complete painting procedure may take 1 or 2 days. According to the specified algorithm, the work is carried out within 6-12 hours, depending on the selected type of primer, paint and varnish.
A more complex, but also more effective method of modifying a torpedo is to install a new backlight. It requires experience in repairing or replacing car electronics and the ability to carefully solder small elements.
Simple and complex tuning of the Lada Granta dashboard, which is not attractive and modern enough, will significantly improve the appearance of the interior. In most cases, the work can be done with your own hands without investing large sums of money. A self-improved car will definitely become a source of pride for its owner.
Composition of VAZ instruments – 2192 Granta, Kalina 2 FL “luxury”.
Dear customers, in order to avoid errors when sending an electrical composition of devices (EC), in the “Comment” line, indicate the model of your car, year of manufacture, month with or without chrome.
Before shipping, we check all compositions for functionality, excluding the possibility of defects.
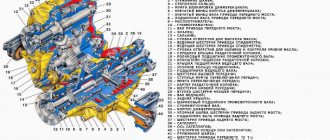
Compositions of vehicle instruments are designed to process and display information about the multifunctional and technical condition of components, assemblies, systems and vehicle movement characteristics.
The electrical composition of the instruments makes it possible to display all the characteristics of the car that the driver needs. The composition of the instruments merged all the control and measuring instruments - backlight lamps, control lamps, indicators of the level and temperature of the cooling water, fuel level indicator, speedometer, tachometer, clock, temperature indicator, total and daily mileage counter of the car.
The dashboard of the Lada Kalina 2, Grants looks presentably modern, it not only fits perfectly into the interior, but is also very easy to use, you don’t need to be distracted from the road, everything is placed side by side, you just need to look a little at the instrument panel.
The instrument cluster has 25 built-in indicators that light up when certain criteria or defects occur.
1. Tachometer. Do not exceed the very permitted engine crankshaft speed (threshold - 5500 rpm).
2. The control lamp for turning on the left turn signal (with a greenish filter in the form of an arrow) lights up with a flashing light when the left turn signal is turned on (synchronously with it). Flickering of the control lamp with double frequency indicates a burnt-out lamp in any direction indicator.
3. An induction type speedometer indicates at what speed the car is moving at that moment. The scale is graduated from 0 to 200 km/h, the division value is 10 km/h. The speedometer is driven electronically by a sensor installed on the gearbox housing.
4.Indicator lamp for turning on the right turn signal.
5.Water thermometer in the engine cooling system. If the indicator needle enters the reddish zone (more than 115 °C), which means the motor is overheating, then a constant (within 5 s) sound signal is heard. It will be repeated until the needle leaves the reddish zone (less than 110 °C). If the needle is in the reddish zone, you should brake, let the engine cool and remove the cause of overheating.
6.Fuel level indicator. Indicates the need for refueling to avoid interruptions in engine operation.
7. Signal lamp for spare fuel remaining. Lights up in orange when the vehicle needs to be refueled to avoid interruptions in engine operation. Immediately when the warning light comes on, an intermittent sound signal is heard (2 repeated switches on/off for 0.25 seconds).
Creaks on the parting panel of the Lada Granta
The description of the Lada Granta instrument panel comes down not only to the positive aspects of the design. According to reviews from car owners themselves, after some time of using the car, the instrument panel still begins to creak and knock in some places. Fortunately, as a rule, these places are typical, and with some effort, you can get rid of these problems on your own.
Creaks usually appear in the following places:
1. The center console is the place where the radio is located or is intended to be located.
2. Areas with built-in airbags or with plugs instead.
3. An air duct or cable that serves as a lever for drawing air into the air conditioning system.
4. Dashboard visor.
These problems are not great and, if necessary, you can get rid of them yourself using sound insulation materials.
Sources
- https://la-granta.ru/pribornaya-panel-lady-granta.html
- https://Vaz-Lada-Granta.com/elektrika-tormoza/panel-priborov.html
- https://www.tungrem.ru/avtomobili-lada/lada-granta/561-opisanie-paneli-priborov-lada-granta
- https://1LadaGranta.ru/harakteristiki/panel-priborov-avto.html
- https://NaDomkrat.ru/ustroistvo-avtomobiley/panel-priborov/obzor-paneli-priborov-avtomobilya-lada-granta
- https://avtozam.com/vaz/lada-granta/harakteristika-pribornoj-paneli/
- https://vgrante.ru/?cat=15&pcat=15
- https://la-granta.ru/panel-priborov-lada-granta.html
Sequence of actions when dismantling the dashboard
The reasons for disassembling and replacing the Grantback liftback dashboard are very varied: damage, installation of a new diode, etc.
- We unscrew the three mounting bolts around the perimeter. Carefully remove the assembled unit so as not to damage the contact boards, electrical wiring, and terminals;
- Remove the instrument panel mount for the Lada Granta liftback;
- To replace the tachometer/speedometer needles, you need to move the lever up a little and turn it counterclockwise.
After the final replacement and maintenance, we reassemble the structure. Self-repair of the front panel of the Grant liftback is completed.