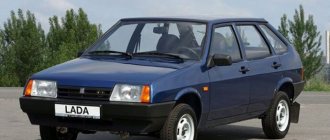
How many light bulbs are there in the dashboard of a VAZ-2110
Car : VAZ-2110. Asks : atom. The essence of the question : how many backlight bulbs TOTAL are there in the dashboard of a VAZ-2110?
Good afternoon, I will re-light the instrument panel.
Tell me what type of light bulbs are in the instrument panel and how many of them you need to buy. I want to take diode ones, which one is better?
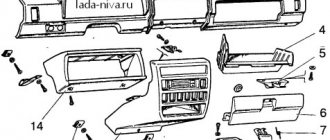
Disassembly and replacement of devices
To replace (repair) devices, you need to perform the following actions in a strictly established order:
The entire combination of devices should be completely removed.
Unscrew the screws (2 pcs.) that secure the tire. After which the bus itself must be disconnected from the device system board.
Unscrew the screws (7 pcs.) that secure the frame with glass.
You need to remove the frame by disconnecting it from the device system.
Unscrew the 2 screws that secure the device composition board.
Disconnect the left light filter, which is marked with warning lamp symbols.
Disconnect the right light filter, which has warning lamp symbols on it.
Unscrew the screws (2 pieces each) that secure the reddish and snow-white pads. Then remove these pads.
LEDS IN THE INSTRUMENT PANEL FOR VAZ 2110 2111 2112
Unscrew the nuts securing the fuel level sensor, cooling water temperature sensor and tachometer. Each device is secured with 3 nuts.
Disconnect the board from the device system housing.
Unscrew the screws securing the device scale to the body (5 pcs.).
Remove the scale with devices from the system body.
Very carefully, prying the arrow of the fuel level indicator with a screwdriver, you need to remove it from the axle.
Unscrew the screws (2 pcs.) that secure the fuel level indicator to the scale.
Disconnect the fuel level indicator. Install a new one in its place. When installing the sensor, perform all steps in the reverse order of removal.
Change other devices in the same manner as described. This is the entire repair of the VAZ 2110 device panel. You see, there is nothing difficult and there is no need to go to a special service center and pay money.
The assembly of the device system must be carried out in the reverse order of the disassembly procedure. When carrying out this work, you need to take into account that the nuts that secure the tachometer have a different thread.
Types of lamps in the instrument panel on the VAZ-2110
The lighting located on the instrument panel, as well as indicators that demonstrate the status of various units on the VAZ-2110, is carried out using incandescent lamps ( in stock ). Over time, they burn out - we had a case when almost all the lamps burned out. We also replaced them with LED bulbs.
- 12V 1.2W incandescent lamps are used .
- Installation is carried out in cartridge W1.2W .
Number of lamps = 17.
When replacing, you can update both the incandescent lamps separately and with the socket. To replace a complete set for backlighting and indicators, you will need to purchase 17 incandescent lamps with the previously specified characteristics.
Indication symbols
As you know, all the lights on the control panel come on when the ignition is turned on, and then, when the engine is already running, most of them go out. But when one remains on or blinks, this cannot but be alarming, because not everyone can immediately figure out what malfunctions this indicates, which of the systems needs urgent repairs.
Let's look at the designations of the instrument panel of the VAZ 2110. You should know that regardless of whether the panel is new or old on your car, the designations are almost the same, but the indicators may be located slightly differently.
Nuances and subtleties of do-it-yourself tuning of the instrument panel illumination of the VAZ 2110
There may be many reasons why an owner might want to change the instrument panel lighting on his VAZ 2110. First of all, out of a desire to bring the “interior” of your favorite car from the domestic automobile industry closer to the best examples of imported cars.
Of course, it’s no secret: even if at first the instrument panel on a VAZ (even an old model, even a Euro, even a Priora) looks, let’s say, so-so, then over time the backlight also shines less and less.
Instrument panel of VAZ 2110 with LED backlight
Therefore, if you really want to, then replacing the backlight, and perhaps the entire dashboard, with your own hands is not at all a complex operation. Let’s try to explain in detail how to do this.
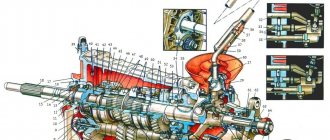
Device
The entire instrument cluster is mounted on the panel with two bolts and consists partly of mechanical and partly of electronic components. The electronic component of a regular panel is a speedometer and tachometer, but some cars from the VAZ 2110 model range already have an electronic panel.
Also, there must be indicators: coolant temperature, availability, fuel level, as well as warning lights, of which there are 12 installed on the VAZ 2110.
All device connections are stored in a printed circuit board, which is mounted on the back of the case.
Dashboard of VAZ 2110 disassembled
Removal and disassembly
Do-it-yourself removal of the instrument board is carried out according to the following algorithm:
Simple and fast upgrade
In principle, with your own hands you can either completely replace the instrument panel of a VAZ 2110 or tuning the existing one.
One of the quite popular options is replacing light bulbs with LEDs. Moreover, there is no difficulty in this - you need to remove the light bulbs and insert LEDs in their place.
However, there is one small trick: they work well only if the polarity is observed! If the LED does not light up immediately when connected, you need to remove it, turn it 180 degrees, then reinsert it into the socket.
Even such a simple replacement will increase the brightness of the dashboard, but this is not enough, it is hardly worth completing the tuning with your own hands.
Deep revision
It is also advisable to add lighting - using an LED strip. You can take a white one, or a colored one. Preferably something that is not too harsh on the eyes – perhaps blue or green, depending on the owner’s taste.
Today, blue light is the most popular - it gives good visibility of readings on all instruments, but does not interfere with the driver’s ability to see the road clearly.
Another good idea is to make the arrows glow a different color. To do this, they need to be cleaned of old, red paint, and then painted white.
It could be nitro enamel or, even simpler, white nail polish. A color LED must be installed next to the needle on the instrument scale. The arrow, changing its position, will be colored differently.
Additionally, when using only white light, a colored overlay will help. That is, even without electrical intervention, the colored film overlay will change its appearance.
If possible, the light filter is removed, and the backing is decorated with an overlay, and here you can get creative with different materials and colors (electrical tape, colored tape, colored vinyl film). Such an overlay will significantly transform the panel and make it exclusive.
Priora panel
Some people prefer the Priora's dashboard. You need to know that you won’t be able to change it with your own hands “in a hurry” - there are differences: in the wiring, in the mounting of the ECU.
It should also be taken into account that the Priora has the same “propensity” for unnecessary squeaks as the “native” one, so you should also think about sound insulation in order to “fit” the Priora panel without unnecessary gaps and cracks. Another drawback of the Priora is the small glove compartment. In addition, you must definitely purchase a mount in the ECU area, specifically from Priora.
Panel from Priora in VAZ 2110
Or maybe you even liked the electronic panel, the installation of which is also possible. However, before you decide, do not forget to calculate how much such a replacement will cost you.
It is quite possible that tuning the lighting you already have, carried out with imagination and invention, will cost you much less. In this case, tuning yourself will become a source of pride for you, and will not only decorate the interior of your VAZ 2110, but also improve the lighting, make it brighter and more comfortable.
Top part
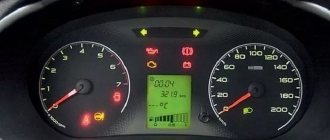
So let's start from left to right. First, the top part of the control panel:
- Side scale from 50 to 130 and arrow. Shows the temperature of antifreeze (antifreeze) in the engine cooling system;
- Almost round scale (0 – 80) and arrow. Tachometer showing engine speed;
- Two arrows at the top, almost in the middle of the control panel - turn signals (right, left);
- Speedometer. Well, this device, probably everyone knows, shows the speed at which the car is moving;
- A side scale with an arrow and, most often, two images of a filling column (white and red). Instead of a red column there may be a yellow light. This is an indicator of the fuel level in the tank. If the red column (yellow light) lights up, it means that there is very little fuel left in the tank - no more than 7 liters, urgent refueling is required.
Bottom part
Let's look at the indicators at the bottom of the control panel. If they don’t light up, it means the machine is working normally, and when any of them lights up, this indicates a malfunction in certain components. Most often, this is a signal that repairs are needed, and the sooner the better. From left to right:
- The indicator on the far left at the bottom is the air damper light (if you have a carburetor engine);
- Icon in the form of an oil can. If this light comes on, it means there is insufficient oil pressure in the engine. An alarming signal. You need to stop, find the reason;
- A round icon with the letter P inside on the control panel indicates that you have the parking brake on, which, as you know, should be turned off when moving away;
- Indicator of a fault related to the generator or battery (a symbolic image of the battery is shown on the indicator). Perhaps the battery is not charging from the generator, there is an open circuit, or the generator belt is loose or broken. In any case, your intervention and repairs are needed, otherwise troubles cannot be avoided;
- If the engine is running and the Check Engine indicator is on on the control panel, this is the most unpleasant thing for the driver, since it indicates serious malfunctions in the engine. In general, when this indicator lights up, it is recommended to stop driving and turn off the engine. Most likely it needs repairs;
- Typically there is a red triangle above the Check Engine. It lights up when the “hazard light” is on - an emergency signal sign;
- The headlight light indicates that the high beam is on. Designed to control headlights: when an oncoming car appears, do not forget to switch to low beam;
- A very important indication icon on the front panel (in a red circle) is a signal that there is not enough brake fluid. Perhaps it is leaking somewhere, which it is advisable to find out as soon as possible and, if necessary, carry out urgent repairs and replenish the level;
- The icon of a burning light is a control for turning on the dimensions;
- In addition to the indicated lights, the front control panel has time indicators (and a button for setting hours and minutes) as well as a display that shows the total and daily mileage. On the new panel, this display may be narrow.
Additional panel
The additional front panel of the new-style BSK control has indicators:
- An oil can is shown. If the light works, check the oil level;
- An icon lights up, which, with some imagination, can be “identified” as working wipers. This indicates that there is not enough windshield washer fluid in the tank;
- Conventional image of a thermometer over a container with liquid - high temperature of antifreeze;
- A crossed out light, which the arrow points to, is a sign that the brake light or parking lights are not working;
- If the light with the image of a wheel with brake pads lights up, it is quite possible that the pads are worn out and require replacement;
- The sign of a man with a seat belt indicates that the seat belt should be fastened.
Removal and modification
Here's a quick look at the device and control panel icons. If for some reason she refuses, don’t immediately panic. Most often, the reason is the absence of contacts in some place in the wiring. But of course, if you wish, you can completely change or tune the panel.
For example, remove the cover and replace the light bulbs with brighter LEDs. Such a panel works brighter and the signals sent by the car will be more noticeable to the driver. If desired, you can install a more solid europanel, which will transform the interior.
- Disconnect the “-” wire from the battery;
- Remove the shield by unscrewing the screws;
- Remove the fastenings of the control panel to the trim, remove the instrument cluster from the socket;
- Remove the glass mask;
- Disconnect the wires from the block;
- Make changes to the instrument panel or replace it with a new one. Reassemble everything in reverse order.
Source
Disassembly and replacement of devices
To replace (repair) devices, you must perform the following actions in a strictly established order:
Unscrew the screws (2 pcs.) that secure the tire. After this, the bus itself must be disconnected from the instrument system board.
Unscrew the screws (7 pcs.) that secure the frame with glass.
It is necessary to remove the frame by disconnecting it from the instrument system.
Unscrew the 2 screws that secure the instrument cluster board.
Disconnect the left light filter, which is marked with warning lamp symbols.
Disconnect the right light filter, which has warning lamp symbols.
Unscrew the screws (2 pieces each) that secure the red and white pads. Then remove these pads.
Unscrew the nuts securing the fuel level sensor, coolant temperature sensor and tachometer. Each device is secured with 3 nuts.
Disconnect the board from the instrument system housing.
Unscrew the screws securing the instrument scale to the body (5 pcs.).
Remove the scale with instruments from the system body.
Very carefully, prying the arrow of the fuel level indicator with a screwdriver, you need to remove it from the axle.
Unscrew the screws (2 pcs.) that secure the fuel level indicator to the scale.
Disconnect the fuel level indicator. Install a new one in its place. When installing the sensor, perform all steps in the reverse order of removal.
Replace the remaining devices in the same manner as described. This is the entire repair of the VAZ 2110 instrument panel. As you can see, there is nothing complicated and there is no need to go to a specialized service center and pay money.
Assembly of the instrument system should be carried out in the reverse order of disassembly. When carrying out this work, it is necessary to take into account that the nuts that secure the tachometer have a different thread.
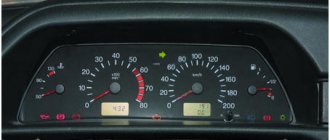
Location of lamps on the dashboard of the VAZ 2110
In order to replace a specific light bulb, you need to clearly know its location. Let's look at the dashboard of a VAZ 2110 car and find out which light bulb is responsible for what.
The purpose and location of the dashboard lights of a VAZ 2110 car, where:
- 1, 5, 7, 8, 12, 15 and 20 – illumination of the pointer instrument system;
- 3 – control of the right direction indicator;
- 4 – control of the left turn signal;
- 9 – emergency low oil pressure;
- 10 – parking brake;
- 11 – the generator is faulty (the battery does not charge);
- 13 – activation of the alarm;
- 14 – malfunction of engine systems;
- 16 – control of turning on the high beam;
- 17 – critically low brake fluid level;
- 18 – control of turning on external lighting (side lights and low beam);
- 19 – critical fuel level sensor (reserve 6-7 l).
What lamps are installed and how many of them?
The VAZ instrument panel is illuminated and the status of the vehicle’s components is indicated using 12 V 1.2 W incandescent lamps, which are installed in a 2W2 socket. The lamp is easily pulled out of the socket - you just need to pull it with your fingers; it can be purchased either separately or with a socket. In total, 20 lamps are used for lighting and indication in the instrument panel for the VAZ 2110, and they are inexpensive - 5-10 rubles. (at the time of writing) depending on brand (without cartridge).
VAZ car lamp installed in a socket and without it
If desired, instead of incandescent lamps, you can install LED ones in the VAZ instrument panel - they are produced for the same voltage with the same standard size and can be either with or without a socket. By the way, in the latest modifications of dozens of VAZs, LED light sources have already been installed.
LED bulbs without socket and with socket for VAZ 2110
Why are LEDs better?
First of all, they have a longer service life (up to 20-30,000 hours instead of 1,000 for incandescent lamps). They are not afraid of vibrations and are 8 times more economical. But you have to pay for all this in the literal sense of the word: LED light bulbs are many times more expensive than their conventional incandescent counterparts. If you consider that there are 20 of them in the VAZ panel, the amount will be considerable.
Be careful with the generator warning lamp; based on feedback from our readers, it is better to replace it only with the same one.
The backlight of the VAZ 2114 instrument panel does not light up: do-it-yourself repairs
Bright backlight
But quite often VAZ 2114 owners discover that the instrument panel backlight does not light up. If such a situation occurs, appropriate action should be taken immediately to eliminate it.
Why the instrument panel does not work
Disassembled dashboard
The first thing you need to figure out is why the instrument panel on the VAZ 2114 does not work. If the backlight goes out, there may be several reasons for this:
- The incandescent lamps burned out, the LED lighting groups stopped working;
- The connectors have oxidized;
- The electrical wiring is faulty, there are defects in the circuit;
- The fuse box has stopped working;
- Damage appeared on the common contact board;
- The dimensions system is damaged;
- There is no minus on the body (weight).
Removing the dashboard
Scheme for disassembling the panel
Therefore, now let’s figure out how to disassemble the instrument panel on a VAZ 2114:
- Unscrew the three screws, remove the trim and the protrusion from below. It comes out of your car's body bracket;
- Now remove five more screws located on the right console trim;
- Remove the screen; Disconnect the negative terminal from the battery;
- Disconnect the wiring harness connector from the cigarette lighter;
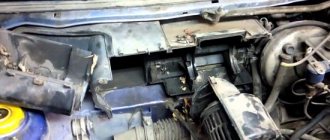
- Remove the handle from the lever;
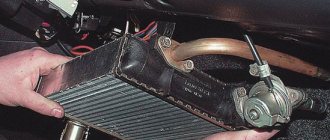
- The fasteners for the electric fan of the heating system, that is, the stove, also have to be removed;
- Unscrew the steering wheel block bracket fixing bolts;
- Remove LEDs, lamp sockets and decorative inserts on the panel;
- Unscrew the hydraulic corrector illumination lamp. For this you will need a key for 21;
- Now all that remains is to remove the screws at the top and bottom.
Thus, we figured out how to remove the dashboard on your VAZ 2114. Be sure to cover the electrical circuit with something after the measures have been taken to prevent moisture, dust and all kinds of contaminants from getting there.
Selection of light bulbs
Wiring ringing
Today, the market offers a wide range of lamps that can be used for the dashboard of the VAZ 2114. Among the most well-proven devices, we note a few. Their name and cost are presented in the table.
| Manufacturer | Price |
| LED lamps Sho-Me SM-T5 (blue, white and red (Korea) | 80 rubles - pair |
| High Brightness SMD LED Module | 20 rubles |
| LED Sho-me SM-T5-cap-super (white) | 50 rubles |
| Osram and Philips halogen lamps | About 40-80 rubles per unit |
Replacing the backlight
In analysis
To improve the quality of your dashboard lighting, it is advisable to install new LEDs in place of the old ones. They provide excellent illumination, consume minimal energy, and guarantee a high level of data reading.
- Buy a set of LED lamps, having previously calculated the number of devices needed for each sensor.
- After removing the block, install the resistors and lamps in specially designated places on the VAZ 2114 - in the sockets. To dismantle the cartridges, they are carefully unscrewed counterclockwise. New sockets are installed in their place and light bulbs are inserted. Respect the polarity and position the LED heads. They will have to be carefully ground off.
- Connect the power and check how the new backlight works.
- Reassemble step by step. Be sure to route the wiring to the board and carefully secure it to it. This way, the backlight components will not interfere with the reassembly process.
- Make sure the instrument panel arrows are positioned correctly. When trying to quickly complete a job, they often become deformed and bent.
- The backlight structure is fixed with screws.
- The power for the LEDs is connected to the power supply for the light bulbs, the arrows are put on and set to zero.
- Using the on-board computer, check the operation of each sensor and device. If the IDs are functioning correctly, return the instrument panel to its original condition. That is, assemble the entire assembly.
How to remove the tidy
On a VAZ 2110, removing the dashboard from the dashboard is not difficult, and the only tools you need are a Phillips screwdriver and pliers or a wrench. With their help, we will remove the positive terminal from the battery before starting work. So, lower the steering wheel and unscrew the 4 screws that secure the decorative trim.
Releasing the decorative trim on the VAZ 2110
After this, we pull the cover towards ourselves, and it can be easily removed, hanging on the wires of the switches. To prevent the cover from getting in the way, the wires from the switches can be disconnected - they are on the connectors.
Disconnecting wires from switches and removing buttons located on the decorative trim
Before disconnecting the connectors, do not forget to label them so as not to mix them up during assembly!
So, now we have a tidy in front of us, which is held in place by two screws located on the sides.
The instrument panel is secured with two screws
We unscrew them and carefully remove the panel, not forgetting that it is also on the wires. In principle, the wires supplying the instrument console in the VAZ do not need to be disconnected, since their length is sufficient to replace the lamps.
The ten have long enough wires, they allow you to replace light bulbs without disconnecting the connectors
Removing the instrument panel and preparing for replacement
To change the lamps in the instrument panel, the latter will have to be removed. It cannot be said that the PP can be removed with one movement of the hand: the designers of the VAZ 2107 made dismantling a little more difficult than on other cars of the VAZ family. Nevertheless, dismantling the PP is quite feasible in a garage or even a parking lot. In this case, the operation does not require any special knowledge. The tools we will need are:
- small flat screwdriver or knife;
- crosshead screwdriver.
I think all this will be found in the trunk of any VAZ 2107, and we can get started. First of all, we remove the plastic handles from the heating control knobs by prying them off with a flat screwdriver.
Removing handles from the seven's interior heating system
We unscrew the nut securing the daily counter reset button (marked with a red arrow), and push the button itself inside the shield.
Removing the daily counter reset button
Now you need to unscrew the screw that is located under the plug and secures the decorative trim. Remove the plug using a flat-head screwdriver and unscrew the Phillips screw.
Removing the fixing screw of the PP decorative trim
After this operation, the right side of the panel will move away so that you can get to the flexible speedometer control shaft.
Releasing the right side of the control panel on a VAZ 2107
The shaft is removed with bare hands: simply unscrew the nut securing it.
Removing the speedometer drive
Now remove the instrument panel from the clamp that secures its left side and pull it out slightly to get to the vacuum hose connected to the econometer. It can also be removed with bare hands, but be careful not to tear it.
Removing the vacuum hose from the econometer to the PP
It remains to disconnect the three power connectors of the instrument panel and the three wires on the VAZ 2107 heater switch. Before disconnecting, it is advisable to mark them so as not to confuse them when assembling the panel.
Disconnecting the power wires from the heater switch
We remove the decorative trim along with the PP and unscrew the four self-tapping screws securing the shelves (two on each, I marked them with red arrows) to the decorative trim, and the instrument panel can be removed.
Removing PP from a decorative trim
Restoring the backlight and changing the warning lamps
We remove the light bulb that needs to be replaced (the purpose of the light bulbs is in the first photo of the article). To do this, turn the socket counterclockwise 90 degrees, and it will easily come out along with the light bulb.
Replacing a light bulb without disconnecting the power wires on a VAZ 2110
We remove the burnt device from the socket, insert a new one in its place and install the socket with the lamp in place, turning it 90 degrees, but clockwise. After this, we install the terminal on the battery, turn on the ignition and check the operation of the VAZ panel, performing the appropriate manipulations: turn on the hand parking brake, headlights, turn indicators, high beam headlights, etc. If everything is in order, then install the panel and decorative trim in place .
Repair of "tidy" VAZ 2110
The domestic car 2110 cannot boast of a high-quality panel. In severe frost or summer heat, plastic often begins to crack. In addition, sometimes its corner also comes off. The “tidy” of this machine consists of three parts: a central, upper lining and a lower plastic lining. The corner most often comes off through: unscrewing the screws that attract the top cover, or through the fact that its soft part has moved away from the metal part of the top cover.
In the first option, you need to remove the panel, because otherwise you won’t be able to tighten the top trim. If only the soft part has come off, then there may be several solutions. You can glue it, but it will not stick tightly to the plastic air deflector. Another option is to mask the gap that forms when the corner of the panel peels off.
You can, of course, cover the gap with wire. It is placed inside using a screwdriver. Instead of a wire, you can use a headlight seal. In this case, you can return the corner to its place. Polyurethane foam is used to glue the corner. The casing, thanks to the foam, will stick to the metal body, but first it needs to be cleaned and degreased.
Then we apply foam inside, using a wet rag to remove excess foam. Use paper clips to press the corners. There is no need to remove the foam immediately. You should wait until it dries. After the foam has dried, you need to paint over it with a marker. It may seem like the foam is bursting, but in fact, the corners of the panel will not come out.
Now you can move on to repairing the crack in the panel. To do this, use either a plastic repair agent or tighten the lining with material. As for the first option, it is the simplest, because during repairs you do not need to remove the cover. You can remove the crack using a special epoxy resin.