Repair
Regardless of what exactly you do with the rocker - repair, adjust or change, you will still need to disassemble this unit.
Disassembly is performed as follows.
- Remove the cover from your gear shift knob.
- Place the car on a pit, or raise the front end with a jack.
- Remove the front console. It is held in place by mounting bolts.
- Now remove the curtain itself. To fix it, AvtoVAZ used 6 bolts in the case of the VAZ 2110 model.
- When carrying out dismantling work, be sure to examine the condition of all elements.
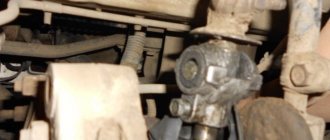
- By bending the boot, you will gain access to the support, oil seal and cardan shaft.
Now regarding the repairs. There may be several recommendations in this regard, depending on the current state of the node and its components.
- At best, repairs will require the use of a repair kit for the backstage. It doesn't cost much.
- If the bushing is deformed, it will need to be replaced with a new one.
- Check the lever shaft bore for wear.
- Make sure there is no play in the driveshaft. Otherwise, a regular repair kit will no longer be enough, that is, a complete replacement of the entire backstage will be required.
- Often the culprit of extraneous noise and rattling when shifting gears in gearboxes is the rocker pad. Changing it is quite simple, and even a beginner can perform the operation.
Replacing the oil seal
Quite often, VAZ 2110 owners are faced with a situation where, after parking under the car, they find traces of oil. There are two options here - the oil filter has worn out or there are problems with the oil seal.
As you replace the oil seal, you will be able to simultaneously inspect and change such elements as the cushion, cardan shaft, and boot.
But let's talk about everything in order. First of all, check whether it is really an oil seal and not a filter. If everything is fine with the filter, then we drive the car into a pit or find another way to end up under the bottom of your VAZ 2110. Beforehand, it would be a good idea to watch video materials regarding your current situation.
- Carefully inspect the boot. If oil leaks from the gearbox through the oil seal on your car, traces of it will definitely remain on the boot.
- Bend back the boot. This way you can get to the cardan, disconnect it and gain access to the cuff.
- You first need to dismantle the cardan from the lever, and only then from the rocker itself. Not the other way around.
- The cardan has been removed, so we move to the oil seal.
- The cuff is removed from the gearbox using a hook and an awl. Therefore, make sure you have these tools at hand in advance.
- Now a new one is installed in place of the old oil seal. Craftsmen have adapted to using ordinary plastic bottle caps. If you get used to it, it turns out to be very easy to change the oil seal.
- After replacing the element, return all dismantled components to their places. If some of them need replacing or signs of wear are already visible, it is better to replace them immediately. It is unlikely that you will want to repeat the same operation in a couple of weeks and lie under your own car.
Repair will not give the desired result if the adjustment was carried out with errors. To do everything carefully and competently, use the help of a partner. One will work under the car, the second will help from inside.
The gearbox is one of the most complex components of a vehicle. However, this does not mean that its repair cannot be done at home on your own. Now we will tell you what the VAZ 2110 rocker is, what may be the reasons for its malfunction and how to repair the mechanism.
Fighting the ringing
Typically, a ringing sound appears after adjusting the gear shift lever. To correct this drawback, you need to install a spring to hold the lever. The development of mechanical engineering makes it possible to replace the parts of the VAZ 2110 backstage with similar, but more advanced ones. For a VAZ car, the Kalina rocker is ideal.
In this case, the cardan from the new model is modified to be 20 mm longer than on the ten. This sound is directly related to the part itself; the Kalina rocker has no play, and all the vibration is transmitted into the car interior, to the gear shift lever itself. The easiest way to get rid of rattling is to install a spring.
By holding the lever, it will prevent vibration from occurring. When performing such repairs, it is not necessary to disassemble parts of the car. A more reliable way would be to install a rubber or plastic washer. It will take a little longer, but the effect will be more effective. To make a repair, the following is required:
- soft plastic, you can use a regular glass jar lid;
- file;
- scissors;
- screwdriver;
- keys for “10” and “13”.
This repair involves removing the casing from the gearshift lever and lifting it up; the lever itself does not need to be removed. Afterwards, you need to unscrew the nut, using the Phillips bit to unscrew the screw. You can use a screwdriver and push it through the side of the tunnel. Then unscrew two more nuts with a “10” wrench. Cut out a washer from plastic. The most important thing remains, you need to insert these washers into the mechanism.
The process itself will not be easy, since the hole is very small. The washers are inserted along the left and right sides of the bushing. It will have to be sharpened; the thickness of the washer is only 1.5 mm. Place oil-resistant rubber rings onto the bushing axle on both sides. The parts need to be slightly compressed. This repair will allow you not to hear the ringing noise for a long time, and the speeds will switch much smoother.
Remember: the tighter the nut on the gear shift knob is tightened, the harder it moves. All these types of manipulations can more likely be attributed to masking defects rather than repairs. The main thing is to find the cause of the vibration. You may have to replace the entire repair kit for the rocker or modify the linkage joint.
To get rid of all this, you need to carry out a simple procedure for adjusting the gearbox rocker, especially since adjusting the rocker will take you no more than half an hour.
The gearbox slide is necessary to prevent random switching of gears due to the simultaneous movement of the sliders. Often, the entire transmission suffers from an incorrectly adjusted rocker, and as a result, you are at risk of malfunctioning the entire gearbox. In our previous articles, we have already talked about this detail several times, for example, in the article: About how to install a short-stroke rocker on a Lada Priora, as well as in the article: Installing a short-stroke rocker on a VAZ 2109. In addition, the issue of engaging gears and gearboxes is addressed in this article.
Adjusting the gearbox slide requires the presence of an assistant, in which case the result, and the work itself, will be of better quality. It is fashionable to adjust the slide in several ways; below we will talk about each of them in more detail.
How to adjust the rocker on a VAZ 2110 with your own hands
Before adjusting the gearbox linkage, it is necessary to perform a number of preparatory work:
- Drive the car into the pit.
- Tighten the handbrake and install the wheel chocks.
Method No. 1 - adjusting the rocker according to the rear speed.
- Loosen the clamp.
- Engage reverse gear and position the lever as you would like it to be in this position.
- Then tighten the clamp and check how the rocker works, whether you are satisfied with the current position of the lever and the operation of the rocker.
Method No. 2 - adjusting the rocker at first speed.
This method is used, as a rule, when the first method did not produce results.
- Turn on first speed.
- Loosen the rocker clamp.
- Turn the rocker drive counterclockwise until the gearshift lever begins to rest against the plastic reverse speed stop.
- Tighten the clamp and check how everything works.
Method No. 3 - adjusting the scenes in neutral.
If you do not have a plastic stopper, the adjustment is made in neutral gear.
To adjust the neutral position of the gearshift lever, you need to accurately calculate the depth of the shift of your gearbox to the driveshaft of the VAZ 2110. Sometimes such manipulations result in the appearance of annoying rattling of the lever.
If adjusting the rocker does not lead to anything and there is still a problem with switching, replace the rocker completely or ask for help from specialists.
It would seem that such an element as the backstage cannot be modified or modernized, because everything here is extremely simple. However, tuning is also possible here, we’ll talk about this in this article, and as an example we will have a VAZ-2110 car. Many car owners prefer to change the standard rocker because it has too long a stroke; instead, they install a short-stroke one. This is good because the clarity of switching improves and less time is spent on it, but at the same time, car enthusiasts for some reason forget that the rocker needs adjustment.
If there is no adjustment, the driver will soon feel difficulty changing gears. It is recommended to do the work together with an assistant, although, if desired, you can do everything alone.
In this case, the owner of the “ten” replaced the rocker, did not adjust it, and had problems when shifting from reverse to fifth gear. The adjustment can be done in different ways; we will consider several options with you.
1. In the first case, the adjustment is made in reverse gear. We switch the box to reverse mode, then climb under the car and tighten the clamp. That's it, the work is finished, the problem is solved. But what to do if it is impossible to switch to reverse gear? For this we have the following method.
2. Here the “ten” link is adjusted when first gear is engaged. We switch the gearshift knob to first speed, unscrew the bolts securing the rocker clamp, to do this you will have to crawl under the car. Next, the drive must be rotated counterclockwise. We twist until the gearshift lever collides with the plastic rear speed lock. Now you just need to tighten the clamp bolts and the setup is complete.
Do you want to adjust the transmission neutral position? Then you will have to calculate the fit of the rocker on the “tens” cardan. So, we learned that when replacing the rocker, it is imperative to adjust it so that in the future there will be no problems with switching gears. Moreover, we learned to do it ourselves, and this saves us money. However, if you are a specialist and have done such work for the first time in your life, then it will not be easy to assemble the mechanism perfectly.
Very often, after self-upgrading, extraneous sounds appear in the gearbox. Some people don't pay any attention to the rattling noise and drown it out with music, but we're not one of those people, so we need to eliminate the cause of the sound. The problem can be solved quite simply; all you need to do is buy a spring and put it on the slide. This spring will hold the gearbox and the formation of unpleasant noise will stop. Let's go back to the adjustment once again and repeat how to do it:
1. Set the gearbox to neutral position.
2. Turn the gear selector rod counterclockwise. We do this until the adjusting pin fits into the hole in the rod.
3. Remove the gear lever trim.
4. After fixing the gearshift knob and the gear selection rod, fix the adjusting bolt.
The travel of the gearbox handle is adjusted individually, this is done by adjusting the length of the link arm.
Tuning
Many VAZ 2110 car owners, even having purchased a completely new car, strive to change the scenes. This can make it more comfortable, but only if done carefully.
The fact is that the short-stroke rocker is, in fact, a homemade product, a modification. If you have a short-throw shifter, the gearbox wears out less, and in general this is not bad for the gears - they engage more clearly.
In order for the short-stroke rocker to replace the standard one, it does not have to be completely removed. It is enough for the ball joint to be disassembled from the outside. It is necessary to unclench the metal ring of the support and spread the plastic legs so that the ball comes out.
Next, you need to disconnect the rod from the support and weld a small piece of pipe to the rod, as well as a piece of durable sheet metal. Do not forget to lift up the hinge, which has a hook, to prevent the gears from being engaged by mistake.
Although the short-throw rocker requires more effort to engage, it increases the smoothness and clarity of gear engagement. But, in principle, choosing which is better for him - short-stroke or full-time - is the right of every VAZ 2110 owner.
Replacing rocker seals
Nothing frustrates a car owner more than traces of oil under the bottom while parked. The cause of this manifestation may be a worn out oil filter or a faulty oil seal. When installing a new oil seal, you can see and evaluate the condition of the rocker pad, cardan and boot.
Before you begin disassembling all components of the car, you need to find out the reason for the leakage of the oil mixture. If the reason is not the oil filter, you need to make sure that the oil seal is in good condition. To do this, the car is installed on a platform or lift. If the work of replacing and installing a new oil seal is being carried out for the first time, previewing a video on this topic will be very helpful.
- Climb under the car and make a visual assessment of the boot. If oil leaks through the oil seal, the boot will reveal this and there will be traces of oil leaks on it;
- Having bent the boot, you need to get to the cardan. Disconnecting the driveshaft will open the way to the cuff;
- The sequence of removing the cardan is strictly from the lever to the rocker, the reverse order is prohibited;
- After dismantling the cardan shaft, access to the oil seal opens;
- To remove the cuff you will need a hook and spike;
- A seal that has become unusable is replaced with a new one. Garage repair gurus use a plastic bottle cap as an auxiliary tool for this;
- After installing the new oil seal, the unit is reassembled. In this case, the condition of each element is necessarily checked for wear, and if necessary, the part is also replaced.
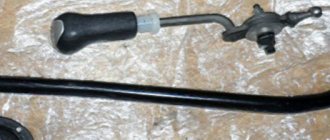
The backstage is a new model (Prior).
In general, I accidentally saw this miracle on the Internet, I wanted to find it and install it for myself. I bought parts from a 2014 Lada Priora, all assembled with levers and other fittings)
The clip is ten-size, the levers are completely similar to the old ones. The most interesting thing is the rocker, the handle is like on the new Priors and Grants with a manual transmission. In technical terms, it is similar to the viburnum wing, perhaps one to one.
It’s hard to say how she’s doing at work. But I would like to note right away that the reviews about this design are different, some are very negative! Someone has some play between parts 17 and 20; apparently the metal bushing in the center (part 18) is in the way.
It does not allow the metal discs (part 16) to be properly pressed against the plastic spacers (17) and the lever itself (20). Theoretically, if you sharpen it, there should be no more problems.
The scheme is Kalinov’s, but the essence is the same. Let's go and see!) Gearbox lever cage for VAZ 2110. I'll put the priority one with scanty mileage aside for now.
None
None
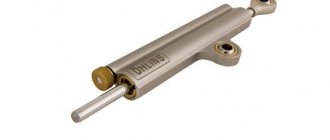
Tie rod joint for Lada Sport. There is exactly the same one only for 2108-2110. There are no repair kits for the stock joint, only this damper.
If the plastic bushings (2110-1703189) are still worn out, then it will not save the situation.
It’s very interesting how long it took for the old parts to last?!
The clip has fallen apart, there is play in the hinge. Photos of the installed goodies)
From the bottom everything is as it was, with the exception of updated spare parts)
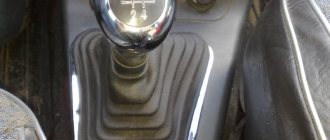
Promised photo of the tunnel
Backstage restyling
None ps: I couldn’t pull the handle off. It is not clear how it is removed at all. I looked at other people’s posts and it turns out that on a grant, when replacing the handle with an alternative standard one, they simply saw and remove it... cruel, IMHO: D.
- avtozam.com
- vaz-2110.ru
- www.drive2.ru
- 24techno-guide.ru
Replacing the gearbox ball joint race
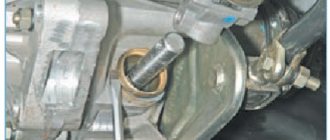
| First, we unscrew the torque rod from the ball joint (in common parlance, a butterfly), then the “butterfly” itself from the car body. The exhaust system will interfere a little. |
| Next, you will need to remove the gear knob: first the cover (by picking it up around the perimeter with a flat-head screwdriver), and then the gear knob itself (by pulling it up from the lever). Unscrew the locking bolt. |
| We unscrew the bolt connecting the rocker and the gearshift lever. Remove the bolt while holding the gearshift lever in the up-right position. |
| From the bottom of the car, remove the “butterfly” along with the gearshift lever. We release the gearshift lever by removing the retaining ring of the hinge cage. |
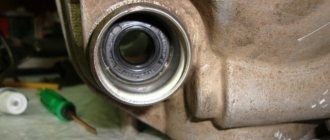
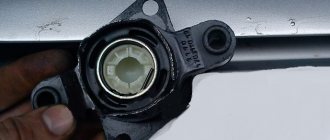
| This is what the old gearshift lever joint cage looks like: |
| Installing the gearshift lever joint cage begins with removing the retaining ring. Then we take out the plastic sleeve and lubricate it with lithol. We put it on the gearshift lever, and then insert it into the holder and the locking ring. |
| Then we install everything in the reverse order, not forgetting to put the rubber boot on the joint cage. First, we install the bolt connecting the rocker and the gearbox lever, and then we screw the “butterfly” to the bottom of the car. |
Which alarm system is better? Which alarm system to put on a car?
xn--2111-43da1a8c.xn--p1ai
Adjustment
You still need to engage first gear and drive onto the overpass. Naturally, put the car on the handbrake and put wheel chocks under the wheels. Don't turn off first gear!
From below, find the clamp that secures the rocker and loosen it. Returning to the car, you need to move the lever to the left as far as you can. You cannot move the lever back or forward; the link may come off.
Go back under the car and tighten the clamp. Sometimes it is enough to move the rocker relative to the cardan by a few millimeters, and the gearbox will work perfectly again, gear shifts will occur as expected.
How to adjust the VAZ 2110 rocker if signs of a malfunction have just begun to appear:
- It is necessary to set the gearbox lever to first gear. It will be difficult to do this, but it must be done;
- It is most convenient to inspect the car on a lifting mechanism, which will provide access under the car. It is necessary to secure it with a handbrake and locking objects installed under the wheels;
- The box should remain engaged in first gear;
- Open the engine compartment and try to find the clamp that holds the rocker. To do this, you need to get close to the transfer case and reduce the clamp pressure;
- As soon as the clamp is loosened, perform the next adjustment step - move the gear shift lever to the left as much as possible. This must be done without jerking; if the movement is chaotic, the slide will come off;
- With the gearbox lever in the maximum left position, tighten the clamp;
- Often it is enough to move the link in relation to the cardan by a few millimeters.
By adjusting the rockers, it is possible to assess the degree of wear of the driveshaft; it is better to replace it if severe wear is noticed.
After the installation procedure, adjustment of the VAZ backstage is necessary. This is necessary to eliminate possible problems with gear shifting. The adjustment can be done either with the help of an assistant or independently, but the latter option will require considerable patience. To adjust the VAZ 2110 gearbox rocker you will need:
- standard set of tools;
- a brush with metal bristles for cleaning joints;
- cotton gloves;
- new backstage repair kit.
Next, unscrew the bolts and turn the electric drive to the left until it stops at the reverse gear pin. Screw in the bolts and evaluate the work by performing an inspection. If the lever stroke does not correspond to important characteristics, carry out secondary adjustment in neutral gear:
- the lever is set to an intermediate position;
- the electric drive of the rod is turned to the left, after selecting the gear, the adjusting pin should fall into the opening of the rod;
- the cladding panel is removed from the lever;
- secured with a bolt.
Also read with this article:
Gearbox rocker For front-wheel drive car models, designers have developed a gearbox speed shifting system using a special mechanism called the VAZ 2110 gearbox rocker. This design for moving the gear lever is designed to ensure good performance of the gearbox. On a VAZ 21101, the gearbox link can be easily replaced on your own.
VAZ 2110 gearbox rocker When operating a vehicle, the rocker, like other systems, must be adjusted. The reason for the adjustment may be due to incorrect movement of the gear shift lever. When you engage the desired gear, you have to tilt it strongly back or vice versa, it rests against the instrument panel:
- The location of the scenes is under the body of the vases.
- It connects the lever to the gearbox.
Why change the backstage
There are situations when it is necessary to intervene in the gear shift mechanism due to the failure of a component. But there are cases when an extreme measure is required - replacing the VAZ-2109, 2114 rocker. In these cases, replacement is required:
- An oil leak appeared due to damage to the oil seal. Only the oil seal can be replaced.
- Complete failure of the scenes.
- You have realized the advantages of a short-stroke design and you have the funds for this kind of tuning.
Symptoms of gear shift mechanism failure:
Increased gearshift lever play
Please note that this behavior may also be caused by a loose cardan. Sometimes the bolt securing it gets screwed out, so to reduce the backlash it is enough to tighten it, and first apply a drop of thread locker. Difficulty shifting gears
Sometimes extraneous sounds are heard. Gear shifting is not possible. Inconsistency between the position of the lever and the selected speed. For example, the back one disappears, and the first one is in its place.
If a slight play appears, it is advisable to carry out diagnostics and identify the breakdown of the unit. Make repairs immediately, otherwise one or more speeds will disappear at the most inopportune moment.
Symptoms indicating a malfunction
In fact, it is not at all difficult to identify that the cause of troubles is precisely the backstage. Meanwhile, there are a number of distinctive points indicating this:
- 1st gear does not turn on/off in any way or moves to another position;
- when engaging 1st gear, initially the gearshift knob behaves as usual, but a little later the gearbox spontaneously begins to jump to reverse;
- It is not possible to turn on/off 1st and/or 5th gear, while no issues arise when switching other speeds.
As soon as the first signs of trouble appear, you can visit a service station or set aside time in the garage to troubleshoot problems.
| Signs of a malfunction | Explanation and solution |
| There is play on the gearshift lever. | The linkage is probably worn out. The problem can be resolved by replacing the worn part. |
| There was a ringing sound in the wings. | This problem occurs most often in checkpoints. In addition, defects in factory production can cause ringing. It is possible that poor quality repairs preceded it. |
| With tension, the speeds on the box are turned on, and they are also knocked out. | It makes sense to try 2 methods: When the setting does not help, the element should be replaced. |
| Instead of 1st gear, it shifts to reverse. | There are no problems with the lever, but the rocker failed. It is worth making a replacement, but repairs can also be helped by using a repair kit. |
| The lever vibrates excessively. | It is necessary to examine the position of the gearshift knob hinges. There is probably significant play in them. |
Adjustment
Now let's talk about how you can adjust the link if it shows primary signs of malfunction.
- First of all, try by hook or by crook to engage first gear.
- Place the car on an overpass, turn on the handbrake, place additional supports under the wheels to avoid the car moving.
- Do not turn off first gear on the transmission.
- At the bottom, find the clamp that holds the rocker and secures it. To do this you will have to crawl under the hood. You shouldn't have any problems finding the gearbox. The clamp needs to be loosened.
- Now return to the salon. Your task is to move the box lever as far as possible to the left. If you start to pull the handle forward or backward, the drawstring will most likely come off. You don't need it.
- Get back under the car and tighten the clamp back.
- In many cases, simply shifting the rocker relative to the cardan shaft by literally a few millimeters is enough.
When adjusting, pay attention to the condition of the cardan shaft. It may require replacement if worn out
Work is in full swing
Finalization
Now many owners of the VAZ 2110 are discussing the possibility of refining and improving the gearbox by replacing the rocker from a standard one to a short-throw one.
The short walk is the result of independent tuning. Decide for yourself whether to carry out such work or not. But from the point of view of the efficiency of the gearbox, installing a short-throw rocker is only beneficial, since gears begin to shift more clearly.
Short walker
To install a short walker for yourself, it is not necessary to completely dismantle the standard version.
To do this you need to perform several operations:
- You just need to disassemble the ball joint from the outside;
- Next, the metal ring of the support is opened and the legs made of plastic are spread apart;
- This is how the ball will come out;
- Now the rod is disconnected from the support, and a small piece of pipe and a piece of sheet metal of good strength are welded to the rod;
- Be sure to lift up the hinge with the hook, otherwise erroneous switching of speeds will not be avoided.
Installing a short drive will entail the need to apply more force when engaging a particular gear. But on the other hand, switching becomes clear and smooth. Therefore, decide for yourself which option would be better for you - standard or short-stroke.
Let's sum it up
As you can see, if problems arise with shifting gears, replacing the rocker on a VAZ 2110 is a last resort. In fact, problems can often be resolved by setting up and adjusting the rocker, as well as overhauling the mechanism and replacing individual worn parts (you need a VAZ 2110 rocker repair kit).
We also recommend reading the article on how to replace the cover on the gearshift lever. From this article you will learn how to remove the gearshift lever cover and replace this element with a new cover.
Before starting disassembly, it is important to make sure that the gears are difficult to engage precisely because of malfunctions of the backstage. The fact is that malfunctions of the clutch or the gearbox itself can also have similar symptoms. For this reason, it is important to make sure that it is the gear shift mechanism that needs revision or replacement.
As a result, I would like to add that in some cases, only replacing the backstage with a short-stroke one allows you to obtain the desired clarity and smoothness of inclusions. In this case, you should give up trying to repair and modify the standard version and start looking for a separate ready-made solution.
Moreover, if you need a VAZ rocker, buying such a mechanism is not difficult. Today it is fashionable to highlight a large number of different offers on the market, from which it is possible to choose the best option, both in terms of quality and price.
Reasons for replacement
There are several situations when the owner of a VAZ 2109 has or wants to get into the design of the gearbox and specifically work with the rocker:
- Oil is leaking due to a damaged rocker seal. It must be replaced;
- The old drawstring was out of order;
- I would like to exchange the long-stroke for a short-stroke in view of its advantages.
Now to the question of when replacing or repairing the backstage is a necessary measure.
- The backlash of the gearbox selector has increased significantly.
- Gears change with difficulty, and when changing speed, extraneous sounds appear.
- It is possible to change gears, but with a lot of effort.
- Speeds change incorrectly. Instead of one, a completely different one turns on.
- It is impossible to turn on all or part of the gears at all.
Even if the resulting play is still insignificant, it is advisable to immediately begin repairs or completely change the drawstring.
Replacing the oil seal
If you find that the oil in the gearbox is gradually disappearing, you can suspect the rocker seal. There is nothing else left to do but change the element.
- First, buy a new shift rod seal. It costs about 70-100 rubles.
- Drain the oil from the box, having prepared a clean container in advance. This is in case you refill the same oil. Although this is an excellent reason for you to change the transmission lubricant at the same time.
- To make sure the oil flows out better, first unscrew the filler plug or remove the speedometer gear. After draining the oil, screw the cap back on.
- We climb under the car and disconnect the fasteners of the gearbox lever driveshaft.
- Pull the boot off the cardan, unscrew the bolts securing it to the gearshift rod. Problematic fasteners that you will have to tinker with.
- After removing the cardan shaft, remove the rod boot.
- We remove the damaged oil seal using an awl or suitable available tools. The main thing here is the stock itself.
- We install a new one in place of the old oil seal and press it with a tube of the appropriate diameter.
- Put the boot back in place and rotate the driveshaft.
- Please note that the bolt securing the cardan to the rod is an adjustment bolt. Therefore, screw it in exactly the same way as before dismantling. Otherwise, some speeds may not turn on.
After the work done, do not forget to check the result.
Replacing the cardan
Practice shows that if problems arise with the slide, it is not at all necessary to completely change it.
The instructions for replacing the cardan are as follows.
- Using two 13mm spanners, unscrew the clamp that relates to the speed switch drive rod.
- Pull the boot off with a screwdriver, moving towards the box. If you want, remove it completely. So it definitely won’t interfere with the repair process.
- Using a 10mm wrench, unscrew the fixing bolt on the cardan.
- Apply several gentle, not strong blows with a hammer to knock the cardholder off the shaft. Remove the boot to the side if you have not done so before.
- We replace the old cardan with a part from Kalina. It is more reliable, efficient and durable.
- For reassembly you will need the help of a friend. Do not rush to tighten the clamp immediately at the end.
- The assistant will set the position of the gearshift lever at the optimal points from inside the cabin. First you need to catch the center, then move the lever a little to the right while you tighten the clamps from below.
- Check if the gears engage well. If yes, then we continue assembling the unit and check the updated gearbox under real road conditions.
The experience of VAZ 2109 owners shows that when there are problems with the rocker, the essence often lies in an unsuccessful factory cardan. By replacing it with an analogue from Kalina, you will be able to get rid of discomfort and continue to confidently operate your car. By replacing the cardan shaft, the design of the gearbox will improve significantly.
Adjustment
After changing the link or cardan, you should definitely adjust the operation of the unit.
- Engage reverse gear, loosen the clamp tension.
- Set the gearbox selector to the position in which it should ideally be located when engaging reverse.
- Tighten the clamp back.
- A similar operation is performed with other speeds.
There are situations among VAZ 2109 owners when difficulties arise when engaging reverse gear. This is where adjustment can help.
- Set the gear lever to first gear;
- Loosen the rocker clamp;
- Turn the rocker drive counterclockwise;
- Turn the drive until the selector is pressed against the plastic stopper for the reverse gear. You will feel this without any problems;
- Resting against the stopper, tighten the clamp under the bottom. That's it, the adjustment is done.
Installation of a short-stroke rocker
If you don’t bother with alterations and find where the short-throw VAZ 2112 gearbox assembly is sold. Then let's do the replacement:
- To gain access to the bolts securing the gearbox lever, we need to remove the protective decorative cover from it along with the knob
- The knob itself is not screwed to the lever, so it will be enough to pull it hard to remove it
- Now you need to disconnect the gearbox lever rod from the cardan; to do this, you first need to loosen the clamp using a key at “13”
- Pulling the shaft off the cardan
We loosen the clamp with the key “13” and pull the gearbox rod off the cardan
- Let's go to the salon
- And remove the locking ring, then remove the lever with the ball and spring from the plastic case
Remove the locking ring, and then the lever with the ball and spring will come out
- Then we pull the lever with the rod into the cabin, to make it more convenient, you can disconnect the rod from it, although it can be pulled out without disconnecting, it’s already been checked
- We go down the car to disconnect the traction drive
- First of all, we pull off the rubber boot from it, then, using the “10” key, unscrew the bolt that is attached to the left side of the cardan shaft
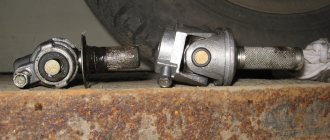
- The VAZ 21124 short-stroke gearbox requires replacing the Priorovsky cardan with a Kalinovsky one
Differences between the traction drives of Kalina and Priora
- As you can see, the cardan rods differ greatly in length
- This problem can be solved by simply shortening the Kalinovsky rod
- This must be done, taking into account the type of short-stroke link
- There are situations when the rod may not fully enter
- As a result, the gearbox lever moves towards the parking brake.
- This can be corrected by shortening, if necessary, know that you need to cut off no more than 1-2 centimeters
- We install the “Kalinovsky” cardan, first lubricate it from the inside with “Litol” lubricant
- The fastening bolt screws in easily because it has a cone-shaped shape; you should not tighten it, however.
- Installing traction through the cabin
- It is more convenient to perform the installation with an assistant: so that one holds it in the cabin by the elastic band, and the second carefully stretches the rod
Now assembly
And so we have in our hands the short-throw shift link of the VAZ 2112 gearbox, the removal of the old one is completed, all that remains is to screw on the new link:
- We put a rod on the cardan shaft
- Then we assemble the mechanism that blocks accidental engagement of reverse gear, lubricate the spring ball
- Adjusting the gearbox lever
- Then we clamp the clamp on the rod with the “13” key
- Note: If you assemble the mechanism that blocks accidental engagement of reverse gear first, then due to the long rod it may not be possible to put the cardan rod on the rod. Shortening the driveshaft may solve the problem. And don’t forget to put the boot on the driveshaft.
- Now let’s adjust the mechanism that blocks accidental engagement of reverse gear, since after adjusting the rocker it may not fall on the blocking plate to which it usually clings
- A similar problem is solved as follows: remove the plate and adjust the hook
- In the bracket itself that secures the plate, there is a cutout for which the engagement occurs
- Our task is to adjust or modernize this plastic hook using sandpaper or a file
A short-throw gearbox is installed on the VAZ 21124, enjoy the short shifts. If there are unclear points, it is better to clarify them before performing the work using a video.
Installing a short-stroke cardan
The first step is to purchase the cardan itself. The best choice would be a part from Priora or Kalina. Usually it is included in the repair kit with a boot, so the standard boot from a VAZ 2110 will not fit here.
Work is performed only if there is an overpass, inspection hole or lift. It is also recommended to call an assistant for help, since at the end of the process it will be problematic to independently adjust the position of the gearshift lever.
The work proceeds according to the following scheme:
- Armed with two 13 keys, we need to loosen the clamp on the drive rod and then pull it off the rod.
- The next step is to dismantle the boot. Next, use the 10th key to unscrew the bolt, which is a lock on the standard cardan. Now you can remove the cardan with gentle blows of a hammer.
Important: it is necessary to check the condition of the oil seal. If this is the first intervention in the gearbox, then it is most likely in a worn condition, so it is recommended to change the boot.
- We install the driveshaft from the Priora in the reverse order: put on the boot and install the new driveshaft, securely tighten the fixing bolt, and then tighten the boot. All that remains is to put the drive rod on the cardan rod, but the clamp should not be tightened.
- Now the assistant gets behind the wheel and places the gearshift lever in the optimal position. At this time, the clamp is tightened. Done, the replacement is complete, all that remains is to test the switching.
Instructions for replacing the rocker on a VAZ-2110
If adjusting the part does not give positive results, there is only one thing left to do - replace the part or try to resurrect it through repair, but in the latter case you will need the help of knowledgeable repairmen.
Replacing the VAZ-2110 backstage looks like this:
- Prepare the necessary tools in advance so that you don’t have to be distracted from your work later. What you will definitely need:
- screwdriver;
- side cutters;
- set of wrenches.
You won't be able to cope without a repair kit designed specifically for the VAZ-2110.
- Now that everything is at hand, open the hood and find the nut connecting the transmission rod and the tip of the handle.
- Remove the special protective cover from the nut and tighten the turnbuckle.
- Get back into the car and take out the frame that fits the lever that controls the transmission. Clamps may interfere with this work, but you can’t get rid of them, spend a little time and everything will work out.
- Turn the cover inside out.
- Using a sharp knife, cut the clamp to secure it and remove the cover. It's okay if you couldn't avoid damaging the integrity of the clamp. It is disposable, so the clamp will still have to be replaced with a new one.
- Get rid of the tunnel lining on the floor.
- Disconnect the axle retaining part from the gearbox handle.
- Pull out the gear knob by pulling the lever up.
- Slide the sleeve inside the lever, which is responsible for the direction of the part.
- Remove the 4 mounting bolts holding the guide bushing in place.
- Remove the housing and remove the shaft.
- Now look at the nodes. If there are signs of wear on the rubber part, the bushing cannot be repaired and must be replaced. If the hole located under the handle axis is severely worn out or the play is noticeable to the naked eye, it’s time to change the link.
- Return all parts to their original place and adjust the operation of the gearbox.
Video on how to replace the rocker on a VAZ-2110: