Cars with front-wheel drive have both advantages and disadvantages compared to their rear-wheel drive counterparts. Moreover, in practice, the vast majority of modern cars are often front-wheel drive, since the design of such a transmission is simpler and cheaper, a car with front-wheel drive is easier to drive, and the overall design of the transmission allows it to remain a completely reliable solution.
Many VAZ models (2108, 2110, etc.), which long ago replaced the outdated “classics,” were no exception. As practice shows, the gearbox on various front-wheel drive VAZs is quite reliable, but often the weak link is the VAZ shifter. Next, we will look at the popular VAZ 2110 model, malfunctions of the VAZ 2110 backstage, as well as how to repair and replace.
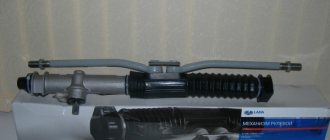
Replacing the universal joint on a VAZ 2110, VAZ 2111, VAZ 2112
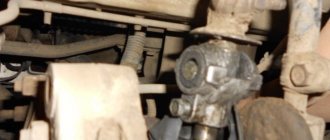
Welcome! The backstage cardan is what people usually call it, but in reality it is called the “Gearbox control drive rod joint”, something like this, thanks to it, gear shifting is carried out, or rather, not thanks to it, but thanks to your hands, that is, in that the moment when you grab the gearshift knob and shift it, by means of a rod that goes from the rocker itself to the box and the next gear is engaged, and the cardan is an intermediary in this matter and an assistant in shifting gears, if the cardan is severely deformed, then you simply cannot change gear You can, or you can shift, but with great effort, and it’s not a fact that that particular gear will turn on and not any other.
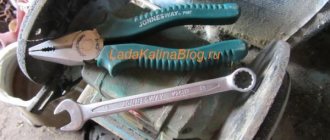
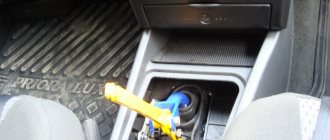
Note! In order to change this hinge (in the future it will be called that), you will need to stock up on tools, which will include: Wrenches and spanners (Whichever is more convenient for you), and you will also need a screwdriver and a rubber hammer (If you have this one, if not, then take the regular one)!
Summary:
Where is the rocker shaft? You can only see it if you get under the bottom of the car and move the boot (Indicated by a red arrow) that protects it to the side; for an example, see the photo below, on which the blue arrow indicates the location of this very hinge:
When do you need to change the driveshaft? It is changed as it wears out, namely, when it wears out, the gears may not engage correctly, for example, you turn on the first gear and your reverse gear turns on instead, and also this hinge, many car owners are replaced with the same hinge, but only from the viburnum, but indeed the hinge is from Kalina does not have any play, therefore the gears are engaged clearly and the gearshift lever travel itself becomes less than if we take, for example, a standard hinge from a VAZ 2110, but there is one thing!
The whole point is that the Kalinovsky joint has no play, which means it will put more force on the gearbox, in addition, due to the fact that there is no play in the joint from the viburnum, all the vibration that comes from the box will reach the gearshift knob, unlike the original one a hinge from which much less vibration will go to the handle.
Note! Let’s say something else about the viburnum hinge, if your gearbox hasn’t been repaired for a long time and from time to time it knocks out gears when driving (Gears can knock out gears due to heavily worn gear teeth and because of worn out forks that are responsible for engaging the gear), then It is not recommended to install a Kalinovsky hinge on your car, because as mentioned earlier, it transfers more load to the box and therefore it will fail very quickly, so be careful!
Importance of using a steering damper
The steering damper is not a mandatory element and is an optional equipment. Its use is most justified on SUVs, that is, cars designed to move in difficult road conditions, since the steering damper dampens vibrations of the steering rods when the car hits bumps and when the wheels get into holes.
Steering rack damper
At the same time, it is also installed on ordinary passenger cars. Firstly, even a city car is not immune from sudden encounters with bumps on the roads. Secondly, a number of clear advantages of using a damper justify the cost of its installation:
- Improved handling. The car “holds” the road well: there is no need to constantly fight vibrations and maintain the trajectory when moving in a straight line.
- Maintaining wheel alignment angles for a long time without adjustment. Wheel alignment should be adjusted every 15-30 thousand kilometers. With a damper this value can be increased several times.
The biggest drawback in using a damper is a decrease in the information content of the steering, which is expressed in the inability to determine the condition of the road surface due to vibrations of the steering wheel (as there are simply no vibrations). But this is a matter of habit and is not a decisive factor in deciding to install the device.
How to replace the universal joint on a VAZ 2110-VAZ 2112?
Note! It is possible to remove this hinge only on an overpass, inspection hole, or if you raise the car, because this hinge is located under the bottom and you will need to crawl under it to unscrew both bolts that secure it!
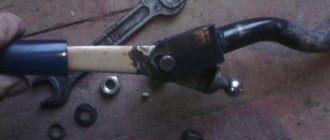
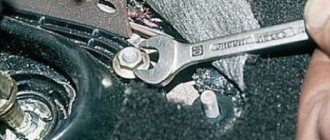
Removal: 1) At the beginning, as you already understood, you will need to crawl under the car, after that, look for the boot (Indicated by the arrow) and the hinge itself, which is located under this boot, so after that, take two keys in your hands and hold the bolt with one to prevent it from turning , loosen the nut of this bolt a little as shown in the figure, and after the clamp nut is loosened, grab the rod with your hand and remove it from the hinge as shown in the small figure.
Steering rack knocking on Kalina: reasons
To tighten the steering rack on the Lada Kalina, it is necessary to dismantle the largest pipe going from the air filter to the injector. That is, getting to this mechanism is not so easy. But, after spending a considerable amount of time, I still managed to get to the problem node. I just couldn't tighten the nuts. WD-40 was used, after about half an hour the wrench finally grabbed and moved the nuts. Imagine my surprise when I realized that the problems were in a completely different place.
It turned out that the connection was loosened at the place of the cardan and splines. After tightening them up, the problem went away on its own. We can say that I was somewhat lucky, because this is the most common and harmless reason why the steering rack on Kalina knocks. In your case the problem may be different. As a result, I will highlight the following possible malfunctions:
- the central tooth on the steering rack is worn out;
- the working couple has exhausted its resource;
- another component of the assembly has worn out, for example, a disc spring;
- resulting corrosion.
Replacing the backstage on VAZ 2110, VAZ 2111, VAZ 2112
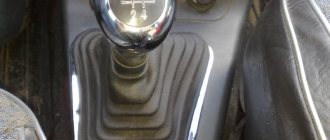
Welcome! The rocker - it is responsible for changing gears in the car, it stands under the bottom of the car and goes into the interior, at the end of the rocker (on its rod) a cover is put on, which is popularly called the gearshift knob cover, you also grab this cover when changing gears in the car .
Note! To replace the rocker on a car of the tenth family, you will need to stock up on: A set of wrenches, as well as an extension cord with a socket head and a screwdriver!
Summary:
Where is the backstage? As mentioned earlier, it is hidden under a cover (Indicated by an arrow), so to get to it you will need to first pry the cover in the front part with your nails and then remove it from the backstage and then you will have almost complete access to it, and practically because that the rest of the rocker is located under the bottom of the car.
When do you need to change the backstage? Many people at the very last moment think about the rocker, because if the rocker is incorrectly adjusted or worn out, such things happen to the car that the first thing that comes to mind is a malfunction of the box, but still, let's look at these things that will tell you that the rocker is not adjusted correctly or needs to be replaced, firstly, the rocker may stop engaging the first gear, and with the exception of all the others except the first, the fifth may not engage, and the last sign that also indicates a malfunction of the rocker is when you get into the car, engage first gear and then give the gas to take off beautifully, but instead of your car starting to move forward, it suddenly goes back into the car parked behind, of course I don’t want you to find yourself in such a situation, well, the point is that when malfunction or if the rocker is incorrectly adjusted, after engaging first gear, reverse gear can easily engage and you will go back without expecting it.
Replacing the steering universal joint
Every vehicle owner can measure the parameters of this structural element. To do this you will need a caliper or a regular ruler. With these tools it is easy to determine the length of the cross and the diameter of its cup, which are measured in millimeters and are designated L and D, respectively.
When purchasing a crosspiece, it is necessary to take into account the type of its fastening, which may involve the use of retaining rings or covers, as well as core punching. We note the fact that in the latter case (when the part is fixed by punching), replacement can only be carried out using specialized equipment, after which it is necessary to perform the procedure for balancing the unit.
How to replace and adjust the rocker on a VAZ 2110-VAZ 2112?
Backstage adjustment:
Note! Before you go to the auto store and buy a new rocker, be sure to try to adjust the old one first so as not to waste money, maybe everything is fine with the old rocker!
1) At the very beginning of the operation, we will tell you why the adjustment of the rocker may go wrong, namely, after removing the box, after replacing the cardan shaft, or after unscrewing the nuts and bolts that secure the tension clamps of the rods that come from the rocker, and in other cases.
2) Now let’s move on to the actual adjustments, firstly, you will need to first drive the car into a pit or lift it using a lift, then climb under the bottom of the car and there you will find the boot under which the driveshaft itself is located (the boot is indicated by a red arrow), next to with this cardan and the boot that covers it, the end of the rod coming from the rocker itself will be attached, and this end will be attached using a tie clamp, so take two screwdrivers in your hands and with their help loosen the bolt nut a little (the nut is indicated by a blue arrow, and the bolt green), while when you loosen, hold the bolt itself with one wrench so that it does not turn, and with the other at this time loosen the nut, after the nut is slightly loosened, take a screwdriver in your hands and insert it into two holes, namely in the hole between the tie clamp (Indicated by a yellow arrow) and into the hole of the rod itself (Indicated by a white arrow), thereby widening both holes (In fact, these are not holes but a groove, so in the future we will use this word) so that the link rod can easily move relative to gear selector rod.
Note! Before you crawl under the car, put the car into first gear!
3) After you loosen the tension clamp, get out from under the car and return to the car interior. In the cabin, move the gear shift lever all the way to the left, but forward or backward and do not even try to pull it.
4) And to complete the operation, again climb under the car and tighten the nut of the same bolt that secured the tie rod of the rocker link.
Note! When all the operations are completed, test the gearshift lever for functionality, namely, check whether all gears engage clearly, start the car, drive it a little and if the shifter is working, then everything will be fine and you won’t even need to change anything!
By the way, another way (almost the same method) of adjusting the rocker, see the video clip below, in this video an example is shown on a VAZ 2109 car, but don’t pay attention to this, since the entire gear shift mechanism is on front-wheel drive cars VAZ, including the top ten, is practically no different from each other!
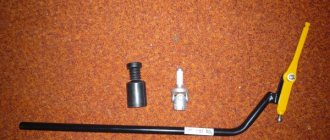
Making a short-stroke slide with your own hands
The diagram shows in detail where you need to cut with a grinder, and where you need to cook.
So, let's begin the modernization process:
- We raise the place of attachment of the piece of iron that goes from the gearbox to the lever inside the VAZ 2110 interior.
- You can do without dismantling the rocker, the main thing is to disassemble the ball joint.
- Now we need to ensure that the plastic paws release the ball. To do this, you need to unclench the metal ring. We disconnect the rod and carefully drag it inside through the cover, which is responsible for protecting it from dirt. It will be much more convenient to work if the clamp near the gearbox is loosened.
Adjustment is made using this lever. - Guided by the diagram, we cut off the parts using a grinder. It is necessary to weld a piece of metal pipe with a wall thickness of about 3 millimeters into the rod. To avoid skew, it is necessary to use identical pieces. The pull can be lengthened by 2-4 centimeters.
- All that remains is to raise the hinge with the hook, which serves to prevent an erroneous shift to reverse gear 2110.
Replacement is carried out according to the same scheme. Only instead of welding, a freelance short-stroke rocker from another car is installed. Replacement is a more expensive solution, so doing it yourself is problematic. If you have experience working with gearboxes, then replacing and purchasing a new part will cost about 1,000 rubles.
Signs of wear on the crosspiece
Often, motorists do not pay attention to insignificant signs that it is time to make repairs, and wait until the problem makes itself known publicly and this is fraught with consequences, especially when it comes to loss of vehicle controllability.
The first signs of wear on the crosspiece appear as:
- the presence of noticeable resistance to the steering wheel when rotating at speeds above 80 km/h;
- delayed wheel turning and loss of sensitivity (delayed response of wheels and steering shaft);
- increased free play angle of the wheels (popularly this symptom is also called “Steering play”);
- uneven rotation of the steering wheel, the steering wheel moves with sharp jerks;
- obvious grinding or knocking noise that occurs when the steering wheel is rotated; the grinding becomes especially noticeable and obvious on an uneven road.
Most often, motorists turn to a car service center to replace the steering shaft crosspiece mechanism only when the last sign of a malfunction appears, but in vain, because in the event of an emergency, the steering control will not be able to adequately respond to the driver’s efforts, and sometimes, the steering control may even fail, this is already fraught with very big troubles.
Repair
Regardless of what exactly you do with the rocker - repair, adjust or change, you will still need to disassemble this unit.
Disassembly is performed as follows.
- Remove the cover from your gear shift knob.
- Place the car on a pit, or raise the front end with a jack.
- Remove the front console. It is held in place by mounting bolts.
- Now remove the curtain itself. To fix it, AvtoVAZ used 6 bolts in the case of the VAZ 2110 model.
- When carrying out dismantling work, be sure to examine the condition of all elements.
- By bending the boot, you will gain access to the support, oil seal and cardan shaft.
Changing the boot
Now regarding the repairs. There may be several recommendations in this regard, depending on the current state of the node and its components.
- At best, repairs will require the use of a repair kit for the backstage. It doesn't cost much.
- If the bushing is deformed, it will need to be replaced with a new one.
- Check the lever shaft bore for wear.
- Make sure there is no play in the driveshaft. Otherwise, a regular repair kit will no longer be enough, that is, a complete replacement of the entire backstage will be required.
- Often the culprit of extraneous noise and rattling when shifting gears in gearboxes is the rocker pad. Changing it is quite simple, and even a beginner can perform the operation.
Replacing the oil seal
Quite often, VAZ 2110 owners are faced with a situation where, after parking under the car, they find traces of oil. There are two options here - the oil filter has worn out or there are problems with the oil seal.
As you replace the oil seal, you will be able to simultaneously inspect and change such elements as the cushion, cardan shaft, and boot.
Dismantling works
But let's talk about everything in order. First of all, check whether it is really an oil seal and not a filter. If everything is fine with the filter, then we drive the car into a pit or find another way to end up under the bottom of your VAZ 2110. Beforehand, it would be a good idea to watch video materials regarding your current situation.
- Carefully inspect the boot. If oil leaks from the gearbox through the oil seal on your car, traces of it will definitely remain on the boot.
- Bend back the boot. This way you can get to the cardan, disconnect it and gain access to the cuff.
- You first need to dismantle the cardan from the lever, and only then from the rocker itself. Not the other way around.
- The cardan has been removed, so we move to the oil seal.
- The cuff is removed from the gearbox using a hook and an awl. Therefore, make sure you have these tools at hand in advance.
- Now a new one is installed in place of the old oil seal. Craftsmen have adapted to using ordinary plastic bottle caps. If you get used to it, it turns out to be very easy to change the oil seal.
- After replacing the element, return all dismantled components to their places. If some of them need replacing or signs of wear are already visible, it is better to replace them immediately. It is unlikely that you will want to repeat the same operation in a couple of weeks and lie under your own car.
Repair will not give the desired result if the adjustment was carried out with errors. To do everything carefully and competently, use the help of a partner. One will work under the car, the second will help from inside.
The gearbox is one of the most complex components of a vehicle. However, this does not mean that its repair cannot be done at home on your own. Now we will tell you what the VAZ 2110 rocker is, what may be the reasons for its malfunction and how to repair the mechanism.
Body "tenth"
Body "tenth"
Modern VAZ cars are front-wheel drive Priora, Kalina and the outgoing Ten.
You can argue about their similarities and differences for a long time. “Kalina” is a completely new “junior” class model for VAZ. But there are components that are common to all three cars or that differ little - for example, gearboxes. They all seem to look the same, and therefore before buying a box you should carefully study its differences. The product is expensive - make no mistake! What do the boxes have in common? Firstly, the gear ratios of all gears and the final drive are the same. For example, the gear ratio of the main pair is 3.7. It should be noted that it is quite “heavy” for an engine - in the future it is possible to switch to a pair of 3.9. This will certainly improve the traction and acceleration characteristics of cars, including the so-called elasticity (acceleration intensity in top gear). It is unlikely that this will significantly affect fuel efficiency - after all, with such a main pair, cars in a number of situations will “go to maximum speed” not in fourth, as before, but in fifth gear.
Since May 2005, a new gear synchronizer has been “registered” in the gearbox - from I to III. The locking ring has become lighter, which makes it easier to switch lower, more dynamic gears. The sliding clutch and synchronizer hub remain unchanged, but the driven gears are different. Their tapered sections correspond to the new blocking rings. In addition, new speed and reverse sensors have appeared, and in the Kalina box there is an electric lock for selecting reverse gear.
We talked about gearboxes of the same family, which have the same gear part - from the VAZ-2110 gearbox. However, it should be noted that Kalina cars also use another gearbox - with a gear part 21083. Here, the main gear drive gear is not removable, but is cut directly onto the shaft.
The primary and secondary shafts of the gearboxes in question are interchangeable (assembled). At one time, when “tenths” of gearboxes were destroyed due to a breakdown of the secondary shaft in the area of the main gear gears, experts replaced this assembly with a reliable secondary shaft from option 21083 - some still drive with it to this day.
Now, in 1st, 2nd and 3rd gears, instead of the previous brass blocking rings (pictured on the left), new ones with an increased friction surface are used. The new ring is lighter and has three jaws rather than six.
Since the end of July 2007, the rear bearing of the primary and secondary shafts of the open type 6–50305А2ЭШ1 (pictured on the right) has given way to a closed bearing 750305-AU with increased dynamic load capacity.
If you measure the smallest diameter of the ring cone, then for the old one it is 50 mm, and for the new one it is 52 mm. Naturally, the smooth bevel surfaces on the driven gears must fit these rings. If the required blocking ring is not available, you can replace it with an old one, but complete with the driven gear.
Shown here are the previous axle shaft seals - with helical notches that took into account the direction of shaft rotation. To simplify installation and eliminate confusion, the rubber on the left oil seal contained red pigment, while the rubber on the right seal contained black pigment.
And this is a modern, universal axle seal - with a symmetrical notch. It began to be used from the beginning of 2005. Both repairmen and car owners now have fewer problems.
Speedometer drives. On the right is a mechanical one - for VAZ-2110. If the plastic gear breaks, you will have to disassemble the box. In the middle there are a couple of gray parts - for the Priora. On the left is a black pair for Kalina. Do not get confused, otherwise the speedometer readings will be very far from the real values.
On the 2110 and Kalina gearboxes, the old-style reverse sensor is on the right. A new sensor was installed on the Priora gearbox, designed for a sealed connector.
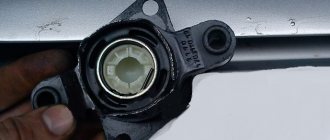
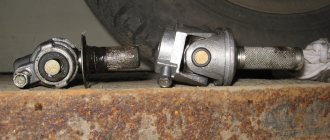
Gear shift drive joints. On the left is traditional for front-wheel drive VAZs. They also install it on Priora. The Kalina has a more complex hinge, with a classic cross. Don't be confused when purchasing!
Reverse lock solenoid for Kalina. The first blockers had a brass body with an M1 6 threaded part. It happened that it would break off. Now the body is steel, and the thread is M20. This solenoid has been installed since December 2005.
You can distinguish the 2110 gearbox not only by the number on the crankcase. It is also given out by the old gear shift drive hinge 1 and the mechanical speedometer drive 2.
Priora gearbox. The most characteristic difference from the others is the gray speed sensor 1 connector. "Kalinovsky" is similar, but it is black.
The new reverse sensor on the Priora gearbox has a sealed connector. This is also a distinctive feature (if such sensors do not finally appear on “tens” and “Kalina”!).
Kalina gearbox. Its signs are a new gear shift drive hinge 1 and a black speed sensor connector 2.
The reverse gear lock solenoid 1 on the Kalina gearbox is located next to the reverse gear sensor 2.
Diagnostics
In any car, the gearbox is used to prevent the car from changing gears on its own. This part needs to be monitored and looked after; in addition, over time it becomes loose and requires adjustment. If the adjustment has not been made for a long time or it was performed poorly, then the driver will feel uncomfortable when driving the car.
It is because of this that prevention should be carried out, as well as due attention should be paid to the scenes. If the car begins to behave somehow incorrectly, then it is necessary not to delay the repair.
Gearbox slide
To understand that the rocker requires adjustment or replacement, you just need to monitor the operation of the gearbox.
As a rule, when a failure occurs, the following symptoms appear:
- Difficulty when engaging 1st gear. As a rule, it is difficult to engage the gear; the driver has to practically drive the lever in to engage 1st speed.
- Possibly difficult shifting from 1st to 2nd speed.
- Due to a loose lever, it is not 1st speed that is engaged, but reverse. This is very dangerous, especially at a traffic light, at the start. It is necessary to urgently repair the rocker, otherwise the problem will only get worse.
- Difficulty engaging 5th gear, while other speeds can be engaged smoothly.
- There is play in the shift knob. As a rule, the rocker only requires replacement and adjustment is not necessary.
- Extraneous sounds appeared coming from under the car, or rather from the gearbox. As a rule, the sound becomes ringing. This problem is a disease of the entire VAZ 2110-2112 family. As a rule, such a ringing can appear after repairing the car’s suspension.
- When driving, the speed may jump. In other words, the car, gaining acceleration, independently disables the engaged gear and switches to neutral speed. For further driving, you will need to keep the lever at the desired speed constantly so that it does not jump out.
- Strong vibration that occurs on the shift knob. This is due to the failure of the scenes. It will need to be repaired to solve the problem.
If the symptoms described above appear, then you will need to begin repair work. You should completely replace the linkage or simply adjust it and gear shifting will become comfortable again. Therefore, it should be adjusted before replacing.
Adjusting the work of the scenes
Backstage adjustment
Adjustment is made only in cases where:
- The gearbox was removed and installed back;
- Previously, repairs were carried out to replace the cardan;
- In the case when the hinges on the slide have turned.
Of course, adjustments can be made at other points as described earlier. Do not forget that even minimal gaps can disrupt the correct operation of the entire transmission.
Naturally, before starting repair work and adjustments, you will need to prepare the right size wrenches. With their help, the clamps will be loosened. You should also place bricks, stones or special anti-roll devices under the wheels.
When everything is ready, you can begin the work process itself. To do this you need:
It is recommended to use an overpass or pit for repairs; if these are not available, then use reliable jacks. Next, you should go to the garage. When the car is ready for repair, it is necessary for safety to put on the handbrake and throw bricks or specialized devices under the wheels that will prevent the car from rolling away. Next, you need to crawl under the car and find a special clamp. It connects the hinge and the rocker itself. Then you will need to loosen it using a wrench. Loosen the clamp
Next you need to get out from under the car and get behind the wheel.
Now engage reverse gear, it is only important not to confuse it with 1st gear. Therefore, you should look at the position of the lever, it should be maximally in the upper left corner
It is recommended to do this procedure with someone. This person will need to hold the lever in a locked position. Next, you need to climb under the car again and tighten the clamp, applying great force.
That's the whole process of adjusting the scenes. Nothing complicated, the main thing is to follow safety precautions.
Installing a short-stroke cardan
The first step is to purchase the cardan itself. The best choice would be a part from Priora or Kalina. Usually it is included in the repair kit with a boot, so the standard boot from a VAZ 2110 will not fit here.
Required tools:
- Hammer.
- Screwdriver.
- Keys for “10” and “13” (2 pieces).
Work is performed only if there is an overpass, inspection hole or lift. It is also recommended to call an assistant for help, since at the end of the process it will be problematic to independently adjust the position of the gearshift lever.
Cardan shaft mounting location. Here you need to unscrew it with the 13th key.
The work proceeds according to the following scheme:
- Armed with two 13 keys, we need to loosen the clamp on the drive rod and then pull it off the rod.
- The next step is to dismantle the boot. Next, use the 10th key to unscrew the bolt, which is a lock on the standard cardan. Now you can remove the cardan with gentle blows of a hammer.
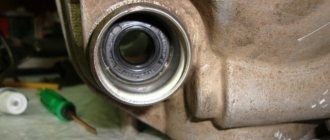
Important: it is necessary to check the condition of the oil seal. If this is the first intervention in the gearbox, then it is most likely in a worn condition, so it is recommended to change the boot
- We install the driveshaft from the Priora in the reverse order: put on the boot and install the new driveshaft, securely tighten the fixing bolt, and then tighten the boot. All that remains is to put the drive rod on the cardan rod, but the clamp should not be tightened.
- Now the assistant gets behind the wheel and places the gearshift lever in the optimal position. At this time, the clamp is tightened. Done, the replacement is complete, all that remains is to test the switching.
Stories from our readers
“Fucking basin. "
Hi all! My name is Mikhail, now I’ll tell you a story about how I managed to exchange my two-wheeler for a 2010 Camry. It all started with the fact that I began to be wildly irritated by the breakdowns of the two-wheeler, it seemed like nothing serious was broken, but damn it, there were so many little things that really started to irritate me. This is where the idea arose that it was time to change the car to a foreign car. The choice fell on the melting Camry of the tenth years.
Yes, I had matured morally, but financially I just couldn’t handle it. I’ll say right away that I am against loans and taking a car, especially not a new one, on credit is unreasonable. My salary is 24k a month, so collecting 600-700 thousand is almost impossible for me. I started looking for different ways to make money on the Internet. You can’t imagine how many scams there are, what I haven’t tried: sports betting, network marketing, and even the volcano casino, where I successfully lost about 10 thousand ((The only direction in which it seemed to me that I could make money was currency trading on the stock exchange, they call it Forex. But when I started delving into it, I realized that it was very difficult for me. I continued to dig further and came across binary options. The essence is the same as in Forex, but it’s much easier to understand. I started reading forums, studying trading strategies. I tried it on a demo account, then opened a real account. To be honest, I didn’t manage to start earning money right away, until I understood all the mechanics of options, I lost about 3,000 rubles, but as it turned out, it was a precious experience. Now I earn 5-7 thousand rubles a day. I managed to get the car buy after half a year, but in my opinion this is a good result, and it’s not about the car, my life has changed, I naturally quit my job, I have more free time for myself and my family. You’ll laugh, but I work directly on the phone)) If If you want to change your life like me, then here’s what I advise you to do right now: 1. Register on the site 2. Practice on a Demo account (it’s free). 3. As soon as you get something on the Demo account, top up your REAL ACCOUNT and go to REAL MONEY! I also advise you to download the application to your phone, it’s much more convenient to work from your phone. Download here.
To replace the “ten” cardan you will need a pit, keys for 10 and 13:
- The gearbox control rod joint is hidden under the boot.
- We remove the boot and move it to the gearbox.
- Loosen the clamp bolt to 13, loosen it a little and pull the link off the hinge. Then unscrew the 10mm bolt that secures the hinge on the gear selector rod and remove the hinge.
- We install a new hinge without play on the gear selector rod and secure it with a 10-point bolt. To prevent it from turning away from vibrations, we lubricate it with a thread locker.
We put the boot and the drawstring in place and adjust it.
After that we do a test drive. If everything is good, then tighten the clamp. There is an opinion that before installing the glass you need to saw off its tip a little, in fact, everything installs perfectly without sawing. After adjustment, the gearshift lever is located exactly in the middle.
Impressions from the backlash-free driveshaft of the Lada Kalina on a VAZ 2110
It seems that the lateral travel of the lever has decreased. The difference is especially noticeable while driving than when parked. Gear changes have become clearer, there is no “yaw” movements of the lever.
However, do not forget about gearbox vibration . If previously these vibrations were transmitted to the rocker and were partially damped by the play of the standard cardan, now they are transferred in full force to the gearshift knob, which causes rattling, which has to be dealt with over time.
Adjustment
Adjusting the VAZ 2110 gearbox rocker
It is recommended to carry out the adjustment work together with a partner. To do this you need to prepare:
- regular set of tools;
- you will need a metal brush to clean the joints;
- cotton gloves;
- Just in case, buy a repair kit at a car store.
- Place the car in a garage with an inspection hole.
- Engage reverse gear.
Note. There are problems with inclusion - then first gear is engaged.
- Go down into the viewing hole.
- Clean the places where the fastening bolts are installed for the rocker clamp using a wire brush.
- Wipe with a rag for easy rolling.
- Unscrew the bolts.
- Turn the drive to the left until the lever stops in the plastic lock of the reverse gear.
- After this, tighten the bolts.
- Check the lever travel with the gears engaged.
VAZ 2110 gearbox link and its replacement
If the stroke still does not meet the required parameters, then it is necessary to make adjustments in neutral:
- Place the lever in the neutral zone.
- Turn the rod drive to the left to select the speed until the adjusting pin enters the rod hole.
- Remove the trim panel from the lever.
- Secure with the adjustment bolt.
Gearbox link for VAZ 2110
The lever stroke is adjusted on each car depending on the driver’s habits. This procedure is carried out by adjusting the size of the scenes from the lever itself . The neutral position is calculated depending on the depth of the seat on the cardan shaft.
Note: after the adjustment, a rattling sound remains, then you need to install a spring to hold the lever.
The progressive, accelerated development of the automotive industry in Russia allows car enthusiasts to use new and improved spare parts for older models, which include “tens”.