The gearbox is one of the most complex mechanisms in the entire car. Despite this fact, you should not panic and be afraid to repair it yourself. Even the gearbox can be repaired or prevented on its own. For example, owners of a VAZ-2112 car can replace the rocker in their garage.
Adjustment
You still need to engage first gear and drive onto the overpass.
Naturally, put the car on the handbrake and put wheel chocks under the wheels. Don't turn off first gear! From below, find the clamp that secures the rocker and loosen it. Returning to the car, you need to move the lever to the left as far as you can. You cannot move the lever back or forward; the link may come off.
Go back under the car and tighten the clamp. Sometimes it is enough to move the rocker relative to the cardan by a few millimeters, and the gearbox will work perfectly again, gear shifts will occur as expected.
Repair and restoration work
Regardless of the repair, adjustment or replacement of the link, the need to disassemble this unit does not disappear.
The parsing process includes the following procedure:
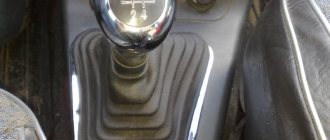
- First, you need to remove the casing from the gearshift lever, or, more precisely, from its handle.
- The front of the car needs to be raised with a jack or placed on a pit.
- Unscrew the mounting bolts that hold the front console, and then remove it.
- Now you need to unscrew the six bolts that hold the rocker and also remove it.
- When dismantling, you should be extremely careful, paying attention to the condition of each part and element, so that if their condition is unsatisfactory, replace it with a working analogue.
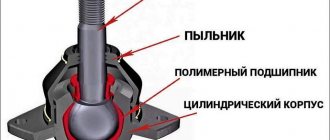
- To gain direct access to the cardan shaft, oil seal and support, you need to bend the boot.
Now let's get back to the repair itself. In fact, depending on the condition of the components and the unit itself, several recommendations can be made:
- It is practically impossible to do without a special repair kit for repairing the backstage, fortunately it is inexpensive.
- If the bushing is deformed during the repair work, it will have to be replaced with a new one.
- If the driveshaft is loose (which needs to be verified), then the matter will not be limited to just one repair kit, since you will have to dismantle and install a new rocker.
- The hole in the lever axis must be examined in detail, checking for wear.
- The rocker pad is one of the common reasons leading to random gear shifting and the appearance of extraneous noise and vibration. Replacing it is quite simple, so even a beginner can cope with this task.
Changing the oil seal
Many owners of a VAZ 2110 can often observe a situation where, after a long period of parking the car, traces of oil are found underneath it (on the ground). The problem has two causes: wear or damage to the oil filter, or wear to the oil seal.
However, before starting repairs, you need to objectively determine the cause of the oil leak. To do this, you need to carefully inspect the oil seal and filter for damage or wear. Once you are finally convinced that the oil seal is faulty, you should begin preparation and direct repair work.
If the filter is fully operational and not damaged, then in this case, you should put the car in a pit or find another way that will make it possible to get to the bottom.
It would be wise to watch videos dedicated to this type of repair, as well as view other useful materials, including information about repairing the VAZ 2110 backstage.
After that, you can get down to the most important thing:
- The boot should be studied in detail and inspected. If oil leaks from the gearbox, then traces of it will certainly remain on the surface of the boot.
- To get to the cardan, you will have to bend the boot. Afterwards, disconnect it, thereby gaining access to the cuff.
- Dismantling the cardan should begin by disconnecting the lever, and only then freeing it from the rocker.
- Let's move on to the oil seal.
- Before removing the cuff, you need to prepare the hook and awl in advance, since it can only be removed thanks to them.
- To install a new oil seal, craftsmen often resort to using a standard plastic bottle cap. This is quite convenient in practice.
- After successful installation, we assemble in the reverse order.
The main malfunctions in the operation of the gearshift lever on VAZ 2010 - 2012 models
In many ways, the operation of the manual gear shift mechanism is highly susceptible to physical wear and tear, since it contains many moving parts and functional elements. Often, a faulty VAZ 2110 rocker starts to play a lot, making it difficult to change gears normally and fully. In this case, unfortunately, all that remains is to replace the unit with a new one.
Very often, VAZ 2110 motorists may complain about strong vibrations in the operation of the rocker. In this case, there can be a lot of reasons: from worn-out engine or gearbox mounts to improper repairs or tuning (for example, installing a backlash-free short-stroke driveshaft). In such cases, motorists, as a rule, struggle with the consequences of the malfunction by installing fixing springs for the handle, or plastic shock-absorbing inserts under the lever axis. Although the search for primary causes could in many ways be more rational.
In addition, a malfunction of the link can also be determined by the following symptoms:
- unclear gear shifting. In other words, “knocking out”. Often, it occurs after incorrect adjustment of the lever; the problem can be completely cured by replacing the rocker;
- strong rattling of the gearshift knob, requiring replacement of the lever ball joint cage, also known among motorists as the rocker pad;
- erroneous gear shifting, accidental engagement of reverse gear instead of first gear.
As you can see, there are a lot of problems with the rocker on VAZ 2110 cars. Most of them are far from the most pleasant and require surgical intervention to eliminate them. Work should definitely begin with adjusting the gearshift lever, which will allow you to eliminate in advance unreasonably high costs for replacing a functional shift lever.
Adjustment
Now let's talk about how you can adjust the link if it shows primary signs of malfunction.
- First of all, try by hook or by crook to engage first gear.
- Place the car on an overpass, turn on the handbrake, place additional supports under the wheels to avoid the car moving.
- Do not turn off first gear on the transmission.
- At the bottom, find the clamp that holds the rocker and secures it. To do this you will have to crawl under the hood. You shouldn't have any problems finding the gearbox. The clamp needs to be loosened.
- Now return to the salon. Your task is to move the box lever as far as possible to the left. If you start to pull the handle forward or backward, the drawstring will most likely come off. You don't need it.
- Get back under the car and tighten the clamp back.
- In many cases, simply shifting the rocker relative to the cardan shaft by literally a few millimeters is enough.
When adjusting, pay attention to the condition of the cardan shaft. It may require replacement if worn out
Work is in full swing
Finalization
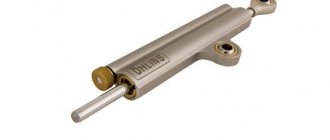
Now many owners of the VAZ 2110 are discussing the possibility of refining and improving the gearbox by replacing the rocker from a standard one to a short-throw one.
The short walk is the result of independent tuning. Decide for yourself whether to carry out such work or not. But from the point of view of the efficiency of the gearbox, installing a short-throw rocker is only beneficial, since gears begin to shift more clearly.
Short walker
To install a short walker for yourself, it is not necessary to completely dismantle the standard version.
To do this you need to perform several operations:
- You just need to disassemble the ball joint from the outside;
- Next, the metal ring of the support is opened and the legs made of plastic are spread apart;
- This is how the ball will come out;
- Now the rod is disconnected from the support, and a small piece of pipe and a piece of sheet metal of good strength are welded to the rod;
- Be sure to lift up the hinge with the hook, otherwise erroneous switching of speeds will not be avoided.
Installing a short drive will entail the need to apply more force when engaging a particular gear. But on the other hand, switching becomes clear and smooth. Therefore, decide for yourself which option would be better for you - standard or short-stroke.
How to make it yourself
- first you need to raise the attachment point of the piece of iron, which is located from the gearbox to the lever, which is located inside the cabin;
- Next, we disassemble the ball joint (if desired, you can completely dismantle the old link);
- next step: free the ball from the plastic claws that secure it. To do this, you need to unclench the metal ring. Next, we disconnect the rod and drag it inside so that it passes through the cover, which is responsible for protecting it from dirt. The clamp located near the gearbox should be loosened in advance. This way you can make your work easier;
- at the penultimate stage you need to cut off the excess parts using a grinder. A piece of metal pipe should be welded into the base of the rod, which will have a wall thickness of approximately 3 millimeters. It is necessary to use only identical pieces to ensure that there are no distortions. The rod itself needs to be lengthened by about 2-4 centimeters;
- at the last stage, you need to adjust the reverse gear locking mechanism, due to the fact that after adjustment the part may not coincide with the plate on which it is attached. To correct this situation you need to: remove the plate and adjust the hook. On the plate mounting bracket there is a cutout with which the hook occurs. You need to adjust the plastic hook or simply upgrade it using a file or similar means.
After that, you simply put on the cover for the manual transmission, the knob and try the modernized VAZ shifter in action.
Changing the backstage for a VAZ 2110-2112 -2170 (Priora) car is carried out according to the same scheme. In this case, instead of welding, you will need to install a freelance short-throw rocker from another car. It should be noted that the replacement option is a more expensive option in price, since replacing it yourself is more problematic. If you already have experience working with transmissions, then purchasing and replacing parts yourself will cost about 1,000 rubles.
Replacing a car's rocker, eliminating play
The design of the gear lever movement device is invented with the aim of uninterrupted operation of the gearbox. You can repair the backstage yourself or with the help of a partner for convenience. Most car enthusiasts are inclined to replace the standard rocker with a short-throw one. Installing a short-throw rocker is a type of tuning that allows you to reduce the limit of movement of the gear shift lever.
When using such a link, gear shifting occurs clearly and quickly. The process of replacing a regular link with a short-stroke one is quite simple. It is necessary to lift the fastening of the iron rod that runs from the gearbox to the shift lever in the passenger compartment. In this case, it is not necessary to remove the link; you only need to disassemble the spherical support.
Then open the iron ring until the plastic tabs move apart and the ball is released. After this, loosen the clamp near the gearbox, disconnect the rod and drag it in using the dirt cover. While in the pit, cut off the parts and weld a pipe into a rod, no more than 2-3 mm thick, and a piece of sheet metal, 5-6 mm thick. The rod is usually cut off by 2-4 cm.
A simpler option, but quite expensive, is purchasing a new rod. A short-stroke slide costs about 700 rubles.
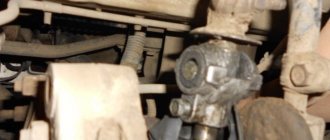
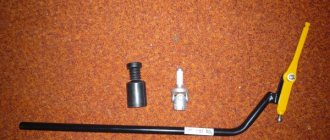
Large play on the rocker is a disease of the car model in question, the cause is the original gearbox driveshaft. To carry out repairs, you need to purchase the cardan itself. For this car, it is suitable from Kalina; it is purchased together with the boot. For the repair itself, a minimum of tools is required: keys “13” and “10”, a screwdriver and a hammer.
Repair or replacement is carried out on an inspection pit or lift. You will need the assistance of an assistant to make subsequent adjustments to the shift lever. Using two keys set to “13”, stretch the clamp on the rod and pull the drive off the rocker rod. Use a screwdriver to push the boot towards the gearbox or remove it completely.
Unscrew the bolt and knock down the cardan with weak blows of a hammer. Installation of a new one is carried out in the reverse order, that is, first you need to put the boot on and the cardan on the shaft. After the bolt aligns exactly with the recess on the shaft, put the boot on the universal joint.
Price issue
If you decide to replace the rocker seal at the same time as installing the rocker itself, this can be considered absolutely the right thing to do. Additionally, replacing the driveshaft will not cost much, but the efficiency of such a comprehensive repair will be much higher.
Actions on your own, you only have to purchase the necessary parts and ordinary consumables. If you contact a car service, the minimum cost of the service will be 800-1000 rubles. That is, the savings are obvious.
The curtain itself costs about 400 rubles. From here it becomes clear why we did not advise buying a repair kit, but rather completely replacing the part. There will be no savings as such, but the difference as a result of the repair will be significant.
Installation of the backstage from "Kalina"
Replacing the VAZ 2110 gearbox
On a VAZ 2110 you can successfully install a slide from Kalina:
- To do this, it needs to be modified a little.
- The cardan from the new model is 20 mm longer than the original “tenth”.
- Therefore, it needs to be cut, to do this, use a lathe.
Note: when cutting manually, you can ruin the part, since when the temperature of the metal increases, it loses its strength.
- The replacement of the slide must be carried out in the garage from the inspection hole.
- Remove the plastic tunnel from the car interior.
- Also remove the boot.
- Remove the old rocker, unscrew all the fasteners from under the bottom of the car.
- Install a new link and adjust it.
Note: adjustment must be carried out in order to later avoid troubles that arise during operation of the vehicle.
Why is it recommended to install a cardan from the new Kalina? On VAZ-2110 models, universal joints made of less resistant material are installed, so they quickly fail. This causes premature play in the rocker, which usually affects the quality of gear shifting while the vehicle is moving. After purchasing a new link, a visual comparison should be made of the old cardan and the purchased one. The comparison will be entirely in favor of the new acquisition. The Kalina cardan is made of better quality material, it is much more wear-resistant.
Gearbox slides for VAZ 2110
After installing a new link, the lever may rattle. Since this link completely eliminates play, that is, the vibration is transmitted completely to the lever.
Fixing lever rattling
- To do this, install a new ball joint for the lever and install a repair kit.
- The ball joint must be replaced from the inspection hole, since it is easier to change it from under the bottom of the car.
- Install the retaining spring to the gear lever.
It will dampen vibration by holding the lever in the desired position. This will not affect the application of additional forces when turning on the speeds. To get rid of the rattling of the lever, you can install additional plastic washers on the gearbox axle. To do this you will need:
- material - plastic (regular lid for jars);
- open-end wrench No. 10, No. 13;
- scissors;
- Phillips screwdriver;
- flat file, you can use a small flat file.
Stages of work:
- remove the plastic tunnel;
- unscrew the nut with an open-end wrench No. 13;
- Unscrew the screw using a Phillips screwdriver;
- unscrew the two nuts with a No. 10 wrench;
- remove the bolt;
- carefully pull out the bushing;
- remove the washers.
Using scissors, according to the size of the sleeve, cut two washers from the prepared plastic materials:
- Lubricate all parts with graphite lubricant.
- Place an additional washer on the bushing.
- Put it in place.
- Insert another washer on the right.
- Place oil-resistant rubber rings on both sides of the bushing.
- Reinsert the bolt.
- Treat the threads with graphite lubricant.
- Tighten the nuts.
Note: when tightening the nut to 13, you must take into account the following: if it is tightened too tightly, the lever will be difficult to move.
After such painstaking work, the car enthusiast will get rid of the rattling gear lever for a long time. The lever begins to work easier, and the gears are switched on more efficiently. You need to do the work yourself after watching the video and photos. Painstaking work must be carried out after a detailed study of each stage of work, since the gearbox gate ensures good operation of the gear lever. Therefore, how professionally the repair is carried out will completely affect the provision of comfort during operation of the VAZ-2110. It is also recommended to read the manufacturer's instructions. Price of spare parts for replacing the rocker:
- gearbox driveshaft from VAZ-2114/2115 from 300 rub.,
- boot from 65 rub.,
- drawstring from "Kalina" within 500 rubles.
Do-it-yourself installation and adjustment will give the car enthusiast the opportunity to fully feel the difference in the operation of the car.
https://carfrance.ru/regulirovka-kulisi-vaz-2110/https://vaz-remont.ru/samostoyatelnaya-regulirovka-kulisy-na-vaz-2110-regulirovka-kulisy-kpp-svoimi-rukami/https: //ladaprofi.ru/vaz-2110/kak-sdelat-regulirovku-kulisy-na-vaz-2110.htmlhttps://vaz-2110.ru/podveska/regulirovka-kulisy-na-vaz-2110.htmlhttps:// ladafakt.ru/kak-otregulirovat-kulisu-na-vaz-2110.htmlhttps://avto-zhelezo.ru/1742-kulisa-korobki-peredach-vaz-2110-menyaem-svoimi-rukami.html
Symptoms of a malfunctioning rocker
There are certain signs indicating that it is the gearbox linkage that has become unusable, and not the transfer case itself.
The most common signs:
- When turning on/off first gear, the driver experiences difficulties; it is difficult to move the gearbox handle to the desired position;
- The first gear is driven correctly, but after a while the reverse gear is set independently;
- The choice of any speed takes place in normal mode, but it is difficult to turn on the first and fifth, the lever does not obey.
As soon as the listed symptoms, even one of them, are noted while driving a car, you need to contact the service to fix the problem. If experience and desire allow, you can fix the breakdown yourself. The most common symptoms of a link failure and possible cause:
- The play in the gearbox lever can be clearly felt: the cause could be physical wear of the linkage, the problem can be solved by completely replacing the part.
- The box slide rings when gears are changed: sometimes the sound indicates a poorly performed repair or a factory assembly defect.
- Speeds are switched with great effort: adjusting the VAZ 2110 rocker will fix this; if the problem persists, you will need to replace the element.
- When you engage the first gear, the lever shifts to reverse gear: the reason is precisely in the gearbox, a mandatory replacement is required. The situation can be corrected by a repair kit, but this depends on the severity of the damage or the detected wear of the assembly elements.
- When the engine is running, strong vibration is transmitted to the gearshift knob: the hinges need to be checked, the cause could be play.
VAZ replacement scenes.
| Replacing the scenes of a VAZ 2106 |
| Click to view | Replacement of the VAZ classic backstage, VAZ backstage, Lada gearbox, classic gearbox, backstage 2101-2106, lever... |
| Tags: |
| Replacing the VAZ 2108 gearbox driveshaft with a Kalinovsky driveshaft! |
| Click to view | We replace it with a driveshaft without play from Kalina, thereby getting clearer gear shifting! |
| Tags: |
| Replacing the VAZ backstage |
| Click to view | We change the rocker on a VAZ of the tenth family and install a hinge from Kalina. Enjoy watching! Come in... |
| Tags: |
| Installing Kalinovsky wings on a VAZ 2114 |
| Click to view | Transferring the backstage of the “house&q uot; VAZ 2101-07 classic Review/Installation. |
| Tags: |
| Adjusting the scenes of the VAZ 2110 is the easiest and most accurate way. |
| Click to view | Friends, good day everyone! In this video I correct my mistake when installing the gearbox driveshaft from... |
| Tags: |
| Transferring the scenes of the “house” VAZ 2101-07 classic AkAn motor tech Review/Installation |
| Click to view | SEND A DONATION TO THE AUTHOR OF THE vid. thanks to those who held... |
| Tags: |
| Gearbox driveshaft from Viburnum, working on errors \\ VAZ 2112 |
| Click to view | Replacing the scenes on vases of the tenth family and installing a Kalinovsky cardan + results after 3 days of driving. |
| Tags: |
| Impressions from the backlash-free driveshaft of the Lada Kalina on a VAZ 2110 |
| Click to view | How to replace the repair kit for the VAZ classic gearbox, installing the gearbox lever in place. group… |
| Tags: |
| Replacing the scenes on a VAZ 2110/2111/2112 |
| Click to view | Write comments, like, subscribe, thanks to this the channel is developing. Thank you for watching! |
| Tags: |
| How to install the gearshift lever. Replacing the backstage repair kit. |
| Click to view | Replacing the bushing on the gearshift knob of a VAZ 2108. At the same time, I recommend changing the cardan... |
| Tags: |
| Gear shifter (selection) VAZ classic |
| Click to view | Be sure to give it to yourself! Then you will say thank you. |
| Tags: |
| We remove the play on the gear shift knob! |
| Click to view | Installing a Kalina gearbox on a VAZ 2112 Music downloaded from “Music from Epidemic Sound”... |
| Tags: |
| 5 COOL chips that you MUST put in your ZHIGULI! |#15| |
| Click to view | I found some leaks in the area of the gearbox driveshaft. I bought two reinforced oil seals for 25 rubles apiece, a new dust seal... |
| Tags: |
| Installation of gearbox driveshaft from Viburnum \\ VAZ 2112 |
| Click to view | Link to a young and interesting channel about the kitchen. |
| Tags: |
| Replacing the gearbox seal on a VAZ Kalina. Jet thrust of Kalina! There is no more vibration. |
| Click to view | In this video I carry out a number of measures to reduce the free play of the gearbox of a front-wheel drive VAZ... |
| Tags: |
| Assembly of a VAZ 2107 five-speed variable gearbox. |
| Click to view | Another step towards ease of use. |
| Tags: |
| We eliminate all backlash, chatter and extra movement in the gearbox of a front-wheel drive VAZ |
| Click to view | Priora 2012 surprise from AvtoVAZ repair of the backstage and how to complete it etc. |
| Tags: |
| Zhulka – Transfer of the backstage or short-stroke backstage. |
| Click to view | A short video about the device for fastening the gear shift knob on the gearbox of a car of the 1st family... |
| Tags: |
| Priora 2012 surprise from AvtoAZ repair of the scenes and what they come with |
| Click to view | A method for eliminating the looseness of the gear lever on the side of a VAZ. |
| Tags: |
| Removing the shift lever VAZ. |
| Click to view | Subscribe to my Facebook channel: BK: ... |
| Tags: |
| How to eliminate the looseness of the gear lever on the side of a VAZ. Do it yourself. |
| Click to view | Donat for tyunyashki I'm on VK Installing a short-stroke... |
| Tags: |
| Replacing the VAZ-21099 gearbox universal joint with a “Kalinovsky” one |
| Click to view | don't worry, everything will work out. |
| Tags: |
| Replacement of the universal joint and oil seal of VAZ 2109. NOT KALINA! ONLY FAMILY!!!! |
| Click to view | Do-It-Yourself Vaz Repair. Clear shifting of the VAZ 2109 gearbox. VAZ repair. Tuning VAZ 2109. VAZ.... |
| Tags: |
| Short-stroke rocker VAZ 2109 TUNING |
| Click to view | The video shows the process of replacing the rocker cushion on a VAZ 2110 car. The rocker cushion is used |
| Tags: |
| tin broken drawstring |
| Click to view | Video about how to remove the gearshift lever without breaking the clamps. Cashback: |
| Tags: |
| Do-It-Yourself Vaz Repair. Clear shifting of the VAZ 2109 gearbox. VAZ repair. Tuning VAZ 2109. VAZ 2109 |
| Click to view | Simply and easily |
| Tags: |
| Replacing the backstage cushion of a VAZ 2110″ rel=”spf-prefetch |
| Click to view | Description missing |
| Tags: |
| How to remove the gearshift lever VAZ” rel=”spf-prefetch |
| Click to view | Description missing |
| Tags: |
| Adjusting the VAZ backstage. We set the gearshift knob of VAZ 2109, 2110, 2114, 2115 without the help of a partner.” rel=”spf-prefetch |
| Click to view | Description missing |
| Tags: |
| INSTEAD OF THE FIRST GEAR, THE REVERSE GEAR OF THE VAZ 2110,2111,2112 is engaged.” rel=”spf-prefetch |
Alternative supports
Replacement cushion for VAZ 2110
Considering the long-standing problem of Samara and a dozen, the manufacturer immediately released a whole series of alternative pillows:
Let's now consider their features:
- The support of JSC-BRT and the peculiarity of its structure is contained in a hinged product, which replaced the bearing in this place. At first glance, it looks like a panacea, since the general principle of operation seems to be clear: the creators of this technical innovation used an element that has increased rigidity in the radial direction. At first glance, the sounds should disappear and the car should become silent on uneven roads, however, conflicting reviews from the motorists themselves do not allow us to completely agree with this fact.
- An alternative to OAO-BRT is SS-20, where a steel bushing was installed in place of the standard bearing, which was completely welded into a rubber damper. The manufacturer of this new product claims that the SS-20 will completely eliminate the appearance of elevators and extraneous sounds. Moreover, the manufacturer directly promises that the SS-20 will be able to guarantee the classic behavior of the rocker (see Replacing the rocker on a VAZ 2110 on your own): regardless of the topography of the road surface, the lever will be stable and without extraneous sounds.
- The developers of "Assomi" boldly claim that the use of a special prescription rubber mixture will completely smooth out all impacts and sound noise, thereby significantly increasing the overall level of comfort of the car.
VAZ 2110 gearbox rocker
So, you need to choose who to trust, because there are a huge number of manufacturers to choose from, who all guarantee the high quality of their products. And most importantly, they guarantee that they managed to create a universal high-tech product that is most effective from a practical point of view.
When to change your pillow
VAZ 2110 backdrop
Factors that indicate the need to replace the wing cushions:
- extraneous sound during movement, the irradiation of which can even spread to the body of the vases;
- traces of hardening or cracking of the rubber cushion are visible, as well as if it is separated from its metal base;
- there is a pronounced increasing vibration that has not previously been observed;
- in case of unsatisfactory backlash length, etc.
Why does the VAZ-2110 need a rocker?
The rocker is located in the gearbox (gearbox), which, in turn, is necessary to change the speed of the vehicle and indicate the direction, for example, reverse or forward. The slide also allows you to turn off the power unit and completely stop the VAZ-2110.
Now about what the node is needed for. It is designed to transmit rotational movements, starting from the crankshaft and ending with the chassis of the car. In order for the gear to engage at least at a minimum, the small circle gear must engage on the drive shaft with the large sprocket of the driven shaft. Using a lever located on the gearbox, moving parts with sliders are switched, and therefore the speed of movement of the VAZ-2110 is changed.
The gearbox cannot operate properly if there are malfunctions of the rocker. Why is the slide built into the gearbox? It is responsible for the simultaneous movement of the sliders and the random movement of 2 gears at the same time.
If the rocker is configured and adjusted incorrectly or the old part cannot be repaired, then the performance of the gearbox will suffer greatly.
Backstage replacement and repair
Taking into account the fact that during operation of a car, the rocker on a VAZ or on any other car experiences constant loads, the mechanism wears out, and adjustments get lost
For this reason, it is important to understand what in a particular case would be the optimal solution: repair, adjustment or replacement of the rocker with a standard new one or a short-stroke one
In any case, it is necessary to first disassemble the mechanism. To do this you will need:
- remove the cover on the gearshift knob;
- drive the car onto a pit or overpass/lift;
- remove the tunnel where the gearshift knob is installed by unscrewing the bolts;
- dismantle the rocker itself (on a VAZ 2110 it is secured with six bolts).
During the disassembly process, you need to carefully check the condition of each individual part, you should also bend the boot, check the condition of the support, oil seal, cardan, etc.
If, for example, the oil seal has failed, then it is enough to have a repair kit where such an oil seal is included. This kit will also come in handy if more complex repairs to the backstage are required.
If the bushing is deformed, it must be replaced. In the event that the cardan is loose, as well as in a situation where the hole in the lever axis is worn out, a complete replacement of the link will be required, that is, a repair kit will not be able to solve the problem.
We also note that a common problem that drivers note during operation is the rattling of the rocker. Typically, in this case, if there are no other complaints, the drawstring cushion is often the culprit.
At the same time, replacing the rocker cushion is not a complicated procedure, but the result is often positive and significantly increases the comfort when operating the vehicle.
Another important procedure in the process of servicing the rocker is replacing the rocker rod oil seal. It is important to understand that the serviceability of not only the operation of the scenes, but also the gearbox directly depends on its condition
If drops of transmission oil are visible under the car, this often indicates that the seal is leaking. As a rule, problems with the VAZ 2110 rocker seal appear in the form of a crunching noise when switching.
As for replacing the oil seal, the car needs to be driven into a pit or raised on a lift. Next, you should inspect the rubber boot. If it is not sealed or is torn, traces of oil will be visible.
Then you should bend the boot, disconnect the cardan and thus gain access to the cuff. Now the cardan is removed from the lever, after which it is disconnected from the rocker. After removal, you can get to the oil seal and then use an awl or hook to remove the gearbox cuff.
Next, you should press in a new oil seal (in home-made conditions, installation is carried out using a stopper from a plastic bottle). If the oil seal is installed successfully, you can proceed to reassembling the entire mechanism, not forgetting to put the boot in place.
In fact, such repairs allow you to avoid oil leaks in the gearbox and improve the operation of the gear shift mechanism
Finally, we note that it is also important to carry out adjustments and settings after repairs.
The fact is that even a serviceable, but incorrectly configured rocker will not work properly. By the way, on a VAZ 2110 it’s difficult to set up the rocker yourself. To make the process easier, it is better to immediately invite an assistant.
Replacement instructions
Before starting work, we advise you not only to purchase a new spare part, but also to watch training videos on replacing the slide. The procedure is not very complicated, but a visual aid will never be superfluous. Especially if you do not have much experience in repairing a car and transmission in particular.
The process involves performing several sequential steps.
- Remove the housing from your gear shift knob.
- Raise the car using a jack. In some cases, an inspection hole will do, if you have one in your garage.
- Now you should dismantle the console, which will give you access to the backstage.
- The element is held in place by six bolts, which can be removed using a regular 13 mm wrench.
- But it's not that simple. You won’t be able to unscrew the top two bolts with a wrench, so don’t even try. They are specially planted as tightly as possible, so to dismantle them you simply need to cut them down with a grinder.
- Now you can safely remove the remaining two bolts in the lower fastening of the rocker, for which your effort and a 13 key will definitely be enough.
- The next step is to remove the clamp and move the boot. You will need to remove the hinge. At the same time as replacing the link, we recommend changing the hinge. It would be a good idea to replace the oil seal and cardan shaft. These elements have a limited service life, and since you decide to change the slide itself, there are objective reasons to do everything as efficiently as possible.
- After this, install the new unit in place of the old one. Act carefully so that the rubber bands of the slides fall on the welded bolts, which you previously sawed off using a grinder.
- The assembly is now reassembled, operating in the opposite sequence to disassembly. It is not necessary to seat the top mounting bolts tightly, but try to tighten them firmly.
Gearbox slide: what it is, signs of wear, how to adjust it yourself
Not all motorists have any idea what the name of this or that part in their car is. In this case, we are talking not only about the mechanisms “hidden” in the engine, but also about the devices with which they interact literally every day. One of these parts is the gearbox linkage.
Please note: The name "slide" is not official for this mechanism, but it is generally accepted. In fact, this part is called the transmission control rod
1. What is a gearbox rocker 2. Signs of gearbox rocker wear 3. Adjusting the gearbox rocker
What is a gearbox rocker?
Many drivers mistakenly believe that the rocker refers to the gear shift lever, but this is not entirely true. If we are talking about a gearbox rocker, we mean a composite mechanism whose task is to connect the gearshift lever and the rod. That is, the driver cannot see the backstage, much less touch it. This element is located between the lever and the gearbox itself, and it is located under the bottom of the car, near the driveshaft, and in some cases under the gearshift lever itself.
As can be understood from the description, the rocker regularly has to deal with serious loads, so this element must have good strength. Despite this, the slide is susceptible to damage. If it does not contain enough lubricating components, drops of water, dust or other “debris” have entered it, there is a high risk of part failure.
Please note: On some cars, the rocker can last 200-300 or even more than thousands of kilometers without replacement. But, if we take the average result, the gearbox usually fails after 100 thousand kilometers of operation
Signs of gearbox wear
The driver must pay attention to possible failure of vehicle components, including knowing the characteristic signs of wear on the gearbox linkage in order to take timely action to replace it. Despite the fact that the mechanism is quite reliable, you should be aware of the following “symptoms” of its imminent breakdown:
- Increased play at the gearshift knob. This can be noticeable both when the handle is in neutral and in one of the gears;
- Difficulty shifting gears. For example, one or more gears are difficult to “stick”, or maybe a crunching noise occurs when the lever moves in their direction;
- It feels like changing gears has become more difficult, as if the lever has become much heavier;
- Gears are engaged incorrectly, for example, instead of fifth, third is engaged or vice versa.
Drivers often ignore the appearance of play in the gearbox, believing that this is a normal situation. In fact, if backlash occurs, it is imperative to diagnose the gearbox, and, if necessary, adjust or replace the linkage. The fact is that a slight play is already a fairly serious symptom of a faulty gearbox linkage.
If it “breaks” while the car is moving, this can lead to serious consequences for both the car and the driver, since in such a situation there is a high risk of getting into an accident.
That is why, if you notice problems with gear shifting, be sure to contact a service center for diagnosis and repair of the linkage, if necessary.
Adjusting the gearbox rocker
It is not always necessary to completely or partially replace the scenes. Quite often you can limit yourself to simple adjustments. At the same time, it is possible to adjust the link with your own hands, without contacting a service center. There are two ways to adjust:
- In reverse gear. In order to adjust the rocker for reverse gear, you need to loosen the clamp on it, and then move the gearshift lever to the position that corresponds to the ideal engagement of reverse gear. After this, the clamp is tightened, and the work is considered completed;
- On the first transfer. If it is not possible to engage reverse gear, you can adjust the gearbox rocker in first gear. To do this, engage first gear, and then loosen the rocker clamp. Next, rotate the rocker drive counterclockwise until the gearshift lever stops in the plastic reverse speed lock, and then tighten the clamp.
It is worth noting that the general processes for adjusting the gearbox rocker are described above.
It is important to say that the process may differ depending on the car, so before starting work it is recommended to read the instructions specifically for your car model
Diagnostics
In any car, the gearbox is used to prevent the car from changing gears on its own. This part needs to be monitored and looked after; in addition, over time it becomes loose and requires adjustment. If the adjustment has not been made for a long time or it was performed poorly, then the driver will feel uncomfortable when driving the car.
As practice shows, those car owners who forget about the rocker and its adjustment can, over time, destroy the entire transmission system. And this is a very expensive repair.
It is because of this that prevention should be carried out, as well as due attention should be paid to the scenes. If the car begins to behave somehow differently, then it is necessary not to delay the repair.
Gearbox slide
To understand that the rocker requires adjustment or replacement, you just need to monitor the operation of the gearbox.
As a rule, when a failure occurs, the following symptoms appear:
- Difficulty when engaging 1st gear. As a rule, it is difficult to engage the gear; the driver has to practically drive the lever in to engage 1st speed.
- Possibly difficult shifting from 1st to 2nd speed.
- Due to a loose lever, it is not 1st speed that is engaged, but reverse. This is very dangerous, especially at a traffic light, at the start. It is necessary to urgently repair the rocker, otherwise the problem will only get worse.
- Difficulty engaging 5th gear, while other speeds can be engaged smoothly.
- There is play in the shift knob. As a rule, the rocker only requires replacement and adjustment is not necessary.
- Extraneous sounds appeared coming from under the car, or rather from the gearbox. As a rule, the sound becomes ringing. This problem is a disease of the entire VAZ 2110-2112 family. As a rule, such a ringing can appear after repairing the car’s suspension.
- When driving, the speed may jump. In other words, the car, gaining acceleration, independently disables the engaged gear and switches to neutral speed. For further driving, you will need to keep the lever at the desired speed constantly so that it does not jump out.
- Strong vibration that occurs on the shift knob. This is due to the failure of the scenes. It will need to be repaired to solve the problem.
If the symptoms described above appear, then you will need to begin repair work. You should completely replace the linkage or simply adjust it and gear shifting will become comfortable again. Therefore, it should be adjusted before replacing.
Adjusting the work of the scenes
The adjustment procedure will save money that could possibly be spent on completely replacing it.
Adjustment is made only in cases where:
- The gearbox was removed and installed back;
- Previously, repairs were carried out to replace the cardan;
- In the case when the hinges on the slide have turned.
Of course, adjustments can be made at other points as described earlier. Do not forget that even minimal gaps can disrupt the correct operation of the entire transmission.
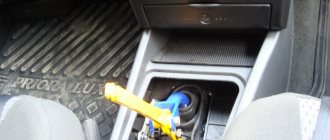
Naturally, before starting repair work and adjustments, you will need to prepare the right size wrenches. With their help, the clamps will be loosened. You should also place bricks, stones or special anti-roll devices under the wheels.
When everything is ready, you can begin the work process itself. To do this you need:
- It is recommended to use an overpass or pit for repairs; if these are not available, then use reliable jacks. Next, you should go to the garage.
- When the car is ready for repair, it is necessary for safety to put on the handbrake and throw bricks or specialized devices under the wheels that will prevent the car from rolling away.
- Next, you need to crawl under the car and find a special clamp. It connects the hinge and the rocker itself. Then you will need to loosen it using a wrench.
That's the whole process of adjusting the scenes. Nothing complicated, the main thing is to follow safety precautions.