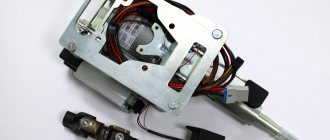
Tuning does not always mean installing a new body kit or shortening the Priora springs. Sometimes modernization helps improve driving comfort. An excellent example would be a short-throw rocker. VAZ owners know the “features” of the gear shift lever (GSL), which is not so easy to direct to the desired gear. The short-throw rocker on the Priora solves this problem, but we will tell you how to install it on the Priora and adjust it correctly.
The instructions in our material are also relevant for motorists who want to know how to repair and replace a conventional rocker. The instructions describe in detail the process of dismantling and adjustment, which is carried out for a factory part according to exactly the same principle.
Gear shift setting for VAZ 2110
If you do not have a plastic stopper, the adjustment is made in neutral gear.None If adjusting the rocker does not lead to anything and there is still a problem with switching, replace the rocker completely or ask for help from specialists.
Source: VAZ DIY repairs
Problems with adjusting the gearbox linkage lead to the appearance of unnecessary sounds and overtones while driving, “knocking out” speeds, the appearance of play in the gearshift lever, and an increased risk of gearbox failure. All this is both inconvenient and simply dangerous on the road, and therefore work on adjusting the gearbox linkage must be carried out when the first signs of imbalance appear. Moreover, you can do this yourself, and all you have is a free half hour and an assistant.
The work is carried out on a viewing hole or a lift (with the handbrake engaged and using wheel chocks, of course). If there is no inspection hole or overpass, you can adjust the gearbox rocker in the usual way, by lifting the car with a jack.
Repairing the box
Tuning door cards on Prior
In the event that this kind of adjustment work did not bring much results, you will have to remove and disassemble the gearbox of your VAZ 2110
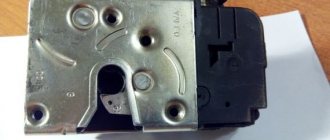
The main attention should be paid to the gears, as they are most often knocked out. This is especially true for first and second speeds.
It will also be important to check the latch. There are three latches in total in the gearbox.
The very first of them is very long and is responsible for 1st and 2nd gears. Next comes the clamp for third and fourth gears, and the shortest of the clamps is intended for 5th gear
There are three latches in total in the gearbox. The very first of them is very long and is responsible for 1st and 2nd gears. Next comes the clamp for third and fourth gears, and the shortest of the clamps is intended for 5th gear.
complete gearbox assembly
Often, VAZ 2110 owners voice a problem regarding the switching or departure of first gear. Most likely, the reasons lie in the following:
- synchronizer problems;
- damage to the retainer spring when the lever dangles and the gears are switched on randomly;
- damaged rod and fork.
A common problem is when the second gear is reluctantly engaged, or it is simply knocked out. The most likely causes of the problem:
- poor engagement of the gear and clutch that engages the gears;
- wear of gear teeth and coupling;
- problems with the clutch.
Algorithm for installing a short-stroke rocker on a Lada Priora
- To gain access to the bolts, the decorative cover must be removed from the knob box lever. The latter is not secured to the lever in any way; to remove it, it will be enough to pull strongly.
How to install a short-throw rocker on a Lada Priora
- We dismantle the gearbox lever rod from the cardan by loosening the clamp using a key set to “13”.
Installing a Lada Priora short-stroke rocker yourself
- To gain access to the lever, you must release the ball that blocks the engagement of reverse gear, which springs when engaged. Be careful! Do not pull the lever to get it released.
How to install a short-throw rocker on a Lada Priora
- The retaining ring is removed, then you need to remove the lever with the ball and spring inserted into the plastic case.
Do-it-yourself short-throw rocker on a Lada Priora
Do-it-yourself short-throw rocker on a Lada Priora
- Remove the lever with the rod through the interior. To make it more convenient, they can be separated.
How to make a short-throw rocker on a Priora
- Remove the cardan. To do this, tighten the rubber boot with a “10” key. Then you need to unscrew the bolt that secures the cardan on the left side.
Principle of operation
Study the diagram below to understand how the short throw rocker works. The lever is installed in the neutral position, here it is indicated by the points “O” and “F”. To start the transmission, you need to move the rod - it will connect to the control gear at point “B” - at point “A”. After this, the handle will move to point “E”. Repairs and subsequent replacements are carried out in order to reduce the distance.
This can be done if the lever extends to point “H”. This move will increase the distance. On the diagram, "A" and "B" will become points "C" and "D". Replacing the standard rocker with a short-stroke one allows you to reduce the movement of the handle. We've sorted out the theory, now we can start the repairs.
Installing a short-stroke rocker on a Lada Priora - step-by-step instructions
1. To access the bolts, you need to remove the decorative cover from the box lever along with the knob. The second one is not secured to the lever in any way, so to remove it you just need to pull it hard.
2. Then you need to remove the gearshift lever rod from the cardan; to do this, first loosen the clamp with a key set to “13”.
3. Before releasing the lever, you need to release the reverse gear locking ball, the one that springs when engaged. To do this you need to remove the locking ring.
Attention! Do not pull up on the lever to release it.
4. Remove the lock and lever along with the ball and spring, which are inserted into the plastic housing.
5. We take out the lever together with the rod through the interior; for convenience, you can disconnect the lever from the rod, although you don’t have to do this.
6. Remove the cardan. First of all, you need to pull off the rubber boot, then using a “10” wrench, unscrew the fastening bolt on the left side of the cardan.
7. As you can see in the photo, the cardan rods differ in length. The problem is solved by shortening the Kalinovsky rod; this must be done taking into account the type of short-stroke link. In some cases, the rod may not go in completely, as a result the gearbox lever will move towards the handbrake. If you also need to shorten, then know that you need to cut off about 1-2 cm.
8. So, we install the “Kalinovsky” cardan, having previously lubricated it with lithol from the inside. The bolt screws in easily because it has a cone shape, but do not overtighten.
9. Traction is also installed through the interior. It’s more convenient to do this in pairs with an assistant: one holds it by the elastic band in the cabin, and you carefully pull the traction.
Now assembly. It is produced in the following sequence
- Place the rod on the cardan shaft.
- Next, assemble the reverse gear locking mechanism. Lubricate the spring ball.
- We adjust the gearshift lever.
- Now tighten the clamp on the rod.
It's no secret that the Priora has a congenital problem - the rattling of the gearbox driveshaft.
Lada Priora Sedan designer assemble it yourself Logbook Mileage and clutch replacement
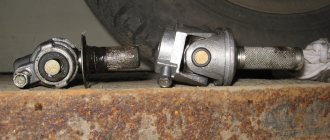
In almost all Priora, the rubber boot of the gearbox driveshaft is destroyed after some time. One glance is enough to give a verdict: the boot is made of burnt rubber, so it doesn’t last long! The markings on the cardan shaft boot were not Balakovsky.
It was decided to replace the Priora boot with a Viburnum boot, and also replace the Priora gearbox driveshaft itself with a Kalina driveshaft - it is too praised on various forums.
| The original boot of the gearbox driveshaft was cracked, and there was even a hole in its “accordion” | |
| I purchased a Balakovo-made boot and a Tolyatti gearbox driveshaft, all from Kalina | |
| I had to tinker a little with the Kalina gearbox driveshaft: the Kalina driveshaft rod is longer than the Priora rod by about 2 cm. Since I didn’t have the opportunity to compare the Kalina driveshaft with my own driveshaft (it was still on the car at that time), I had to cut it “blindly”. I measured 1.8 cm from the edge and started sawing | |
| I don’t have a grinder, I sawed with a hacksaw for metal - it took about 40 minutes of time, 2 hacksaw blades and a slightly ground corner on the emery))) It’s very difficult to saw, because the metal is strong! After sawing off part of the rod, I made a conical chamfer using sandpaper and a file. | |
| Let's start removing the original gearbox driveshaft. We loosen the clamp and tighten the torn boot. Next, we unscrew the fixing bolt, but unfortunately this is not so easy to do: the bolt is coated with red thread locker and there is no way to unscrew it. The open-end wrench turned, “licking” the edges, and the powerful socket head did not fit, the gearbox housing interfered with it. In general, in order to remove the fixing one, stock up on spanners. Replacing the boot and drive shaft itself takes about 10 minutes | |
| I sawed at random, but the size was amazingly accurate - the length of the rod of the original Priora gearbox and the Kalina gearbox are the same! | |
| The original driveshaft of the Priora gearbox is essentially not a driveshaft at all: it bends only in one plane, while the Kalinovsky gearbox driveshaft bends in 2 planes. In addition, the photo clearly shows a huge gap of 2-3 mm on the original Priora driveshaft | |
| The anthers differ slightly, but the Kalinovsky anther has better workmanship than the original Priora anther | |
| A little about adjustment. While unscrewing the fixing bolt, the reverse gear jumped out. We had to manually select the desired gear using pliers, but we couldn’t do it the first time. Having assembled the mechanism, it turned out that in place of the reverse gear it turned out to be the first, and the second could not be engaged due to the reverse speed limiter. I had to redo everything. The repeated adjustment turned out even worse, only 3, 4, 5 gears remained. It was possible to adjust it normally only the 4th time, using pliers to find the reverse gear. And we found it this way: having removed the link and clamped the cardan shaft with pliers, turned it counterclockwise until it stops and pushed the hinge forward. In order to make sure that we had engaged the reverse gear, I started the engine and carefully moved off - the car went backwards! Let me make a reservation right away: absolutely nothing will happen to the box, nothing will fly out or break. | |
| We install the gearbox driveshaft in place. Having straightened the clamp clamp a little, we connected the gearbox driveshaft to the rocker, set the lever to the reverse gear position and tightened the clamp clamp! The check showed that all the gears are there and they work perfectly. The feeling is very pleasant, the gears are engaged very softly and smoothly, no snagging. The lateral play of the lever has not changed, the longitudinal play has become smaller, but this difference is not noticeable either while moving or standing still. The position of the lever has changed a little, it has become a little closer to the driver’s seat, but it doesn’t touch anything, and it’s not noticeable from the outside, just by feeling it! But now you don’t have to reach so far for fifth gear |
Also check out
- Install the Kalinovsky cardan by applying lithol to its inner surface. Since the bolt is cone-shaped, screwing in is not difficult.
- The thrust should be installed through the interior. It's good if you have an assistant nearby. He will hold it by the elastic band in the cabin, at this time you need to stretch the traction.
Assembly is performed in reverse order
- First, we put the rod on the cardan shaft.
- Then you can begin assembling the reverse gear locking mechanism. Lubricate the spring ball.
- Adjust the gearshift lever.
- Tighten the clamp on the rod.
Attention!
If you first assemble the reverse gear locking mechanism, the long rod will not allow you to put the rod on the cardan shaft. The problem can be solved by shortening it. It is important not to forget to put the boot on the driveshaft.
How to install a short-throw rocker on a Priora
How to make a short-throw rocker on a Lada Priora
Adjust the reverse gear locking mechanism, since the consequence of adjusting the scenes is that the mechanism does not match the plate to which it clings. The problem can be solved by removing the plate and adjusting the hook (it is a cutout on the mounting bracket). You can sharpen it with sandpaper or a file.
The photo shows the adjusted toe.
Installation of a short-stroke rocker on a Lada Priora
To complete the procedure, you need to put on a manual transmission cover with a knob.
How to replace and adjust the rocker on a VAZ 2110-VAZ 2112?
Backstage adjustment:
Note! Before you go to the auto store and buy a new rocker, be sure to try to adjust the old one first so as not to waste money, maybe everything is fine with the old rocker!
1) At the very beginning of the operation, we will tell you why the adjustment of the rocker may go wrong, namely, after removing the box, after replacing the cardan shaft, or after unscrewing the nuts and bolts that secure the tension clamps of the rods that come from the rocker, and in other cases.
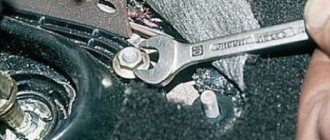
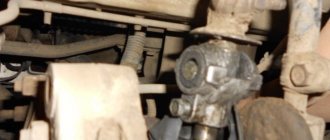
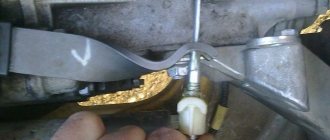
2) Now let’s move on to the actual adjustments, firstly, you will need to first drive the car into a pit or lift it using a lift, then climb under the bottom of the car and there you will find the boot under which the driveshaft itself is located (the boot is indicated by a red arrow), next to with this cardan and the boot that covers it, the end of the rod coming from the rocker itself will be attached, and this end will be attached using a tie clamp, so take two screwdrivers in your hands and with their help loosen the bolt nut a little (the nut is indicated by a blue arrow, and the bolt green), while when you loosen, hold the bolt itself with one wrench so that it does not turn, and with the other at this time loosen the nut, after the nut is slightly loosened, take a screwdriver in your hands and insert it into two holes, namely in the hole between the tie clamp (Indicated by a yellow arrow) and into the hole of the rod itself (Indicated by a white arrow), thereby widening both holes (In fact, these are not holes but a groove, so in the future we will use this word) so that the link rod can easily move relative to gear selector rod.
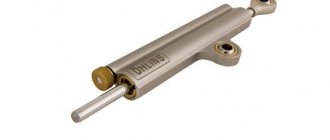
Types of mechanisms
Despite the different design models, only two types can be distinguished:
- Long-stroke (standard, previously installed on cars of model 2109 and similar).
- Short-wheel drive (installed on Kalina cars).
Structurally they are very similar, only different in size. The advantage of short-throw ones is that with their help, gears are engaged easier and faster.
True, many myths have formed around the gear shift: some claim that the dynamic characteristics of the car are significantly improved. This is all wrong; there is no connection between the dynamics of the car and the view of the backstage. But still, the short-stroke one has advantages over the standard one.
Causes
The reasons why reverse gear engagement is poor or difficult may be as follows:
- loosening of the fastening clamp of the rocker, due to which the length of the rod is not enough to fully engage the gear;
- jamming of the reverse speed lock;
- spring breakage and debris getting into the guide grooves of the gear selection mechanism;
- spontaneous loosening of the selection mechanism mounting bolts;
- the clamp bolt is cut off;
- wear of the clutch disc and release bearing;
- incorrect adjustment of the clutch and clutch pedal;
- low oil level in the box or the need to replace it.
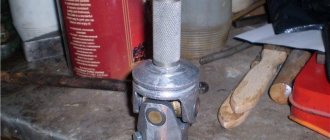
Do-it-yourself short-throw scaffold
Short-stroke link for classics
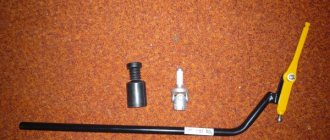
For production in this case you will need:
- a piece of pipe with a diameter of fifteen millimeters;
- nut from a classic ball nut;
- RPP from 2108;
- backstage repair kit 2108 (axle and two bushings);
- cardan from the steering mechanism 2104, 2105 or 2107.
The work is performed as follows:
- The ball from the bottom is cut off from the RPP;
- The lower part is sawed off so that a pipe can be inserted into it and scalded;
- The nut is welded to the pipe from below;
- The ball is placed in a convenient place;
- The cardan is attached to the gearshift lever.
The described process is illustrated by the following photographs:
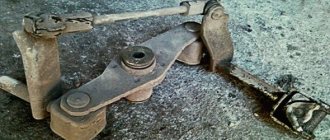
Short-stroke rocker VAZ 2109
One of the main parts will be a cardan from Kalina, which will help avoid play in the lever.
Next you need to complete the modification, as shown in the photographs:
Then two pieces of metal are welded
After finishing the work, you need to clean all the seams and paint them in the desired color.
The short-throw shifter, which you install yourself on many VAZ car models, has its pros and cons, but it allows you to reduce gear shifting time and makes it easier to control the car. Whether to do it or not is everyone’s personal choice, but it cannot be denied that such a modification is perceived by many as necessary and useful.
I like1I don't like
Do-it-yourself short-throw scaffold
Short-stroke link for classics
For production in this case you will need:
- a piece of pipe with a diameter of fifteen millimeters;
- nut from a classic ball nut;
- RPP from 2108;
- backstage repair kit 2108 (axle and two bushings);
- cardan from the steering mechanism 2104, 2105 or 2107.
The work is performed as follows:
- The ball from the bottom is cut off from the RPP;
- The lower part is sawed off so that a pipe can be inserted into it and scalded;
- The nut is welded to the pipe from below;
- The ball is placed in a convenient place;
- The cardan is attached to the gearshift lever.
The described process is illustrated by the following photographs:
Short-stroke rocker VAZ 2109
One of the main parts will be a cardan from Kalina, which will help avoid play in the lever.
Next you need to complete the modification, as shown in the photographs:
Then two pieces of metal are welded
After finishing the work, you need to clean all the seams and paint them in the desired color.
The short-throw shifter, which you install yourself on many VAZ car models, has its pros and cons, but it allows you to reduce gear shifting time and makes it easier to control the car. Whether to do it or not is everyone’s personal choice, but it cannot be denied that such a modification is perceived by many as necessary and useful. » alt=»»>
https://litezona.ru/ustanovka-korotkohodnoj-kulisy-vaz-2107/https://tuningsport.ru/catalog/kulisa-c-88/rychag-pereklyucheniya-peredach-korotkokhodnyy-v-sbore-turbotema-vaz- 2101-2107/https://tuningsport.ru/catalog/kulisa-c-88/rychag-pereklyucheniya-peredach-korotkokhodnyy-v-sbore-turbotema-vaz-2101-2107/https://putinizm.ru/korotkohodnaya- kulisa-vaz-2107https://znanieavto.ru/kpp/korotkoxodnaya-kulisa.html