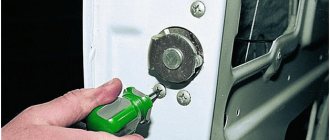
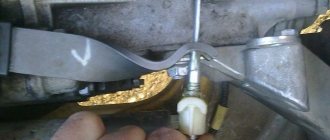
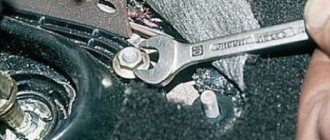
now the time has come to adjust the door locks, since the seals have already pressed down and have taken the working position, so to speak))) I have always adjusted the locks for myself and not only for myself, so I have little experience, but I have it)) and so let’s get started: 1. where to start to start, this is adjusting the mating part of the lock which is located on the body, it is screwed on three bolts, loosen these same bolts so that the lock latch can move, then: - move the latch outward if the door closes tightly - move the latch inward if the door does not close tightly ( that is, if it closes easily, but when closed it does not go straight along the body, but kind of sticks out as if it’s not closed) - move the lock down if the door rises when closing.
I noted everything in the photo below))
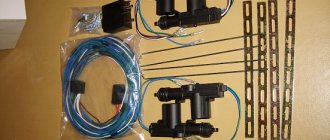
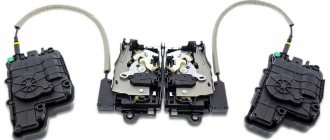
I also did a little magic with the locks)) they came from the factory silent, but they still clicked quite loudly, and because of this I decided to do a little magic on them, namely, I took them apart and, using a screwdriver, took out two springs from the lock, throwing out the one smaller one, and the larger one I put in place, plus in the place where the metal pawl, so to speak, hits the lock body during the click, I glued a small piece of the seal to muffle the sound from the impact (the photo is more clear)
well, something like this)) I hope this post is useful to someone)) thanks for your attention))
Quite often, drivers wonder how door locks are adjusted on Priora, 2107, 2110 and 2112. This is a fairly common job. The bodies of domestic cars have never been of particular quality. The problem arises due to misalignment of parts; wear of the elements of the lock itself can also affect it; this is usually observed on fairly old cars. In any case, adjustments will need to be made. Otherwise, the door will either open while moving or not close at all. This will, at a minimum, cause you inconvenience, and at a maximum, it may turn out to be unsafe.
Adjusting door locks on Priora, 2107, 2110 and 2112 does not require special skills. Even a beginner can handle this job. Such repairs do not require a large number of tools. Everything you need can be found in any garage.
Adjusting and replacing the lock on 2107
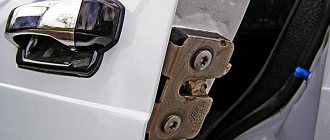
First, you need to identify the reason for the poor functioning of the lock. In some cases, the problem is sagging hinges. Because of this, the door sag and, accordingly, the lock does not coincide with the latch. You can check this by measuring the gaps between the door and the body. This figure can range from 3 to 7 millimeters. It is important that it is completely uniform. If the indicator is different, then you need to adjust the position of the loop. In some cases, this may save you from further manipulations with the lock.
The lock is adjusted in the following order:
- The position of the latch is outlined directly on the car. To do this, you can use a marker;
- If the door closes with just 1 click or just closes tightly. You need to unscrew the lock and move it to the sides of the outer part of the body;
- The door closes, but the gap remains, you need to loosen the latch, and then move it inside the body.
Sometimes, drivers experience problems opening the car from the inside. This occurs due to the door handle being misaligned. To fix it, you need to unscrew the screws securing the handle, move it to the optimal position and secure it.
Replacing a lock is also not a difficult task. This option is used when other methods no longer help. Installation of the new mechanism is carried out in the following order:
- First, remove the armrest, window regulator, dismantle the trim;
- Unscrew the button that turns off the lock. The manufacturer recommends using a slotted screwdriver to disconnect the switch rod from the locking mechanism, but in practice you can do without it;
- From the end of the door, unscrew two screws securing the groove;
- Remove the tongue from the groove, while the gutter moves away, this happens together with the seal;
- Unscrew the 2 screws securing the inner handle. It must be pushed inside the door;
- Unscrew 3 screws securing the locking mechanism to the door;
- All that remains is to remove the lock from the door. This is done together with the rod and the internal handle.
How to adjust body clearances?
The presence of even body gaps assumes that the body panels are properly adjusted. If the car has a light color, then uneven and unsymmetrical gaps between the panels are especially noticeable.
Uneven gaps and, accordingly, incorrectly adjusted body panels affect:
- Exterior of the car. This includes gaps and panels not being on the same plane.
- It becomes more difficult to open and close the hood, doors, and trunk lid.
- The amount of water ingress and wind noise. Incorrectly adjusted body panels directly affect increased noise and water leaks into the cabin.
- If any body panel comes into close contact with another panel adjacent to it, the paintwork on the rubbing areas will wear off.
How to measure gaps?
In factories and professional workshops, special rulers are used to easily measure the gaps between panels. It is not difficult to make such a ruler yourself. It can quickly compare different gaps without even remembering the values.
The coincidence of adjacent panels along the plane can be checked by applying a ruler with its edge simultaneously to two edges of different panels. A gap of 2 mm is allowed between the ruler and the body.
Manufacturer's recommendations for body panel gap sizes vary among different body panels. There may be different options for the front fender and hood compared to the front fender and front door. Typically, the size of the gaps between panels varies from 3 to 8 mm. In some cases the gaps may be larger.
Reasons for uneven and unequal gaps
It is important to correctly understand the reason for the uneven arrangement of panels and the gaps between them.
It is advisable to make sure that all structural elements of the body on which the panels are actually attached have the correct geometric parameters. If there are displacements and distortions, then it will not be possible to achieve even and symmetrical gaps, with the exception of minimal changes that can be compensated by adjusting the fastenings of the body panels. For example, if the engine compartment strip, on which the upper part of the radiator and the hood lock are attached, is displaced, then the gaps between the hood and the front fenders will be uneven and unequal.
It is necessary to make diagonal measurements of symmetrical points and, if necessary, eliminate the displacement by pulling in the desired direction.
Simpler reasons could be worn door hinges and sagging, missing one or more mounting bolts, misaligned locks, or simply an incorrectly installed body panel.
Replacing and adjusting locks on VAZ 2110 and 2112
Often, the reason for a poorly closing door is the displacement of the main part of the lock relative to the receiving part. In this case, you simply need to adjust the position of the latch. To do this, use a Phillips screwdriver to loosen the screws securing the clamp. This will allow you to move it in the desired direction. Tighten the screws and check the door operation.
If you cannot adjust the lock, then perhaps its parts are simply worn out. In this case, you will have to replace it. This is done in the following order:
- First you need to remove the casing, it’s not difficult, so we won’t focus on this;
- The outer door handle rod is disconnected from the lock;
- The lock lever is disconnected from the lock cylinder rod;
- The lock handle (inside) is removed from the rod;
- Use a Phillips screwdriver to unscrew the screws securing the outer part of the lock, after which it can be removed;
- The inner part of the lock is removed together with the blocking rod, as well as the handle rod;
- Disconnect the locking rod. To do this, remove the plastic rod holder. Be careful. It can be easily broken;
- The outer handle rod is disconnected by removing the lock washer.
Assembly is carried out in reverse order. If necessary, adjust the length of the rods; this is done by unscrewing or twisting their tips. When assembling, do not forget to lubricate the lock mechanism.
Prior door lock does not open
In general, at the same time as unlocking the lock, I pulled the door opening handle strongly, and the closing button did NOT rise! No matter how much you click the lock now, it doesn’t move up or down! the door doesn't open at all. he pushed and pulled very hard at different moments there. Tell me how to disassemble the door from the inside by removing the trim without opening the door, or are there workshops in Voronezh that work so late at night, or maybe someone will help. I won’t have time to go to a long distance tomorrow morning.
Adjustment on Kalina
Typically, it is necessary to adjust the operation of the lock on this model if there is excessive noise that occurs when closing the doors. It rarely gets to the point where the locking device works poorly. To work, you need a Phillips screwdriver, a wrench and a screwdriver with an asterisk. The work is carried out in the following order:
- Using a screwdriver, loosen the screws securing the clamp. It is secured with two Phillips screws and one sprocket;
- We make adjustments. The shift here is made up or down;
- Tighten the screws in the selected position.
To reduce noise, you can put a silicone cap on the clamp. If this procedure does not help, then it makes sense to tighten the screws securing the door hinges.
Removing the lock on Kalina
Sometimes adjustments don't help. This indicates wear of this mechanism; this often happens when the machine is used intensively. To continue normal operation of the car, it is necessary to change the lock. This is done in the following order:
- The door trim is dismantled;
- Using a Phillips screwdriver, remove the screw securing the base of the handle (inside). After this, carefully remove it from the guide pin;
- The insulating material located in the door is removed;
- The rod is disconnected from the cylinder mechanisms. To do this, press it out using a slotted screwdriver;
- The rod coming from the external handle is disconnected in the same way;
- Using the “8” head, the outer handle is detached;
- The outer handle is removed from the car;
- The lock itself is secured with 3 screws. Older machines use Phillips screws. On newer ones you can find stars;
- The locking drive block retainer moves upward. After that, disconnect the block with wires;
- Using a screwdriver, we disconnect the rod clamp; at the same time, it must be carefully rotated around its own axis. This way you can remove the handle rod (internal);
- The locking mechanism is removed from the door.
Assembly is carried out in reverse order. Before installing the new lock, be sure to lubricate it. This will extend the life of the mechanism.
Conclusion
. As a rule, car doors sag somewhat over time. This leads to some problems in operating the machine. To eliminate the problem, the door locks on Priora, 2107, 2110 and 2112 are adjusted. This work is not difficult, even a beginner should not have any problems. But sometimes this doesn't help. In this case, you will have to replace the entire lock. For each model, this work is slightly different, but usually, difficulties arise to a minimum.
Soundproofing vases with your own hands
We all know that the sound insulation in our cars leaves much to be desired, so very often owners turn to car services to reduce the noise level inside the car.
Actually, what is sound insulation? Noise insulation is a set of measures whose purpose is to reduce noise penetrating into the car interior, which includes the sounds of passing cars, wind noise, the sound of a running engine, chassis, wheel noise, the sound of small stones on the bottom of the car and similar sounds. In the article, we will step by step look at how to make sound insulation for a VAZ 2114, Priora and Kalina with your own hands.
Soundproofing VAZ 2114
In a VAZ 2114 car, sound insulation is more than necessary, and there is no need to say that the treatment must be complete, that is, all parts need to be processed: trunk, hood, floor, ceiling and doors. Partial processing of the car will not give any results, so you should not be lazy and save money, otherwise you will end up throwing money down the drain.
In order to soundproof a VAZ 2114 car, you need the following materials:
- stroyizol SD 90;
- accent 15 LM KS;
- vibroplast Gold;
- agilin;
- Vizomat MP – vibration absorbing material;
- splen 3004.
You will also need various working tools: a tape measure, a ruler, a square, a set of screwdrivers, an awl, a mounting tool, a household hair dryer, scissors and a set of keys.
The work begins with clearing the interior of upholstery, panels and anything that might get in the way. In fact, you clean everything right down to the body. In order to suppress excess noise and vibration and increase the rigidity of the structure, it is necessary to completely treat the surface of the trunk floor with vibration-absorbing material Vizomat MP. This material also has good thermal insulation characteristics and allows you to keep the cabin cooler longer in the summer heat.
In order to glue Visomat MP you will need a household hair dryer; the material is heated to a soft and elastic state, after which it is adjusted to the curves of the body. This must be done before the material “stiffens” and no longer fits as tightly as it should. For a good fit, you will also need rolling rollers; you won’t be able to glue it with your own hands and the sound insulation will not be of very high quality. Do not forget that fastening elements, hatches, and various technological openings cannot be sealed, since access to them will be needed after soundproofing work.
Adjusting and replacing the lock on 2107
First, you need to identify the reason for the poor functioning of the lock. In some cases, the problem is sagging hinges. Because of this, the door sag and, accordingly, the lock does not coincide with the latch. You can check this by measuring the gaps between the door and the body. This figure can range from 3 to 7 millimeters. It is important that it is completely uniform. If the indicator is different, then you need to adjust the position of the loop. In some cases, this may save you from further manipulations with the lock.
The lock is adjusted in the following order:
- The position of the latch is outlined directly on the car. To do this, you can use a marker;
- If the door closes with just 1 click or just closes tightly. You need to unscrew the lock and move it to the sides of the outer part of the body;
- The door closes, but the gap remains, you need to loosen the latch, and then move it inside the body.
Sometimes, drivers experience problems opening the car from the inside. This occurs due to the door handle being misaligned. To fix it, you need to unscrew the screws securing the handle, move it to the optimal position and secure it.
Replacing a lock is also not a difficult task. This option is used when other methods no longer help. Installation of the new mechanism is carried out in the following order:
- First, remove the armrest, window regulator, dismantle the trim;
- Unscrew the button that turns off the lock. The manufacturer recommends using a slotted screwdriver to disconnect the switch rod from the locking mechanism, but in practice you can do without it;
- From the end of the door, unscrew two screws securing the groove;
- Remove the tongue from the groove, while the gutter moves away, this happens together with the seal;
- Unscrew the 2 screws securing the inner handle. It must be pushed inside the door;
- Unscrew 3 screws securing the locking mechanism to the door;
- All that remains is to remove the lock from the door. This is done together with the rod and the internal handle.
Reassembly should not be difficult for you. The hardest part is installing the inside handle. It should be installed together with the lock and rod. The difficulty lies in inserting the handle into the groove intended for it. Don't forget to lubricate the mechanism when installing it. This will extend its service life.
Adjustment on Kalina
Typically, it is necessary to adjust the operation of the lock on this model if there is excessive noise that occurs when closing the doors. It rarely gets to the point where the locking device works poorly. To work, you need a Phillips screwdriver, a wrench and a screwdriver with an asterisk. The work is carried out in the following order:
- Using a screwdriver, loosen the screws securing the clamp. It is secured with two Phillips screws and one sprocket;
- We make adjustments. The shift here is made up or down;
- Tighten the screws in the selected position.
To reduce noise, you can put a silicone cap on the clamp. If this procedure does not help, then it makes sense to tighten the screws securing the door hinges.
Removing the lock on Kalina
Sometimes adjustments don't help. This indicates wear of this mechanism; this often happens when the machine is used intensively. To continue normal operation of the car, it is necessary to change the lock. This is done in the following order:
- The door trim is dismantled;
- Using a Phillips screwdriver, remove the screw securing the base of the handle (inside). After this, carefully remove it from the guide pin;
- The insulating material located in the door is removed;
- The rod is disconnected from the cylinder mechanisms. To do this, press it out using a slotted screwdriver;
- The rod coming from the external handle is disconnected in the same way;
- Using the “8” head, the outer handle is detached;
- The outer handle is removed from the car;
- The lock itself is secured with 3 screws. Older machines use Phillips screws. On newer ones you can find stars;
- The locking drive block retainer moves upward. After that, disconnect the block with wires;
- Using a screwdriver, we disconnect the rod clamp; at the same time, it must be carefully rotated around its own axis. This way you can remove the handle rod (internal);
- The locking mechanism is removed from the door.
Assembly is carried out in reverse order. Before installing the new lock, be sure to lubricate it. This will extend the life of the mechanism.
Conclusion
. As a rule, car doors sag somewhat over time. This leads to some problems in operating the machine. To eliminate the problem, the door locks on Priora, 2107, 2110 and 2112 are adjusted. This work is not difficult, even a beginner should not have any problems. But sometimes this doesn't help. In this case, you will have to replace the entire lock. For each model, this work is slightly different, but usually, difficulties arise to a minimum.
If the door does not close tightly or tightly, adjust the lock.
You will need: impact screwdriver with TORX T40 bit, hammer.
1. Loosen the three screws securing the retainer.
2. Move the latch outward if the door closes tightly, or inward if the Lada Priora door does not close tightly.
- 3. Move the lock down if the Lada Priora door lifts when closing.
- 4. Tighten the screws to the torque specified in Appendix 1.
A pattern that is the norm
The figure-of-eight design of locks is the norm in domestic car manufacturers. Priora was no exception to this rule and received figure-eight locks from the assembly line. What exactly is the pattern?
The pattern appears at the time of purchase of the above-mentioned silent locks, which also have a figure-eight design. The only difference is the smaller thread diameter of the bolts in the mating part of the mechanism.
All Ptimash bolts have a silicone seal, the color range of which cannot be predicted
It is worth paying attention to the fact that their color can be either transparent, which is the most popular, or any other. Thus, it is not realistic to match the color of your fingers to the color of the car, but the final high-quality result more than covers this shortcoming