Let's say the key in the VAZ-2109 lock does not turn or, conversely, turns and does not unlock the door. Repairing car locks involves one of the following actions: replacing the cylinder (cylinder), replacing or repairing the internal lock. In official manuals, by the way, it is recommended not to repair the internal lock mechanism, but to replace it. Be that as it may, you first need to get to it, for which you remove the door trim. Each of the actions required for dismantling is further illustrated in the photo. The entire sequence must be considered in order.
repair of door locks for VAZ 2108, VAZ 2109, VAZ 21099
The door locks are non-removable and cannot be repaired.
If the door locks are broken, replace them. The design of the front door locks of all cars and the rear doors of VAZ 2109 and VAZ 21099 cars is fundamentally the same, the main difference between the locks is that lock switch cylinders are installed in the outer handles of the front doors, therefore this subsection shows the process of repairing the front door lock as more complex. 1. Press out the bottom seal and remove the three spring clips securing the protective film at the top and one more at the bottom. Remove the protective film from the door.
2. Disconnect the outer handle rods and the lock switch from the inner lock.
3. Remove the two screws securing the door lock. Since the threads of the screws are sealed, we recommend using an impact screwdriver when unscrewing.
4. Remove the outside door lock.
5. Remove the two screws securing the inside door lock handle.
6. Push the inside handle inside the door.
7. Remove the internal lock with internal handle from the door.
8. Remove the rubber holder from the end of the rod. Remove the strap handle by turning it.
9. Remove the locking bracket from the lever pin and disconnect the inner handle rod from the inner lock lever.
10. Rotate the plastic holder and remove the end of the locking rod from the lever.
11. Unscrew the two nuts securing the outer lock handle.
12. Remove the outer lock door handle with rods.
13. Remove the pin and plastic rod end from the door lock cylinder.
14. Remove the locking spring by removing its ends from the slots on the cylinder and on the lock handle.
15. Insert the key into the lock cylinder and remove the lock from the handle. 16. Install a new door lock on a VAZ 2108, VAZ 2109, VAZ 21099 car in the reverse order of removal, having first lubricated all rubbing parts with grease. Check the ease of opening and the reliability of closing the door lock. If necessary, adjust the door lock.
17. To adjust the door lock, loosen the fastening screws and move the lock: a) outward, if the door closes tightly; b) inside, if the door does not close tightly; c) down, if the door rises when closing. After adjusting the door lock, tighten the screws. Use an impact driver to loosen and tighten screws.
HELPFUL ADVICE If you need to remove the retainer, first trace its outline on the body pillar. This will help maintain the door lock alignment during installation.
Source
Features of door adjustment
The adjustment work involves changing the height of the rods. The rods are attached using plastic tips that have a ball joint inside. Correct adjustment of the door lock is carried out by pulling out the groove. Next, you will need to twist slightly counterclockwise or clockwise. The lock is adjustable by selecting the ideal length. So please be patient.
After the repair, you will have to adjust the sash slamming mechanism. By the time you move on to setting it up, you can already return the trim back to the door, since the work will be carried out with the latch on the body. Move the clamp up or down until you achieve the perfect result. The door should latch easily, without noise or effort. This adjustment can be made without replacing the lock cylinder if you are not satisfied with the need to apply force when closing.
Driver's door lock repair
It so happened that when I picked up the car, the driver's door did not open or close with the key and it was not at all comme il faut to climb through the passenger door to open the driver's door from the inside. Therefore, a few days later I found the necessary repair kit, I wrote about this in one of the previous records
and now I got around to installing it. The procedure turned out to be relatively simple - I had to remove the door trim and replace the missing rod. Having previously looked at the instructions on where to unscrew what and how to remove it, I went to repair the lock.
In my case, the door trim was held on by 4 neat self-tapping screws, closed with plugs. Apparently, this was done so that the trim would not play. However, it also sat on all the pistons, which I managed to carefully remove, without breaking it, unscrewing all the screws.
Well, having removed the trim, you can now get to the door handle.
Looking through the door, I noticed that the old rod was inside, but for some reason it was not connected. But since I had new spare parts, I decided to remove the old one and install a new one. This is where the most interesting part began: This 100 ruble repair kit turned out to be so crappy that all my plastic was cracked even before installation in the door. And when I assembled everything, because of the cracked plastic, the door lock did not open, but stupidly popped out of its groove .I had to give up on the whole thing and install the old, original rod. The plastic is oak, high quality, unlike new consumer goods. Well, having assembled everything, the hardest part remained - connecting the rod to the lock itself. Since the plastic is oak and hard, I have It didn’t work out at all, I fiddled with it for about 20 minutes until I pressed it with all my strength with pliers. In the end it turned out like this:
Well, then I assembled everything in reverse order in a couple of minutes.
PS: My advice to anyone who encounters a similar problem is that if your plastic part is broken, then look for a better repair kit, since this one, from AvtoVAZ, is completely crappy.
Source
How to install a silent lock
Silent mechanisms are installed on foreign-made vehicles, but no one forbids installing this device on a domestic car. These locks are considered more reliable and of higher quality. Removal and installation is carried out from the outside. Installation instructions:
- The screws are unscrewed. The handle is removed.
- The latch is released.
- The old product is replaced with a new one.
- The bolts are tightened. This must be done with effort.
- Adjustment is in progress. A functionality check is being performed.
If the key is difficult to turn, you can loosen the bolts holding the lock. To extend the service life, a special gasket is additionally inserted next to the screws.
We repair “Nine” locks ourselves
Let's say the key in the VAZ-2109 lock does not turn or, conversely, turns and does not unlock the door. Repairing car locks involves one of the following actions: replacing the cylinder (cylinder), replacing or repairing the internal lock. In official manuals, by the way, it is recommended not to repair the internal lock mechanism, but to replace it. Be that as it may, you first need to get to it, for which you remove the door trim. Each of the actions required for dismantling is further illustrated in the photo. The entire sequence must be considered in order.
Device, principle of operation
Most often the front door lock on the VAZ 2109 breaks down. The operating principle is contained in a mechanism that is located not only inside the structure, but also outside. The device is a cylinder, inside of which the teeth fall into grooves during movement. When they close, a closing occurs; when they open, an opening occurs. On the vases there are standard products with a larva. If you periodically carry out lubrication, they will last a long time. To replace or repair the device, it is necessary to remove the interior trim, disassemble the steel block, and remove the core.
The larva's device is not sophisticated, but reliable. The teeth are located on both sides. They start moving with the help of a key on which there are notches. Manufacturers lubricate the internal elements well during assembly of the device, so the mechanism works properly for a long time. Inside the larva there is a latch that controls the operation of the pins and a rod that connects the chain of elements. If a tooth breaks, the case is damaged, or the groove is blocked, the mechanism will cease to perform its functions.
The VAZ 2108 door lock is sold in any car store. Average price – 1500 rub.
"Nine" and the door lock device
Theoretically, the lock mechanism can be divided into 3 parts: a handle with a cylinder and a button, the main mechanism, and the inner door handle. All nodes and connections between them are shown in the diagram.
The node labeled “2” looks like this.
4 rods fit to it, that is, to this node. Two of them are connected to the external handle, and in order to dismantle it, the rods are disconnected.
If there is no electrical wiring inside the door, you do not need to disconnect the battery before performing repairs.
In other cases, that is, when power windows or locks are installed, the battery must be disconnected. To do this, as many people know, it is enough to remove the “negative” terminal. This means that before repairing locks, the hood is opened first, not the doors. Anyone who violates such a requirement will, at best, have to change burnt fuses.
Replacing the door lock cylinder
To gain access to the locking mechanism, you need to remove the trim. On the “Nine” it is quite simple to remove it - the casing is held in place by plastic pistons. These pistons are located around the perimeter; they are simply pressed out and, if necessary, replaced with new ones.
First, as is easy to understand, you need to dismantle three elements: the side handle, the window lifter handle, the socket of the inner handle of the lock. The “dog” must be pulled up, but it is better to remove the seal that protects the glass during the dismantling of the casing.
Removing and disassembling the door handle
When the door trim is missing, you can freely disconnect the two rods that go from the door handle to the lock. The following shows exactly what elements we are talking about.
By squeezing the plastic tab with a screwdriver, the rod is disengaged. We will assume that all of the above actions have been completed. Then, you can move on to the next stage.
The outer handle is attached to the metal using two nuts. One of them is located under the trim, the second is on the back side of the door. Both nuts need to be unscrewed.
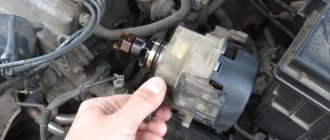
After dismantling the specified unit, it will be easy to remove the cylinder. This is done like this:
The appearance of the spring holding the cylinder and the handle together is shown below.
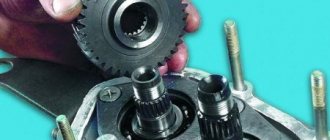
It is important to know that the knot itself, called the “larva,” needs careful handling.
Experience shows that it will be easy to lose the metal pins that ensure secrecy. The cylinder is secured inside the handle body and the pins remain in place. But if you pull the cylinder out, each pin is “free.”
We replace the lock cylinder ourselves
The result of all the efforts discussed above is shown in the following figure:
You need to carefully pull the cylinder out using a standard wrench. And having installed a new part, the assembly is performed in the reverse order to that considered so far. The lock parts can be lubricated with machine oil, and it is recommended to fill the cylinder with a special product:
It is acceptable to use one or the other.
The bravest ones can decide to dismantle the main unit. The fact is that unscrewing the two screws securing the external overhead mechanism will not be so easy. You will need an impact driver. If you don’t have one in your arsenal, use a regular one (cross). This is what the result should be:
Having done everything as indicated, you can try to remove the main lock mechanism. It is allowed to disconnect the two remaining rods last.
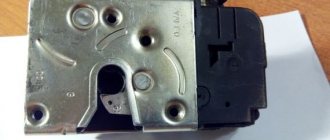
It is recommended not to repair the assembly shown in the last figure, but to replace it as an assembly.
Trying to carry out repairs will be counterproductive - the connections are made with rivets. They do not allow analysis. However, we will leave the choice to the discretion of the owner. The rivets can be drilled out and then threaded connections can be used. But such a solution should be considered temporary.
Please note that the special products listed above are only suitable for lubricating the larvae. They are not a substitute for machine oil. It is unlikely that there will be a “craftsman” who decides to treat mechanical parts with WD-40. The result will be predictable - a mixture based on mineral oils will finally “finish off” all the locks.
One last thing to note here. Special chemicals, unless we are talking about machine oil, must be packaged in an aerosol. In addition, a spray tube must be present:
If you neglect the last advice, it is unlikely that you will be able to process the cylinders. By the way, WD-40 is not the best option of all those listed. Make your own choice.
Removing the door trim
Before replacing any door handle on a VAZ 2109, dismantling the finishing structure is carried out in the following order:
- remove the window lifter handle: press the lock with a flat screwdriver, remove it and remove the element from the slots;
- unscrew the screws securing the armrest handle to the door (on new models the screws are hidden under a shaped plug);
- remove the plastic lining of the interior handle by prying it off with a screwdriver (can be fixed with an individual screw);
- remove the plastic lock release button using a Phillips screwdriver.
On the front doors it is additionally necessary:
- unscrew the screws securing the lower plastic trim to the door, equipped on later models with power window buttons;
- remove the speaker.
After removing all fasteners, the plastic trim, additionally attached with pistons, should be carefully detached from the door.
Instructions for removing the front door lock on a VAZ 2109
A reliable lock in a car is not only the prestige of the manufacturer, but also the car owner’s confidence in the safety of his car, and peace of mind for the safety of the contents in the car during his absence. Sometimes, for various reasons, there is a need to change it.
Replacing the front door lock on a VAZ 2109 is not a difficult task, and does not even require a mandatory visit to a car service center or the services of an expensive technician. Anyone can replace the lock with their own hands. The main thing is to be patient, prepare the necessary tools and not put off the replacement.
Installation instructions
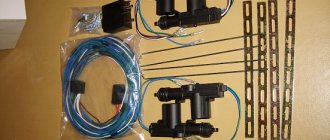
To independently integrate the central lock into a VAZ 2109 car, you will need:
- installation kit;
- insulating tape;
- s-shaped corrugations for wiring;
- wire cutters;
- screwdriver or drill;
- screwdriver;
- plastic clamps.
Tools and materials in the photo
Some important points
- Before installing the central locking system, be sure to remove the terminals from the battery. This will help avoid accidental short circuits during installation and protect the vehicle's electronic devices.
- The central locking control unit is located under the front panel. This will make it easier to connect to the electrical network.
- An electric drive with four outputs is installed in the driver's door.
- Before installation, consider how the wiring will go to the rear right door. Most often it is placed under the carpet and secured with plastic clamps.
Step by step guide
- Remove the door trims and plastic decorative trims from the sills and side pillars.
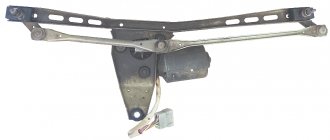
- Attach the control motor to the door. Use mounting plates and screws.
Mounting strips and self-tapping screws are used to secure the electric drive.
The electronic unit is installed under the dashboard
Fines for crossing the stop line and speeding will no longer bother you!
Replacing a door lock on a VAZ 2109
The door lock on the VAZ 2109 is no different from the same lock on the rear door. Therefore, the process of photographing the front door lock can be applied to the rear door as well. The only difference between removing the lock on the front door and removing it on the rear is in the installation of the switch cylinders on the handles on the outside.
There are instructions with photos and videos for changing the lock. Here is a step-by-step algorithm for changing the lock on a VAZ 21093 car.
Work algorithm
After repairing or changing the lock, perform all steps of the algorithm for installing a lock in the front door on a VAZ 21093 in reverse order.
Problems that arise after changing the lock
After changing or repairing a lock, it may happen that the lock does not immediately return to its “convenient” place or the lock does not work properly. This may occur for the following reasons.
The locking mechanism itself is not adjusted
To adjust the lock on the front door of the VAZ 2109, you must adhere to the following recommendations:
The rod is not connected to the lock
If the lock on the front door of a VAZ 2109 does not open, first check the lock rod. Most likely, you simply forgot to lock it. In this case, you will have to unscrew the lock and connect the rod.
Short deadlift
Another reason may be that the thrust is not adjusted. In this case, you need to unscrew and lengthen it a little.
As you can see, there is nothing complicated in the process of removing the lock from a VAZ 2109 car. The main thing here is not to rush, follow safety rules and carefully carry out the entire work algorithm. Having done the work correctly, next time you will do the same procedure without any problems. And, most likely, you will have to remove it more than once, since the factory versions for the VAZ 2109 often become unusable.
Source
Features of door adjustment
The adjustment work consists of changing the height of the rods. The rods are attached using plastic tips that have a ball joint inside. Correct adjustment of the door lock is carried out by pulling out the groove. Next you need to twist it a little counterclockwise or clockwise. The lock is adjustable by selecting the perfect length. Therefore, be patient.
After the repair, you will have to adjust the sash slamming mechanism. By the time you move on to setting it up, of course, you will have already returned the trim back to the door, because the work will be carried out with the latch on the body. Move the clamp up or down until you achieve a perfect result. The door should latch easily, without noise or effort. This adjustment can be made without changing the lock cylinder.
, if you are not satisfied with the need to apply force when closing.
Replacement of all door locks on VAZ 2108, VAZ 2109, VAZ 21099
Note! First, before starting work, from the car door on which you are going to replace any lock, first remove the trim; you will find information on how to remove the trim from a car door “in this article”!
Replacing the outside door handle:
1) First, disconnect both rods from the inner lock of the outer handle, to do this:
1. First, use a screwdriver to pry up the “door handle trigger rod” and then disconnect it.
2. Then, in the same way, disconnect the second rod “door lock switch rod” from the internal lock.
Note! For more details on where both rods of the internal lock are located, see the photo below!
2) Next, unscrew one inner retaining nut that secures the outer handle to the car door.
3) And after unscrewing the inner nut, completely unscrew the last nut, which is located on the edge of the door and also holds the outer handle.
4) And then remove the outer door opening handle, together with the rods, from the car door.
Replacing the lock cylinder:
1) First, remove the outside handle from the car door, if you still have it removed. (see "Removing the outer handle")
2) After removing the handle, using an awl or a thin screwdriver, push out the locking pin of the lock.
3) And then, on the back side of the handle, remove the lock leash.
4) Next, use a screwdriver to pry the spring of the outer handle cylinder.
5) And then remove it.
6) To complete the operation, insert the door opening key into the cylinder, and then remove the cylinder from the handle.
Replacement of external and internal door lock:
Replacing an external door lock: 1) In order to remove the external lock from a car door, read a separate article on this matter, published earlier on our website, the article is called: “Replacing an external lock”
Replacing the inner door lock: 1) First, use a screwdriver to remove both screws that secure the outer lock to the car door.
Note! It is best to unscrew these two screws with an impact screwdriver, but if you don’t have one, then use a regular screwdriver! (If you do not know about such a screwdriver or do not know how to use it, then look at the article entitled: “What is an impact screwdriver and how should it be used?”)
2) After unscrewing the screws, remove the outside lock from the car door.
3) And after that, remove the inner lock from the inside of the car door.
4) After removing the internal lock, remove from it using a screwdriver the lock washer that locks the “internal drive rod”.
5) And after disconnecting the lock washer, remove the “internal drive rod” from the lock.
6) Next, disconnect the plastic clamp that secures it from the “lock release button drive rod”, and then remove the rod from the lock.
Replacing the inner door handle:
1) First, use a screwdriver to unscrew both screws that secure the door handle to the car door itself.
2) Then put your hand into the inside of the door, and then remove the door handle from there.
3) After removing the handle from the inside of the door, disconnect the traction cable from it, and then remove it from the car.
Main types of breakdowns
The first warning for the driver is an extraneous sound when turning the key. Jamming, difficult movement or blocking of the key inside the cylinder will indicate that something is wrong with the device. Variations of breakdowns:
- the pin broke;
- the groove or internal parts are rusty;
- mechanical damage to the door;
- water appeared and froze inside the castle;
- the retaining ring has failed;
- the latch broke;
- the thrust cap collapsed;
- the opening element broke, leaving part of the key inside the device;
- temporary wear of parts.
More often, problems begin in late autumn. Wet snow gets into the core and freezes as the temperature drops. The ingress of water leads to steel deterioration. No less damage comes from dust, dirt, and long-term use. If the unlocking device is inserted into the cylinder with great difficulty, it moves tightly, as if clinging to something, then preventive measures or repairs are required.
In any case, the cylinder will need to be disassembled, then lubrication, repair, replacement or simple inspection is performed.