Not everyone knows that the main reason for clogging and failure of injectors and injectors is the low quality of Russian gasoline. Therefore, the procedure for cleaning the power system is most in demand in this country.
However, washing the injector and nozzles without removing them is a fairly simple operation. Although disassembling and cleaning the injector at a service center is quite expensive. But you can save on this procedure by cleaning the injectors in the “field” conditions, in your garage with your own hands. In this article we will tell you how to do it yourself.
Why is injector flushing required?
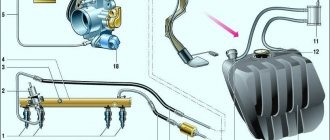
The factory purpose of fuel injectors is to properly spray the fuel mixture into the combustion compartment. More precisely, small drops are sprayed at an angle and in a certain shape.
If a nozzle becomes clogged, the quality of the spray decreases, namely, the configuration of the torch or the size of the droplets changes. In this situation, the fuel does not burn completely, traction decreases, and noticeable failures in engine operation occur.
Why does debris form in the injector when any vehicle has a fuel system kit with filter installed?
- This is not surprising, since the filter traps mechanical components. Iron oxides, rubber components and other substances also get into gasoline. Such impurities, under the influence of high temperatures in the engine, are attached to the plane in the form of a coating.
- This coating covers the sections of the nozzle, preventing it from spraying fuel productively. The rate of blockages in the fuel system largely depends on the quality of the fuel.
- If in big cities its characteristics are almost up to standard, then at numerous gas stations near the highway and in small settlements there are considerable problems with this.
The owner especially notices clogged injectors in winter. At this cold time, the fuel forms a viscous mixture, and therefore difficulties arise with starting the engine.
Why are they clogged?
The most unpleasant thing in this case is that the clogging occurs slowly and gradually; it will not be possible to notice a deterioration in engine performance immediately. During operation, clogging inevitably occurs, sooner or later, this is influenced by the quality of the fuel, the operation of the filters, the quality of the injection settings and other factors. After stopping the engine, the “garbage” dissolved in the fuel settles inside the injectors.
Not all deposited particles enter the combustion chambers during startup; some of them stick to the walls of the nozzle and remain in it. Frequent short trips, when the engine does not warm up properly, contribute to such sticking, and the amount of deposits increases. Therefore, as soon as you notice, you should clean the injectors, without waiting for the moment when washing is powerless.
Symptoms of a clogged injector
Here are the symptoms that the injectors are clogged:
- The engine starts poorly when cold, and after starting it is able to function unstably at transitional stages and idle rotations;
- As the speed increases, with the accelerator pedal fully depressed, dips appear;
- Significant increase in fuel costs when traveling;
- The engine power has weakened, the dynamic properties of the vehicle have decreased;
- Popping sounds are heard from the exhaust pipe;
- When the car is running, vibrations occur.
Improper spraying through dirty injectors increases fuel consumption, and if you delay cleaning, it can lead to their breakdown and the need to buy new parts.
Signs of dirty injectors
A logical question among inexperienced motorists is when to clean the injector on a car and restore the functionality of the nozzles, that is, the injectors.
Experts and experienced motorists are well aware of the enormous importance of clean nozzles in an injection engine. Therefore, without waiting for signs of contamination, they carry out periodic preventive cleaning. It is recommended to do this at least once every 30 thousand kilometers.
But this is a conditional figure, since the condition of each vehicle is individual and can vary significantly depending on a number of factors. Injectors are mainly affected by the quality of the fuel being poured, the condition of the fuel system, filters, as well as the owner’s attitude towards the issue of maintaining his car.
You should not wait for signals from the injector, which will clearly indicate when you finally need to clean the clogged injectors. It is best to engage in preventative cleaning and not rely on one or another regulation. There are many examples where injectors become clogged after just a couple of thousand kilometers, and sometimes even after several hundred. For others, who followed all the rules and filled with really good fuel, the injectors worked perfectly for 30-40 thousand kilometers.
There are several signs that will tell you that the injectors are clogged, contaminated, and you need to take action as soon as possible. Typical symptoms are as follows:
- starting the engine occurs with some difficulties;
- at idle, so-called floating speed appears;
- the driver clearly feels a drop in power;
- engine thrust drops noticeably;
- during acceleration, sharp jerks are felt;
- for no apparent reason, fuel consumption increases significantly.
The signs presented potentially indicate that the injector is clogged. But you cannot completely rely on such symptoms, since they can also indicate problems and malfunctions in other components.
To make a final diagnosis, it is best to carry out diagnostics at a car service center. If you don’t want to spend money on service stations, you can check the injectors yourself. To do this, a visual inspection is carried out. These signs most often appear on old cars whose mileage has exceeded 100 thousand kilometers.
Relying on someone else's experience and performing cleaning at intervals regulated by the car manufacturer is not entirely correct. You need to rely on the specific characteristics of your car. If you feel something is wrong, you should make sure that you are right, conduct a diagnosis or visual inspection, and based on this, make final decisions.
Methods for cleaning the injector
The most sensitive part of the injector to dirt is the nozzles. Therefore, the words “rinse the injector” mean cleaning and washing the injectors.
There are 3 known methods for cleaning and washing these parts:
- Soft, not requiring removal of nozzles from the power unit;
- Manual type;
- Washing using ultrasound.
Before you start flushing the injector, you will need to determine the exact reasons for the malfunctioning engine. Sometimes it happens that difficulties do not come from dirty injectors, but due to incorrect operation of the meters or injection controller, as well as engine malfunctions.
Let's start cleaning
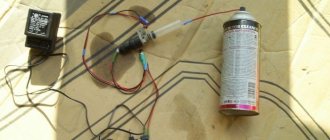
You cannot do the first method yourself. The second is too simple and primitive to describe in detail, but in case of heavy contamination it is ineffective. Therefore, let's move on to the description of the third method. To perform the work, you need a fuel hose, a container for cleaning composition and liquid for washing injectors. The procedure is as follows:
- a flushing supply system is manufactured. A clean plastic bottle with a volume of 1.5-2.5 liters without moisture is suitable. A liter of flushing and half a liter of fuel are poured into it. After mixing the liquids, you need to attach the hose to the neck of the bottle and secure it. Some craftsmen advise attaching a fuel filter to the system, although there is no point in it;
- the engine starts and warms up;
- then the engine must be disconnected from the fuel supply from the tank. Stop him. Proceed carefully, remember that the fuel system is under pressure. The most convenient way is to disconnect the hose going from the tank to the fuel pump;
- start the engine, it will stall itself when the fuel in the pump runs out. After this, connect your rinsing bottle to the pump instead of the supply hose;
- the return fuel hose should be plugged (it’s convenient to do this with a 10mm bolt and clamp it with a clamp);
- It’s better to hang the bottle above the motor, with the neck down, and make a hole in the bottom for air if you haven’t done this;
- check the tightness of the homemade system and start the engine for 5 minutes, then turn it off for 5 minutes (so that the cleaner that gets into the injectors dissolves the sediment);
- then start the engine for 30 minutes, let it run at idle, sometimes (2-3 times during the entire period) add gas briefly - up to 2500 rpm to enhance operation and wash away contaminants;
- After flushing, you should restore the fuel system to its original state and let the engine run for 10 minutes. This will allow you to burn off any remaining cleaner and check the tightness of the fuel system assembly;
- then, turn off the engine and replace all the spark plugs with new ones. At the same time, all errors from the computer are reset.
Softened washing method
A mild cleaning method consists of adding special additives to the fuel that dissolve sulfur and tar deposits. This is a very popular cleaning method among drivers.
- The advantage of the technique is that there is no need to remove the injectors from the engine; in addition, the gearbox valve is cleaned. After washing, it is worth changing the spark plugs.
- Experienced car owners combine both procedures, because by the time of the next injector cleaning procedure, the spark plugs should be changed.
- Considering that the injectors are not removed from their place, the quality of the cleaning procedure cannot be checked.
When the deposits have been washed off, the symptoms of a faulty engine will gradually disappear. This method has 2 disadvantages - it cannot be used when the car has traveled more than 10,000 km since the last tank flush.
Otherwise, there is a high risk of clogging the gasoline pump placed in the tank. But it cannot withstand serious pollution. Therefore, this method is recommended for prevention after traveling 4-6 thousand kilometers.
What are the types of washing?
There are two types of injector flushing. But, before deciding which method to use, you need to study the situation in detail.
The washing and cleaning methods are:
- Ultrasonic washing, which can only be done on a special stand, using professional equipment. It is also necessary to use a special solution. This technique does not work well with very dirty injectors and is not recommended for injectors made of ceramic.
- Washing with liquid solution. This procedure can be applied both with the power unit removed and without removing the motor.
In this case, we are interested in the optimal washing method, in which the engine is dismantled. We will take a closer look at cleaning the injectors, without removing them from the engine. This is the easiest way to restore normal operation of the injector.
You will need a second, additional gasoline pump, a container for cleaning fluid, a hose (suitable for garden watering) and, in fact, fluid for cleaning the injector. New spark plugs will also be required.
Injector cleaning process
Cleaning the injector with ultrasound
In terms of effectiveness, this method of washing the injector is better than other methods. The method is based on the phenomenon of cavitation. This is when in a certain place the temperature of a liquid increases when combined with a solid surface under the influence of sound waves.
- For ultrasonic cleaning you need a special stand with a bathtub, an ultrasound generator and detergent are placed in it. Often craftsmen use a familiar dishwashing substance dissolved in water.
- Under the influence of ultrasonic waves, sharp heating plots appear on the plane of the nozzles inside and outside, which causes the appearance of steam bubbles. When the frequency and direction of the waves are chosen incorrectly, shells appear on top of the metal upon completion of cavitation.
- This will cause the device to break down. Therefore, you should not experiment with self-made ultrasonic baths and washing machines. Changing nozzles will be much more expensive than ultrasonic cleaning at a car service center.
To wash the injector in an ultrasonic bath, you need to reduce the pressure in the ramp, turn off the battery and remove it from the car. After washing, the parts are put back in place and connected.
Proper washing removes all contaminants from all parts of the injectors, including from the inside, thereby increasing engine power and reducing fuel consumption.
Application of gasoline additive
This procedure is best timed to coincide with replacing fuel filters and here’s why. The detergent additive is poured into the tank, so the cleaning effect extends to the entire fuel supply system.
Any foreign deposits that have been washed off rush into the filter meshes and quickly clog them. If you do not change the filter elements, you will not be able to properly clean the injectors, because dirt will reach them. So, to perform the operation you will need:
- liquid – fuel additive;
- fine and coarse mesh filters.
Before carrying out the procedure, it does not hurt to learn more about engine additives.
The method of use is simple: the chemical composition from the bottle needs to be poured into the tank and continue to operate the car. After 200-300 km, replace the filter elements. An important point: the amount of cleaner in the container is designed for a certain volume of gasoline; their ratio is always indicated on the product packaging. In order not to get a negative result and not to harm the engine, follow the prescribed dose of the composition.
Most often, car enthusiasts use injector flushing fluid from the following manufacturers:
- Hi-Gear;
- Kerry KR-315;
- Liqui Moly;
- Injector Cleaner concentrate from the American brand STP.
Do not use this cleaning method after a long mileage (over 15 thousand km), when a sufficient amount of deposits has accumulated in the system.
When washed, they will not only clog all the filters, but can also damage the fuel pressure regulator.
Manual method of washing the injector
In order to wash the injectors manually, you need to disconnect the battery and reduce the pressure in the fuel rail. An alternative method is also known:
- Start the engine and remove the fuel pump fuse. When the pressure drops, the engine will stall.
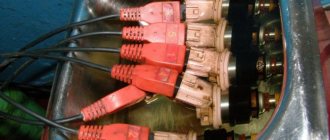
- Now you need to disconnect the battery, wipe the injector so that there is no dust or dirt on the surface.
- The fuel pipes from the injectors are removed (on some machines you will need to remove the entire ramp).
- The injector control wiring is disconnected. Here you need to avoid mixing up the wiring, otherwise the owner will not be able to start the engine.
- The injectors are unscrewed.
Before washing, you need to heavily spray the metal part of the part using a carburetor cleaner. It is possible to use different substances to clean the injector. This is required to separate resin layers.
Then the nozzles are laid to lie down for 3-5 minutes, during this period the product should have an effect.
Using cleaning fluid
The best way to wash the injectors without removing them from the engine ramp is to connect a container with a flushing solution directly to the fuel line of the power unit. The procedure will not affect other elements of the system - filters, pump and pressure regulator. But you will need to make a simple device from the following parts:
- car gasoline hose 1 m long;
- cheap fuel filter with a paper element;
- hose clamps;
- 2 valves for tubeless tires, equipped with spool valves;
- 2 liter plastic bottle;
- manual or electric pump with pressure gauge.
It is necessary to make holes in the bottom and cap of the bottle, selecting the diameter of the drill to match the size of the valves. Then, you need to insert a valve without a spool into the hole made in the plug and attach the hose to it with a clamp. Afterwards, the hose is cut in half and a fuel filter is placed in the gap, observing the direction of flow (from the bottle). A valve with a spool is inserted into the second hole, where the pump is connected. For convenience, it is advisable to hang the bottle from the open hood with the neck down. The device is ready.
Before washing the injector directly on the car, you need to connect the homemade system to the fuel rail, for which you will have to relieve the pressure in it. Find the process fitting with a spool built into the end of the ramp, place a plastic cup under it and press the valve with a sharp object. Excess fuel will pour into the glass and the pressure will drop. Then follow this algorithm:
- Disconnect the main fuel line from the rail and connect the hose from the bottle in its place.
- Disable the car fuel pump by removing the corresponding fuse. Another option is to place a gasoline can under the disconnected line.
- Pour all the wash liquid from the bottle into the bottle.
- Connect the pump and pump the container into a pressure of 3 Bar (no more!).
- Start the engine at idle speed. Now it runs not on gasoline, but on washing liquid.
- Flushing continues until the motor has used all the fluid. During operation, you need to monitor the pressure in the plastic bottle and maintain it with a pump at 2.7-3 Bar.
The cleaning procedure is performed on a warm engine, so it must be brought to operating temperature before connecting the flushing device.
Using the technology described, cleaning the injector yourself is quite simple, and it won’t take much time. It is advisable to combine the procedure with changing the engine oil, since when flushing, some of the liquid that is not burned in the cylinders may get into the crankcase. The mileage between engine lubricant changes approximately corresponds to the frequency of preventive cleaning of injectors.
Materials
To clean it manually, you should stock up on:
- Three wires with a length of 50 -100 cm;
- The energy source is 9 -12 V. If you use a car battery, you need to install a resistor in series with it for resistances of 50-200 Ohms;
- Push-button switch;
- 1-2 small bottles of cleaning fluid for the carburetor;
- Plastic and rubber tubes for connecting the can with the nozzle. Some specialists in this matter use a syringe with a capacity of 5 ml, put its extension on the nozzle, and install a purifier tube in the second part.
One end of the conductor is connected to an energy source or battery and an injector. The other is connected to the battery and the button. The third is connected to the button with the nozzle. It is recommended to use standardized terminals.
A tube or syringe is placed on the nozzle, and a can is connected. It is best to wash with two people.
Device
Many people are faced with the problem of cleaning injectors, but still do not know how exactly these injectors work. The injector itself is an electric valve that supplies fuel to the manifold.
This procedure takes place using special car electronics, the so-called “brains”. All injectors are combined into one system using a fuel rail, which distributes fuel to each injector.
Purification process
You need to press and hold the spray can. Then he presses the button that serves as a switch - once every 5 seconds with a press delay of 0.3 seconds.
- There should be 5 presses in total. The nozzle is removed and put aside, waiting until washing dissolves the internal blockages.
- The remaining injectors are also washed in this way. The washing procedures are completed when all parts are sprayed equally.
This happens in 3-4 cycles of repetitions. You also need to blow out the nozzles with compressed air by pressing the button; if necessary, the sealing rubber bands are replaced and installed on the machine.
Cleaning with carb cleaner
Cleaning injectors with carburetor cleaner Carb Cleaner is not widely used and this is justified by the following reasons:
- Firstly, the procedure requires special care and strict adherence to eye protection measures.
- Secondly, cleaning is performed with minimal pressure coming from the carb cleaner cylinder.
- Thirdly, it is necessary to remove the nozzle from the ramp.
Despite the listed disadvantages, flushing the carburetor with cleaner is a convenient and effective remedy in force majeure circumstances, when the car is on the road and a fuel system malfunction occurs far from a car service center.
Technologically, the procedure is not difficult to perform and it is enough to have on hand a bottle of carburetor cleaner and two pieces of wire with a minimum length of 1 meter. Wires connect the injector contacts to the 12 V battery. When voltage is applied to the injector, the valve opens and in any available way it is necessary to inject liquid from the carburetor cleaner bottle into the inlet tract, and do not forget to protect your eyes with goggles.
There is a large selection of carburetor cleaners on sale, and which one is best to choose for cleaning injectors is difficult for the car owner. It is better to choose one that effectively dissolves hardened resin fractions.
Practice in preventive cleaning of injectors shows that the most effective means, besides Carb Cleaner, are:
- Hi-Gear carburetor cleaner: a popular product that easily and effectively removes various carbon deposits and deposits.
- Carburetor cleaner "Lavr".
- Abro carburetor cleaner: is a good tool for cleaning fuel system elements and throttle assembly.
Photo instructions for flushing the injector
How to wash injector nozzles with your own hands
As practice shows, in order to achieve the best results at home, you need to assemble a small stand. Any driver can do this. Even if you have no experience, the work will take a little time. Required:
- A bottle or other plastic container with a capacity of about 500 ml.
- Nipple – 2 pcs.
- Screwdriver and drill for the outer diameter of the nipple.
- 4 test tubes or tall containers for collecting the cleaning composition.
- 12 V power supply or battery.
- A piece of rubber hose and clamps to secure it.
- Solvent.
First, assemble an improvised stand:
- Select a sheet of any material of a suitable size on which you can fix the ramp. To do this, mark the surface and drill holes in the required places for fastening with bolts.
- The container for the cleanser also needs to be prepared. To do this, one nipple is installed in the plug, and a second one in the bottom; they need to be fixed securely. The easiest way is to use a sealant.
- The bottle is placed upside down, attach a hose to the lower nipple, the second end of which is connected to the ramp. Tighten the connections with clamps so that they are reliable and do not leak liquid.
- Assemble a system from wires and a power supply or battery. Connect all injectors in parallel. It is best to include a button in the system that is activated when pressed. Test operation without adding product. If everything is normal, characteristic clicks will be heard in the injectors.
For cleaning, you can use either a special product or Dimexide. Usually you need about 500 ml or more. The duration of cleaning is determined as you go. Instructions for carrying out work:
- Pour the liquid into the container and carefully connect the connections.
- Using a compressor or pump, pump up the pressure in the system through the second nipple to two atmospheres.
- Use the button to open and close the nozzles so that the cleaning agent passes through them under pressure. The liquid will enter the container from below; the degree of contamination can be determined by its condition.
- Continue working until the torch in all elements becomes uniform and finely dispersed.
- To flush the system from residual cleaning agent, fill in Solvent and also pass it under pressure for a couple of minutes.
By the way!
To clean the outside, you can place the nozzles in a cleaning solution without submerging the rubber seals. If possible, remove them and replace the rubber rings with new ones.
When is cleaning required?
Despite all the advantages, the injector quickly becomes clogged when using low-quality fuel for a long time, which reduces engine efficiency. This is the main drawback of this element of the fuel system. Then the question of flushing the injector arises.
Note! Experts recommend cleaning every 20,000 km. But the frequency may vary depending on the quality of the fuel used and the design features of the injection system.
Flushing the injector without removing it
There are a number of signs that indicate the need to flush the fuel system elements. The most common ones include:
- dirty spark plugs;
- difficult engine starting;
- uneven operation of the motor;
- the appearance of smoky air from the muffler;
- power reduction;
- increase in fuel consumption (as a rule, consumption increases sharply).
Signs of faulty injectors
These are not all the reasons, as there are many of them. Therefore, if you have the slightest doubt, you need to seek help from specialists to conduct a full diagnosis of your vehicle. The cost of this service may vary depending on the city in which the procedure will be performed.
Methods for washing without removal
There are two ways to clean injectors - pour a special product through the fuel tank or make a homemade device and fill it with injector cleaning fluid (the device is connected to the fuel system of the car engine). The first method is considered the easiest to implement, so it will not take much of your time.
How often to change the fuel filter
A special cleaning agent is added every 15,000 km for preventive purposes. If the engine begins to operate abnormally, then this method is considered ineffective. In such cases, the second method is used.
It is more difficult to implement, but using a homemade device is much more beneficial. They resort to the second method in advanced cases, when the injector is working with obvious problems or after 20,000 mileage or more.
Now let's look at each method separately.
Through the tank of a car
You can buy the product used in this method at almost any auto store. The main purpose of such an additive is to clean the entire fuel system of the car. Based on the name of the method, it is easy to guess that the additive is poured through the neck into the fuel tank.
Flushing the injector through the tank
The procedure consists of several stages, the sequence of which must be followed:
- replacing the fuel filter;
- adding a cleaning agent to the fuel tank (one bottle should be enough);
- operation of a vehicle (must travel at least 200 km);
- repeated replacement of the filter element.
On a note! The calculation of the proportion of cleaning agent and gasoline must be observed accurately so as not to harm the engine. Detailed information can be found in the manufacturer's instructions.
Injector cleaning products
On the market you can find cleaners from different manufacturers and at different prices, but not all of them can fully clean the injectors. Below are the best manufacturers whose products are truly effective.
Table. Review of the best purifier brands.
Brand name, photo description
| "Liqui Moly" | A well-known German manufacturer that specializes in additives and lubricants. Injector cleaning products are very popular in the former CIS countries. |
| "STP Injector Cleaner" | The composition of this product is specially selected in such a way as to completely eliminate deposits in the fuel injection system. Positive changes will be noticeable almost immediately (after about 60 km). |
| "Kerry" | A domestic manufacturer of auto chemicals and auto cosmetics, which in its relatively short career has managed to conquer the modern automotive market. The product is the perfect combination of good quality and low price. |
| Hi Gear | Another manufacturer of injector cleaning products used in Russia. This product is produced in the USA, which is why its price is an order of magnitude higher than that of cheaper analogues. |
| "LAVR" | An effective cleaning agent designed for in-place flushing of the fuel system. It has been used relatively recently in the Russian Federation, but during this time many motorists have appreciated the high quality, as evidenced by numerous positive reviews. |
If you find it difficult to choose a manufacturer, you should not focus on the cost of the product alone. It is better to seek help from a sales consultant who will tell you in detail about the product you are interested in and recommend the best option.
Using a special device
To make a washing device, you need to prepare some tools and materials, namely:
- electric compressor;
- drill with a diameter of 13 mm;
- two-liter plastic bottle;
- small hose with a diameter of 12 mm;
- nipples and clamps – 2 pcs.;
- fuel filter;
- cleaning agent – 1 bottle.
Injector flushing device
Having prepared everything you need, you can start working. Below are step-by-step instructions, which, if followed correctly, will simplify the procedure for cleaning injectors.
Step 1. Carefully drill holes in both sides of the bottle (as shown in the photo).
Make small holes on the bottle
Step 2. Connect the bottom of the plastic bottle with a full nipple. Make sure everything is sealed.
Place the nipple on the bottom of the bottle
Step 3. Install the same nipple into the bottle cap, but the valve must be unscrewed to ensure smooth supply of liquid to the nozzles.
Attach the nipple to the cap
Step 4. Connect one end of the hose to the nipple on the bottle cap and secure it with a clamp. Connect the fuel filter to the lower hole and tighten it with a clamp.
Connect the hose to the nipple
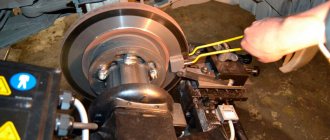
Step 5: Start the engine and warm it up to operating temperature. Now you can connect the manufactured equipment. First, disconnect the special connector on the fuel line.
Disconnect the special chip
Step 6. After removing the fuel supply hose, place this chip on the fuel filter. The action should continue until a characteristic click appears.
Connect the structure to the fuel system
Step 7: Fill the bottle with wash liquid and close it tightly.
Pour the washing liquid into the bottle
Step 8: Hang the filled bottle somewhere on the open hood so it is higher than the engine.
Secure the bottle over the engine
Then connect the compressor pump to the nipple at the bottom of the bottle to create optimal pressure inside the car's fuel system. Turn on the device and inflate the bottle to the 3 atm mark. During the process, the pressure in the bottle will drop, so it needs to be controlled by turning on the pump in a timely manner.
Connection diagram for a device for washing injector nozzles
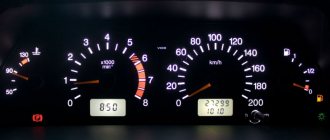
Once the desired pressure is achieved, start the engine and let it run for 10-15 minutes. Stop the engine for a while, and then start it again until the fluid is completely used up. As soon as the engine stops on its own, reduce the pressure in the bottle by unscrewing the cap.
This is what self-flushing the injector looks like
Connect the fuel hose back to the car, connect the chip and start the engine for a few minutes so that it can run on pure gasoline. At this point, the injector cleaning procedure can be considered complete.
Additional recommendations
Having understood the washing technology, you can make sure that it is not so complicated if we are talking only about the technical component.
Selecting the necessary materials, preparing tools and creating a special device for the job is quite simple.
To do this, you only need to have desire, free time and the skills to use conventional tools that are present in the driver's kit.
Cleaning injectors without removal
But with the choice of a high-quality cleaning agent, things are much more difficult, because this is a responsible task. An incorrectly selected product can damage the injectors and make them unsuitable for further use. Such an error will entail not only temporary, but also additional financial costs. Therefore, it is important not to make mistakes when choosing.
Video - Cleaning injectors through the fuel tank
Cleaning the engine without removing the injectors
A gasoline engine can also be cleaned in the field without removing the fuel rail. Many drivers use acetone, which can be purchased at hardware and paint stores. Opinions about its benefits are divided, but there is an effect from its use, so you can try cleaning the injectors with it:
- Fill the tank full and add acetone at the rate of 30-150 g for every 10 liters of fuel. If you don't know the extent of the problem, pour approximately 100 g per 10 liters.
- Drive as usual, while watching the engine work. If everything is normal, then after the fuel is used up, the engine should function much smoother, and consumption should decrease noticeably.
- If necessary, repeat cleaning 1-2 more times. Acetone does not harm the engine if used correctly. It is best to do this when the problem has not yet reached serious proportions, then the effect will be noticeable.
You can also use a special cleaning agent for the injection system. It should be used strictly according to the instructions, observing the proportions when added to the fuel tank.
Non-removal methods help with minor problems. If the deposits are old, it is best to remove the ramp and carry out the work as described above. This is the most effective solution that allows you to remove almost any contaminant.
Cleaning the injectors on your own is not difficult if you understand the topic and use effective products. Every driver can assemble the stand, but sometimes it is possible to clean the system without removing the fuel rail.