Print this article Font size 16
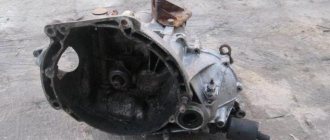
VAZ 2109 and 21099 cars are equipped with four- and five-speed manual transmissions. All gears, except reverse, are equipped with synchronizers. The box is also combined with the differentials.
Useful tips
It is extremely important to monitor the serviceability of the gearbox, and if signs of breakdown are detected, fix them immediately. Do it yourself or with the help of a car service - this is your personal decision.
When operating a car in city conditions, you have to change gears more often. Therefore, it is recommended to use motor oil here. This ensures that the synchronizers remain effective longer. Transmission oil is better suited for highways, increasing the life of bearings and gears, although the synchronizer lasts less.
Internal structure of the box
Replacing the rear bearing
It is not at all necessary to disassemble the gearbox in order to replace the input shaft bearing yourself. But you can't do it without removing the gearbox.
- After removing the gearbox, remove the bell housing and remove the retaining rings.
- Using a powerful screwdriver, pry out the bearing using its ring groove.
- Using the shaft bearing as a support, move the input shaft slightly forward.
- Armed with a hammer, begin striking the end of the input shaft.
- Periodically start turning the shaft and continue to apply systematic blows.
- The degree of tension between the shaft and the bearing can be different, so you will have to hit the end either for a couple of minutes or for half an hour. In any case, the bearing will definitely come off its seat.
- Using gentle but precise blows, press in the new bearing. Only hit the inner ring of the bearing. In this case, the shaft needs to be pulled forward, so you will have to work with a small hammer. It is more comfortable.
Replacing the rear bearing
Device
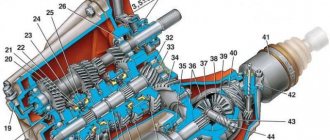
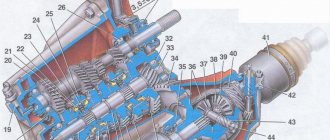
To understand the essence of repairing, disassembling and assembling a gearbox, first of all you need to get acquainted with its structure. In the case of the VAZ 2109, the box structure is as follows:
- On the input shaft there is a block of drive gears that are in constant mesh with the driven gears of the gears when moving forward;
- The second shaft has driven gears with needle bearings. There is also a pair of synchronizers located there;
- The secondary shaft is created together with the drive gear of the main transmission;
- The driven gear of the main gear is attached to the flange of the two-pinion differential box;
- Differential bearings are always mounted with interference, which is adjusted by selecting rings of different thicknesses.
Checkpoint diagram
Tuning the gear knob
Breathing a new spirit into the design of the gear knob is very simple. Today in stores you can see a huge assortment of the most sophisticated accessories in design. But it’s quite reasonable to create something yourself, for example, illumination of the VAZ-2109 gearbox handle. To do this, you should invest in a new pen, the model of which is suitable for these purposes.
When choosing a handle, pay attention to the presence of grooves and holes for wires. Usually the part of the handle on which the gears are marked is not visible because the numbers are chrome-plated. But this shortcoming can be completely corrected.
You can purchase ferric chloride at any chemical store.
Pour the ferric chloride solution into a glass container and place the lid in it. After 10 minutes, remove and rub with a brush. Repeat the operation until all the chrome coating has disappeared. To speed up the reaction, you can add a little hot water to the solution. Next, install the light bulb and wires into the handle body. And now, the new unusual gear knob is ready.
Malfunctions and their elimination
Gearbox repair largely depends on the nature and type of fault. There are several options for the breakdown of this unit, in each of which appropriate actions should be taken to eliminate them.
| Malfunction | Possible reasons | What do we have to do |
| There is noise in the gearbox |
|
|
| Gears are difficult to shift |
|
|
| Spontaneous gear disengagement occurs |
|
|
| Gears are switched on with noise and crackling |
|
|
| There is an oil leak from the gearbox |
|
|
In most cases, problems with the gearbox are eliminated by dismantling and disassembling it. Do not take on this type of work without the proper skills and experience.
What exactly is making noise and why?
Let's try to understand this issue. The main causes of noise coming from the gearbox are:
New manual gearbox from VAZ 2109
Repair of gearbox VAZ 2109,2110,2112,2114,2170,1118.
Thank you so much for watching my videos
, tell your friends, leave comments, subscribe...
Repair of VAZ gearbox (1 part). Do it yourself!
Complete box repair
speeds of a front-wheel drive
VAZ
, at home.
I make it from a VAZ 2109
. Principle…
In addition, the main malfunctions that can result in noise in the gearbox are:
It should also be noted that the VAZ 2109 gearbox can make noise in various conditions: at neutral speed, while shifting gears, or simply while driving at a certain speed. And each of these noises can indicate a different malfunction of the box.
In addition, during diagnostics, one must not forget that only one external sign may indicate several malfunctions in the gearbox. Therefore, it is virtually impossible to visually (i.e., by the type of hum) calculate which component of the box has failed. The damage can only be determined by removing and disassembling the box.
It is also necessary to add that repairing a transmission and eliminating defects requires a lot of knowledge, so it is better not to do this at home. The gearbox is an important unit in the structure of any vehicle, so it is better to entrust its repair and diagnostics to a qualified specialist.
Tuned VAZ 2109
Often the hum of the unit manifests itself:
Most domestic VAZ 2109 car owners face such problems. But if when you press the clutch, extraneous sounds disappear, then this may indicate several breakdowns. In particular, the fifth speed or reverse gear may fail. In addition, the input shaft bearing or release bearing may be faulty.
As practice shows, in the case of bearings the problem is not critical. If noise appeared in your car and then disappeared after several hundred or thousand kilometers, then most likely the remaining bearings were simply ground up by the unit system.
If your VAZ 2109 starts making noise, this does not mean that the bearings or reverse gear have failed. These problems are the most common, but only high-quality diagnostics can specifically determine what has gone wrong.
Dismantling
To dismantle the box, we recommend that you rely on the instructions, strictly follow the sequence and reinforce your skills with visual videos.
- Disconnect the negative terminal from the battery and drain the oil from the gearbox system.
- Unscrew the bolts that hold the crankcase guard in place and remove it.
- Disconnect the ground (wire) from the clutch housing.
- At the end of the clutch cable, loosen the tension on the nuts slightly.
- Remove the cable end from the clutch lever.
- Disconnect the block from the traction relay.
- Disconnect the wire going to the starter traction relay.
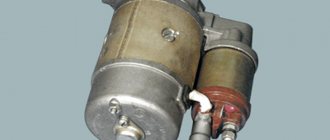
- Dismantle the starter itself directly.
- Disconnect the drive rod from the joint tip. We are talking about traction, which switches gears.
- Disconnect the cable from the car's speedometer drive.
- Unscrew the tie rod ball joint.
- Remove and press the steering rod hinge pin out of the strut swing arm.
- The shank of the inner CV joint of the front wheel drive should be pressed out and moved to the side.
- Disconnect the second CV joint.
- Remove the clutch housing shield.
- Release the gearbox from the fasteners holding it to the engine.
- Remove the box.
Carefully remove the gearbox
Be sure to move it horizontally away from the motor before directly removing the box. Then disengage the input shaft. Be careful not to damage the clutch spring petals.
What affects service life
There is no clear answer regarding the frequency of replacing the input shaft bearing. Therefore, the procedure is carried out depending on the current condition. The wear rate of elements is influenced by several factors, including:
- The quality of the bearings used;
- Driving style;
- Conditions under which the vehicle is operated (weather, road quality);
- Frequency of visits to car repair shops or self-diagnosis of the car’s condition, etc.
Checking status
Let us say right away that it will not be possible to replace the bearing without removing the gearbox. Therefore, first of all, we get acquainted with the features of dismantling the gearbox, after which we proceed to further actions.
Make sure the bearing and its components are in good condition. To do this, check the following:
- There should be no cracks or defects on the shutdown plug;
- The bosses, which are used for mounting on the release bearing, should not show signs of severe wear;
- Check the spring bracket under the soldier. The casing contains a stand for fixing the fork. The spring bracket normally does not have any signs of defects or wear;
- The presence of signs of wear on a soldier is a bad sign.
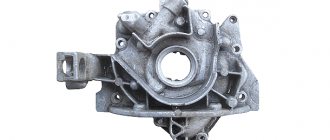
The input shaft is a block consisting of drive gears. Some of them are made on the shaft, the other is pressed with great tension. That’s why we are talking about a non-separable design, where only the front and rear bearings are replaceable. If other components fail, the entire assembly must be replaced.
Disassembly
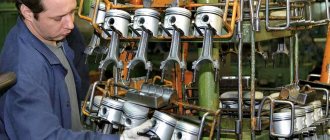
Having removed the gearbox, you can proceed directly to the main thing - disassembly. This will allow you to change damaged elements as you work, identify existing faults and solve problems on your own.
- Clean and thoroughly wash all external surfaces of the gearbox.
- Place the box in a vertical position and remove the back cover.
- Remove the clutch cable bracket, then use a rubber hammer to knock the rear cover off the gearbox.
- Remove the old gasket. She will be replaced.
- Engage any of the two gears - 3 or 4.
- Unscrew the bolt that holds 5th gear, then turn it on.
- Simultaneously turning on the indicated speeds will allow you to fix the shaft and prevent it from turning.
- Unscrew the nut on the secondary shaft, and then on the primary one.
- Remove the 5th speed synchronizer along with the fork.
- Remove the fork from the coupling. Remove the synchronizer as carefully as possible. If you allow the clutch to move away from the hub, the spring-loaded balls that secure the synchronizer will simply fall apart.
- Remove the 5th speed synchronizer locking ring.
- Remove the 5th speed driven gear from the output shaft.
- Remove the thrust ring located on the needle bearing.
- Remove the needle bearing itself from the 5th speed gear.
- Remove the drive gear from the drive shaft and remove the bearing plate.
- Now the needle bearing bushings should be removed from the secondary shaft, and the thrust washer should also be removed.
Jewelry work
- Take out the ring that secures the input shaft bearing, and then a similar ring for the secondary shaft.
- Unscrew the locking plug and remove the ball and locking spring. Next you can get a couple more clamps.
- Remove the rear engine mount.
- Unscrew the reverse gear lock plug, tilt the box and thus remove the lock ball and spring.
- Remove the clutch housing and gearbox housing mounting bolts.
- Acting as carefully as possible, separate the two units. To do this, there are grooves in the crankcases into which the ends of a screwdriver are inserted. By shaking, you can disconnect the elements without any problems.
- Remove the gearbox housing.
- Unscrew the bolt securing the 1st and 2nd speed shift fork.
- Remove the fork and stem.
- Unscrew the bolt securing the 3rd and 4th speed forks.
- Separate the rod head from engagement with the lever, remove it along with the fork from your gearbox.
When disassembling the box into parts, be sure to pay attention to the condition of the elements. If you detect faults in time and replace gearbox components, you can get by with inexpensive but very effective DIY repairs.
Disassembled gearbox
What to pay attention to
So, following the instructions, we disassemble the gearbox of your VAZ 2109. Along the way, pay attention to the following points:
- Bearings. When they wear out, a noise from the box occurs. Plus, worn bearings negatively affect the condition of other gearbox elements;
- Synchronizers and sealing washers. If their condition leaves much to be desired, then the gears shifted poorly precisely because of them. Replace them;
- Clutch system, cotters, coupling hub clamps. All this must be replaced separately if there are signs of wear or defects;
- Blocking rings, synchronizers. If there are chips or nicks, don’t even think about alternative solutions, replace them immediately;
- Bearing tracks. Over time they wear out. If signs of wear are found, perform a complete replacement. In this state, they were only a short time away from breaking;
- Gap between gears and locking rings. Normally it is no less than 0.6 mm. In case of deviations, there is only one solution - replacing the rings;
- Retaining rings. If elasticity is lost, these elements must be changed, since they will no longer be able to perform their functions.
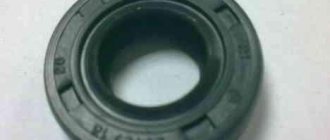
When assembling the gearbox, do not forget to lubricate the new gaskets with a layer of lithol. And when pressing the oil seals, do it with the working edge inward. The metal clip should be located on the outside.
During the process of reassembling the gearbox, all rubbing components should be treated with oil, and do not forget about the sealant for connecting the clutch housings and gearbox. Doing everything yourself is quite possible.
2_34.jpg
1. Remove the gearbox from the VAZ-2109. We clean it from dirt using diesel fuel and a rag.
2. Remove the oil level dipstick from the gearbox.
3. Install the gearbox clutch housing vertically by unscrewing bolts 1 and 2, nuts 3 securing the clutch cable bracket. Remove bracket 2 of the clutch cable from the gearbox.
4. Unscrew the remaining 4 nuts securing the rear cover.
5. Remove the back cover.
6. Unscrew the bolt securing the 5th gear fork.
7. Secure the gearbox shafts from turning.
8. Unscrew the nut securing the input shaft.
Video
A video from the Garage channel demonstrates the removal of the switching mechanism on an already partially disassembled box.
For 21099 1994 V. With mileage 106 thousand km. (box 21083 5-speed) when starting backwards, the reverse gear is systematically switched off, which is accompanied by the crunching of gear teeth (the crunching is gentler than from the clutch not pressing when the reverse gear is engaged) and the reversing light is turned off.
The probability of falling out depends on the sharpness of the switching on: with a smooth switching on it falls out, with a sharp switching on it does not, the stroke of the lever is the same. If the gear does not fall out when starting, then it will not fall out under load. This feature can be assessed by touch when the engine is turned off: a sharp start is accompanied by a shaking of the power unit, and to disengage the reverse gear it is necessary to pull the lever toward you a significant distance (1.5-2 cm), at the end of this stroke the power unit shakes and the force drops sharply on the lever. After smooth switching on with the same stroke of the lever, switching off occurs when the lever is pulled millimeters, the resistance is small and its changes are not noticeable. It seems that something needs to fly through something at speed in order to properly lock the reverse gear.
The problem first arose approximately 50 thousand km after replacing the clutch and adjusting the rocker, and went away after the next adjustment of the gearbox drive (then it happened extremely rarely). I note that on the plastic upholstery of the floor tunnel there are traces of contact with the gearbox lever in the “reverse” position (a piece of the cover frame is broken) - obviously a defect in the gearbox drive adjustment. The rocker has been adjusted several times, neither the lever in the cabin nor the rod under the floor touches anything (I don’t have an operating manual, but the absence of interference during all strokes is a criterion for correct adjustment + ergonomics). I will add that the car had an anti-theft device with a reverse gear lock, which was used every day, often several times a day.
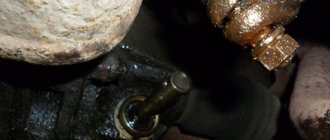
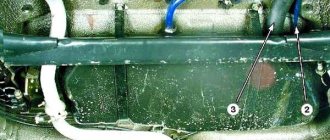
One fine day I got sick of it and an investigation was carried out, which revealed the cause: wear of the reverse fork [1] - (2108-1702046) and the reverse clamp spring bushing (2108-1702086) - [7]. A stamped reverse fork [1] with a thickness of about 4 mm is fixed in the on position by a spring-loaded ball with a diameter of 8 mm [2] – (2101-1702077). The ball moves along a steel spring bushing [7] pressed into the aluminum box housing [6]. This is sealed externally with a plug [5] on a copper gasket [4] (under the reverse light switch). Where the locking ball will ride depends on the accuracy of bending the fork, tilting the e-axis (on the body of the gear selection mechanism) and drilling in the gearbox body; in the middle of the thickness of the fork or along the edge. I was unlucky, and the ball moved closer to the rear edge of the fork (the position is like on a car).
“Thanks to” the frequent use of the anti-theft device that secures the reverse gear, the tooth on the fork was ground down on the rear part of the thickness and did not provide proper fixation. Engaging the rear tooth with a tooth that was not full in width caused the ball to shift from the axis of the spring bushing; it cut a groove in the bushing and moved even further to the rear, so that as a result the ball rolled along the edge of the fork and practically did not register the engaged reverse gear. All this was found out without removing or opening the box; all that was required was to drain the oil and unscrew the reverse lock plug. Through the resulting hole you can see the reverse fork, the fixing tooth on it and traces of friction with the ball. The spring bushing fell out on its own; if it does not fall out, then it must be removed by hooking it with a wire hook. In a good way, you should disassemble the box, remove the gear selection mechanism, replace the reverse fork or mechanism assembly and the specified bushing.
However, this prospect is not encouraging for time and financial reasons, especially since the defect can be temporarily corrected directly on the machine: the bushing should be turned over and hammered with the unworn end inward. I would warn you against installing a ball with a larger diameter: the crankcase is aluminum and VERY soft compared to the iron bushing and ball - it will soon become loose and it will all end with the installation of the ball from the CV joint, and the spring [3] of the retainer is very stiff and can simply break. – VAZ-2109 car and its modifications Catalog of spare parts in Russian, English, French, German, Spanish. Developed by the Scientific and Technical Center of JSC AVTOVAZ as of 01/01/98.
Disadvantages, breakdowns and problems of the Lada Samara box
The reliability of the manual transmission is weak, the transmission is famous for unclear shifts and howling
Gears switch off spontaneously due to wear of the locks on the couplings and gears
The box hums most often due to a lack of lubrication or when the bearings are damaged.
A strong crunch when switching hints at a quick replacement of synchronizers
The weak point of the gearbox is the rocker; it often requires repair or replacement
Another common problem is oil leaks from different seals.
You can contact the site administrator by email: [email protected]
All texts were written by me, are authored by Google, included in the original Yandex texts and notarized. For any borrowing, we immediately write an official letter on company letterhead in support of search networks, your hosting and domain registrar.