This type of malfunction, such as non-working brake lights on a VAZ 2107, is a common situation that every owner of this car brand faces. The reasons why the brake lights on a VAZ 2107 do not light up are factors such as depleted bulbs, a short circuit in the wiring, or oxidation of the contacts. Driving with bad legs is not only prohibited, but also dangerous, so we'll learn how to find and fix the problem yourself.
The main causes of brake light failure
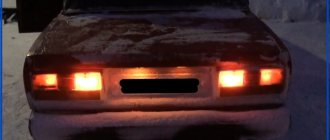
Unlike dimensions and alarm systems, your car must have working brake lights. They signal to vehicles behind them that the driver is slowing down. Brake alerts for drivers behind help prevent collisions and accidents. It is quite difficult to independently find a stop fault on a VAZ 2107 car, since these signs are located at the rear. To see the brake lights work, you will need two people, one of whom should press the brake pedal, and the other to check the action.
When the brake pedal is depressed, the following effects may occur:
- The brake lights are on: there are no faults, the car can be driven.
- Off: need to look for the problem. In addition, the signal that both car lights are off indicates the need for global control, since paired light elements burn out in rare cases.
- Half-lit: If only one brake light is on, you will need to disassemble the second headlight and check if the bulb is working. The lighting element (light bulb) more often fails and less often the cause may be a broken contact.
Causes of foot malfunction on the VAZ 2107:
- Fuse F11 (10A) has blown. A fuse consists of a fusible link that blows when high current flows in the circuit. The fuse is designed for the appropriate current value, so its breakdown may be associated with a short circuit or the installation of powerful lamps.
- Short circuit or damaged wiring. This type of malfunction often occurs after work has been done in the interior or trunk.
- Contact oxidation. Oxidation may form over time at the junction of the lamps with the socket or at the place where the wires are connected to the headlights, the causes of which are poor contact and moisture entering the headlight unit of the rear lights.
- Incandescent bulb burnout: Bulbs have their advantage, so brake light failure is often associated with burnout.
- A faulty frog or frog is a sensor found in the brake pedal design. The sensor closes the contact when the brake pedal is pressed, causing the brake light to come on.
These are all kinds of malfunctions associated with the inoperability of the stop on the VAZ 2107 and other cars. You can identify the malfunction and fix it yourself, without contacting an electrician. To identify the malfunction, you will need a tester or multimeter. Let's take a closer look at how to find and fix brake faults on a VAZ 2107.
Missing mass
An incandescent lamp operates when a constant voltage of 12 V is supplied. The positive wire is powered from the battery through the frog. Less or weight is removed from the car body. If the negative cable is disconnected from the light box, the contacts will not work. If work has recently been carried out on the rear optics and a malfunction of the brake lights is detected, it is necessary to recheck the connection of the ground wire.
this is interesting! The negative wire at the junction with the housing may oxidize, so you need to make sure there is no oxide or corrosion. If there is, you will need to clean the seam with sandpaper and treat it with thick lubricant.
Lamp burnout
Such a breakdown can only be detected after disassembling the lamp socket. You can visually determine if the lamp is faulty if there is a broken filament on it. Light bulbs are not repaired and are replaced with new ones. The brake light lamp on the VAZ 2107 is a regular spiral element, the power of which is 21 W. It is not recommended to screw in an element of higher power, as this will create an additional load on the on-board network.
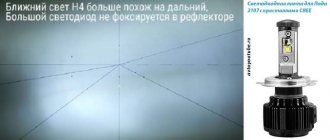
this is interesting! To extend the life of the emitting source and at the same time reduce energy consumption, you can insert LED lamps instead of halogen ones. They last longer than usual and consume several times less energy, but their disadvantage is their high cost.
Contacts have oxidized
It is not difficult to identify such a malfunction; to do this, you need to unscrew the lamp from the socket and inspect the interior. Oxides and rust can be identified visually, and to eliminate the problems you will need to clean the contacts with sandpaper. Next, before installing the luminescent element, it is necessary to treat the position of the cartridge with silicone grease.
this is interesting! Contacts can oxidize, corrode, or become loose, which can cause your brake lights to malfunction. Contacts also need to be checked on a frog or DSS.
Broken wiring
When carrying out work in the interior, you can accidentally touch the wiring that supplies the rear lights. Although it is placed in special holes and covered with protective elements, this possibility cannot be ruled out. In addition, not only the physical impact of a person can damage the wire, but also the occurrence of a short circuit. To exclude or confirm this cause, it will be necessary to ring the wire coming from the sensor near the pedal at the base of the optical group.
this is interesting! When the wire is shorted, the fuse usually burns out immediately, so you should check this element first if both lamps on the back do not light up. On some new sevens, an additional brake light is installed behind the rear window. Its inoperability also indicates faulty wiring, a blown fuse and a faulty stop sensor.
Burnout of tracks and sensor malfunction
Below is a diagram that can help you understand the working principle of the entire braking system. To avoid having to figure out the circuit, you should also double check the service of the brake light sensor. It is located near the brake pedal; this element is also called a frog. To eliminate this type of malfunction, you will need to replace the sensor by unscrewing it and first disconnecting the contact (when disconnecting the contact, it is recommended to remove the negative terminal from the battery).
The DSS cannot be repaired and must be replaced if faulty. Its performance can be checked with a multimeter by dialing a number. The cost of such an item is one cent, and buying it is not a problem.
If after the work done the brake lights on the VAZ 2107 do not work, then you need to check the contact marks on the boards. To do this, you need to disassemble the headlights and perform a visual inspection. The integrity of the traces can be checked using a test lamp, and a soldering iron must be used to troubleshoot the problem.
To summarize, it should be noted that it usually takes some time to find faults, and even less to fix them. In order not to create an emergency situation on the road, it is necessary to regularly check the operation of all vehicle lighting devices during daily operation of the vehicle on a regular basis once a month.
Lighting is extremely important in cars, and this applies not only to headlights, but also to signal lights. Turn signals, side lights, brake lights - all this helps surrounding drivers to better distinguish the contours of the car and predict the driver's maneuvers. When the brake lights on a car do not work, this can lead not only to a collision, but also to a fine if the traffic police discovers the malfunction. It is best to fix this problem immediately after it occurs; moreover, very often the reasons why the brake lights do not light up are quite common and the problem can be easily fixed without contacting a service center.
Headlight adjustment
It is generally accepted that headlights perform their function if the road in front of the car is well lit and oncoming drivers are not blinded. To achieve such operation of lighting fixtures, they must be adjusted correctly. To adjust the VAZ-2107 headlights you need to:
- Place the car on a flat, strictly horizontal surface at a distance of 5 m from a vertical screen measuring 2x1 m. The car must be fully fueled and equipped with all the necessary equipment, the tires must be inflated to the required pressure.
- Draw a marking on the screen on which line C will indicate the height of the headlights, D - 75 mm below C, O - the center line, A and B - vertical lines, the intersections of which with C form points E, corresponding to the centers of the headlights. J is the distance between the headlights, which in the case of the VAZ-2107 is 936 mm.
- Move the hydraulic corrector regulator to the extreme right position (position I).
- Place a load weighing 75 kg on the driver's seat or place a passenger there.
- Turn on the low beam and cover one of the headlights with an opaque material.
- Achieve alignment of the lower boundary of the beam with the E–E line by rotating the adjusting screw on the rear side of the headlamp.
- Using the second screw, align the break point of the upper border of the beam with point E.
The same must be done for the second headlight.
Why don't the brake lights light up?
Almost all problems with electronics in a car are solved in the same way. You need to look for the problem in the device itself, which is faulty, or in the power supply system to it. The same goes for the main causes of brake light failure. If they don't light up, it could be for one (or more) of the following reasons:
- Problem with the brake light fuse: its oxidation or failure;
- The faulty bulb(s) are installed in the brake light;
- Problem with the brake light ignition mechanism when pressing the brake pedal;
- Oxidized contacts in the socket for installing a brake light;
- Damage to electrical wiring.
As you can see, of the problems listed above, only one can cause serious problems for the driver if he wants to repair the brake lights himself, and we are talking about wiring wear. Modern cars are equipped with dozens of electronic devices, and an unfortunate frayed, torn or stuck electrical cable can turn off your brake lights. If none of the troubleshooting steps below fix the problem, it is most likely a wiring issue. In such a situation, you will need to find a detailed car wiring plan and check the voltage in the sections with a tester, and after finding a problem, solder or replace the wires.
But do not rush to monitor the tester; very often the brake lights do not turn on due to much more trivial faults, the elimination of which will be discussed below.
Glass
When converting factory headlight units, acrylic or polycarbonate elements are used instead of tempered, heavy glass. When choosing, you should take into account the diameter of the new glass, adjusting it to the size of the standard blocks.
Acrylic headlights are made by heat shrinking using old glass as a matrix. The minimum thickness of a new plexiglass headlight is 4 mm. The advantages of an acrylic block are low cost and the ability to be manufactured in a workshop. The disadvantages include rapid wear of the part. Acrylic quickly becomes covered with microcracks after being hit by gravel thrown out from under the wheels of a vehicle in front, and loses transparency after overheating. It is recommended to additionally protect the headlights with armored film.
Polycarbonate headlights are two times lighter than glass and are characterized by increased resistance to mechanical damage. Compared to acrylic glass, polycarbonate glass does not become cloudy over time, does not lose light transmission, and is resistant to temperature changes.
Checking brake lamps and brake light sockets
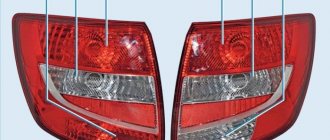
It is recommended to start troubleshooting brake lights by checking the lamps. To do this, you need to open the trunk and remove the tail lights, after which you can get to the brake lights. Depending on the make and model of the car, the method for removing the tail lights may vary, and on some cars you may even be able to get to the brake lights without this procedure.
The most reliable way to check whether the cause of the malfunction lies in burnt-out lamps or oxidation of the contacts in the socket for installing them is to replace them with new ones. It is not always possible to determine by eye whether the lamps have burned out or not, so it is better to purchase new light-emitting devices in advance and install them. If it turns out that no new copies of the required size have been found, you can remove the working lights from the turn signals, side lights or other lighting fixtures in the car. Try them and if the problem is solved, just buy new bulbs and replace them so that the brake lights work the same way again.
Important: some car models are designed in such a way that if one brake light fails, the second one goes out automatically. Therefore, when checking, it is best to screw the bulbs into both brake lights to make sure that the problem is not due to a faulty brake light.
When replacing the lamps does not eliminate the problem, you must ensure that the brake light “cartridges” do not oxidize. Also check that the outlets are connected to the vehicle's wiring harness. If in doubt, you can disconnect the wiring contacts, clean them with fine-grit sandpaper, lubricate them with electrically conductive grease and reconnect them.
Note: to check the sockets after carrying out the above manipulations, use new lamps (removed from other lighting fixtures), since it is possible that previously installed lighting fixtures have become unusable simultaneously with damage to the contacts.
Lighting and light signaling schemes for VAZ 2107, VAZ 2105, VAZ 2104
Troubleshooting the lighting system of the Lada 2107, removing and installing the lamp of the Lada 2105, light signaling of the VAZ 2104, VAZ 2105, VAZ 2107. Diagnostics of electrical equipment of the Lada 2105. Instructions for repairing electrical equipment: ignition systems, starter of the Lada 2104. Operation of the generator, battery, purifier . Diagram of fret 2107.
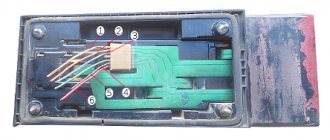
Scheme for switching on external lighting: 1 - block headlights with side light lamps; 2 — engine compartment lamp; 3 — mounting block; 4 — glove box lighting lamp; 5 — instrument lighting switch; 6 — rear lights with side light lamps; 7 — license plate lights; 8 — external lighting switch; 9 — indicator lamp for external lighting, located in the speedometer; 10 — ignition switch; A - to terminal “30” of the generator; B - to instrument lighting lamps and switch backlight lamps
Diagram for switching on headlights and fog lights in the rear lights of the VAZ 2107: 1 - block headlights; 2 — mounting block; 3 - headlight switch in a three-lever switch; 4 — external lighting switch; 5 — rear fog light switch; 6 — rear lights; 7 - rear fog light circuit fuse; 8 — fog light indicator lamp, located in the indicator lamp block; 9 — indicator lamp for high beam headlights, located in the speedometer; 10 — ignition switch; P5 - headlight high beam relay; P6 - relay for turning on the low beam headlights. A - view of the plug connector of the VAZ 2104 headlight unit: 1 - low beam plug of the VAZ 2105; 2 — high beam plug; 3 — ground plug; 4 — side light plug; B - to terminal “30” of the generator. B – terminals of the rear light printed circuit board (numbering of terminals from the edge of the board): 1 - to ground; 2 - to the brake light lamp; 3 - to the side light lamp; 4 - to the fog light lamp; 5 - to the reversing lamp; 6 - to the turn signal lamp
Electrical circuit for switching on external lighting for VAZ 2104, VAZ 2105, VAZ 2107. Scheme for switching on headlights and fog lights (for VAZ 2104, VAZ 2105, VAZ 2107 cars produced since 1988). With the circuit for switching on the fog light on cars produced before 1988.
Mounting block VAZ 2104, VAZ 2105, VAZ 2107 (cover removed): 1 - rear window heating relay (P1); 2 — relay for turning on the headlight cleaners and washer (P2); 3 - relay for turning on sound signals (P3); 4 — relay for switching on the electric motor of the engine cooling system fan (P4); 5 - spare fuse; 6 — relay for turning on the high beam headlights (P5); 7 — relay for low beam headlights (P6); 8 - fuse
Problem with fuse for brake lights
A car's electrical circuit often experiences problems due to faulty fuses that can fail. There are several ways to check fuses in a car, including visually or with a multimeter. In this case, there is a “home” method for diagnosing the brake light fuse.
It's fairly easy to verify that the brake lights are off due to a blown fuse. To do this, just start the car and press the horn. If there is sound, then the fuse is good and the brake light malfunction is due to another reason. If there is no sound, you need to use the fuse block diagram to determine which one is responsible for the brake lights and horn, and then replace it.
Note. This testing method is not suitable for all car models. On some vehicles, multiple fuses control the brake lights and horn, and if one fails, the other will continue to function properly.
Brake light switch malfunction
When the driver presses the brake pedal, the force is transferred to a mechanism commonly called the "frog" or limit switch, which is also the brake light switch. When pressed, the brake lights light up, respectively, if for some reason it stops working, the brake lights do not light up.
In total, there are 2 main reasons why the limit switch does not work:
- Contact oxidation;
- Carbon deposits and corrosion.
As you can see, the defects are very similar and can be eliminated in the same way: by cleaning the “frog” or replacing it.
To disassemble the brake light switch, you will need to remove the pedals. In addition, it is easy to find under the brake pedal, and the limit switch can be disassembled by simply turning it 90 degrees counterclockwise. When the “frog” is disassembled, disconnect the wires from it and try to close them “manually”. If as a result of these manipulations the brake light comes on, it means that the brake light switch needs to be replaced or repaired.
If you decide to tinker with the limit switch, repairing it is quite simple. It is enough to familiarize yourself with the device, clean all contacts with an alcohol-based liquid, and then lubricate them with electrically conductive lubricant. Subsequently, the “frog” can be assembled, installed and tested.
Important: Keep in mind that if your car has brake lights on all the time, it is very likely that the problem is also related to the limit switch. The troubleshooting method for this situation is no different from the option presented above.
The diagram is an excellent source of information that will help you decide on the algorithm of actions, tell you which circuits should sound, and which fuses you should pay attention to first. Another useful tip: when going on a trip, take technical documentation with you; experience suggests that it may be needed at any time during the trip. In addition to basic tools, it wouldn’t hurt to have a test lamp and a multimeter in your car. Aliexpress auto parts, how to find and order fuses, light bulbs, etc. On Aliexpress at a reasonable price and free shipping. It is advisable that they include a multimeter, 12 V incandescent lamps, and spare fuses.
Other tuning ideas
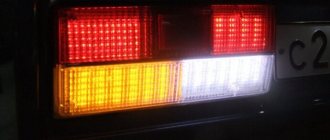
As mentioned above, all lamps in lanterns can be replaced with LED ones. And not just remove incandescent lamps and install LED ones, but use LED modules or strip. Otherwise, the appearance of LED lights will not differ from ordinary ones. Installation of LED modules may look like this:
And using an LED strip you can do this:
You can simply tint the lights, completely changing the appearance of the car, and it is easier to apply the tint to the outside of the glass. This will allow you not to disassemble the light devices or even remove them from the car.
Tinted rear lights VAZ 2112
And finally, a short video demonstrating the capabilities of LED modules that can be used to tune the rear light fixtures of a VAZ 2112.
This concludes the conversation about the rear lights of the VAZ 2112. Now we can easily remove these lighting devices, if necessary, repair them, modify them, or simply replace a burnt-out light bulb in the lanterns.
Previous Replacing car lamps How to remove the tail lights of a VAZ 2110 - replacing lamps, ideas for tuning Next Replacing car lamps Replacing lamps and tuning tail lights of a VAZ 2114
Dimensions of VAZ 2106
The subsequent connection to the turn signals and stop signs has its own grounding wire, suitable for the size of the reverse gear, and the PTF connection is serial from the stoppacks. Why first stop, then PTF and only then dimensions.) As far as I understand, in conventional headlights the weight goes to each bulb. So, the questions: 1) Why does the “bulb malfunction” indicator light up when the headlights are on - the light bulb is on. 2) Because the PTFs do not burn, despite the fact that they are in the circuit (mass) in series in front of the blades that they burn.
Removing and replacing rear lights
The procedure for replacing rear lights is as follows:
First you need to turn off the ignition, open the hood and disconnect the terminals from the battery. Then open the trunk of the car and remove the protective cover on the headlight, disconnect the mount and disconnect the wiring connector from the contacts on the board. Be careful not to damage them. Using a socket wrench size 8, you need to unscrew the four nuts that secure the taillight
Having done this, under the nuts of the studs you will be able to see the tips of the ground cable. Next, you need to carefully remove the taillight from its seat. To change the diffuser, it must be removed from the optics body. The procedure for installing and assembling optical elements is performed in reverse order.
All about sedans
Traffic police inspectors will definitely watch the video from the voice recorder, and today it is on every car. Detecting a brake light malfunction on video is irrefutable evidence of a malfunction.
Body warning lights, including brake lights, are very important for a vehicle that will be driving on a busy highway or performing any maneuvers. Side lights, turn signals and brake lights are designed to ensure maximum driving safety. They allow other drivers to determine the size and shape of the car and receive information about what maneuvers you will perform. The driver of a car who drives with a non-functioning stop sign faces a fine for driving a disabled vehicle.
In addition, the threat of an emergency will be real: a collision with a car that will be moving behind you.
The brake light does not light up: possible reasons, solution to the problem and recommendations
Below are the three main symptoms of faulty stop indicators. The brake lights do not turn on completely. If your car's brake lights have gone completely off, you should look for an open in the wires, a limit switch, or a faulty fuse. Troubleshooting should begin with the fuse box. There is usually a table on its cover indicating which circuit is protected by which fuse.
If it is missing or the information contained in it is illegible, you can use the owner's manual for the vehicle. If the correct fuse is blown, it cannot be replaced until the cause is determined.
This usually happens when there is a short circuit or damage to the insulation of the wires and they touch the housing. A similar effect is observed when water gets into electrical connections. In this case, it is necessary to dry the area where the moisture has entered.
The brake lights do not light up: causes of the problem and how to fix it
It’s difficult to find a driver who denies the fact that car breakdowns occur much more often outside the city, where there is a real chance to quickly receive qualified help. If something breaks, it will happen on a country road, during a trip to nature, where the motorist will be left alone with the problem.
That is why it is recommended to obtain a minimum of information in advance about the principles of solving problems in a car and the simplest options for solving them yourself. One of the most common faults is problems with cables and electrical equipment, the operation of which is inextricably linked with it, especially with the lighting system.
Tail lights, stop and reverse lights do not light up
We watch a video on how to install a brake light - experienced drivers recommend replacing the lamps at the same time; some models provide automatic synchronous shutdown of both devices if there is a malfunction. Only by replacing both lamps can a correct diagnosis of the fault be guaranteed.
Brake light contacts, how to check, how to repair If the legs are replaced with new ones, but the fault is not eliminated, you will need to make sure that the brake light sockets are not oxidized. In this case, you should ensure that the cartridges are in contact with the vehicle wiring.
If, upon inspection, the presence of a high-quality contact is suspected, it is better to immediately disconnect the contacts, treat them with fine sandpaper, then with electrically conductive lubricant, and carefully restore the connection. The malfunction, which consists of oxidation of the contacts, can be easily eliminated independently. If something more serious happens, for example, a spring comes off, then it is better to contact a car service specialist - in this case, you will need to replace the broken part. Wiring faults, how to check wiring, how to fix car wiring problems can be fully diagnosed with special equipment. On the road, of course, you will have to deal with simpler methods.
The first step is to inspect the accessible sections of the electrical circuit that are located under the hood. A short circuit may occur between two wires or the housing.
If a break occurs between the wires, their insulation will melt; such areas can be seen with the naked eye.
Replaceable tips
Speaking about replacing faulty components of an electrical circuit, it is worth saying a few words about the correct replacement of light bulbs.
This must be done in the following order:
Turn off the ignition and remove the key from the lock. Open the hood. Unscrew the headlight (to do this, unscrew the bolts on both sides) and remove it. Remove the contact group by disconnecting it from the reflector (this procedure should be performed very carefully). When you find the spring clips, undo them. Remove the faulty light bulb. Insert the new bulb into the empty cartridge.
Rearranging and installing the headlight unit is carried out in the same sequence, but in reverse order. If necessary, a similar procedure can be performed with the second block. It is worth noting that it is highly advisable to replace lamps not with bare hands, but with light gloves. The glass of the flask is quite thin, and under high pressure it can burst right in your hands.
Why are the brake lights on, turn signals, rear lights VPZ 2106
Therefore, if on a VAZ 2114 or another model (provided that LED lamps are used) the brake light does not light up, then you should also check the generator and replace the damaged element, then replace the lamp. Such a malfunction can occur periodically and is associated with wear and tear of the entire generator. If the brake lights on the VAZ 2115 do not light up and other breakdowns often occur, you should also think about replacing it with a more reliable car (in some cases this is more profitable than constantly investing money in endless repairs). Malfunction of brake lights in combination with other indicators Most often, the brake light is used in conjunction with the side lighting of the car. The cylinder contains two threads, one end of which is connected to the base, and the other two are brought out to separate contacts.
An unfortunate break, pinching or bending of the wire can cause the brake lights to turn off. If you suspect a breakdown of this type, you will need to find a plan of the car's electrical circuits and arm yourself with a tester.
Checking the voltage in the required areas will help determine the location of the defect; if a problem is detected, it will be necessary to replace the wire or restore its integrity by welding. But don’t start by looking for wiring defects; the reasons are usually simpler.
It makes sense to consider them in more detail. Brake lights, how to check, how to replace The first step is to make sure the most basic thing: the bulbs are working properly. This is done as follows: the trunk is opened, the rear lights are removed, as a result, access to the brake lights is opened.