The more time goes on, the more electronics are used in cars. Thanks to sensors, the electronic control unit receives the necessary signals and adjusts the operation of the engine and fuel system. One of the vital sensors of a car is the oxygen sensor; let’s look at it using the example of a VAZ 2115 car.
An oxygen sensor, simply called a lambda probe, is necessary to be able to determine the amount of oxygen contained in the exhaust gases. Thanks to the data received from the oxygen sensor, the electronic control unit adjusts the amount of the fuel mixture, allowing the engine to operate in normal mode.
Since the lambda probe begins to fully function only after a temperature above 350 degrees, its operating conditions can safely be called aggressive. It is recommended to diagnose it every 25 thousand kilometers. It is recommended to replace it after a mileage of 100 thousand kilometers. But it can last much longer, for this you need:
- Refuel the vehicle with gasoline specified in the instructions;
- When checking the cylinders, the ignition must remain on;
- The exhaust system components should not overheat above 900 degrees.
Types of sensors and operating principle
The lambda probe is installed in the exhaust system. Sensors are divided into two types: two-point and broadband.
The two-point sensor consists of ceramics, the elements of which are coated with zirconium dioxide on both sides. Installed in front of or behind the catalytic converter.
The principle of operation is to measure the level of oxygen concentration in the environment and exhaust gases. If the level changes and becomes different, a voltage is created at the ends of the sensor elements, from low to high. Low voltage is created if there is excess oxygen in the system.
Otherwise, if the system does not have the required level of oxygen, high voltage will be created. These signals are sent to the engine control unit, which distinguishes them by current strength.
The wideband sensor is a more modern design. It also has two ceramic elements. One of them can be called “pumping”. It is responsible for activating the process of pumping or removing air from the system.
The second element can be conventionally called “two-point”. The principle of operation is based on the fact that as long as there is the required amount of oxygen in the mixture, the current strength on the “pumping” element does not change and is transferred to the “two-point” element.
It, in turn, receiving a constant current from the “pumping” element, maintains a constant voltage between its elements and is inactive.
As soon as the oxygen level changes, the "pumping" element supplies the changed voltage to the "two-point". This, in turn, ensures either pumping air into the system or pumping it back.
How is self-diagnosis performed?
Press the button to start diagnostics
We have sorted out the main errors on the Priora, now it’s worth finding out how self-diagnosis is performed. The VAZ 2170 with 16 valves has a special controller with which diagnostics are performed. If you have an on-board computer installed, then diagnostics are performed on it. There is also special equipment that allows for a more in-depth check of Priora 16 class systems.
Since most Priora 16 cars already have an on-board computer, we will consider the option without the use of special devices. Diagnostics begins with activation of the test mode. The work proceeds according to the following scheme:
- Turn off the ignition. Now we hold down the daily mileage reset button, without releasing the button, we start the ignition of the Priora 16 cl;
- On the instrument panel you will see a display with an indication. After turning on the ignition, all components of the instrument panel will light up. The needles of the temperature, speedometer, tachometer and other instruments will begin to move to the maximum level and back. This behavior indicates that self-diagnosis has begun;
- Let's move on to the right steering wheel switch. Here you will find a button for switching the on-board computer settings. Click on it, a message with the software version will appear on the instrument panel screen;
- The instrument panel error diagnosis will begin if you press this key again. Various codes will appear on the display, which you can decipher in the table below;
- When the diagnostics are complete, you can reset the error data. Press and hold the daily mileage reset button for about 5 seconds.
Lambda probe on VAZ cars
VAZs use several types of sensors:
1. Bosch No. 0 258 005 133, Euro standard – 2. Installed on outdated models with an engine capacity of 1.5 liters. On later models with Euro 3 standard, this sensor was used as the first one, and was installed before the catalyst.
The second sensor was installed, which has a “return connector”. But you can find two identical sensors installed
2. Bosch No. 0 258 006537 was installed on cars manufactured since October 2004. They have a heating element in their structure.
Lambda probes produced are interchangeable with zirconium sensors of similar structure. Please note that a non-heated sensor can be replaced with a heated sensor. Not the other way around.
CO – potentiometer
SO – potentiometer VAZ
Idle speed controller
The idle speed control adjusts the crankshaft speed at idle by controlling the amount of supply air that bypasses the throttle valve (the throttle valve is closed). Principle of operation:
- It consists of a two-pole stepper motor and a cone valve connected to it
- The valve is extended or retracted by computer signals
- When the regulator needle extends completely (this corresponds to 0 steps), it blocks the air supply
- And when the needle is retracted, it provides air access proportional to the number of steps the needle is indented from the saddle
- Failure leads to instability of idle speed, and the engine may stall
Replacing the regulator goes like this:
- De-energize the car wiring by removing the terminals from the battery
- Press the plastic latch to disconnect the connector from the regulator located on the throttle pipe and marked with number 2
Number 2 indicates idle speed control
Idle speed regulator VAZ
- Check the condition and replace, if necessary, a torn or lost elasticity sealing ring of the regulator
Warning: Do not try to pull out or push in the valve with your hands, this may damage the idle speed control. To do this, you need to use a diagnostic device or a special monitor.
- We install a new sensor on the car, lubricate its O-ring with engine oil, and do not forget to connect the connector to it
Here we looked at the VAZ 2109 injector; the sensors on the engine may be different, depending on the model, but there is an air conditioner sensor located on the dashboard.
Oxygen sensor malfunctions and error codes
Among the possible breakdowns of the lambda probe, the following can be distinguished: loss of sensitivity, non-working heating. As a rule, the on-board computer will not show you a breakdown if the problem is loss of sensitivity. It’s another matter if the heating circuit breaks, then the malfunction will be recorded.
- Error P1115 - a breakdown has occurred in the heating circuit
- Error P1102 - low resistance on the oxygen heater
- Error P0141 - the heater has broken down on the second sensor
- Error P0140 – sensor number two has broken
- Error P0138 - the second sensor indicates an excessive signal level
- Error P0137 - the second sensor indicates a reduced signal level
- Error P0136 – there is a short circuit to ground of the second sensor
- Error P0135 - the heater on the first sensor has failed
- Error P0134 – the first sensor has no signal
- Error P0133 - the first sensor responds slowly to the request
- Error P0132 – there is little oxygen in the system, the signal is high at the first sensor
- Error P0131 – there is a lot of oxygen in the system, the signal is low at the first sensor
- Error P0130 - the first sensor sends incorrect signals
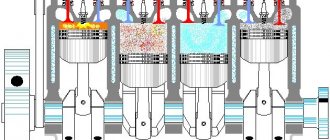
Operating principle
It detects the difference between these two indicators and sends a corresponding signal to the electronic control system.
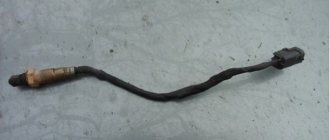
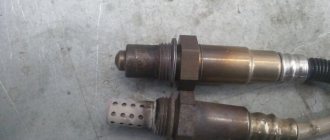
The VAZ 2114 lambda probe consists of the following components:
- frame;
- electric heater;
- outer electrode;
- internal electrode;
- ceramic insulator. Located between the electrodes;
- a casing that protects the outer electrode from the aggressive effects of exhaust gases;
- connector for connection.
The outer electrode is made of platinum, and the inner one is made of zirconium. Due to the different properties of metals, the sensor is able to perform its functions.
The engine exhaust system is the hottest component, so the components of the lambda probe, to prevent premature breakdowns, are made of materials resistant to high temperatures.
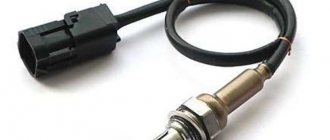
The connector for connecting the lambda probe to the electronic control system consists of four contacts:
The pinout of the connector contacts and the VAZ 2114 oxygen sensor itself is as follows:
The on-board computer supplies a voltage of 0.45 V through the electrical supply contact of the lambda probe.
Also, while the engine is running, voltage is supplied to the electric heater.
After starting the engine, the on-board computer does not take into account the readings of the lambda probe. Operation is monitored based on the readings of other sensors: mass air flow and internal combustion engine temperature, as well as the throttle opening sensor.
This is due to the fact that the electric heater has not yet heated the oxygen sensor to its operating temperature. It is equal to ± 350 °C.
When the lambda probe is sufficiently warmed up, it can objectively read the necessary parameters:
- outer electrode - exhaust gas parameters;
- internal—external air parameters.
The signal transmitted by the sensor is the difference between two quantities.
By comparing the amount of oxygen in the exhaust manifold and outside, the system determines the degree of combustion. In other words, the task of the oxygen sensor is to detect incomplete combustion of the combustible mixture.
When the on-board computer receives data about the deviation in the amount of oxygen, it makes changes to the operation of other systems (for example: in the fuel system or ignition, making it earlier or later). Thereby compensating for deviations in engine operation.
Previously produced oxygen sensors on the VAZ-2114 did not have an independent warm-up function. The manufacturer did not add an electric heater to the sensor design. Therefore, until the exhaust gases warmed the lambda probe to operating temperature, the on-board computer took into account the readings of other sensors. But at the same time, the quality of the exhaust gases was significantly reduced.
In connection with the approval of new regulations regarding road transport, aimed at reducing the degree of environmental pollution, the manufacturer changed the design of the oxygen sensor and began installing electric heaters. As a result, monitoring and changing the quality of exhaust gases on cars began much earlier than the natural warming up of the engine.
Replacing the oxygen sensor
If any damage occurs, the sensor must be replaced. You can try to do this yourself. Let's consider the situation of replacing a lambda probe on a VAZ 2114:
- We put the car on an overpass or drive it into a pit and remove the motor protection (to replace the sensor with the neutralizer).
- We are looking for the wires from the oxygen sensor, and follow them to the sensors themselves, they are located on the catalyst (the first before the converter, the second after).
- We cut the clamps and disconnect the connectors.
- Let the system cool down.
- We take a wrench for “22” or special. head and unscrew the sensor.
- We take a new sensor and install it in place of the old one. We tighten the nuts.
- We connect the wires to the connectors.
- Use new clamps to secure the wires to the cooling system (do not allow contact with the exhaust pipe).
- Install the protection in reverse order.
On other car models, replacing the sensor will be identical.
Replacement problems
When replacing, the old sensor may stick to the pipe. In this case, proceed like this:
- Apply wd-40 generously and try to unscrew
- Turn on the engine, heat the exhaust system and unscrew the sensor
- We try to heat (being careful) the sensor itself and unscrew it
- Tap lightly with a hammer and try to unscrew it again
- If that doesn't help, try thermal shock. Pour cold water onto the well-heated sensor. Try unscrewing it again.
Oxygen sensor price
The price of an oxygen sensor will vary by region and model. It ranges from 1000 to 3000 rubles . Buy a lambda probe in specialized stores and only with a guarantee.
Causes of oxygen sensor failure
- Coolant or brake fluid has come into contact with the sensor housing.
- The fuel used has a high lead content
- Severe overheating of the sensor caused by unclean fuel (clogged cleaning filters)
- The sensor has simply expired
- Mechanical damage to the sensor while the vehicle is moving.
A failed sensor will affect the operation of the vehicle as a whole and lead to additional problems. But using them you can immediately determine a possible breakdown of the sensor and replace it in a timely manner.
Related problems when the oxygen sensor fails
- The car began to consume more fuel than usual
- The car began to move jerkily
- The engine became unstable
- The normal operation of the catalyst is disrupted
- When testing for exhaust gas toxicity, the result gives inflated values.
In conclusion, I would like to give advice: in order to avoid the problems described above in the future, monitor the performance of the lambda probe. Check its condition every five to ten thousand kilometers.
Installed in the exhaust pipe of the exhaust gas system. The oxygen contained in the exhaust gases creates a potential difference at the sensor output, varying from approximately 0.1 V (a lot of oxygen - a lean mixture) to 0.9 V (a little oxygen - a rich mixture). Based on a signal from the oxygen sensor, the controller adjusts the fuel supply to the injectors so that the composition of the exhaust gases is optimal for the efficient operation of the converter (oxygen sensor voltage is about 0.5 V). For normal operation, the oxygen sensor must have a temperature of at least 360°C, so for quick warm-up after starting the engine, a heating element is built into it. The controller constantly supplies a stabilized reference voltage of 0.45 ± 0.10 V to the oxygen sensor circuit. Until the sensor warms up, the reference voltage remains unchanged. In this case, the controller controls the injection system without taking into account the voltage at the sensor. As soon as the sensor warms up, it begins to change the reference voltage. Then the controller turns off the heating of the sensor and begins to take into account the signal from the oxygen sensor.
Causes of failure and their symptoms
Although during normal operation the service life of the sensor is determined by a mileage of 60,000-80,000 kilometers (according to the “manual”), it can be damaged ahead of time if:
- Periodically and constantly use leaded or low-quality fuel (the lead contained in gasoline is dangerous);
- When installing a lambda probe, use a sealant that is not heat-resistant or contains silicone;
- For some reason (incorrectly adjusted ignition timing, interruptions in it, “rich” air-fuel mixture) the sensor overheats;
- “Flooding” the engine through repeated and unsuccessful attempts to start it (the danger of igniting fuel in the exhaust system with subsequent detonation);
- Oil and coolant will get into the exhaust system (poor condition of the valve stem seals (see Replacing valve stem seals) and “breakdown” of the cylinder head gasket);
- The exhaust system is depressurized;
- There will be an open, short to ground, or even poor contact in the sensor output circuit.
Well, since in the event of a lambda probe failure, the electronic control unit contains average readings, according to which the air-fuel mixture will be formed (different from the ideal ratio). We will be able to “read” information about the failure of the oxygen sensor based on the following signs of engine operation:
- Fuel consumption is significantly increased;
- The car's dynamics have deteriorated;
- At low speeds (idling), the engine is unstable;
- Increased heating of the sensor itself, which is accompanied by crackling of the exhaust pipe after stopping the engine.
- The “CHECK” warning light on the instrument panel lights up.
Attention! In most cases, the failure of the oxygen sensor is not detected by the on-board electronics, except in cases where there is a break in the heating circuit. Therefore, if the mileage of your car is more than 100,000 kilometers, then replacing the lambda is a resolved issue, since its price is much lower than the costs that will appear with the increased appetite of the car.
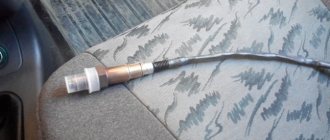
Where is the oxygen sensor located on the VAZ 2115
In a VAZ 2115 car, the oxygen sensor is located on the exhaust pipe, in the area from the exhaust manifold coupling to the resonator. Access to equipment from under the bottom of the machine.
For ease of repair (prevention), use an inspection hole, a roadside overpass, or a hydraulic lifting mechanism.
The operating life of the controller is 85 – 110 thousand km. If refueled with high-quality fuel, the service life of the equipment reaches 120,000 km.
Oxygen sensor for VAZ 2115: original, analogues, price, articles
| Catalog article/marking | Price in rubles |
| BOSCH 0258005133 (original) 8 and 16 valves | From 2400 |
| 0258005247 (analog) | From 1900-2100 |
| 21120385001030 (analog) | From 1900-2100 |
| *prices are as of May 2022 | |
The VAZ 2115 is equipped with a lambda probe from the German concern Bosch. The cost of a part of 2,500 rubles is not always affordable for many car owners, as a result of which they choose cheaper analogues.
Note to the driver. Service station specialists recommend purchasing original parts in order to prevent unstable operation of the equipment.
Signs of a malfunctioning oxygen sensor on a VAZ 2115 car
The symptoms are in many ways similar to other breakdowns, so it is important to correctly identify the breakdown at the initial stage.
- Difficulty starting the engine “cold” or “hot”;
- Increased fuel consumption;
- Power reduction;
- Passive acceleration dynamics;
- The engine is not running properly;
- An indicator on the instrument panel indicates the presence of system errors in the electronic control unit (P0137, P0578, P1457, P4630, P7215);
- Periodic shooting sounds are heard from the exhaust pipe, which indicates an enrichment (leanness) of the combustible mixture;
- Blue, gray, black smoke from the exhaust pipe.
If one or more signs are detected, immediately contact a service station specialist for a comprehensive diagnosis.
Functionality check
Before replacing the device, you should check its current condition.
You can check the DC using a measuring device:
The manufacturer guarantees high performance of the device. As practice shows, if the lambda probe was manufactured strictly in accordance with GOST, the first signs of its malfunction may appear no earlier than after 80 thousand kilometers. On average, the “life” of a recreation center is 160 thousand kilometers.
DK is in its place
But the instruction manual attached to the VAZ 2114 states that the DC should be changed after every 80 thousand kilometers. This is due to a decrease in sensitivity, which deteriorates the quality of the air-fuel mixture supplied to the combustion chamber.
How does DC affect engine performance?
In fact, the lambda probe has a very serious impact on the efficient and correct operation of the power unit. DC allows you to maintain optimal characteristics of the fuel and air mixture. If the DC is working properly, then:
How to ensure optimal operation of the DC
So that you do not have to change your DC in the very near future, follow simple recommendations. They will allow you to maintain the sensor in optimal conditions and guarantee efficient operation.
Reasons for reducing the service life of equipment
- Violation of vehicle operating conditions, failure to comply with scheduled technical inspection deadlines;
- Filling the car with low-quality fuel;
- Purchase and subsequent installation of non-original parts;
- Violation of installation technology;
- Defective parts during manufacturing;
- Damage due to an accident, collision, impact;
- Incorrect operation of the firmware of the electronic control unit.
Do-it-yourself controller diagnostics on a VAZ 2115
To check the equipment we use a multimeter. Most motorists have the device in their garage. The sequence of actions is as follows:
- We place the car above the inspection hole;
- Remove the block with wires from the oxygen sensor;
- Connect the multimeter terminals;
- We activate the device to the “Resistance measurement” position;
- We analyze the received data.
If the arrow tends to infinity, the lambda probe is working; if the arrow drops to zero, the part is faulty, replace it with a new one. Remember that the controller is non-separable and cannot be prevented.