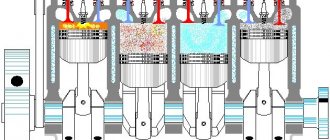
Oxygen sensor heater control circuit malfunction
1200 rub. for the photo report
We pay for photo reports on car repairs. Earnings from 10,000 rubles/month.
Write:
P0135 is an oxygen sensor (bank 1, sensor 1) heated circuit fault. This error code tells the driver that there is a malfunction in the heating mechanism of the first lambda probe, the one installed before the converter. Error p0135 can be determined using a car scanner or self-diagnosis (using a paper clip and counting the blinks of the check icon on the instrument panel). Since there may not be other symptoms indicating a problem with heating the oxygen sensor.
Error p0135 is written to the ECM memory when the engine is running, when the temperature of the converter is significantly higher than set, and the resistance of the oxygen sensor is greater than required. This code is recorded in the ECU event archive and can be displayed even if the problem is resolved, therefore, in order to establish the presence of a real problem in the system, you need not only a self-diagnosis mode, but also a testing mode, and reset the existing entries in the archive.
P0141: Oxygen Sensor Heat Circuit Trouble Code B1S2
P0141 faulty oxygen sensor heating after the catalyst! When diagnosing, the computer displays the following message: “P0141 Oxygen sensor 2 heater (bank 1) is faulty.” This error is very similar to a similar one, only with code p0135, which indicates the failure of the first lambda heater (before the catalyst).
Error code P0141 indicates that the oxygen sensor heating circuit is broken (Bank 1 Sensor 2)
The “Jakichan” signal, also known as the CHECK ENGINE lamp on the dashboard, lights up the second time a breakdown of the heating element of the lambda sensor B1S2 occurs. The engine controller calculates the resistance of the oxygen sensor, which depends on the operating temperature. This rebuff may vary depending on the car model and technical specifications. information from the measuring device itself (for example, on a VAZ from 90 to 500 Ohms, and on foreign cars like Toyota 10-16 Ohms).
Reasons that caused error P0141
There are not too many probable reasons that signaled the controller that error code p0141 was found:
- Contact is lost in the oxygen sensor power supply block.
- The oxygen sensor heating element burns out.
- A different type of sensor is installed.
Therefore, if the goal is to get rid of an unnecessary lamp on the instrument panel, which reminds of a problem with the sensor after the catalysts, then you need to start looking for the cause by checking the type of contacts and wires of the measuring device.
We check and fix the problem
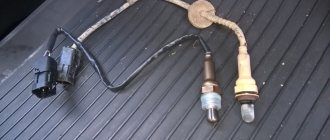
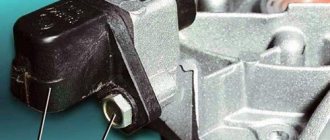
Since there are few reasons for the appearance, few people check the lambda probe, but immediately replace it when there is even the slightest suspicion that it has lost its properties (usually at the service station). But, if you do everything for yourself, then you need, naturally, to check and inspect the contacts, carefully examine all the signs of a breakdown of the oxygen sensor. An inspection pit will be required because the sensor is located at the rear of the catalyst and the power connector must be removed from it. Most likely everything will be oxidized there. You also need to inspect the wiring from the connector, because it is possible that one wire is broken or short. Afterwards, we measure the voltage of the windings of the lambda heating element with a multimeter (a method for checking the oxygen sensor is presented in the car repair book).
To make a correct verdict about whether the oxygen sensor is working, you need to know the nominal resistance of the sensor’s heating element. Since at plus 20 degrees it is less when the engine is warm, when the exhaust levels are 800 degrees or more. Resistance varies depending on the car model and the type of sensor.
When checking, a failure of the sensor was discovered, then you need to replace it with a new one, but there is a nuance here, because car owners often do not find the same sensor and install a universal one, or from another car, but it will not work every time.
When changing oxygen measuring devices, it is imperative to remove the battery terminal!
But, if the diagnostics reported that the sensor is in order and will still work, then it is necessary to erase the error from the electronics memory and, if the error appears again, we do the diagnostics again. Because the reason for setting a breakdown code can be many related codes, even a malfunction of the ECU. Therefore, it is necessary to analyze the conditions under which error P0141 appears and check other systems and electrical circuits.
Causes of error P0135
There are not so many malfunctions that have arisen with the oxygen sensor heater, and by checking them with a multimeter you can easily determine them yourself:
- Poor contact in the sensor power supply (oxides);
- Broken wiring/short circuit in the heater circuit;
- DC failure;
- The presence of other errors that caused the failure.
Thus, in order to eliminate the cause of the exhaust gas heater error popping up, you need to check the lambda probe one by one.
Reasons for the error
There are several factors that can trigger the P0135 error code. These include:
- disruption of the natural operation of the oxygen sensor;
- the presence of malfunctions or oxidation of the contact that powers the oxygen sensor;
- short circuits in the circuit itself;
- wiring breaks;
- malfunctions of the electronic control unit.
According to statistics, error P0135 is most often found on Nissan, Renault and Toyota cars.
Eliminating an error in the heating circuit
First, we make sure that the sensor wiring is intact, and then we check the condition of the contact chip (we clean the oxidation). After which it would be logical to check the resistance of the lambda heating. On a warm engine, at a normal temperature of 20 °C, we remove the chip from the sensor and measure the resistance between two wires of the same color (they are supplied with 12V power).
Having done all of the above, cleaned the contacts or replaced the sensor, error P0135 should disappear after a few minutes of engine operation. Having a computer at hand with a special program installed, you can check this and delete the event recorded in the archive. You can also reset the error by removing the terminal from the battery.
One of the errors that a diagnostic scanner can show when checking the vehicle’s proper operation is a power supply error to the oxygen sensor heating circuit. It is indicated on diagnostic devices under the number P0135. This error indicates that the heating system of the oxygen sensor, which is the first lambda probe installed in a position before the converter, is faulty. In this article, we will look at how this error manifests itself and what to do when it occurs.
What does it indicate?
An error diagnosed under code number P0135 indicates a malfunction or open circuit of the oxygen sensor heating circuit. This device is the first lambda probe, which is installed in a position before the converter.
In the production of modern oxygen sensors, highly developed technologies are used to minimize the risks of hidden defects, and the resources they possess can last for several hundred thousand kilometers. But despite this, error P0135 is one of the most common and can occur even during the car’s warranty period.
In order for the oxygen sensor to start working, its sensing element must be heated to a certain temperature level. On earlier cars, lambda probes were not equipped with heating circuits. However, due to requirements for compliance with environmental standards, manufacturers began to produce heated oxygen sensors. Initially, this element was made of wire, and later - of ceramic material.
The integrity of the heater is controlled by an electronic control unit. During normal operation and the whole circuit, a small voltage is displayed on the transistor. If the resistance is too high, the voltage level across the resistor reaches zero. When this indicator is determined by the controller, emergency mode is activated, and error code P0135 is recorded in the device’s memory.
Symptoms of error P0135
Among the indirect manifestations of error P0135, the driver may notice a problem with increased fuel consumption. But the problem here is that the increase in fuel is so insignificant that many do not even notice due to the “ragged” driving mode.
A couple more symptoms of the P0135 error are a loss of dynamics when accelerating, a change in the exhaust sound (to a “heavier” or “harassing”) and a change in the exhaust smell, which can also be felt in the cabin, to a more pungent one.
Please note: The symptoms of the P0135 error are largely determined by the settings of the electronic control unit, which is responsible for engine operation.
On which cars is this problem most common?
The problem with code P0141 can occur on different machines, but there are always statistics on which brands this error occurs more often. Here is a list of some of them:
- Acura
- Alfa Romeo
- Audi
- BMW
- Chevrolet (Chevrolet Aveo, Cavalier, Captiva, Cruz, Lanos, Lacetti, Orlando, Epica)
- Chrysler
- Citroen (Citroen C4, C5)
- Daewoo (Daewoo Matiz, Nexia)
- Dodge (Dodge Caravan)
- Fiat (Fiat Albea, Punto, Stilo)
- Ford (Ford Maverick, Mondeo, Focus, Escape)
- Geely (Geely MK)
- Honda (Honda Accord, SRV, Stream, Civic, HR-V)
- Hover
- Hyundai (Hyundai Accent, Getz, Santa Fe, Sonata)
- Kia (Kia Rio, Sorento, Spectra, Sportage)
- Lexus (Lexus gs300, rx300)
- Lifan (Lifan Solano)
- Mazda (Mazda Millenia, Tribute)
- Mercedes (Mercedes w203, w210)
- Mitsubishi (Mitsubishi Outlander, Galant, Karisma, Colt, Lancer, Montero, Pajero)
- Nissan (Nissan Almera, Qashqai, Maxima, X-Trail)
- Opel (Opel Astra, Vectra, Zafira, Corsa, Meriva, Omega)
- Peugeot (Peugeot 107, 206, 207, 307, 308, 406, 407)
- Renault (Renault Duster, Laguna, Logan, Megan, Sandero, Scenic, Fluence)
- Skoda (Skoda Fabia)
- Subaru
- Suzuki (Suzuki Grand Vitara, Liana)
- Toyota (Toyota Avensis, Camry, Corolla, Rav4, Highlander, Harrier, Yaris)
- Volkswagen (Volkswagen Golf, Passat)
- Volvo
- Gazelle Business, Next, umz 4216
- Zaz Chance
- Lada Kalina, Largus, Niva, Priora
- UAZ
With fault code P0141, you can sometimes encounter other errors. The most common ones are: P0036, P0130, P0132, P0135, P0136, P0138, P0155, P0161, P0171, P0174, P0300, P0301, P0302, P0303, P0304, P0314, P0400, P0443, P1409.
What to do if P0135 occurs
Error P0135, if it occurs alone, can be resolved quite simply. As you can see, there are quite a few reasons for its occurrence. We recommend following the following algorithm to fix error P0135:
- The first thing you need to do is make sure that the sensor itself is working. The surest way to do this is to install a new sensor and check for an error. If this is not possible, go to the second point;
- Check the oxygen sensor contact. Even if it seems normal, it is better to clean it of possible oxides for diagnostic purposes;
- Next, diagnose the heating resistance of the oxygen sensor. With a warm engine at an average ambient temperature (about 15-20 degrees Celsius), the resistance between two wires of the same color that matches the sensor should be about 3-9 ohms (depending on the car model). If there is no resistance or it is significantly greater than recommended, this may indicate an open circuit or short circuit.
If you have checked all of the above points except the first and found no problems, this indicates a malfunction of the sensor itself. In this case, it needs to be replaced, since oxygen sensors are not economically feasible to repair.
P0141 is an OBD-II code indicating that the electronic engine control unit (ECU) has tested the oxygen sensor (lambda probe) heater circuit and detected a problem. In this case, we are talking about the heating circuit of the oxygen sensor installed after the catalyst (sensor 2).
Diagnosis of the problem
The most common problem that causes P0135 on vehicles with a low oxygen sensor is a physical break in the wire. You don’t have to be into off-road driving to do this: you can damage the wiring even in an off-road parking lot if you’re unlucky. Therefore, first of all, inspect both the sensor wiring and its connector. We are specifically interested in the heating wires, which can be found in the service documentation for your car or, in the case of common Bosch sensors, immediately look at the two white wires.
Something else useful for you:
- Why does the engine start poorly when cold?
- Fuel pressure regulator - device, principle of operation, malfunctions
- Why does the speed fluctuate on a cold engine?
If there are no visible signs of a break or oxidation of the wiring (do not forget that an excessive increase in circuit resistance will also lead to error P0135!), measure the resistance of the heater with a tester. Depending on the model of a particular lambda probe, it varies, but in any case it will be in the range of 3-20 Ohms.
If the measured value differs by an order of magnitude, or the tester shows a complete break, the sensor must be replaced. Usually the ceramic heating element fails due to cracking (often a rustling sound is heard in the removed sensor when shaken), but in any case it is not repairable.
This is interesting: When is it necessary to balance the driveshaft on a car?
But, if the resistance of the heater itself is normal, the problem lies in the external circuits. Having turned on the ignition, we use a tester to check the contacts on the “braid” connector. On one of them, the voltage differs slightly from the on-board voltage, the second is called to ground (the heating control key is open, the resistance of the open key is tenths or hundredths of an ohm).
The biggest problem is the failure of the key itself in the control unit, which is rare, but even in diagnostic practice one has to deal with it. In this case, the most profitable option for the owner, even for domestic cars, is to resolder the block rather than replace it with a new one. To check the serviceability of the key, use a tester to test the entire circuit from the lambda probe connector to the injection computer connector. If the circuit is working properly, it is the block that is “to blame”.
Signs of error P0135
Even before diagnosing the P0135 error, the following symptoms may indicate its possible presence:
- complicated engine starting, especially in the cold season, wet weather;
- change in the nature of exhaust gases (grayish-black tint);
- slightly increased fuel consumption per unit of travel.
The listed symptoms may be the result of other malfunctions, therefore, to accurately determine the type of error, computer diagnostics of the engine should be performed.
Diagnosing Error Code P0141
To find the exact cause of the error, you must perform the following steps:
- Check the electrical connectors and insulation of the wiring leading to oxygen sensor No. 2 (after the catalyst).
- Check the lambda probe readings using a scanner to see if the sensor heating circuit is working.
- Check that there is power to the oxygen sensor heater.
- Check the heating resistance of the lambda probe to ensure it meets the manufacturer's specifications.
Diagnosis and problem solving
Trouble code P0141 means that there is a problem with the heated oxygen sensor (lambda probe) heating element circuit. The control module monitors the time required to warm up the sensor. And it begins to send the corresponding signal.
The code is triggered when the sensor takes too long to heat up. Water entering the oxygen sensor connector may cause the lambda probe heater fuse to blow.
Before replacing the sensor, check the condition of the heated oxygen sensor fuse and connectors. If the fuses and connector are good, replacing the O₂ sensor (bank 1) usually solves the problem.
How to avoid mistakes during troubleshooting
In order to save money and accurately establish the “diagnosis”, follow these simple tips:
- Check the wiring and sensor connector for moisture, which may cause a short circuit.
- Check the lambda probe for oil or coolant contamination.
- After installing the new oxygen sensor, check it with a scan tool to ensure that the heater circuit is working properly.
- Check the old lambda probe for damage caused by a faulty catalytic converter.
Reasons for error P0141
There are not many possible reasons that could signal the controller to set error code p0141:
- Loss of contact in the lambda probe power supply;
- Fume of the oxygen sensor heating coil;
- Installing a different type of sensor.
Therefore, if the goal is to get rid of the annoying light on the dashboard that reminds you of a problem with the oxygen sensor after the catalyst, then you should start looking for the problem by checking the condition of the contacts and wiring of the sensor.
The ECU checks the oxygen sensor heater circuit upon first start-up and detects an open or short circuit or increased current consumption in the lambda probe heater circuit.
How can I fix error 0141
Methods to combat the problem are as follows:
- delete the stored fault codes from the control unit’s memory and carry out a road test to check (the error may have appeared only once);
- replace the oxygen sensor;
- repair or replace the sensor wiring or connector;
- Replace the fuse in the lambda probe heating circuit.
Additional recommendations
Error P0141 can only be caused by a malfunction in the heating circuit of the oxygen sensor 2 installed after the catalyst. This sensor and fault code are in no way related to the first lambda probe.
Oxygen sensors send information to the electronic engine control unit, which uses it to properly control the operation of the fuel injectors. If you disconnect one of these sensors or both lambda probes, the ECU will operate in emergency mode, which will lead to a significant increase in fuel consumption.
Note that errors related to oxygen sensors can sometimes be caused by malfunctions of other engine components. Therefore, do not rush to change the sensor immediately. Engine diagnostics must be carried out comprehensively. There are cases that the problem lies even in the failure of the control unit.
Source
Is it possible to drive with P0141?
Unlike the upper oxygen sensor, one of the main elements that ensures the normal functioning of the injection system, the lower one is an element of self-control, which only in the most environmentally “strangled” firmware actually affects the operation of the engine. In most cases, a detected malfunction of the lower sensor heating will have absolutely no effect on dynamics, consumption, or reliability.
However, it is better to immediately make sure that the sensor is faulty: operating a car with damaged wiring or water in the injection ECU connector is more dangerous.
P0141 is an OBD-II code indicating that the electronic engine control unit (ECU) has tested the oxygen sensor (lambda probe) heater circuit and detected a problem. In this case, we are talking about the heating circuit of the oxygen sensor installed after the catalyst (sensor 2).
What does P0141 mean?
Modern cars use two oxygen sensors (OS), located before and after the catalytic converter. The sensor upstream of the exhaust gases (DK 1) is located in front of the catalyst. It is used to determine the oxygen concentration in exhaust gases. This information is used by the control unit (ECU) to control the fuel-air mixture (FA) of the engine.
The sensor compares the amount of oxygen in the exhaust with the ambient air (the sensor has a hole for air from the atmosphere). It generates the corresponding voltage, which is transmitted to the controller. The control unit then controls the injector control pulse based on this value.
The downstream oxygen sensor (DC 2) is located downstream of the converter and is used to check the efficiency of the catalyst. This is achieved by checking the oxygen content of the exhaust after it leaves the catalyst. For this reason, DC 2s are known as catalytic oxygen sensors.
Modern cars use heated oxygen sensors (HO2S). These sensors contain a heating element that brings the sensor to operating temperature more quickly. This allows the ECU to use input signals faster to more accurately control fuel and reduce emissions.
The heater circuit is energized through a relay that closes when the engine starts. The ECU monitors the heater circuit and will turn on the Check Engine Light if it detects a problem.
Code P0141 corresponds to sensor 2 heater. This indicates that the ECU has detected a problem with the downstream oxygen sensor heater circuit.
Bank 1 refers to the side of the engine where cylinder number 1 is located. Bank 2 is on the opposite side of the engine. If you only have four cylinders, then there will only be one bank.
The related trouble code for the other engine block is P0161 - O2 Sensor Heater 2 Bank 2 Circuit Malfunction. This indicates that the ECU has detected a problem with the Bank 2 downstream oxygen sensor heater.
Technical description and interpretation of error P0135
This diagnostic trouble code (DTC) is a generic powertrain code. The P0135 code is considered a common code because it applies to all makes and models of vehicles. Although the specific repair steps may vary slightly depending on the model.
The malfunction means that the heated circuit in the oxygen sensor on bank 1 reduces the time required to enter the closed circuit. Sensor #1 will be the front sensor after the engine.
When the air heats up and reaches operating temperature. The oxygen sensor reacts by switching according to the oxygen content in the exhaust surrounding it. The ECM monitors how long it takes for the oxygen sensor to begin shifting.
It determines, based on the coolant temperature, how much time has passed since the sensor responded. If a lot of time has passed before the oxygen sensor starts working properly, a P0135 code will appear.
You can also look for a similar problem with code P0141 (Bank 1 Sensor 2).
How to troubleshoot P0141?
This code can only be caused by problems in the DC heater circuit or the sensor itself.
Typically, heated sensors have four wires - two of which go to the heater circuit, and two for powering and grounding the sensor. In this case, we are dealing only with a circuit with a heater.
Typical DC heater circuit and connectors:
Source: alldata.com
Find the wiring diagram for your vehicle to make sure you are testing the correct wires.
Check heater circuit wiring
Disconnect the O2 sensor connector. Check the voltage and ground of the heater. You can do this using a digital multimeter.
After reviewing the wiring diagram for your vehicle, determine which pin on the connector is power and which is ground. Set the multimeter switch to "Constant Voltage".
Touch the black lead of the multimeter to the housing and the other to the power lead on the connector. You will see a reading close to the battery voltage. If not, you have a problem with the DC power supply. It will be necessary to examine the electrical circuit on the power side to determine the cause of the circuit failure.
To test the ground wire circuit, connect the red lead of the multimeter to the positive terminal of the battery and the black lead to the ground on the connector. You should see a voltage of about 12 volts. If this is not the case, you need to look for the cause of the circuit malfunction using the wiring diagram on the ground side.
Checking the heating element
If everything is fine with power and grounding, you need to check the sensor heating element for high resistance or an open circuit. This can be done using a digital multimeter.
Set the device to resistance measurement mode (Ohms). Then connect the multimeter leads to both contacts of the heater circuit on the sensor connector side.
Look up the specifications for your oxygen sensors to see if the resistance value is within normal limits. Otherwise, the heating element inside the sensor has high resistance and the sensor should be replaced.
If during the test you measure infinity, then there is a break in the heating element. In this case also the sensor must be replaced.
How to Troubleshoot or Reset Trouble Code P0141
Some suggested steps to troubleshoot and fix error code P0141:
- Visually inspect the electrical wires and oxygen sensor 2 (bank 1) connector.
- Read all stored data and error codes using an OBD-II scanner. Clear your memory of error codes and take the car for a test drive. This will help determine if the P0141 code appears again.
- Review the oxygen sensor data to see if it is working.
- Measure the voltage at the oxygen sensor 2 heater circuit (bank 1).
- Measure the resistance in the oxygen sensor 2 (bank 1) heater circuit and compare the value to the manufacturer's specification.
- Find the fuse diagram and check the integrity of the corresponding fuse element.
Diagnosis and problem solving
Trouble code P0141 means that there is a problem with the heated oxygen sensor (lambda probe) heating element circuit. The control module monitors the time required to warm up the sensor. And it begins to send the corresponding signal.
The code is triggered when the sensor takes too long to heat up. Water entering the oxygen sensor connector may cause the lambda probe heater fuse to blow.
Before replacing the sensor, check the condition of the heated oxygen sensor fuse and connectors. If the fuses and connector are good, replacing the sensor (O₂ bank 1) usually solves the problem.
Codes related to P0141
- P0030 - DC heater control circuit, bank 1, sensor 1.
- P0036 - DC heater control circuit, bank 1, sensor 2.
- P0053 - DC heater resistance, bank 1, sensor 1.
- P0054 - DC heater resistance, bank 1, sensor 2.
- P0135 - DC heater performance, bank 1, sensor 1.
- P0141 - DC heater performance, bank 1, sensor 2.
- P0050 - DC heater control circuit, bank 2, sensor 1.
- P0056 - DC heater control circuit, bank 2, sensor 2.
- P0059 - DC heater resistance, bank 2, sensor 1.
- P0060 - DC heater resistance, bank 2, sensor 2.
- P0155 - DC heater performance, bank 2, sensor 1.
- P0161 - DC heater performance, bank 2, sensor 2.
What to do if error P0130 occurs
As you can understand from the description of the problem, there are not many factors that lead to error P0130. Accordingly, the driver or technician can get rid of the malfunction by performing the following algorithm of actions to determine the cause of the problem and eliminate it:
- The first step is to check the wires that supply the first lambda probe (installed before the catalyst);
- If power is supplied through the wires, carefully inspect the oxygen sensor connector for corrosion, damage, carbon deposits, contamination and other defects;
- Next, it is recommended to check the voltage between the lambda probe signal wire and ground. To do this, you need to connect the voltmeter probes to them. If the oxygen sensor is working properly, its voltage will be around 0.45 Volts (if the voltmeter shows a different number, it is recommended to check the voltage value for your specific car model, as it may differ);
- It is also recommended to use an ohmmeter to check the resistance of the oxygen sensor heater (two white wires). The resistance value will vary from 2 to 10 ohms, depending on the car model. The exact value can be found in the documentation for the sensor;
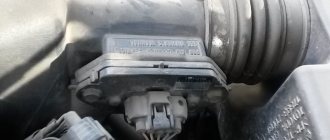
- If the problem is not related to the wiring and oxygen sensor, you need to check the mass air flow sensor and the tightness of the exhaust manifold; the gaskets may need to be replaced. Be sure to diagnose the presence of suction in the circuit after the flow meter.
After completing the necessary steps to eliminate the P0130 error, you should let the engine run for some time in various modes (especially those in which the Check Engine light came on) and reset the error.
Most often, error P0130 is diagnosed on Opel, Kia, Hyundai, Subaru and Ford vehicles.