Causes of error P0130
The most common causes of this error are:
- Disconnecting the oxygen sensor connector
- Corroded oxygen sensor connector
- Damage to the electrical wires coming from the oxygen sensor to the ECM
- Fuel supply limitation (fuel pump malfunction or fuel filter clogged)
- Air intake system leakage
- Air or fuel system leakage
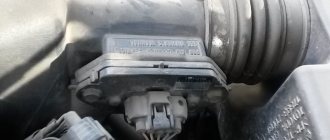
- Malfunction of the mass air flow sensor
- Malfunction of the absolute pressure sensor in the intake manifold
- Malfunction in the fuel vapor recovery system
- Oxygen sensor malfunction
- Fuel pressure regulator malfunction
- Engine control module (ECM) malfunction
Possible causes of error P0130
Error P0130 is not necessarily directly related to the performance of the lambda probe. On the contrary, the most common cause of malfunction is electrical wiring.
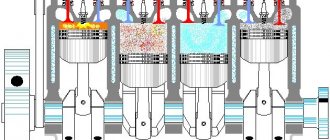
The O2 sensor is located in one of the hottest areas of the engine compartment, namely, immediately behind the exhaust manifold. The temperature in this place reaches 300 degrees Celsius or more. The nearby sensor connector gets quite hot. Its contacts can collapse, oxidize, and lose mechanical properties. In this case, the electrical contact may be broken, resulting in error P0130.
In second place in the likelihood of error P0130 occurring is a failure of the oxygen sensor. The working element of the lambda probe is a ceramic porous base coated with a thin film of an oxygen-sensitive element. Exhaust gases pass through micropores, heated to a high temperature during the ignition process. After 50,000 kilometers, the working coating begins to rapidly decrease in thickness, and the O2 sensor loses its sensitivity. When the signal amplitude decreases below 0.45 Volts, the sensor does not meet the necessary parameters, and the engine control unit generates error P0130.
Some sources contain information that error P0130 can be eliminated for a while by washing the O2 sensor in a special composition or solvent, removing traces of carbon deposits from the working element. In isolated cases this has an effect, but only for a short time.
Error P0130 from the sensor located in Bank 1 can be detected by the engine control unit based on an incorrect comparison of its readings with the signal from the lambda probe located behind the catalyst. This situation may occur if the catalyst was removed abnormally. In this case, the readings of the first and second oxygen sensors are approximately the same, and the engine control unit mistakenly thinks that something has happened to one of the lambda probes. In practice, this problem is artificially eliminated by installing an additional fitting on the 2nd oxygen sensor, a special electronic filter, an emulator, or by performing chip tuning. At first, such “hiding” the removal of the catalyst can work successfully, but then sooner or later error P0130 “treacherously appears.”
Finally, one of the least likely causes of the P0130 error is a failure of the engine control unit. Such malfunctions do occur, but are extremely rare. As a rule, the engine control unit has reliable protection for input circuits against overloads. If a firmware failure occurs, then along with error P0130 many other engine errors will be diagnosed.
How does a mechanic diagnose a P0130 code?
To properly diagnose the P0130 code, you will need an advanced diagnostic scanner that can not only read stored trouble codes, but also view readings from various sensors in real time.
First, the mechanic reads all the stored data and error codes using an OBD-II scanner to find out when and under what circumstances the P0130 code appeared. He will then clear the error codes from the computer's memory and test drive the vehicle to see if the P0130 code appears again.
If the error code appears again, the mechanic will continue diagnosing to determine the cause of the error. To do this he will need:
- Advanced diagnostic scanner
- Digital voltmeter
- Smoke installation for detecting leaks in the intake system
On what cars does it occur?
An error such as P0130 can occur on cars of various brands, models and generations.
There is no need to say that in some cars error P0130 is observed much more often than others. It can appear on almost any vehicle.
If we single out cars whose owners actively complain about a similar problem associated with low voltage in the oxygen sensor circuit located in front of the catalyst, then the list will look something like this:
- Hyundai Solaris.
- Renault Logan
- Skoda Octavia Tour.
- Opel Insignia.
- Renault Duster.
- Lada Priora
- Volkswagen Polo Sedan.
- Lada Kalina.
- Lada Largus.
- Chevrolet Niva.
- Hyundai Accent.
- Kia Rio, etc.
Replacing the lambda probe
Things are somewhat better for more elite brands such as Mercedes or Audi. But even in their case, error P0130 is not completely excluded.
It is difficult to say that the P0130 error appears on a Prior or Grant from AvtoVAZ much more often than on cars like the Skoda Octavia Tour or Hyundai Solaris. There are no corresponding statistics, and it is unlikely that there will be.
But regardless of which car the P0130 error occurred on, the solution will always be the same. This includes diagnostics and further elimination of detected faults.
Common mistakes when diagnosing code P0130
The most common mistake when diagnosing a P0130 code is to rush to replace the oxygen sensor without first checking it.
Before replacing the sensor, it is necessary to perform a thorough diagnosis using special equipment and consider all possible causes of the error.
Since there can be multiple causes for the P0130 code, replacing the sensor may not solve the problem and may cause the code to reappear.
Symptoms that appear
The P0130 error itself does not have characteristic symptoms that would allow us to immediately say that the problem in the engine is observed from the lambda probe. These are rather indirect signs by which you can guess to check the ECU, read the error and then understand the essence of the problem from it.
If there is a voltage problem in the oxygen sensor circuit, this will affect engine performance. Therefore, error P0130 almost never goes unnoticed.
If there is such a malfunction, you can notice it by the following signs:
- fuel consumption increases without changing the load and operating conditions, that is, fuel consumption is higher than before the error under similar conditions;
- the engine is unstable at high speeds;
- the car noticeably loses in dynamics;
- acceleration takes more time;
- actively pressing the gas pedal to the floor still does not give the expected jerk;
- The Check Engine light comes on on the dashboard.
What repairs can fix the P0130 code?
To resolve P0130, you may need to:
- Connecting the OBD-II scanner to the vehicle diagnostic connector
- Checking for an Error Code
- Analysis of data stored in the vehicle's ECM memory
- Clearing error codes from computer memory
- Test drive your vehicle to see if P0130 appears again
- Check and, if necessary, repair or replace electrical wires or oxygen sensor connector
- Checking and, if necessary, replacing the oxygen sensor
- Check and, if necessary, replace the engine control module (ECM)
Technical description and interpretation of error P0130
This diagnostic trouble code (DTC) is a generic powertrain code. The P0130 code is considered a common code because it applies to all makes and models of vehicles. Although the specific repair steps may vary slightly depending on the model.
DTC P0130 refers to the first oxygen (O₂) sensor located on Bank 1, upstream of the catalytic converter. It measures the amount of oxygen entering the exhaust gases.
There are four wires to the O₂ sensor. Two wires are for the heating element and two wires are for sensor data. The heating element should have battery voltage on one wire when the engine is off. And grounding on the other.
The PCM supplies a voltage of 0.5 volts to the O₂ sensor, which it varies depending on the oxygen content of the exhaust gases. The PCM also provides grounding for the sensor.
Changes in oxygen content cause changes in the resistance of the O₂ sensor. This change in resistance affects the 0.5 volt voltage supplied by the PCM. It can vary from 0.1 to 0.9 volts. A value of 0.1 indicates complete leanness and 0.9 indicates complete enrichment.
The meaning of this code is that the O₂ (oxygen sensor) voltage has been low for more than 2 minutes, or the sensor is not active at all. This is perceived by the Engine Control Module (ECM) as a malfunction and therefore sets the P0130 OBD2 error code.
Oxygen sensor malfunctions and error codes
Among the possible breakdowns of the lambda probe, the following can be distinguished: loss of sensitivity, non-functional heating. As a rule, the on-board computer will not show you a breakdown if the problem is loss of sensitivity. It’s another matter if the heating circuit breaks, then the malfunction will be recorded.
- Error P1115 - a breakdown has occurred in the heating circuit
- Error P1102 - low resistance on the oxygen heater
- Error P0141 - the heater has broken down on the second sensor
- Error P0140 - sensor number two has broken
- Error P0138 - the second sensor indicates an excessive signal level
- Error P0137 - the second sensor indicates a low signal level
- Error P0136 - there is a short circuit to ground of the second sensor
- Error P0135 - the heater on the first sensor has failed
- Error P0134 - the first sensor has no signal
- Error P0133 - the first sensor responds slowly to the request
- Error P0132 - there is little oxygen in the system, the signal is high at the first sensor
- Error P0131 - too much oxygen in the system, low signal at the first sensor
- Error P0130 - the first sensor sends incorrect signals
Troubleshooting
Using a scan tool or adapter, determine whether sensor 1 in cylinder block 1 is switching properly. It should switch between lean and rich conditions quickly, evenly.
Step 1
If so, the fault is probably intermittent. You should check the wiring for visible damage. Then wiggle the connector and wiring while observing the oxygen sensor voltage. If the signal changes, secure the appropriate part of the wiring harness to the location where the problem occurs.
Step 2
If the DC is not shifting properly, try to determine whether the sensor is showing the exhaust correctly or not. This can be done by briefly removing the vacuum supply from the fuel pressure regulator. The oxygen sensor should show a rich mixture in response to the addition of additional fuel.
Restore the fuel regulator to its previous condition. Then create a lean condition by disconnecting the vacuum line from the intake manifold. The oxygen sensor should show a lean mixture in response to the increase in air.
If the sensor is working properly, there may be nothing wrong with it, but the problem could be holes in the exhaust or an unaccounted for vacuum leak in the engine.
Unmeasured engine air leaks are almost always accompanied by lean error codes.
If there are holes in the exhaust, it is possible that the O2 sensor is misreading the exhaust due to excess oxygen flowing through them.
Step 3
Perhaps the DC simply does not switch or works slowly and sluggishly. Disconnect the sensor connector. Using a multimeter, make sure it is receiving 5 volts of reference voltage.
Next, check for 12 volts in the oxygen sensor heater circuit. Also check the continuity of the grounding circuit.
If any of these are missing or are not the correct voltage, repair the open or short in the appropriate wire. The lambda probe will not work properly without the proper voltage. If the voltages are OK, replace the oxygen sensor.
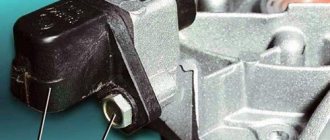
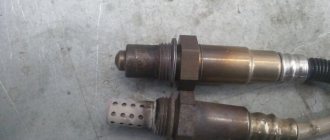
Replacing the oxygen sensor
If any damage occurs, the sensor must be replaced. You can try to do this yourself. Let's consider the situation of replacing a lambda probe on a VAZ 2114:
- We put the car on an overpass or drive it into a pit and remove the motor protection (to replace the sensor with the neutralizer).
- We are looking for the wires from the oxygen sensor, and follow them to the sensors themselves, they are located on the catalyst (the first before the converter, the second after).
On other car models, replacing the sensor will be identical.
Replacement problems
When replacing, the old sensor may stick to the pipe. In this case, proceed like this:
- Apply wd-40 generously and try to unscrew
- Turn on the engine, heat the exhaust system and unscrew the sensor
- We try to heat (being careful) the sensor itself and unscrew it
- Tap lightly with a hammer and try to unscrew it again
- If that doesn't help, try thermal shock. Pour cold water onto the well-heated sensor. Try unscrewing it again.
Oxygen sensor price
The price of an oxygen sensor will vary by region and model. It ranges from 1000 to 3000 rubles . Buy a lambda probe in specialized stores and only with a guarantee.
Causes of oxygen sensor failure
- Coolant or brake fluid has come into contact with the sensor housing.
- The fuel used has a high lead content
- Severe overheating of the sensor caused by unclean fuel (clogged cleaning filters)
- The sensor has simply expired
- Mechanical damage to the sensor while the vehicle is moving.
A failed sensor will affect the operation of the vehicle as a whole and lead to additional problems. But using them you can immediately determine a possible breakdown of the sensor and replace it in a timely manner.
Related problems when the oxygen sensor fails
- The car began to consume more fuel than usual
- The car began to move jerkily
- The engine became unstable
- The normal operation of the catalyst is disrupted
- When testing for exhaust gas toxicity, the result gives inflated values.
In conclusion, I would like to give advice: in order to avoid the problems outlined above in the future, monitor the performance of the lambda probe. Check its condition every five to ten thousand kilometers.
Causes of P0130
Usually the cause of P0130 is a bad DC, however this is not always the case. If your oxygen sensors haven't been replaced and they're old, there's a good chance the sensor is the problem. But it can be caused by any of the following factors:
- Water or corrosion in the connector.
- Loose terminals in the connector.
- Burnt wiring on exhaust parts.
- Open or short circuit in the wiring.
- Holes in the exhaust that allow unaccounted oxygen to enter the exhaust system.
- Air leak.
- Faulty oxygen sensor.
- ECU malfunction (rare).
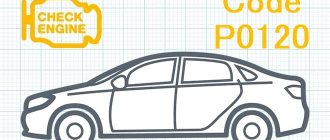
Error P0130 - Oxygen Sensor Circuit Low Voltage
When faced with error P0130 while diagnosing a car with a scanner, the driver has the opportunity to independently eliminate its cause without contacting a service center. In most cases, the cause of the error in question does not require special diagnostic equipment or special knowledge. The P0130 error itself indicates that there is a low voltage in the oxygen sensor circuit installed before the catalyst. This problem can occur when the sensor itself, wiring, or a number of other elements are faulty. Before carrying out repairs, you should thoroughly study the error.
What does this mean? Causes and Troubleshooting
Oxygen sensors are installed before and after the catalyst. Information from the front sensor is sent to the ECU to ensure the correct formation of the air-fuel mixture (a system with negative feedback is used). The second sensor (located behind the catalyst) is necessary to monitor the operation of the catalytic converter itself.
Error P0133 does not occur at the first sign of a malfunction. For example, on Kia and Hyundai cars, the sensor diagnostic time is 11 cycles. And the indicator light on the dashboard, indicating a malfunction (Check Engine), turns on only on the third drive cycle.
- the coolant temperature must be at least 75°C;
- the fuel supply control system, based on a feedback circuit from the oxygen sensor, is working properly;
- catalyst temperature exceeds 450°C;
- crankshaft rotation speed is in the range of 1440…2880 rpm;
- the load on the motor does not exceed 90%;
- oxygen sensor switching time exceeds 25 seconds;
- The ECU determines that the oxygen content in the exhaust gases is higher than normal.
A slow response of the oxygen sensor, that is, error P0133, can occur for a variety of reasons. Next we move on to their description.
Windows Update problems
“Windows Update” is a subsystem that is responsible for downloading, installing and uninstalling updates for the OS.
To open the troubleshooting wizard to fix Windows Update errors, you need to call the “Troubleshooting problems using Windows Update” option from the wizard’s main menu (how to access it is described above). Now you need to click “Next” and monitor the errors that the program detects.
It also happens that the Windows Update problem is resolved, but the unsuccessful update remains. In this case, you need to roll it back, and this is done in Windows 7 like this:
- Go to: “Start” - “Control Panel” - “Programs and Features”. In the window that opens, select the “View installed updates” button. In the “Programs and Features” menu, find the “View installed updates” button and click on it
- The window that opens shows a list of updates. To roll back what you don’t need, simply select it with the left mouse button and click the “Delete” button. To remove an update, select it from the list, highlight it and click on the “Delete” button
- When the removal is complete, restart your computer.
DETAILS: Carbon deposits on car spark plugs: causes of appearance
The built-in wizard is, of course, useful, but not ideal. It does not fully cope with cleaning the registry or fixing most bugs. Fortunately for the user, there are many third-party programs that can be used to fix bugs and keep your computer in working order.
FixWin 10
Despite its name, this free program is intended not only for Windows 10, but also for earlier versions of the OS, including Windows 7. The main window of the program has several tabs, and all errors specific to Windows 10 are placed in a separate one. the rest apply to all versions of Windows.
https://www..com/watch?v=xangyj9DRYU
To start automatic error correction, you need to go to the tab of interest and find the error for which you want to find a fix. Here you can see how to solve this problem manually.
If the troubleshooter doesn't work
The Troubleshooter is a system program, and if it doesn't work, something serious has happened. The failure may be due to update errors, unsuccessful changes to the system (this can be done, for example, by third-party programs), as well as hardware damage to the disk. And if nothing can be done about the latter, except replacing the hard drive, then the rest can be eliminated.
- First, try uninstalling the latest updates. How to do this is described in detail above.
- If uninstalling updates does not help, use Command Prompt. To do this, press Win R and type cmd in the Run window. To open Command Prompt, press Win R and in the Run window type cmd
- In the Command Prompt, type the following commands:
- net stop wuauserv;
- regsvr32%windir%system32wups2.dll;
- net start wuauserv.In the “Command Prompt”, enter the command and press Enter
- Restart your computer.
- If the troubleshooter still doesn't turn on, the problem is more serious. If you have backups (system backups that can be used to roll back the OS), now is the time to use them. To do this, go to “Start” - “Control Panel” - “Recovery” and select the “Run System Restore” option. The initial window of the utility prompts the user to select a backup - recommended or another
- The program itself will offer you the optimal backup copy for recovery. If you do not agree with it, select another backup from the list. From this list you can select any backup copy and roll back your Windows to it
- If you want to see exactly what will change in the system after the backup, click “Search for affected programs.” A window will open where you will see a list of changes. The program will show which programs and files will be changed after rolling back to the backup copy
- In the last window, click “Finish” and wait for the system to be rolled back to the state at the time of the backup. It will take some time. To start a system rollback to a backup, click “Finish” and wait a moment
- If you accidentally select the wrong restore point, the backup can be canceled in the same “Run System Restore” utility. To do this, open it and select the “Cancel system restore” option, and Windows will return to the state it was in before the backup. To cancel an unsuccessful system rollback, run the program again and select “Cancel system restore”
Debugg
In any case, troubleshooting begins with the wiring of the DC and its connector, then the voltage value of the sensor signal is checked. And depending on the technical characteristics of the lambda, changes in parameters should occur within appropriate limits. And if it is possible to see the operation using a diagnostic tool, then we warm up the engine to operating temperature, watch for voltage changes, no, we take a multimeter in our hands and, connecting the probes to the corresponding contacts of the sensor, check the serviceability of the input signal circuit (measure between the positive contact of the sensor and mass). Then, having disconnected the power supply, we check the voltage for a minute; jumps should occur in a certain range depending on the operation of the engine. If this does not happen or the value is outside the limits, the oxygen sensor is faulty and must be replaced.
After replacing the sensor (by the way, you should remember that not all cars can replace the original DC with a universal one), clear the error programmatically or by removing the battery terminal for 10 minutes and let the car run for several minutes at full and partial load to make sure the error is eliminated, so It’s quite rare, but it still happens that P0134 is not associated with a failure of the lambda probe or a break. Then an analysis of the operation of other electronic circuit systems is required.