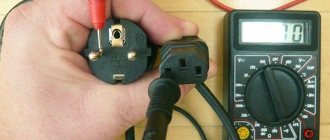
The question is how to check the air conditioner in a car often worries future car owners who have decided to purchase a used car, however, those who already drive a car with air conditioning may be wondering if the air in the cabin has suddenly stopped cooling properly.
Ideally, for this, it is advisable to contact a specialized car service center, since they have not only qualified craftsmen, but also the appropriate special equipment. However, you can also check the operation of the air conditioner in your car with your own hands. Thus, the verification process should consist of several stages - checking the immediate serviceability of the air conditioner, the condition of its compressor, compressor clutch, oil and freon levels, as well as tightness in the system.
How often to check your car's air conditioner
Checking the car air conditioner is carried out both routinely and in an emergency manner. In the first case, the level of freon and oil in the system is checked, as well as the degree of sealing. In accordance with the routine maintenance of most modern cars, the corresponding checks and refilling with freon must be performed:
- for cars under six years old - once every two years;
- for cars older than six years - once a year.
However, the question of how to check a car air conditioner is often of interest to people who buy a used car and do not know about the performance of the air conditioner, because the seller will always say that there are no problems, or they just need to refill the freon. But former car owners often make mistakes when using car air conditioning! Accordingly, a check is necessary if the owner gives one of the following answers:
- The air conditioner works, but you need to top up the freon (refrigerant);
- the air conditioner was charged last year, and it worked that season;
- freon was removed from the system for the winter;
- the compressor belt was removed, broke, the belt is old, and so on;
- there are mechanical damages, depressurization of the system (for example, a damaged radiator, cracks in pipes, etc.).
Please note that repairing a car air conditioner can cost about 500...1000 dollars. Accordingly, if the unit is even partially faulty, you can start talking about reducing the overall price of the car.
To check the car air conditioner yourself, you need to diagnose individual components of the air conditioning system. If an unpleasant odor appears when the air conditioner is turned on, it makes sense to clean it using special cleaners.
What to check
In practice, there is a list of typical components and parts of the air conditioning system that can theoretically fail, so they must be checked when signs of their malfunction appear. Let's list them in order:
- Condenser . This unit provides freon cooling. If it is partially damaged or contaminated, the corresponding cooling will be performed with low efficiency. This usually causes overheating and increased pressure in the air conditioning system.
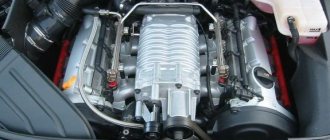
- Compressor . It provides operating pressure in the system. Usually its failure is caused by depressurization of the system, wear of gaskets, weakening of the drive belt tension, wear of oil seals, bearings, cracks in the housing and simple contamination.
- Evaporator . When it fails, an unpleasant odor appears in the cabin, and moisture may also appear in the air ducts. Typically, the causes of evaporator failure are corrosion of its body or a clogged drain pipe.
- Receiver . Its tasks include removing excess moisture from the conditioned air and cleaning it from wear particles. Failure of the receiver may be indicated by constant coating of hoses with condensate.
- Thermostatic expansion valve (TRV) . Its tasks include monitoring the refrigerant level, as well as adjusting the pressure in accordance with the amount of freon and the temperature. If the thermostatic valve fails, unstable operation of the air conditioner, periodic shutdowns, freezing of hoses, and uneven supply of cold air to the cabin are observed.
- Pressure meter . It is designed for emergency shutdown of the air conditioner in the event of a critical drop in the refrigerant level in the system.
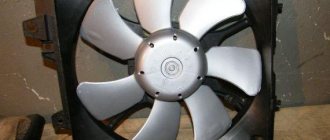
- Fan . Not all air conditioners are equipped with additional fans. They are designed for additional cooling of the refrigerant. Typically, a fan malfunction is caused by a failure of its bearing or a breakdown in the vehicle's electrical network.
Often, when diagnosing the condition of an air conditioner, they also check the tightness of the system and the presence of refrigerant leaks. It is better to do this in a car service center, but you can carry out a number of checks yourself.
Refueling based on pressure and overheating temperature
We would like to warn you right away that this method of adding freon is considered unreliable, although many refrigerators fill freon “by eye”, focusing only on pressure. The best and most correct charging method is to completely replace the refrigerant by draining the system and filling it by weight, as described in our manual.
In addition to the thermometer and gauge manifold, you will need:
Important point. Different types of refrigerants have different physical properties. There is no concept of interchangeability or compatibility of these liquids as such; only the gas indicated on the nameplate of the refrigeration unit will do. In household air conditioners, grades R22 and R410a are used, in cars - 134th freon.
First of all, make sure there are no leaks, otherwise you risk wasting time and effort. When refueling, follow the instructions:
Example. If previously the temperature of the gas main at a pressure of 5.4 Bar was +17 °C, the overheating reached 17 - 8 = 9 degrees (freon R22). This means that the tube needs to be cooled to + 14 °C in order to meet the standard.
The technology for refueling a split system based on overheating and pressure is described in detail in the video:
How to check the operation of the air conditioner
It is advisable to check the air conditioner in a car in conditions when the air temperature outside the car is +15°C and above, that is, in the summer. This will make his work feel better.
Please note that on some vehicles the warning light on the on/off button will be active (lit) even though the air conditioning itself will not be active.
The simplest test is to measure the temperature of the air coming out of the air conditioner. To do this, you need to use a thermometer, preferably an electronic one, since it is more convenient to work with, but also gives results faster.
So, the thermometer probe must be placed as deep as possible in the deflector, from where the cold air comes out. Next, you need to set the minimum temperature on the air conditioner, turn on the fan to maximum, and it is also advisable to turn on the recirculation mode. If the air conditioner is working properly, after a few minutes the thermometer should show a temperature of about +10°C. If lower is even better, it means the air conditioner is working, you just need to check the integrity and tightness of the line. If hot air is blowing from the air conditioner, then there are several options.
The first is that too little time has passed, so you still need to wait. Second, it’s very hot outside and inside the cabin, perhaps air is coming from outside. The third is a malfunction of the air conditioner, individual elements of the system, low freon level, etc. Additional diagnostics are needed.
It is advisable not to carry out the test at ambient temperatures below -10°C. The fact is that at low temperatures, the refrigerant pressure drops significantly, which can lead to incorrect test results. In extreme cases, you can strongly warm up the car with the heater on to such an extent that not only the interior, but also the “torpedo” warms up. This is done so that the evaporator sensor “understands” that the interior can be cooled. Accordingly, the air conditioning or climate control system can be started.
Some vehicles equipped with an outside temperature sensor may not be able to turn on the air conditioning system.
, if the temperature is lower than the set one (for example,
below +5°C
). In this case, it makes sense to enable the recirculation mode, in which the compressor is forced to turn on.
Checking system lines
If the air conditioner turns on and its compressor starts working, then it is necessary to check the temperature of individual parts of the system. In particular, you need to grab the metal part (not the rubber or plastic hose!!!) of the return line . Usually it is a thick pipe running from the passenger compartment to the compressor. Moreover, you need to grasp it with your whole palm in order to feel its temperature. Almost immediately (after 5...10 seconds) the metal at hand should suddenly become colder . If everything works fine, then it should feel as if there is an icicle in your hand.
Moreover, there will be cold in the main line only when the compressor is on. When it is turned off, the metal will heat up, but when turned on, it will cool again.
Similarly, you need to touch the pressure tube , in particular its metal part. It goes from the compressor to the radiator. If it is not very hot outside (about +20°C), then it will be very warm. If the ambient temperature is higher than the specified temperature, the tube will be very hot. Accordingly, if this is not the case, additional diagnostics are needed.
Next, you need to check by touch the thin tube that goes from the air conditioner radiator into the car interior. Depending on the ambient temperature, the temperature of said tube will also vary from lukewarm to quite hot. However, an indirect sign of a malfunction is its extremely high temperature - such that it is impossible to hold your hand on it. There may be several reasons for this - the fan is not working, the air conditioner radiator is very dirty, the system is overcharged with freon.
Please note that for cars equipped with an expansion tube (in particular, most American cars, some Audi, Volkswagen, Daewoo, Volvo and others) the last check is slightly different. The fact is that their receiver-dryer also works as an after-evaporator, designed to prevent liquid freon from entering the compressor. This unit is installed on the return line. The receiver is quite large, and when the air conditioner is running it also becomes cold. Accordingly, the aforementioned thin tube before entering the cabin also becomes cold.
Additional checks
There is always a risk that before selling, the previous owner hastily refilled the air conditioner and carried out a quick repair. Therefore, it is imperative to inspect all components of the system. In particular, tubes (pipes), clamps, receiver-dryer, radiator, compressor. It is important to look for oil stains, fogging, and oily dirt. If available, there is a high probability of leakage. This means that you need to perform an additional check for the tightness of the system.
Let's move on to diagnostics
So, we have identified the most important components of the system and are now starting independent diagnostics. Even if you have no previous experience of such work, it can be quite effective. We turn on the air conditioner and wait for the noise of the compressor. We touch the metal part of the return line with our hand. In 10-15 seconds you will feel your hand starting to freeze in the literal sense of the word.
Carefully touch the metal tube connecting the compressor to the radiator. As a rule, it is either warm or quite hot if the temperature outside exceeds at least 20°C
We check the condition of the thinnest line that leads to the radiator from the compressor. It is bad if it is very hot, because this is a sign of contamination of the system, either oversaturation with freon, or a broken fan.
If such actions do not lead to one of the described effects, you need to contact experienced car air conditioning technicians. In this case, you will have to measure the pressure in the system - it is possible that we are talking about a refrigerant leak or other, much more serious malfunctions.
In such cases, a careful inspection of the pipes with their attachment points, the receiver-dryer, the compressor, and the air conditioner radiator will help. If there are traces of fogging, oil drips, or traces of dirt, then you should be wary of freon leaking from the system.
How to check the compressor clutch
The simplest test for an electromagnetic (old) type compressor clutch consists of the following steps.
- Turn on the air conditioner. This is usually done using the dedicated button on the driver's control panel. In this case, a special indicator should be activated. As a rule, this is a warning light either on the button itself or on the dashboard.
- When the air conditioner is turned on, in addition to the mentioned indicator, a soft click should be heard from under the hood, indicating that the air conditioner clutch has connected to its shaft.
On most Japanese, as well as many European and American cars, the air conditioner radiator fan is also forced to turn on at the same time. Often the sound of the coupling being connected is not heard in the cabin, so additional diagnostics of the coupling must be carried out.
When the compressor is turned off, only its pulley rotates, and the pressure plate is in its seat. When the air conditioner is turned on, the plate is magnetized to the pulley , which ensures its operation. There are two ways to check the operation of the clutch.
Power-on check
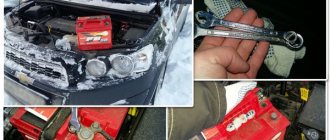
To carry out such a check of the performance of the car air conditioner, you need to start the engine and open the hood. After that, just turn on the air conditioner. It is advisable to carry out the check together. One person turns on the air conditioner, and the second is near the open hood and listens for the clicking sound mentioned above. On some cars you can simply see the clutch. In particular, not the clutch itself, but the part that the belt rotates. Accordingly, if there is a click - good, if not - it is necessary to additionally check the performance of the coupling.
To examine the compressor under the hood, it is advisable to take a flashlight with you for inspection.
Please note that for some German cars this check is not relevant due to their design features. In particular, this applies to Mercedes A-class, Mercedes cars of 220 different classes, BMW E60, E65, E87, as well as Audi cars manufactured before 2003. The absence of the mentioned click in these machines is due to the fact that their pressure plate rotates constantly , and the air conditioner (clutch) is turned on inside its structure.
Checking with the engine off
A similar check of the clutch can be performed with the engine turned off. For example, this is advisable if the engine is very noisy and the sound of the clutch is quite weak. The check must be performed using the following algorithm:
- turn off the engine;
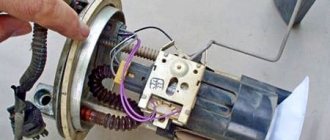
- disconnect the plug from the compressor, thereby de-energizing it;
- using an additional wire, connect the positive terminal of the battery to the positive connector on the compressor (you also need to find out which one is positive);
- If the coupling is working properly, then at the moment of the described connection it should move, emitting the soft clicks described above.
How to check a car's air conditioning compressor
On many new cars, instead of electromagnetic type compressors, constant rotation compressors (the so-called new type) are installed. They usually have a plastic pulley (this was done on purpose so that when jammed, it is the plastic that breaks and the drive belt does not fly off the roller), which is permanently connected to the compressor shaft. There is a rubber damper inside the pulley. When the engine starts, the compressor immediately starts working.
A common failure of permanent compressors is the jamming of their drive shafts. There can be many reasons for this, for example, overheating (including overheating/clogging of the air conditioner radiator), debris or small metal particles and similar debris getting inside.
In this case, the check can be performed only by one method - dismantling the unit and completely disassembling it. Repairing such a compressor is often quite complicated and sometimes impossible. Therefore, in order to prevent the compressor from jamming, it is advisable to monitor the normal condition of the car’s air conditioning system and its individual parts.
Air conditioning system design
To carry out independent diagnostics, the car owner must understand the general principle of operation of the air conditioner, what parts it consists of and where they are located. The system includes the following elements:
- An external heat exchanger (technical name is a condenser) installed in front of or next to the engine cooling radiator.
- Internal heat exchanger (evaporator). Hidden under the front panel of the car.
- A compressor with an electromagnetic clutch stands near the engine and is connected to it by a belt drive.
- Tube-shaped lines connecting both heat exchangers. A special substance moves through them - refrigerant (freon).
- Thermostatic valve (TRV). Most often it is located under the dashboard.
- The receiver is a dehumidifier in the form of a vertical tank. Installed in the engine compartment near the condenser.
Checking the car air conditioner for leaks
You can check the car air conditioner yourself for leaks not only when purchasing a car, but also if signs indicating this malfunction occur. A leak can be judged by the following signs:
- decreased air conditioning performance (the unit does not cool the air in the cabin enough);
- freezing of the external walls of the air conditioning system lines;
- the appearance of oil stains on the pipes of the air conditioning system.
If the level of freon in the system is critically low, it will be impossible to turn on the air conditioner, since the system will automatically turn it off based on data from the corresponding sensor.
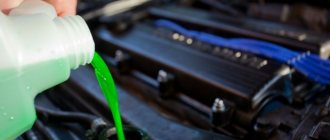
How to check freon in a car air conditioner
The first step is to check the presence of refrigerant in the car air conditioner visually. The easiest method for monitoring the freon level in your air conditioner is to simply use the sight glass on the top of the receiver-dryer. It is specifically designed for visual monitoring of the presence and level of refrigerant.
In some cases, this peephole is simply covered with dirt and/or dust. Accordingly, it needs to be wiped with a rag.
To check freon, you need to start the engine and turn on the air conditioning at full power. After this, through the peephole mentioned above, you need to look at the condition of the freon. One of the situations described below is possible.
- Bubbles appear in the liquid , which disappear after a short time. Conclusion - the amount of freon is sufficient for normal operation of the air conditioner.
- Bubbles in the liquid initially appear in large quantities, but then they become smaller, but they DO NOT disappear completely. This means that freon is at a critically low level . Refueling required.
- Liquid freon has a milky white color, and there are always bubbles on its surface. Freon level is below the permissible norm . The air conditioner cannot be used until the system is charged with freon.
Along with refilling with freon, it is also advisable to check the system for leaks in order to prevent refrigerant leakage in the future.
Checking the car air conditioner with nitrogen
Visual monitoring of the freon level is a very conditional method. This is due to the fact that modern R134A freon, when mixed with synthetic compressor oil, does not leave any oil traces. Therefore, for diagnostics it is better to use special equipment and measure the gas pressure in the air conditioning system.
Leak points are usually the junctions of various elements of the air conditioning system. However, leaks are also possible through the walls of rubber hoses or the compressor seal (if they are mechanically damaged or simply due to old age, when the rubber loses its elasticity).
The test is carried out in a system under pressure, the value of which must be at least 3.5 atmospheres. If there is little freon in the system, then it must be completely removed, and the test must be carried out with nitrogen (the full name of the gas is OFN, oxygen freenitrogen - nitrogen without oxygen). This nitrogen leak test is carried out only at service stations. Using this method, you need to check the following places in the air conditioning system:
- all tubes and connections;
- compressor shaft;
- compressor service valves and gaskets;
- condenser and evaporator tubes;
- receiver/dryer connections;
- Pressure Sensors;
- paired spring lock connections;
- hoses.
Before checking, you must prepare a soap solution. To do this, it is better to use bar soap and “soft” water (without significant impurities of metal salts). The solution should have such a consistency that soap bubbles easily form on the surface of the water. The test algorithm using nitrogen is as follows:
- If there is freon in the system, it must be removed.
- The OFN cylinder must be connected to a special service connector for the air conditioning system in the car.
- Open the valve on the cylinder and set the pressure in the system in the range of 10...15 atmospheres, then close the valve.
- Using a brush or rag, apply the soap solution to the suspected leaks listed above. If nitrogen comes out of the system under pressure, this will be clearly visible from soap bubbles forming on the surface of the part. Accordingly, the larger and more intense the bubbles form, the more significant the leak in this area.
- After testing is completed, all nitrogen from the system must be removed.
During operation, the maximum permissible pressure must not be exceeded (be sure to use a pressure gauge and pressure regulator). In addition, you should not turn on the air conditioner while there is nitrogen in the system.
Self-testing with nitrogen in a garage hardly makes sense, since additional equipment is quite expensive. Accordingly, it is better to contact a specialized car service center for such testing. As of the summer of 2022, the price of such a procedure is in the region of 800...1200 rubles, depending on the service itself, the equipment used, as well as the type of air conditioner (volume of nitrogen used).
Checking for leaks using an electronic leak detector
Leak detector - designed to find even the smallest leaks. The device is quite specific and expensive, therefore, they are used mainly by professional technicians in car repair shops. The algorithm for using a leak detector is as follows:
- The test must be carried out in a closed room, without drafts, and it is advisable to ventilate this room first.
- The air conditioning system must be charged with freon, even partially.
- The leak detector has a special test sensor, which must be brought to the sites of suspected refrigerant leaks.
- The check must be performed from the top to the bottom, since freon is heavier than air, and accordingly, its bulk is located at the bottom.
- When a significant concentration of freon is detected in the air, the test device emits a sound signal. Depending on the model and settings, the audible and/or light alarm will vary depending on the concentration of gas detected.
- If a freon leak cannot be detected with the air conditioner turned off (especially when the system is partially charged with refrigerant), then you can turn on the unit in order to increase the pressure in the system. After this, repeat testing using a leak detector.
Leak test with ultraviolet lamp
To use an ultraviolet lamp to check the air conditioning system for leaks, you must first add a special dye with fluorescent properties to the newly refilled freon. It is sold separately in auto stores. It must be added to the low pressure line in accordance with the instructions included with the packaging.
Accordingly, when freon tinted in this way leaks, it is clearly visible under the influence of an ultraviolet lamp (usually it has a purple, red or green tint). This test method is simple and inexpensive, so all car owners can be advised to add the appropriate dye to it when refilling new freon. And then, by literally illuminating the joints of the tubes with an ultraviolet flashlight, you can see where the leak is.
Service Issues
Maintenance of your car refrigerator should not be neglected either. At the same time, some owners noticed an unpleasant odor in the cabin, while others observed obvious overheating. There is nothing to be surprised about, because this is clear evidence that the inspection has not been carried out for a long time.
What exactly is the service? First of all, you need to regularly clean the condenser located in front of a traditional radiator. As a rule, after each summer season, poplar fluff, adhered insects and other contaminants are discovered. This causes the honeycomb to become clogged and the air conditioner will no longer work properly.
You can clean it with water pressure, but you should act carefully so as not to bend the honeycomb, otherwise you will have to buy a new condenser. It is also acceptable to use special radiator detergents. Then rinse everything well with water and blow with a fan.
Another unpleasant moment is the presence of fungus or dirt on the evaporator, which leads to the appearance of an unpleasant odor. There are several ways out here:
- Try to get to the evaporator and rinse it thoroughly. Unscrewing its element is strictly contraindicated!
- Use special detergents for the internal parts of the car air conditioner. It is not necessary to disassemble the front panel; it is enough to use an extension cord that is used to apply them to the evaporator. After some time, the product is washed off when the air conditioner starts working. This simplifies the cleaning process.
There are situations when at first glance it is clear that the entire system is working properly, but nevertheless it does not work correctly. And if the problem is the lack of refrigerant, then the problem can only be solved by contacting a specialized car service center. It is impossible to charge the device with freon without the necessary equipment.
Only specialists will be able to diagnose at a high level and, if necessary, carry out all the necessary operations.
How to check the oil in a car air conditioner
The oil level in the air conditioning system is critically important, since it ensures not only its normal operation, but also the performance and long-term operation of its individual elements. While the air conditioner is on, oil constantly circulates through the system, lubricating the moving parts inside the compressor and other system elements. However, after turning off the air conditioner, some oil still remains in the compressor. It is this level that can be checked. You can do this as follows:
- let the air conditioner run for about 20 minutes in cooling mode;
- It is necessary to check the oil level in the compressor through the inspection window.
The oil level in the car air conditioner must be above the minimum mark (usually indicated by a dash and the inscription MIN), but above approximately one-eighth of the lower level of the inspection window. Accordingly, there should not be very much oil (no more than the maximum mark). If necessary, oil must be added to the system.
Pay attention to the condition of the oil. First of all, whether it foams. If there are bubbles on the surface, then there is a high probability that freon has entered it. Accordingly, it is necessary to look for the location of the refrigerant leak, and subsequently completely replace the oil with a new composition.
Ordering procedures:
- removing refrigerant from the system;
- Carrying out diagnostics for refrigerant leaks, creating a vacuum in the system and removing moisture, air and various impurities from it;
- adding refrigeration lubricating oil and additives to the system;
- refilling the car air conditioning system circuit;
- air conditioning operating pressure test.
The car air conditioner is refilled in the amount of refrigerant and oil recommended by the vehicle manufacturers. An “undercharged” system causes oil starvation of the compressor, poor cooling and failure of the entire system. In an overcharged system, pressure increases, which also leads to insufficient cooling and the air conditioner turning off.
How to check air conditioning pressure in a car
To check the pressure in the car's air conditioning system, you must use a special pressure gauge (pressure gauge) or stand. In particular, you need to check the pressure with a pressure gauge while the air conditioner is running.
The location and method of connection depends on the design of the specific vehicle. Typically, the lines have special service plugs for connecting a pressure gauge station. It is to them that the pressure gauge adapter needs to be connected.
During the measurement process, it is important to know that during normal operation of the air conditioner, the pressure in the suction line (low pressure) should be around 2 bar, and in the discharge line (high pressure) - 9...12 bar. If the pressure is less, then it is necessary to check the operation of the compressor.
Checking the car air conditioner sensor
The main task of a car air conditioner pressure sensor is to monitor the pressure value in the corresponding system. When the critical limit is exceeded, the sensor sends a signal to the control element with information that it is necessary to turn off the fan, and the pressure pump (compressor) is turned off.
Both the sensor itself is checked (visual inspection for mechanical damage) and its electrical and signal circuits. The sensor circuit in most vehicles is fail-safe, meaning that when the sensor circuit is open, the ECM forces the engine fan to turn on.
Checking Circuit Resistance
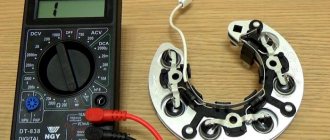
Before performing the test, you must find out the location of the pressure sensor in the air conditioning system. Depending on the make and model of your vehicle, the appropriate location may vary. The further algorithm for checking the electrical circuit will be as follows:
- disconnect the electrical terminals from the sensor;
- set the electrical tester to resistance measurement mode in the range in which it is possible to measure resistance from 100 kOhm and above;
- Use the tester probes to touch the sensor terminals in pairs;
- at high pressure in the air conditioning system, the resistance value of the pressure sensor circuit must be at least 100 kOhm, with the circuit open;
- if the circuit is not open (resistance is less than or equal to zero), then the sensor is faulty and needs to be replaced;
- if the pressure in the air conditioning system is low, then the same resistance value should not exceed 10 Ohms, that is, the circuit is closed;
- if the circuit is not closed, it means that the air conditioner pressure sensor has failed.
If the circuit measurements show that the sensor is working, it is necessary to perform an additional check for the presence of a short circuit in its circuit.
Checking for a short circuit in the sensor
The corresponding check algorithm will be as follows:
- if the pressure in the air conditioning system is low, it is necessary to touch one of the sensor terminals with one tester probe, and the “ground” (housing) with the other;
- if the sensor is working, then the corresponding resistance value will be at least 100 kOhm (that is, the circuit is open);
- if the circuit is closed, it means the sensor is faulty.
The air conditioning system pressure sensor cannot be repaired and only needs to be replaced with a similar device.
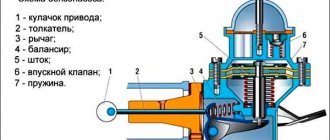
How to check the expansion valve of a car air conditioner
The thermostatic valve (or abbreviated as TRV) is designed to ensure the coordinated operation of individual elements of the air conditioning system - connecting pipeline, radiator, compressor, expansion device and evaporator. In an air conditioner, the expansion valve acts as a narrowing pipeline channel, ensuring a decrease in the temperature of the working gas. That is, it regulates the flow of freon, maintaining overheating.
The thermostatic valve is a fairly simple device. Therefore, the main malfunction characteristic of it is jamming of the valve needle. Because of this, the required balance of pressures in the low and high pressure circuits of the air conditioning system may not be maintained. That is, to check it is enough to find out the pressure in the circuits.
Jamming can be caused by valve failure (for example, due to old age or simply due to mechanical failure) or incorrect selection. In any case, the valve cannot be repaired and must be replaced with a new one.