The internal combustion engine structurally has a large number of associated parts, which experience significant loads during operation of the internal combustion engine. For this reason, assembling a motor is a responsible and complex operation, for the successful implementation of which the technological process must be followed. The performance of the entire power unit directly depends on the reliability of fixation and the accuracy of fit of individual elements. For this reason, an important point is the accurate implementation of the calculated interfaces between mating surfaces or friction pairs. In the first case, we are talking about attaching the cylinder head to the cylinder block, since the cylinder head bolts must be pulled with a strictly defined force and in a clearly designated sequence.
We also recommend reading the article on how to tighten cylinder head bolts. From this article you will learn about the cylinder head tightening torque, the tightening sequence, as well as various nuances during this operation.
As for loaded rubbing pairs, increased demands are placed on the fixation of connecting rod and main plain bearings (main and connecting rod bearings). After engine repair, during the subsequent assembly of the power unit, it is very important to maintain the correct tightening torque of the main and connecting rod bearings of the engine. In this article we will look at why it is necessary to tighten the bearings with a strictly defined force, and also answer the question of what is the tightening torque for the main and connecting rod bearings.
What are plain bearings
To better understand why engine bearings need to be tightened to a certain torque, let's take a look at the functions and purpose of these elements. Let's start with the fact that these sliding bearings interact with one of the most important parts of any internal combustion engine - the crankshaft. In short, the reciprocating motion of the piston in the cylinder is converted into rotational motion precisely thanks to the connecting rods and crankshaft. As a result, torque appears, which is ultimately transmitted to the wheels of the car.
The crankshaft rotates constantly, has a complex shape, experiences significant loads and is an expensive part. To maximize the service life of the element, connecting rod and main bearings are used in the crankshaft design. Taking into account the fact that the crankshaft rotates, as well as a number of other features, conditions are created for this part that minimize wear.
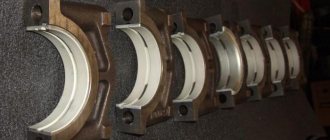
In other words, the engineers abandoned the decision to install conventional ball or roller bearings in this case, replacing them with main and connecting rod bearings. Main bearings are used for the crankshaft journals. The connecting rod bearings are installed at the junction of the connecting rod with the crankshaft journal. Often, main and connecting rod bearings are made according to the same principle and differ only in the inner diameter.
For the manufacture of liners, softer materials are used compared to those from which the crankshaft itself is made. The liners are also additionally coated with an anti-friction layer. Lubricant (motor oil) is supplied under pressure to the place where the liner is connected to the crankshaft journal. The specified pressure is provided by the oil pump of the engine lubrication system. In this case, it is especially important that there is the required clearance between the crankshaft journal and the plain bearing. The quality of lubrication of the rubbing pair, as well as the engine oil pressure in the engine lubrication system, will depend on the size of the gap. If the gap is increased, then the lubricant pressure decreases. As a result, rapid wear of the crankshaft journals occurs, and other loaded components in the internal combustion engine also suffer. In parallel with this, a knock appears in the engine.
We add that a low oil pressure indicator (in the absence of other reasons) is a sign that the crankshaft needs to be ground, and the engine liners themselves need to be changed taking into account the repair size. For repair liners, an increase in thickness of 0.25 mm is provided. As a rule, there are 4 repair sizes. This means that the diameter of the repair liner in the last size will be 1 mm higher. less compared to standard.
We also recommend reading the article about when and why you need to bore the crankshaft. From this article you will learn about what engine crankshaft grinding is, why this procedure is necessary and how it is performed.
The plain bearings themselves consist of two halves, in which special locks are made for proper installation. The main task is to create a gap between the shaft journal and the liner, which is recommended by the engine manufacturer.
As a rule, a micrometer is used to measure the journal; the inner diameter of the connecting rod bearings is measured with a bore gauge after assembly on the connecting rod. You can also use control strips of paper for measurements, use copper foil or control plastic wire. The gap at the minimum mark for rubbing pairs should be 0.025 mm. An increase in the gap to 0.08 mm is a reason to bore the crankshaft to the next repair size
Note that in some cases the liners are simply replaced with new ones without boring the crankshaft journals. In other words, it is possible to get by only by replacing the liners and obtaining the desired gap without grinding. Please note that experienced specialists do not recommend this type of repair. The fact is that the service life of the parts at the mating point is greatly reduced, even taking into account that the gap in the rubbing pair corresponds to the norm. The reason is considered to be microdefects that still remain on the surface of the shaft journal if grinding is not performed.
Video.
The internal combustion engine structurally has a large number of associated parts, which experience significant loads during operation of the internal combustion engine. For this reason, assembling a motor is a responsible and complex operation, for the successful implementation of which the technological process must be followed. The performance of the entire power unit directly depends on the reliability of fixation and the accuracy of fit of individual elements. For this reason, an important point is the accurate implementation of the calculated interfaces between mating surfaces or friction pairs. In the first case, we are talking about attaching the cylinder head to the cylinder block, since the cylinder head bolts must be pulled with a strictly defined force and in a clearly designated sequence.
As for loaded rubbing pairs, increased demands are placed on the fixation of connecting rod and main plain bearings (main and connecting rod bearings). After engine repair, during the subsequent assembly of the power unit, it is very important to maintain the correct tightening torque of the main and connecting rod bearings of the engine. In this article we will look at why it is necessary to tighten the bearings with a strictly defined force, and also answer the question of what is the tightening torque for the main and connecting rod bearings.
Read in this article
How to tighten main bearings and connecting rod bearings
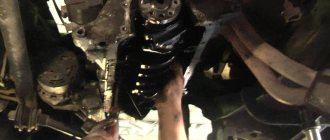
So, taking into account the above, it becomes clear that the tightening torque of the main and connecting rod bearings is extremely important. Now let's move on to the assembly process itself.
- First of all, molar liners are installed in the bed of the molar necks. Please note that the middle liner is different from the others. Before installing the bearings, the preservative lubricant is removed, after which a little motor oil is applied to the surface. After this, the bed covers are placed, after which the tightening is carried out. The tightening torque should be that recommended for the specific model of the power unit. For example, for engines on the VAZ 2108 model, this figure can be from 68 to 84 Nm.
- Next, the connecting rod bearings are installed. During assembly, it is necessary to accurately install the covers in place. The specified covers are marked, that is, their arbitrary installation is not allowed. The tightening torque of the connecting rod bearings is slightly less compared to the main bearings (the indicator ranges from 43 to 53 Nm). For Lada Priora, the main bearings are tightened with a torque of 68.31-84.38, and the connecting rod bearings have a tightening torque of 43.3-53.5.
It should be separately added that the specified tightening torque assumes the use of new parts. If we are talking about an assembly that uses used spare parts, then the presence of wear or other possible defects may lead to a deviation from the recommended standard. In this case, when tightening the bolts, you can start from the upper bar of the recommended torque, which is indicated in the technical manual.
Transmission
- Reversing light switch M14x1.5 28.4-45.1 (2.9-4.6)
- Bolt securing the clutch housing to the engine M12×1.25 53.9-87.2 (5.5-8.9)
- Nut securing the clutch housing to the gearbox M10×1.25 31.8-51.4 (3.25-5.25)
- Nut securing the clutch housing to the gearbox M8 15.7-25.5(1.6-2.6)
- Rod clamp cover bolt M8 15.7-25.5(1.6-2.6)
- Rear cover mounting nut M8 15.7-25.5(1.6-2.6)
- Nut of the rear end of the secondary shaft M20x1.0 66.6-82.3 (6.8-8.4)
- Intermediate shaft bearing clamping washer bolt M12×1.25 79.4-98.0 (8.1-10.0)
- Bolt securing the fork to the gearshift rod MB 11.7-18.6(1.2-1.9)
Signs and causes of cylinder head gasket failure on a VAZ 2114
- A foam-like emulsion is visible on the oil level dipstick. This indicates a failure of the cylinder head gasket or a crack in the block itself. Liquid from the cooling system enters the oil channels and, during engine operation, is whipped into an emulsion, which is observed on the dipstick.
- Drives antifreeze into the expansion tank. The cause most often may be a burnt-out cylinder head gasket. A similar problem may arise due to an air lock in the cooling system; therefore, the heater in the cabin may also not work or the thermostat may not work correctly, provided that the fluid level is normal.
- The exhaust pipe emits a lot of white smoke. This indicates that, most likely, the cylinder head gasket has ruptured; through the resulting gap, coolant enters the cylinder head.
- Oil stains and stains on the surface of the coolant in the expansion tank. This was probably due to a cylinder block gasket rupture and oil leaking into the cooling system channel.
- Increased engine temperature. This occurs due to a breakdown of the combustion chamber edging. Burning gases enter the cooling system and quickly heat up the antifreeze.
To replace the cylinder head gasket we will need:
- torque wrench;
- keys “13”, “17”, “19”;
- socket heads “10”, “13”, “17”, “Torx”;
- screwdriver;
- head for unscrewing spark plugs;
- new cylinder head gasket VAZ 21083100302010 or its equivalent ELRING 463915.
The price of a cylinder head gasket for a VAZ 2114 is about 200 rubles. Relevant for the spring of 2017 for Moscow and the region.
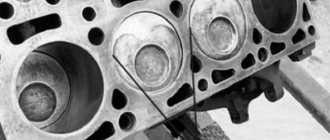
Cylinder head tightening torque
This parameter is always standard and does not depend on the engine type. Any head is tightened using two rows of screws. The screws are located parallel to the combustion chambers. The order of the holes in this case is from the first to the last cylinder.
The correct order for tightening the screws is as follows:
- Two bolted connections located in the center of the right and left rows. For example, in four-cylinder engines they are located between the second and third cylinders
- Next are two screw connections, which are located to the left of the central ones (one in each row)
- Two located on the right side of the central ones (similarly, one in each row)
- Two bolted connections that are located on the left side in both rows
- Two bolted connections in each of the two rows, but located on the right
The tightening torque is no more than 1 kgf.m.
Tightening process and diagram (on a 16 valve car)
16 valve engine of the VAZ 2112 car
But while you have not yet begun the procedure for tightening the cylinder head pins, you need to emphasize that each engine has its own torque and tightening pattern. As you might have guessed, this point will be different for each vehicle. In addition, several factors directly influence the torque indicator, and if you decide to engage in this process yourself, then it will be useful for you to learn about them:
- The tightening torque of the head is affected by the lubrication of the holes for the pins, as well as their condition, and, of course, the quality of the bolts themselves. In order for the torque to be set correctly, both the pins and the holes for them must be lubricated, and regular motor oil will do for this.
- If the thread of the hole or the pin itself is deformed, then it is better to refrain from the tensioning procedure. One way or another, over time this will lead to negative consequences.
Have you ever tightened cylinder head bolts?
Survey
- Yes
- No
Loading …
Required Tools
And, although this procedure requires a certain approach, its preparation will not take much time. The bottom line is that a large set of tools is not required directly to tighten the head pins. The only thing you need is some motor fluid and a special torque wrench.
Torque wrench for work on a 16-valve engine
If you do not have such a key, then you need to buy it in advance or borrow it from a car service center. You need just such a tool, since it allows you to determine exactly the tension moment. Currently, a more budget version of this tool costs about 200-250 hryvnia (600-800 rubles).
Stages
If you removed the head of the 16-valve VAZ 2112 engine, then first of all you need to install it in place.
- Before the actual process of tightening the head pins of a 16-valve engine, their length should be measured. The standard screw length is 135.5 mm. Be sure to check it out. If the length of the pin differs from the above, that is, either more or less, then the pin must be replaced with a new one.
- Take engine fluid and apply it to the bolt threads. This can be done using a brush.
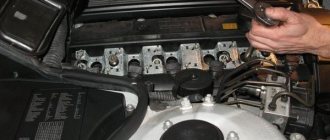
- After this, you can begin installing screws on the 16-valve engine. Tighten them by hand first, then use a torque wrench. The tension torque should be 20 Nm + (69.4 - 85.7 Nm) + 90°+ 90°. That is, tighten the pins, observing the indicators 20 Nm + (69.4 - 85.7 Nm) in accordance with the data on the torque wrench, then turn each screw twice by 90 degrees. As for the tightening order, it is as follows. First you need to tighten the two middle pins starting with the bottom one. Then tighten the two screws on either side of the bottom pin in order. After this, the screws located on the sides of the upper middle pin are tightened. And then, in order, you need to tighten the bolts located at the corners of the cylinder head. The tightening torque procedure is shown in more detail in the photo.
1. After installing the cylinder head in place, lubricate the threaded part of the screws with engine oil.
2. Then, using a torque wrench, you need to tighten all the cylinder head bolts...
3...while observing the order of the bolt tension.
Remember that this component of the VAZ 2112 vehicle is one of the main mechanisms that determine the operation of the engine. Therefore, this issue of repairing the cylinder block should be approached with special care. If you do not have experience in carrying out such work, then it is better to entrust the matter to a qualified professional. After all, very often inexperienced motorists try to save money on repairs, which ultimately leads to even more disastrous consequences.
For example, if the screws are not tightened, this can lead to engine oil leakage and, as a result, condensation. And the appearance of moisture in the internal combustion engine will not lead to anything good. If the screws are overtightened, this may cause cracks to appear, which will necessitate repair of the unit.
When is cylinder head broaching necessary?
How to tighten the cylinder head correctly and with what force
Maybe not all car enthusiasts know, but modern cars do not need preventative tightening of the cylinder head.
Previously, pulling the cylinder head was a mandatory item during the first maintenance, but then the situation changed. Even relatively modern VAZ engines. Broaching the cylinder head is mainly required today for older models of VAZ, UAZ, Moskvich, etc. engines.
The main reason that prompts a car owner to think about the need to tighten the cylinder head is “wet” at the junction of the head and the block. This indicates an existing oil leak.
There may be several reasons. The most traditional: failure, warping of the cylinder head as a result of engine overheating unnoticed by you, or initially incorrectly tightened cylinder head bolts. If you had a capital repair done at a car service center.
In what cases is tightening needed?
Most domestic drivers do not understand for what purpose this procedure needs to be performed, what order must be followed and what the tightening torque should be. However, every driver should know that incorrect actions during this process can damage the cylinder block. Accordingly, this procedure should be treated with all care and responsibility.
Just a few years ago, vehicle manufacturers were required to tighten the cylinder head bolts during the first maintenance of the vehicle. But now this need has disappeared and now it falls entirely on the shoulders of the drivers. If you are the owner of a VAZ 2108, then this procedure should be carried out from time to time. In what cases is it needed:
- If an oil stain appears in the place where the cylinder head connects to the block itself. This indicates a leakage of consumable fluid, which can be a consequence of both wear of the gasket itself and loosening of the pins.
- If you have done engine repairs. Sometimes even qualified specialists can make such mistakes. Therefore, the owner of a VAZ 2108 may find this information useful.
- For verification purposes. Experienced car enthusiasts recommend tightening the bolts at least every 2 thousand kilometers. In practice, there are cases when during the operation of the VAZ 2108 the pins loosen on their own.
What forces act on the cylinder head during engine operation?
How to disassemble a torque wrench Any operating mode of the motor leads to uneven heating of the head. The areas located above the combustion chambers heat up much more strongly than the rest of the body, which causes thermal stress on the metal. The higher the engine speed or the greater the load on it, the greater the difference in heating of different parts of this part. In some areas, the thermal expansion of the aluminum from which the body of this part is made is so strong that it increases the pressure on the gasket between the head and the cylinder block. Therefore, after a certain period of time it is necessary to repeat the tightening torque of the screws, otherwise there is a high probability of the gasket burning out.
What forces act on the cylinder head when tightening the screws?
The gasket, which is installed between the cylinder block and the cylinder head, has a certain thickness, which decreases during tightening. Despite its overall rigidity, the aluminum body of this part is deformed by thousandths of a millimeter during tightening, so it is necessary to carry it out from the center to the edges. In this case, it is possible to compensate for the bending of its surface (sole). When the head rests on the cylinder block, the pressure on each part of its sole is the same. As it is tightened, the pressure in the places where the bolts (screws) are installed increases, which leads to a V-shaped deformation of the sole. To avoid this, you must strictly follow the sequence of actions. If the tightening order is incorrect or the force (torque) does not match the motor, the likelihood of gasket burnout and engine repair increases.
Adjusting the bolt torque
In order to do everything correctly and avoid mistakes, you must strictly adhere to certain rules and follow the order of execution.
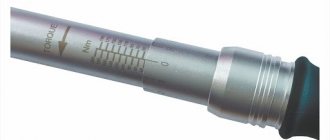
Tightening should only be done with a special torque wrench, which allows you to control the tightening torque.
Torque wrench
First, using a torque wrench, set the holder to the zero position. This means that the device data is equal to the moment of the original position. Then, you need to look at the indicator of the device when starting the fastener. Rotating the holder, we monitor the indicators. If the moment has not changed, this means that the fastener can be stretched and this is normal, as it should be. If the torque increases rapidly, bolt movement must be achieved. This indicates low stretch of the holder. This means stabilization is needed.
While the vehicle is running, the bolts that secure the cylinder head are constantly experiencing various impacts. They constantly heat and cool, which over time leads to the destruction of the structure of the fasteners.
For all power units there are specific rules that must be followed during operation:
- Strictly follow the data specified in the practical manual for the VAZ 2109.
- Adjustment is carried out only with a torque wrench. The use of another device will not allow this work to be performed correctly.
- Use only good bolts.
Replacement bolt kit
When starting to work, be sure to check the condition of the holders. Strictly adhere to the tightening torque values recommended by the manufacturer.
The most important data regarding adjustments is in the annotation for each specific car. As a result, you must carefully study and adhere to what is written in it. During operation of the vehicle, you must strictly comply with all manufacturer's requirements and systematically diagnose the car. Correct and smooth operation of the VAZ 2109 power unit prevents the need to adjust the cylinder head holders.
Since the cylinder head of the VAZ 2109 is a complex unit, it is necessary to carry out repair work only with absolute confidence in your actions. Strictly observing the order of work. If a deviation in the operation of the motor is detected, immediately carry out diagnostics. This will avoid more expensive repair work.
torque wrench; caliper or ruler.
Tightening torques for engine repairs
Tightening torques for threaded connections
Which trailer can be towed with which category?
Engine disassembly
There is nothing to do in engine repair without a torque wrench! Tightening torques when repairing a Honda Civic are very important. Honda engineers calculated the torque for each bolt and nut in the car. There is no need to tighten it by hand until you get a characteristic crunch. Firstly, you can break some bolt, and it will be extremely difficult to get it out. Secondly, a skewed cylinder head will clearly leak oil and coolant. The Honda Civic, like any other car, uses different tightening torques, from 10 Nm to 182 Nm and even more, for the crankshaft pulley bolt. I advise you to purchase a powerful torque wrench, powerful and good, with a click when the torque is reached, do not take a pointer one. And lastly, all connections that are part of one element (disc, cylinder head, cover) are tightened in several stages from the center outward and in a zigzag. So, in order, I describe everything in Nm (Nm). Be sure to lightly coat the threads with oil or copper grease.
Example of a torque wrench, price 50-100$
These points are suitable for all D Series D14,D15,D16. I haven’t tested the D17 and D15 7th generation.
| Cylinder head cover bolts | 10 Nm |
| Cylinder head bed bolts 8mm | 20 Nm |
| Cylinder head bed bolts 6mm | 12 Nm |
| Connecting rod cover nuts | 32 Nm |
| Camshaft pulley bolt | 37 Nm |
| Crankshaft pulley bolt | 182 Nm |
| Crankshaft cover bolts D16 | 51 Nm |
| Crankshaft cover bolts D14, D15 | 44 Nm |
| Oil intake mounting bolts and nuts | 11 Nm |
| Oil pump mounting bolts | 11 Nm |
| Drive board mounting bolt (AT) | 74 Nm |
| Flywheel Bolt (MT) | 118 Nm |
| Oil pan mounting bolts | 12 Nm |
| Crankshaft rear oil seal cover bolts | 11 Nm |
| Coolant pump mounting sensor | 12 Nm |
| Alternator bracket mounting bolt (from pump to gen) | 44 Nm |
| Timing tensioner pulley bolt | 44 Nm |
| CKF sensor bolt | 12 Nm |
| Bolts for fastening plastic timing cases | 10 Nm |
| Attaching the VTEC sensor to the cylinder head | 12 Nm |
| Oil pan bolt (wide gasket), plug | 44 Nm |
Tightening torques for cylinder head bolts
In earlier versions there were only two stages, later there were 4
Important It is advisable to tighten bolts and generally work with threaded connections at a temperature of at least 20 degrees Celsius. Do not forget that you need to clean the threaded connections from any liquid and dirt. It is also advisable to wait 20 minutes after each stage to relieve the “stress” of the metal. PS
Different sources give different numbers, for example 64, 65, 66 NM. Even in the original directories for different regions, I write here the average or most familiar
PS Different sources give different numbers, for example 64, 65, 66 NM. Even in the original directories for different regions, I write here the average or most familiar ones.
The procedure for tightening the cylinder head bolts, crankshaft bed, camshaft bed
- D14A3, D14A4, D14Z1, D14Z2, D14A7 - 20 Nm, 49 Nm, 67 Nm. Control 67
- D15Z1 - 30 Nm, 76 Nm Control 76
- D15Z4, D15Z5, D15Z6, D15Z7, D15B (3Stage) - 20 Nm, 49 Nm, 67 Nm. Control 67
- D16Y7, D16y5, D16Y8, D16B6 - 20 Nm, 49 Nm, 67 Nm. Control 67
- D16Z6 - 30 Nm, 76 Nm Control 76
- Lock nut for adjusting valve clearances d16y5, d16y8 - 20
- Valve clearance adjustment locknut D16y7 - 18
- Banjo bolt fuel hose d16y5, d16y8 - 33
- Banjo bolt fuel hose D16y7 - 37
Other tightening torques
- Nuts on disks 4x100 - 104 Nm
- Spark plugs 25
- Hub nut - 181 Nm
This article is relevant for Honda cars manufactured 1992-2000, such as Civic EJ9, Civic EK3, CIVIC EK2, CIVIC EK4 (partially). The information will be relevant for owners of Honda Integra in DB6, DC1 bodies, with ZC, D15B, D16A engines.
The VKontakte community can help you with most questions. It's really more convenient than writing comments below.