Nuts for alloy wheels Niva Chevrolet
The fact that the wheel nuts are a special product is evidenced by a non-standard metric thread with a diameter of 12 mm with a pitch of 1.25 mm.
Standard coils of the same diameter have a different pitch, 1.75 mm. That is, the wheel threads are made smaller in order to increase the reliability of the connection and implement the “self-tightening” effect due to constant rotation. Larger coils will not work here. The factory nuts are sized so that when the thick stamped steel wheel is tightened, they will fit completely onto the stud. In this case, the element is equipped with a cone at the end, adjacent to the mating part on the disk. Due to the cone-shaped connection, 2 problems are solved:
- self-centering of the hole in the disk opposite the stud when the nuts are evenly tightened;
- more reliable connection of the wheel plane with the hub.
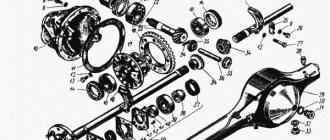
The pin, which carries the load of the entire fastening, is pressed into the hub on splines with an interference fit, and it is sometimes very difficult to knock it out. This is another reason to take the selection of parts for this unit seriously. All nuts available for sale for Niva can be divided into 2 types:
- Open, the pin passes through them when twisted. The car is equipped with such parts at the manufacturer.
- Closed, with a blind hole. Installed on Chevrolet Niva, but the size is also suitable for VAZ-21213.
Factory elements are manufactured with a size for a 19 mm wheel wrench. Various parts found in stores can be made with a 21 mm turnkey, and reach a height of 30 mm or more. The standard length of the open VAZ-2121 nut, made of uncoated carbon steel, is 17 mm. The new decorative parts have a nickel plated finish and a different protruding head shape.
Pros and cons of secret fasteners
To prevent your Chevrolet Niva from being “taken off” the next night after installing new tires, it is recommended to install 1 secret nut on each wheel. No matter how new technologies develop, more reliable means of stingray theft have not yet been invented. Hence the first and main advantage of the secret: such fasteners will help protect much more expensive property from thieves than it is worth.
Modern secrets are no match for the first ones that appeared in distant Soviet times. They are structurally more perfect and differ in aesthetics, which is important. The part is an elongated nut with an adapter for an individual key. If you choose closed-type decorative fasteners of the same length for it, then the wheel as a whole will look quite aesthetically pleasing.
The secret mount is very useful for the spare wheel of the Chevrolet Niva, which is screwed to the bracket on the rear door with ordinary nuts, and therefore most vulnerable to thieves. To unscrew secrets, the following types of keys are made:
To prevent the nut from being grabbed by a gas wrench or other similar tools, the lock on top is equipped with a rotating bushing (shell), and the place for the wrench is located in a recess. Cheap products and fakes may not have a shell, so you cannot buy such nuts. The disadvantages of secrets are:
- The tightening torque is weak, so the remaining nuts must be held securely;
- any tricky fastener can be unscrewed if the thief has the time and opportunity to do so;
- the need to always have the key with you and not forget it under any circumstances.
The last drawback is a real scourge of forgetful drivers. If the ramp of exits 2 is punctured: go get the key or call a tow truck, otherwise the wheel cannot be removed.
To secure a car wheel to the hub, a special type of fastening element is used - nuts. The usual shape that car wheel nuts have is a hexagon. Currently, their range includes nuts, which may differ in many respects. This is not only the height of the nut, diameter and thread pitch, but also appearance, strength class and coating resistance. Therefore, when planning to purchase nuts for discs, you should not neglect the advice of professionals who will help you make the right choice.
Another parameter by which nuts can be classified is the material of manufacture. Standard products are usually made of steel. They are characterized by optimal strength and reliability, as well as an affordable price. To increase the protective properties of the metal, as well as to give products an attractive appearance, chrome, galvanized or colored coating can be applied to the surface of the nut.
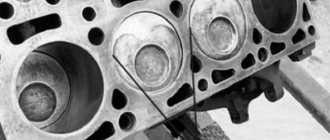
Block plane and gasket penetration
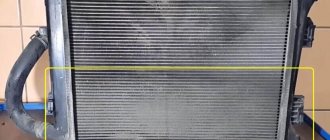
Loosen the fastening clamp and disconnect the hose of the lower thermostat pipe. Loosen the fastening clamp and disconnect the hose of the thermostat side pipe. Loosen the fastening clamp and disconnect the fluid supply hose to the heater radiator from the cylinder head pipe.
Unscrew the nuts of the fuel pipes and disconnect the fuel supply and drain lines. Remove the upper bolt securing the rear intake pipe strut, loosen the lower bolt of the strut and move it to the side.
Torsion bolts (plastically deformable)
Remove the two nuts securing the starter heat shield. Move the shield to the side. Remove the chain from the camshaft sprocket. Carefully place it on the tensioner shoe.
Torsion bolts (plastically deformable)
cylinder head bolt of a new type Part number: 21213-1003271-01-0. Name: Torx cylinder head bolt. This name (torsion bar bolts) is fundamentally incorrect, but what can you do if they are called that on all forums and in all stores. According to science, when they say torsion bar, they mean deformation from twisting. And in this case, tensile deformation. In stores, these bolts are also called cylinder head bolts for Niva Chevrolet or cylinder head bolts of a new type. I also came across the name torx or chamomile. These bolts, unlike hardened ones, provide a constant load. That is, in a very primitive way we can talk about the grommet effect, that is, about the constant force to compress the cylinder head gasket in the axial direction of the bolt. These bolts are widely used on imported engines because they avoid human factor errors. In fact, you don't need to tighten with the precision of a torque wrench. The final values are taken as angular values. I don’t really like this approach, but such things are now commonly called “assembly guarantee”.
Adjustable hydraulic supports (hydraulic compensators).
Old style hydraulic compensators.
Everyone knows what a hydraulic compensator (hereinafter referred to as hydraulic compensator) is and what function it performs. Worse than these g.k. I haven't seen anything, and their price isn't bad. The weakest point of these tensioners is that they tend to constantly unscrew (tightening torque is from 1.7 to 2.5 kg), tighten it harder, it simply will not work. Many people try to install them on various thread clamps, but I think this is not a solution. AvtoVAZ has already stopped producing cars with such cylinder head, but there are a lot of cars with cylinder head, old model, but not everyone has the opportunity to change the cylinder head to a new model. There is a good way, already tested on many cars, to avoid unscrewing the main gearbox. Everything is very simple - tighten them not by 2 kg, but by 4 kg. We did it.
Consequences of an unscrewed g.k.
When starting a cold internal combustion engine, a knocking sound is allowed. for 2 – 4 seconds. If the knocking continues for more than this time or appears on a hot internal combustion engine, it is advisable to contact a service station as soon as possible to eliminate the malfunction of the engine.
axel-roman › Blog › Tightening torques. Chevrolet Niva.
Tightening torque table for Chevrolet Niva 2123. If you don’t have the book, you can look it up here. Tightening torques for cylinder head, engine, gearbox, transfer case, axles and brake system.
Why do you need a wide torque range?
Because all dynamo keys have an error. It is better to take the moment in the middle of the range. Minimum permissible - maximum tightening torque. For example: 100-110 Nm.
Reminder:
In places where there are many tightening points, for example, the intake manifold. It is better to go through the final moment several times. The dots in the middle “sag.”
List of tightening torques (table):
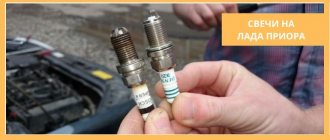
— Cylinder head bolt (cylinder head). M12×1.25.
Clean the threaded holes from oil.
Degrease surfaces.
If the length of the bolt shaft exceeds 117 mm, it should be replaced with a new one.
A non-shrinkable metal-reinforced gasket is installed between the block and the head. Reuse of the gasket is not permitted.
To ensure a reliable seal and avoid tightening the bolts during vehicle maintenance, we tighten them in four steps:
1st step - tighten bolts 1–10 to a torque of 20 Nm; 2nd step - tighten bolts 1–10 to a torque of 70–86 Nm, and bolt 11 to a torque of 31–39 Nm. 3rd step - then turn bolts 1–10 by 90°; 4th move - and another 90°;
It is advisable to use a rotation scale.
— Hydraulic support of the valve lever. (Hydraulic compensator) М24×1.5 15–20 Nm — Camshaft sprocket mounting bolt. M10×1.25. 41–51 Nm — Nut securing the camshaft bearing housing. M8. 18–23 Nm
Apply a thin layer of engine oil to the camshaft cams and journals, bearing housing beds and working surfaces of the valve drive levers. When installing the bearing housing, make sure that the installation sleeves (on the outer mounting studs of the cylinder head on the left side) fit into the housing housings without distortion.
Why change the mount?
There are several reasons why Niva car owners change their wheel nuts to new ones:
Old nuts that are worn or mechanically damaged do need to be replaced, especially when they have poor threads or missing edges. It is difficult to tighten such a part with a torque of 10-11 kgf/m to securely fasten the wheel. It’s better to install a new set; it’s pointless to change 1-2 fasteners. The main thing is that the threaded part of the stud remains normal.
Alloy wheels, although thicker than stamped steel ones, can theoretically be fastened with factory nuts. Another thing is that such details will ruin the entire appearance of the new wheels, so in such a situation it is better to install elements that are in harmony with the wheel. There is another point: in some models of alloy wheels, samples are made in the form of a hemisphere, rather than a cone. Then the standard fasteners will definitely not fit; you need to purchase nuts with a spherical end that fit into the mating part of the rim.
In addition to improving the appearance of the car, there is another reason that forces you to change 1 out of 5 nuts to a special one that can only be turned with an exclusive key. The reason lies in the high cost of car tires and storing the car itself in the open air in the yard, as often happens in cities. To prevent tires from being stolen at night, one clever security nut is installed on the car.
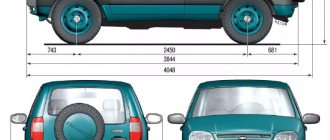
Dimensions of standard wheels
A peculiarity of domestic car models, including the Chevrolet Niva, is the lack of individual wheels for a specific year of manufacture of the car.
Common wheel sizes for Niva Chevrolet:
- rim width 8 inches;
- rim diameter 15 inches;
- offset ET40 – distance between the plane of fastening and symmetry.
Failure to comply with these parameters may result in:
- rapid wear of mechanical parts and components of the vehicle chassis;
- Excessive load on the wheel arches of a car and their breakdown, for example, the use of wheels with a dimension greater than R16 and a high rubber profile, will negatively affect the condition of the fender liner. Its surface will be erased. On the Internet you can see a large number of photos devoted to this topic.
Advice. Before purchasing a new wheel, it is better to consult an experienced specialist.
Another important parameter is the bolt pattern or drilling of the disk. It is designated by the Latin letters PCD. For Niva Chevrolet it is installed by the manufacturer with dimensions 5x139.7. The number 5 means that the disk is fixed to the hub with five bolts, which are located on a circle, and the distance between adjacent fastening bolts corresponds to 139.7 mm.
The center hole (DIA) of the rim is 98.5mm. Therefore, when choosing a wheel, you need to pay special attention to this parameter, since a discrepancy from the standard even by 1 mm will certainly affect the quality of the disk fastening to the hub. After some time, due to a loose fit, the hub will simply wear off.
And the last no less important parameter is the ET offset, which should not exceed a value of 40. Otherwise, this will lead to failure of the internal bearing. The most acceptable offset for the Niva Chevrolet is ET35.
Block plane and gasket penetration
Loosen the fastening clamp and disconnect the hose of the lower thermostat pipe. Loosen the fastening clamp and disconnect the hose of the thermostat side pipe. Loosen the fastening clamp and disconnect the fluid supply hose to the heater radiator from the cylinder head pipe.
Unscrew the nuts of the fuel pipes and disconnect the fuel supply and drain lines. Remove the upper bolt securing the rear intake pipe strut, loosen the lower bolt of the strut and move it to the side.
Torsion bolts (plastically deformable)
Remove the two nuts securing the starter heat shield. Move the shield to the side. Remove the chain from the camshaft sprocket. Carefully place it on the tensioner shoe.
Possible cylinder head malfunctions in a Chevrolet
Before talking about the nuances of tightening, it is necessary to talk in more detail about possible malfunctions of the Niva cylinder head.
So, if there is a drop in power, then you should suspect a poor connection between the air manifold and the head. To eliminate the above-mentioned breakdown, it is not at all necessary to disassemble the cylinder head. It’s another matter when the gasket lacks tightness - it can be caused by insufficient tightening of the bolts or wear of the seal. There will be a lot of fiddling around here. The symptoms of this problem depend on the nature of the gasket damage. So, if low compression is observed, then gases probably penetrate from one combustion chamber to another through a seal that has weakened in places.
Oil or coolant leaks (hereinafter referred to as coolant) indicate insufficient tightening or wear of the gasket in the area between the systems through which these compounds circulate. This problem also causes mutual contamination of the lubricant and antifreeze. The latter in Chevrolet noticeably changes color - it becomes brownish. The presence of such problems dictates the need for emergency repairs of the Niva.
Step-by-step instructions for replacing the cylinder head gasket
The design features of the Niva Chevrolet car make it possible to remove the cylinder head without good access from below . However, the presence of an inspection hole or lift greatly facilitates access to some nuts and the coolant drain valve. There is no need to remove the engine, but it is advisable to clear the space under the hood of interfering hoses and wires.
The following tools will be needed for repairs::
- set of keys and socket heads;
- powerful wrench, ratchets, extensions;
- hammer;
- flat screwdriver;
- head or special wrench 38 for cranking the crankshaft;
- torque wrench;
- brake pipe wrench (suitable for oil line).
Advice. In addition to standard tools, wire for securing removed parts, rags, white spirit or solvent for cleaning surfaces may be useful.
Conventionally, all work on replacing the cylinder head gasket on a Niva can be divided into 2 stages : removing all attachments and all electrical sensors from the cylinder head, removing the timing mechanism and attaching the head to the cylinder block.
Adjusting the clearance in Niva hubs
After installing a new bearing, a new wheel nut should also be used. The wheel must be on the car.
Adjustment of the front hubs on the Niva and Chevy Niva is carried out as follows:
- Screw the hub nut all the way and loosen slightly.
- Checking the play. If it persists, tighten the nut.
- We check the play again.
- The procedure is carried out until the backlash disappears.
- Use a sledgehammer to break a tire or drive a Niva a couple of meters.
- A small backlash appears. We also tighten the nut and leave it barely noticeable.
- Now the nut can be tightened.
Attention! You should drive the car for one day, after which, adjust the bearing again.