A beard is more than just facial hair. This is a device in the car interior in which the radio and other adjacent systems are located. In the VAZ 2107, unfortunately, the center console is located at the bottom, so reaching the radio in a relaxed state is very problematic.
- seeking help from a specialized tuning company (usually a car repair shop), which can create a console for the interior;
- DIY beard making.
The first method, although it saves time and effort, still has a lot of negative aspects. For example, making a custom console is not cheap.
Secondly, it is not always possible for an auto repair shop employee to perform tuning in strict accordance with the customer’s requirements and expectations.
Accordingly, even if you decide to use the services of a specialized company, this does not guarantee that you will be completely satisfied with the result.
Self-production: frame
Creating a VAZ beard entirely with your own hands may seem like a difficult task, but in reality this is not entirely true. It is enough to select special drawings on the Internet, stock up on materials for work and read the tuning instructions.
Initially, the driver must work on the frame, choosing the optimal model as a template. Practice shows that birch plywood is the most popular. Its thickness should be seven millimeters.
It has won positive feedback from owners largely due to its quality and increased level of strength as part of the tuning parts.
To do the work yourself, you will also need vinyl leather, wooden blocks with a cross-section of 2x2.5 centimeters and one tube of epoxy glue. Before you start processing plywood, you must first create a cardboard template. For this, cardboard material with good strength is used.
Each mark must be transferred to the plywood. You can make adjustments before cutting the holes and shaping them into the desired shape. The phrase “measure twice, cut once” perfectly fits the description of this stage.
After perfectly copying the applied dimensions, you can pick up a jigsaw and begin to carefully cut out the console structure along the contours.
How to create a beard: step-by-step instructions
Creating a beard with your own hands is a rather difficult task that must be performed with extreme precision. After making the frame, you can create bars and then insert them into the designated place.
Once their installation is completed, you can begin tightening the frame using self-tapping screws. Since we are creating a VAZ beard with an armrest, it is recommended to steam the plywood in hot boiled water before starting work.
This will allow you to achieve better ductility of the material during processing. Steaming the plywood will also make it possible to solve the problem associated with the transition to a narrower part between the front seats and a wider one where the radio is located.
As soon as the entire tuning structure is ready, it must be dried. This process usually takes about two days.
How to set up the Mystery amplifier
The issue of hardening must be taken seriously, since the durability of the product as a whole depends on it. Place a caprolon stocking on the tuning part, then fill in several layers of epoxy resin.
After the part has completely dried, you need to drill a hole for the gearbox lever. To fasten the finished panels with your own hands, use glue. The structure must first be puttied and cleaned of dirt/sawdust.
Once the part is processed, you can begin to create the covering. Without it, the center console will look too simple.
Additional Helpful Tips
The owner of a VAZ car has the opportunity to make a beard himself from scratch. But before starting work, it is highly recommended to study the drawings on the Internet. A large number of other drivers of VAZ 2107, 2106 and 2105 have published their options for creating a beard with an individual appearance and corresponding drawings.
conclusions
The beard of VAZ cars makes it possible to significantly simplify driving comfort. Both the driver and the passenger will not have to reach for the radio.
Depending on the design, you can also place additional cells here to store parts or small personal items. It usually takes several days to create a part. You need to be prepared for this right away.
Under no circumstances should you start by cutting plywood, as there is a high chance that you will not be able to install it. A cardboard blank will allow you to modernize the design taking into account individual needs.
Of course, in addition to creating a beard with your own hands, you can also seek help from a specialized car service. But why, if this method will save a lot of money? Therefore, feel free to take on interior tuning, starting with the console!
a torpedo from foreign in a classic will eat up a lot of space in front
Installation of ignition on Tavria
Did you do anything with the stove? I installed the same panel, only now my stove mainly heats the radio and not the interior!(
- Yes, it doesn’t seem to heat up normally, well, neither does the radio)) ???? but the interior warms up normally! it's already fried
- I want to improve it a little so that the air from the heater door diverges on the sides, respectively, under the feet of the driver and passenger, and does not blow in the center into the radio!)
If you do, please post a report. I would do it too.
- It doesn’t fit Omega, but from Vectra. I made a small mistake
yeah, did you mean the bottom part? or the entire torpedo from it? if you have the bottom one or the whole one, give me a photo) thanks in advance :)
- Well, it looks good) But it seems to me that it’s difficult to find, the price tag won’t be cheap!
And anyone can install it with modifications, because anyone can redo the terminals for the stove! + something else for sure!
If you install a BMW, you need to change the heater pipes in places. I found it in my city from an Opel. The price tag was 4500 for the whole assembly
I know about BMW) well, the prices are normal, “adequate”, but here if you find one, believe me, there will be about 15 of them!
Yesterday I climbed for fun and found a couple, but not from this model, but from about the same one from the same years! 15 - 25 thousand collected! and after that, the stump is clear, the question arises, is it really needed? ))
On the front panel of the VAZ 2107 in the middle there is a console (beard), on which various equipment is placed (clock, radio, switches, indicators). This part of the car interior is often referred to by drivers as the “beard”. Often car enthusiasts pay special attention to this console, making it original and at the same time increasing its functionality.
What toe should be on a front-wheel drive car?
Beard tuning includes adding additional devices and elements that make it more informative and useful:
- Car radio.
- Dashboard lighting control.
- USB sockets for charging smartphones and tablets.
- Watch.
- Switch for fog lights, exterior lighting, heated rear window.
- Vehicle control instruments (ammeter, voltmeter).
- Pocket for small items near the gearshift lever.
Tools and materials
Tuning consists of making a new beard, on which it is necessary to provide in advance the mounting locations for indicators, switches, control devices and other equipment.
Additional Helpful Tips
The owner of a VAZ car has the opportunity to make a beard himself from scratch. But before starting work, it is highly recommended to study the drawings on the Internet. A large number of other drivers of VAZ 2107, 2106 and 2105 have published their options for creating a beard with an individual appearance and corresponding drawings.
Be responsible in determining the optimal sizes. In addition to the dimensions of the radio, the amount of usable space in the cabin is also taken into account. The console should not create any discomfort for the legs of the driver and passenger. Under no circumstances should you proceed straight to cutting out the plywood. A do-it-yourself cardboard blank will allow you to accurately assess the degree of comfort. A custom console for a VAZ is created to simplify access to the radio, taking into account the location of the gear lever. But here you can also make convenient compartments for storing small personal items. Again, a pre-created blank made of hard cardboard will help with this.
Self-production of a VAZ 2107 “beard”
- MP3 player.
- Dashboard lighting control.
- Watch.
- Switches for external lighting, electric fan, fog lights.
- USB sockets for charging gadgets.
- Control devices for the operation of the vehicle's electrical network (voltmeter, ammeter).
- A compartment for small items, located near the gearshift lever.
The console is also covered with decorative trim, which serves as decoration for the standard interior of a production car.
Materials and tools
Console tuning usually consists of making a new VAZ 2107 beard, on which mounting locations for switches, indicators, control devices and other equipment are pre-provisioned.
The most affordable material for making your own beard is plywood. The thickness must be at least 6 mm, otherwise it will not be possible to achieve the required rigidity of the product.
For finishing, artificial leather is most often used, matched to the color of the interior elements, or, more recently, carbon fiber of a suitable color.
Sometimes tuning the beard of a VAZ 2107 is accompanied by a comprehensive redesign of the interior design with the replacement of finishing materials for the door trim and trim of the front panel with carbon fiber or leatherette. To make a tuned VAZ 2107 beard, in addition to finishing materials, the following devices and tools are needed:
- jigsaw;
- electric drill or cordless screwdriver;
- “grinder” (angle grinder);
- locksmith corner;
- pencil;
- ruler (roulette);
- glue gun (tube of glue);
- furniture stapler (for fastening leatherette).
The new console (beard) is installed in place of the standard one, which should be dismantled to free up space and take the measurements necessary to create the workpiece drawings.
Making a beard VAZ 2107
The design of a do-it-yourself center console can be very diverse. Typically, the design includes a spacious box placed between the driver and front passenger seats (where the gear shift and handbrake levers are located). It can accommodate compartments for small items, appliances, switches or just coasters for glasses.
After the patterns are made and the console parts are marked, they are cut out of plywood with a jigsaw. It is better to connect parts using self-tapping screws and glue. The first will allow you to fix the elements motionlessly while the glue sets. This is the easiest and most reliable way to connect console parts.
The finished beard is covered with leatherette, fabric or carbon fiber. Glue and furniture clips are used to attach finishing materials.
When the glue dries, all that remains is to install the new console in place and secure it.
Before mounting it, you should fix some of the instruments and switches, which will be difficult to install if the beard is fixed in its regular place.
However, this depends on the design features of the tuned console. Sometimes it is easier to attach switches, instruments and devices after the console is fixed.
Source: https://semerkavaz.ru/tyunig/kak-samomu-sdelat-borodu-na-vaz-2107/
The most common reasons for dismantling
There are a lot of reasons for removing the tidy on a VAZ 2107, and some of them can be called banal, but nothing can be done. The most common reason when you need to remove the instrument panel is a burnt-out backlight bulb. Replacing light bulbs in the dashboard of a VAZ 2107 is carried out only when dismantling the device, and this procedure is simply impossible to perform otherwise.
The dashboard on the VAZ 2107 must also be removed for a number of the following reasons:
- Malfunction of pointer indicators.
- Failure of the instrument lighting, as well as lack of functionality of the arrow indicators.
- Replacing the device with a new one, for example, if a digital panel is installed instead of the factory instrument panel.
- Tuning or upgrading the device.
As practice shows, most often the need to dismantle the dashboard arises precisely because the backlight bulb burns out. If the device is dismantled for this reason, it is recommended to immediately replace conventional light bulbs with LED ones.
Required Tools
Before starting work, you will need to prepare the necessary tools so that you do not have to be distracted during the process. Despite the fact that the work of removing the device in question is quite labor-intensive, to implement it you will need a small set of tools, including:
- Phillips and slotted screwdriver.
- Electrical tape to indicate chips that are disconnected from the device.
- Work gloves for unscrewing the speedometer cable.
When all the tools are prepared, it remains to make sure that the parts and elements that are planned to be installed or replaced on the dismantled device are available. After this, we proceed to perform the main part of the work.
How to remove the instrument panel of a VAZ 2107
Instructions for removing the dashboard on a VAZ 2107
Initially, it should be noted that the process of dismantling the tidy on VAZ 2107 cars, the injector and carburetor are identical, therefore the instructions described below are appropriate for sevens of all years of manufacture. Having prepared to carry out the work, you can proceed by following the following sequence:
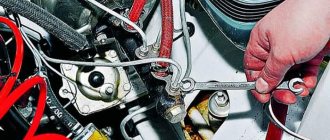
- First you need to turn off the power to the car, for which you remove the negative terminal from the battery. This must be done, since the work will be carried out in the electrical part, and the likelihood of a short circuit occurring is quite high.
- Next, we move into the interior, and using a slotted screwdriver, we remove three caps from the levers responsible for the operation of the heater.
- Using a slotted screwdriver, remove the plastic plug on which the heating sign is depicted. This plug is on the right, and under it there is a Phillips screw that needs to be unscrewed. (There are 2 screws under the plug, but only one needs to be unscrewed - the top one, which secures the right side of the dashboard).
- Next to the hazard warning button, there is an odometer reset button, which is secured with a plastic nut. The nut must be unscrewed and removed with the washer located behind it. The button is recessed inside the panel.
- The right side of the tidy is weakened at this stage, and it remains to perform several additional manipulations in order to completely dismantle the device. To do this, pull out the right side of the device, thereby freeing access to its rear part. Here you need to disconnect all the chips and wires to perform dismantling.
- Initially, the power chips for the stove button are disconnected. Be sure to remember the location of the wires. It is recommended to take photos so as not to be confused when assembly is carried out.
- Next you need to disconnect the speedometer cable. It is secured with a special nut, which can be unscrewed by hand.
- All chips connected to the dashboard are disconnected. It is almost impossible to confuse their locations, since they have different fastenings and differ in size.
- The supply hose is removed from the economizer fitting. This cable is located on the left side of the device.
- After all the chips, cables and wires are disconnected from the device, you can dismantle it.
How to make a beard on a VAZ 2107
On the front panel of the VAZ 2107 in the middle there is a console (beard), on which various equipment is placed (clock, radio, switches, indicators). This part of the car interior is often referred to by drivers as the “beard”. Often car enthusiasts pay special attention to this console, making it original and at the same time increasing its functionality.
Beard tuning includes adding additional devices and elements that make it more informative and useful:
- Car radio.
- Dashboard lighting control.
- USB sockets for charging smartphones and tablets.
- Watch.
- Switch for fog lights, exterior lighting, heated rear window.
- Vehicle control instruments (ammeter, voltmeter).
- Pocket for small items near the gearshift lever.
Tools and materials
Tuning consists of making a new beard, on which it is necessary to provide in advance the mounting locations for indicators, switches, control devices and other equipment.
The most affordable material for making a beard with your own hands is plywood. The thickness must be chosen at least 6 mm, otherwise the product will not be very rigid.
To trim the console, artificial leather is most often used; it is matched to the color of the interior, or carbon fiber of a suitable color.
- Often, tuning the beard of a VAZ 2107 is done by covering the front panel and doors with leatherette or carbon fiber. To make a customized beard, you will need the following tools and equipment:
- pencil;
- locksmith corner;
- roulette;
- jigsaw;
- grinder;
- drill or screwdriver;
- glue gun;
- furniture stapler.
The new beard is installed in place of the old one, the old console is dismantled to make the measurements necessary for the workpiece.
Making your own beard
A beard is a complex structure; it is made of flat parts. To make them you need to make patterns; it is best to make them from cardboard.
It is necessary to achieve high precision of the console parts; rigid cardboard is quite suitable for this. If you are not confident in your skills, first make a mock-up of the console from cardboard.
This will allow you to make sure that the drawings are made correctly and to estimate how the new beard will fit into the installation site.
After making the pattern, mark the details of the beard and cut them out of plywood with a jigsaw. All parts are connected using glue and screws. The latter will allow you to fix the console elements until the glue sets. This is the most reliable and easiest way to connect beard parts.
After the beard frame is ready, it is covered with carbon fiber, leatherette or fabric. For their fastening, finishing materials, furniture stapler and glue.
After the glue has dried, all that remains is to install the new console in place of the standard one. Attach switches and devices and secure.
Tuning beard VAZ 2107: Video
Source: https://7-vaz.ru/tyuning/boroda-vaz-2107.html
Radio tape recorder
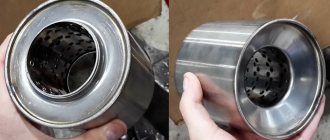
No upgrade of the “six” is complete without installing a speaker system or at least a simple radio. A standard place for a radio receiver in the beard of a small-sized “six”. It should be trimmed to standard 1DIN. This can be done with a metal file. Then sand the edges with sandpaper.
Installing a radio
The radio tape recorder is attached to the beard using a metal case. Radio installation steps:
- Having bent all the tabs, use special spatulas to remove the radio from the case.
- The metal base is inserted into the prepared hole.
- We fix it using special tongues.
Cables are included to connect the player. The most commonly used are:
- black - “earth”;
- red and yellow (often wound together) - ignition “+”;
- blue - power for the active antenna;
- white - front left (FL) speaker;
- gray - front right (FR) speaker;
- green - rear left (RL) speaker;
- purple - right rear (RR) speaker.
You can connect the radio to the ignition switch to the free INT terminal. Then it will only work when the engine is running and the ignition is on. This connection scheme will protect forgetful car owners from completely draining the battery.
If you twist the red and yellow wires together, the radio will no longer depend on the ignition. You can listen to music with the ignition off too.
Typically, a connection manual comes with the audio system. Following the instructions and color scheme, installing audio equipment in the “classic” will not be difficult.
Speaker installation
A good place to place the speakers would be the front door panels. If you choose the right size speakers, they will fit here very well. To install, perform the following steps:
- Remove the trim from the doors.
- On the casing we cut a hole for the speaker. A hole of the required size can be made using a template. To do this, trace the speaker on paper. You need to work carefully so as not to miss the size.
- We attach the column and screw it to the casing using the fastening that comes with the kit.
- We carefully lay the wires in the cavity of the doors so that they do not sag or fall out.
- We install the casing in place.
Additional speakers are placed on the dashboard or on the side pillars of the windshield.
If the car owner changes the entire beard, creating it himself to his own size, then he can place a 2DIN radio in it. A player with a large screen will add charm to the appearance of the car.
Some craftsmen insert speakers instead of air ducts. But from personal experience I know that the standard “six” torpedo does not have side window blowing. In humid and cold weather, windows fog up and freeze. If you remove the air ducts for the windshield, the airflow will worsen even more. Therefore, I do not recommend this installation of speakers.
Video: installing speakers and Shumka
Antenna installation
The “six” did not have a standard antenna installed, but a place for it was provided on models before 1996. Adherents of original spare parts can find their original antenna on the car market. It is attached to the front fender of the car.
To do this, you will need to make a hole in the wing, install the antenna, tighten the bolts and connect the wires to the radio and ground. This installation method is quite complicated and not every car owner will decide to make holes in the body.
The ease of installation is distinguished by the interior active antenna, which is attached to the windshield. It is not exposed to precipitation, does not require additional care, and does not interfere with aerodynamics when the car is moving.
When purchasing an interior antenna, please note that the kit should include instructions, fasteners and stencils to simplify installation. There are two ways to install a radio antenna inside the cabin:
- The housing is attached to the glass behind the rear view mirror, and the whiskers are glued in opposite directions at the top of the glass.
- The antenna body is secured to the top of the windshield on the passenger side, and the poles are glued along the edges of the glass at right angles to each other.
Do-it-yourself VAZ 2107 beard: step-by-step instructions (photos and videos)
On many cars, the front panel has a console in the middle part, which rests on the floor and serves to accommodate a wide variety of equipment. The so-called beard of the VAZ 2107 model is a fairly functional interior detail.
The central console is an excellent stylistic solution for the developers of the VAZ 2107 car interior, and it is also very functional. Tuning enthusiasts often make this unit with their own hands and give it an original look.
Additional elements are added to the design that increase the usefulness of this device and give it uniqueness. They often put on the beard:
- Watch.
- Radio or other multimedia device.
- Dimmer switch for instrument panel lighting.
- Switch block for electric fan, exterior lighting and fog lights.
- At the bottom of the gear lever there is a convenient pocket for small items.
Materials and interior preparation
Making this unit yourself is usually done from a plywood sheet with a thickness of at least 6 mm.
For exterior finishing, a wide variety of materials can be used, mainly leatherette, matched to match the upholstery of other interior parts.
Advanced tuning enthusiasts go further; they cover the front panel, the inner surface of the doors, and some other parts with this material.
To make the center console for a VAZ 2107 car from the materials listed above, you use the following tools yourself:
- electric jigsaw;
- battery drill or screwdriver;
- angle grinder;
- tape measure, plumbing corner, pencil;
- assembly gun for glue;
- furniture stapler.
The beard, made by yourself, is installed in place of the standard unit. It must be carefully dismantled in order to free up a platform for a homemade console.
What can be placed on the center console
Tuning enthusiasts make their own beard to place on this panel:
How to replace a torpedo on a VAZ 2107 with your own hands
- watch;
- multimedia devices (radio, radio, etc.);
- knobs for adjusting the level of illumination of the dashboard;
- switch block for fan, fog lights, external lighting;
- pocket for small items;
- USB sockets for charging gadgets
- part of a car's control devices.
Before taking measurements for the manufacture of the center console, it is necessary to remove decorative trims from the existing part and anything that will interfere with the installation of the new part. In order not to be mistaken with the dimensions, you must first make blanks from cardboard and try them on.
Steering wheel improvement
The steering wheel is the main control element of the car, so it must be comfortable to operate and suitable in size. In the VAZ 2107, the main disadvantage of the steering wheel is its large size, which slows down the steering speed and impairs maneuverability.
The standard steering wheel of the VAZ 2107 makes it difficult to control the car due to its large size
I got behind the wheel of my brother’s “Seven” several times when I was studying at a driving school, and there was a catastrophic lack of lessons with an instructor. In my opinion, the steering wheel is really uncomfortable. It is large, but the rim is quite thin, and it is uncomfortable to hold. And it is not located very well - in the turning position it noticeably covers the dashboard and, unfortunately, is not adjustable. Our steering wheel also had a feature - either constructive, or the wheel alignment was poorly adjusted - the car drives straight not with the steering wheel in a straight position, but with the steering wheel turned slightly to the right.
The easiest type of tuning that will help cope with external defects of the steering wheel, for example, abrasions, is to install a braid on its rim. It also makes control more convenient, since your hands will no longer slide on the steering wheel.
With braiding, the steering wheel does not slip and looks more presentable
To replace the steering wheel, the old steering wheel must be removed. Car stores sell sports steering wheels for the VAZ 2107. You can also install a steering wheel from a foreign car on the “Seven”, but not from just any car; it must fit the mounts. Alternatively, you can go to an auto-disassembly shop with your steering wheel and choose the right one there.
A more technically complex tuning option is to install hydraulic or electric power steering.
Torpedo tuning
The top front panel of a car is called a torpedo. It is a solid metal structure covered with polymer foam and film. It contains an instrument panel, glove compartment, interior heater, air duct deflectors, and a clock.
The front panel is an important element of the interior, which can be tuned in different ways: replace the dashboard completely with a new one, paint it with liquid rubber, cover the smooth surface of the dashboard with leather, film or flock. Before starting tuning work, you need to remove the panel.
Torpedo dismantling
Removing the console occurs as follows:
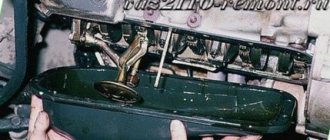
- After unscrewing the four fastening screws, we remove the storage shelf.
Tuning options for the VAZ 2106 torpedo
There are several options for tuning a torpedo:
- You can replace the standard torpedo with a new one from domestic or imported cars. It is installed entirely with devices. Since the parts in the “classic” are interchangeable, panels from the VAZ 2105, VAZ 2107 are suitable for the “six” ;
- cover the torpedo with liquid rubber. This option is labor-intensive, and such a coating is short-lived and will begin to crack over time. It will need to be updated periodically. The big advantage of this method is its low cost;
- reupholstering the dashboard with vinyl film, flock, automotive leather or leatherette. This method of improvement is the most effective, but scrupulous and time-consuming. To carry out the work, it is necessary to dismantle the torpedo and take measurements from it. It is best to make a pattern from non-woven fabric. Using the pattern, cut out the component parts. Sew all the pattern pieces together with strong threads. It is advisable to work carefully so that folds do not form on the material, which will spoil the appearance. Then treat the surface of the console with hot glue and pull on the cover. And, using a hair dryer, glue the cover.
Instrument panel tuning
Modernization of the VAZ 2106 dashboard consists of replacing the backlight and decorative parts of the scales.
Replacing instrument panel scales and arrows
This process is quite simple and you can do it yourself:
- At the start of work, we dismantle the instrument panel panel of the “six”
- We gain access to the sensors and remove all indicator arrows, starting with the tachometer.
- After this we remove the scales.
- To remove the speedometer needle, unscrew the bolts and turn the scale to the left. After this, the instrument needle will drop slightly and begin to oscillate. As soon as it finally freezes, this position must be marked with a marker. All this is necessary so that the speedometer then indicates the correct speed.
Installation of the removed parts is carried out in reverse order. After which the panel is mounted in its original place.
Instrument panel lighting
Many car enthusiasts know that the “six” has weak instrument lighting. When upgrading the panel, you can add LED lighting. Before starting electrical work, be sure to disconnect the negative terminal from the battery.
- Having dismantled the panel, we remove the devices one by one.
- We take each of them apart.
- We glue the links of the LED strip into the body. For small devices, one link of three diodes is enough. For larger ones you will need 2 or 3 links, depending on what lighting intensity you like.
Be sure to wipe the inside of the glass of the devices so that there are no fingerprints left.
Price policy
At the time it went on sale, the “Seven” was the most expensive classic Zhiguli model. The new car was valued at nine thousand rubles, which was 600 rubles more expensive than the other “luxury” model of the Togliatti plant - 2106. Now this sedan is available to almost everyone.
| Car | Cost (rubles) |
| VAZ 2107 | from 12 to 190 thousand |