04 July 2016 Lada.Online 143 436 42
After the next update, the Priora began installing a restyled dashboard in the car’s interior. A large display has become located in the center, which can display not only on-board computer information, but also navigation. We'll tell you how to change the old instrument cluster on a Priora or Kalina to a new instrument panel.
Life hack: dashboard of a Lada Priora car, everything you need to know
Priora has several panels, depending on the year of manufacture, plus non-standard ones made specifically for it.
Everyone knows how important it is to know the instantaneous status of instruments and machine parameters. The panel, also known as the control panel, on a Lada Priora car is, in fact, brief information about the condition of the car at the moment. It contains all the basic information, from movement speed to indicator readings on malfunctions of the main units and components of the machine. When something in it doesn’t work, it’s immediately alarming, because it’s current information. A description of all the icons and their meaning can be found below in the article. Technology is gradually developing, so the dashboard is becoming more and more technologically advanced. But since the Lada Priora is a low budget car, the panel on it is of the same quality. On the first devices, the backlight often does not light up, or is only half lit. Of course, this does not make the Priora look good. The instrument panel on the Priora car changed with the restyling of the 2nd Lada car. And Lux cars come with navigation. In fact, its basic functionality remains the same - all basic information is visible. Here you can monitor the operation of the engine, monitoring the speed, and understand that it is time to take the car for maintenance when one of the lights comes on. The price of a first (1) and second (2) generation part starts from 6,000 rubles and above. Tidying saves you from speeding, helps you refuel on time and prevent the Priora from boiling.
Reasons for disassembly
So, we have already almost indicated the first reason - I don’t like it. This may also be necessary in the following cases:
- For tuning. That is, when we try with all possible forces to correct the “face” of the car, which everyone sitting in the cabin is staring at, that is, the torpedo. To improve comfort and overall aesthetic appearance, you can install new linings, of which there are quite a few types today. The following linings are perfect for the VAZ 2110: • Euro 1, also known as Caprice. It looks nice, but it doesn't have a shelf on the passenger side;
Panel trim VAZ 2110 Euro-1• Euro 2 – similar to the previous one, but with a passenger shelf;
Panel trim VAZ 2110 Euro-2
• There are trims that are installed directly on top of the instrument panel. Installing them yourself is not at all difficult. Among these, one of the most popular is Chestnut;
Panel trim VAZ 2110 Kashtan
Panel trim VAZ 2110 Kashtan
Panel trim VAZ 2110 Kashtan• In addition, you can order an exclusive trim that makes the interior similar to that of the Nissan Primera, with the instrument panel in the center.
Trim Chestnut panel VAZ 2110 (dashboard in the center)
Trim Chestnut panel VAZ 2110 (dashboard in the center) - In order to get to the wiring, change some wire in it, or maybe a complete replacement of the entire wiring harness is necessary;
- To install a new stereo or video system, as well as supply other equipment that is necessary, but not provided for by the designers;
- Replace, fix or clean air ducts;
- When you need wind and noise insulation, since the standard one on the VAZ 2110 leaves much to be desired. Let’s not argue that tens of them are always making noise and rattling, and I really want to get rid of it.
Interior sizing Bimast Bomb
Sizing with Splen on top of Bimast
Interior sizing Bimast Bomb
Perhaps car owners will also find other reasons to replace the dashboard.
Standard instrument panel - article number and price
The original car tidy exists in three types.
- the first is an option for a pre-restyling car;
- the second panel is for a restyled car;
- and the third is the “Lux” option for the restyled one, which has become faintly similar to all previous torpedoes.
Each of them contains standard elements such as a tachometer, so their functionality does not decrease. . Who wants to do tuning of the instrument panel, this option is for them.
Priora first generation
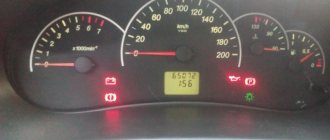
The instrument cluster for the first generation Lada Priora received catalog number 2170-3801010. Cost – about 6,000 rubles. Everything is standard with it - from left to right there are four arc scales with red arrows: odometer, speedometer, coolant temperature, fuel level. Below the speedometer there is a small on-board computer display, and above the arches are all the indicators, including the direction indicators.
Priora 2
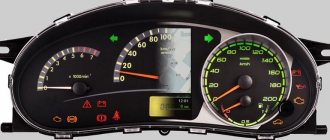
For the Priora “Lux” variation there are two more “subtypes” - with or without a CAN bus. Different subtypes were made so that the panel could be connected to any car. Catalog number – 2170-3801010-50 without tire, 2170-3801010-60 with tire. It is distinctive in that it contains an elongated display with a screen that can highlight the navigator.
The catalog number of the combination for the “Norma” assembly is 21720-03801010-20. Cost – 6,500 rubles. Like the “Lux” version, it received a brighter speedometer and odometer, and the coolant temperature along with the fuel level indicator is hidden at the bottom of the speedometer and odometer. The base will not create a route on the display, but will show all the information in color.
Dismantling algorithm
So, let's begin:
- We remove and remove the front seats from the interior so that they do not interfere with the disassembly;
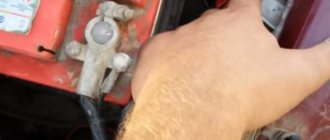
- Disconnect power from the battery;
- We lower the steering wheel of the VAZ 2110 to the lower position;
- Unscrew the screws that secure the panel covers. These are two screws on both sides of the tunnel. Now you can remove the shield;
- We remove the plug on the tunnel in the center by prying it off with a screwdriver;
- We unscrew the screws of the central tunnel to remove it. Before doing this, disconnect the wires from the cigarette lighter;
- We remove the air duct for heating the interior of the VAZ 2110. To do this, having disconnected the cover from the gearbox, you need to pry off the latches with a screwdriver, then remove the air duct;
- We remove the central panel by unscrewing it from the floor;
- Now it is possible to disassemble the torpedo. First, unscrew the mount that holds the glove compartment, disconnect it from the backlight, and take it out;
- In the hole where the glove compartment was located, we remove the screws on both sides, as well as directly behind the glove compartment;
- We unscrew the VAZ 2110 torpedo mount with a key and a screwdriver;
- Near the left pillar we pull out the air duct by prying it with a screwdriver;
- With special care you need to remove the torpedo, supporting it with your hands while unscrewing the nut with a spanner. Then, lifting it up, remove it from the pins;
- Now you need to remove all the wires, marking them with a marker as you go so that you don’t get confused when reinstalling them;
- It is possible to replace the lining and carry out noise insulation work.
Unscrew the two self-tapping screws securing the right flap of the floor tunnel lining
and disconnect it from the air distributor housing
Remove the shield (Left is similar)
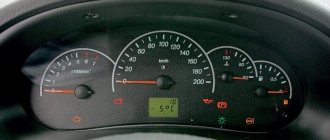
Icons on the factory dashboard
All indicators should light up like a Christmas tree for three seconds when the engine starts. If some icon remains, it means the system is signaling a breakdown. To make it easier to understand all the indicators, here is a schematic picture:
1,5,9,10 are already known scales that display the main parameters that can change. 19 – on-board computer display. Further:
- 2 – Icon indicating the operation of the braking system.
- 3 – Battery condition. If the light remains on, the battery is discharged or the charge level is too low.
- 4.7 – Doublers for direction indicators (“turn signals”).
- 6 – Oil level (indicates low level).
- 8 – Handbrake. Lights yellow when the lever is tightened.
- 11 – “Gasoline light bulb.” Lights up when there are only 10 liters left.
- 12 – Button for switching on-board computer modes.
- 13 – “Emergency”.
- 14 – Electric power steering (indicates a breakdown).
- 15 – High beam on.
- 16 – Side lights/low beam.
- 17 – Airbag condition (malfunction).
- 18 – Immobilizer (if you hear a beep and the icon itself blinks, the immobilizer is faulty).
- 20 – Seat belts not fastened.
- 21 – Unsatisfactory condition of the service brake system.
- 22 – Disabling the airbag.
- 23 – ABS malfunction.
- 24 – “Check”, “Check Engine” - engine failure.
Improvements in the interior
Lux salon
If your car is not luxury, then you can give it this manually by purchasing an additional interior lamp from Priora Luxury, installing heated seats, sun visors from Luxury with a mirror. All these spare parts and accessories are sold in any car spare parts for Lada Priora.
Cases
Every car owner would like his car to remain in new condition for as long as possible. During use, seats are subject to a lot of wear and tear. In order to preserve the original appearance of the seats, it is best to put covers on them. There are a large number of different covers for taste and color. The cost of covers for a Priora varies from 1,500 rubles to 5,000 rubles, depending on the quality of the materials.
Steering wheel cover
With active driving, by 100,000 km, the steering wheel of the Priora begins to wear out. In order to protect it from wear and tear and an unsightly appearance, it is best to put a braid on the steering wheel. There are two types of braids that are put on the steering wheel and that need to be sewn together. Slip-on braids are easy to install, but do not completely cover the steering wheel. Stitched braids completely cover the steering wheel and protect it from damage, but are quite difficult to install.
Replacing Heater Switches
The interior heater switches in the Prior are not very nicely designed. In order to give them a more modern and beautiful look, they can be replaced with switches from Ford Focus. Such switches are not expensive and fit into the place of the standard Prior ones without any modifications. You can order them on AliExpress.
Rugs
Most of the time a person is inside a car. Therefore, it is important to maintain the frequency there. To do this, we will be helped by special EVA mats that perfectly retain moisture, unlike standard ones, and do not allow it to spill outside the mat. This is very important in winter, since snow that gets into the car with your feet begins to melt and form puddles in the cabin that can spill and an unpleasant smell of dampness in the cabin cannot be avoided.
Side mats
You can also install side mats between the door and the seat to protect your carpet from dirt. Such rugs are not expensive, around 400 rubles.
Possible faults
The instrument cluster does not always tell the truth, and sometimes its readings can mislead the driver - they may seem absurd. For each common malfunction, a brief commentary will be given on the possibility of eliminating them:
- The fault lamp does not light up (check the lamp);
- the lamp is on - check the sensor, reset the error via the diagnostic connector.
If none of the above measures help resolve the problem, carefully inspect the wiring - damage to it may cause the light bulb to activate or deactivate.
Favorable prices for Lada spare parts
Selling spare parts for VAZ in our store also means loyal and favorable pricing. By collaborating directly with trusted suppliers and the manufacturer, we do not inflate the cost of products. Moreover, we offer generous discounts when ordering multiple items, and also give you the opportunity to save on shipping.
Order the required number of VAZ parts, make a purchase on the website and pay for the goods in a convenient way. Russian Post, PEC and other transport companies with which we cooperate on an ongoing basis guarantee optimal speed of delivery to the specified address. Before shipping, the goods will be checked for quality and carefully packaged so that the part or spare part reaches you safe and sound.
If you have any questions, call the manager on the hotline or request a call back by filling out the contact form, or write to a specialist on VKontakte directly from the website. Take advantage of any of the opportunities provided to obtain important information about your order.
Pinout of the instrument panel of a Priora car
The panel pinout looks quite complicated, but there is a more simplified diagram that will help you figure out the wires connected inside:
- EUR
- "emergency light"
- Engine oil
- Handbrake
- Immobilizer
- Airbags
- Headlights and dimensions
- Right turn signal
- Left turn signal
- Electronic control unit
- Pad wear sensor
- Seat belts (closing sensor)
- ABS
- Reset button
- Brake system, brake fluid
- ABS
- High beam headlights
- Torpedo shield lighting
- "Weight"
- Thirtieth terminal
- Fifteenth terminal
- Fuel consumption
- Forward key
- Back key
- Ambient temperature sensor (minus)
- Ambient temperature sensor (plus)
- Fuel level
- Speed sensors
- Coolant temperature
- Odometer
- Diagnostics of the shield (service)
- Generator regulator
Online store of VAZ and Lada spare parts NVS-Car
The NVS-Car online store offers to buy spare parts for VAZ (Lada) cars with delivery from Togliatti to other settlements of the Samara region, as well as throughout all regions of Russia and the CIS. In our electronic catalog you will find all categories of parts, spare parts, assemblies and components for popular models of the Volzhsky Automobile Plant. Repairing domestically produced cars is a simpler task compared to a similar task for a foreign car, since all spare and consumable items are in unlimited access and are sold at reasonable prices without import markups.
You can order spare parts for VAZ (Lada) for all parts of the car:
- engine and brake system;
- transmissions and suspensions;
- electronics and exhaust system;
- fuel system and wheelbase;
- optics and glass.
You can buy these and other components, as well as body parts, tuning elements, auto chemicals, mats and other little things in one place, thereby saving time on searching and ordering the right product. Whoever you are - a private motorist, the owner of a car service or tire shop, a tuning specialist - you can always count on us! We guarantee high quality products, secured by guarantees, as well as prompt processing of your orders.
How to enable self-diagnosis of the instrument panel
Using the panel you can “dig into the brains” of the Priora:
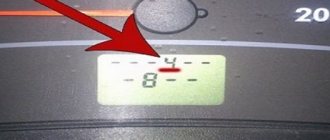
- Hold the button under the fuel gauge and turn on the ignition. The display should indicate the start of the test.
- Press the button again. The display should show the operating system version.
- Click again. The system should show error codes:
- (2) – High voltage level;
- (3) – DT malfunction;
- (4) – DTOZH malfunction;
- (5) – DTV malfunction;
- (6) – Motor overheating;
- (7) – Low oil level;
- (8) – Malfunction of the brake system;
- (9) – Battery discharge;
- E – Brain error, EEPROM.
- If necessary, reset the error: hold the button for three seconds.
- Release the button. Click again. All indicators should light up.
- Leave all the buttons. After 30 seconds, the self-test will automatically complete.
Manufacturer's modifications
Air intake mesh in frill
To ensure the supply of clean and fresh air to the interior of the Priora, the manufacturer has provided a cabin air purification filter. But since the holes in the frill for air intake are very large, which contributes to the fact that foreign objects and debris get into the filter and render it unusable. In order to correct this ailment, it is necessary to solder a metal mesh into the frill, which will protect the filter from debris. This will extend the life of the cabin filter.
Interior noise insulation
As you know, Russian cars are not famous for sound insulation, so domestic Kulibins do the sound insulation of their cars themselves. In order to make sound insulation in the Lada Priora, it is necessary to completely disassemble the interior and glue all the necessary places such as the floor, ceiling, doors, trunk and engine compartment. Sound insulation is glued in. several layers such as vibration, heat, noise. After which the car will be unrecognizable
Acoustic shelf
In a hatchback body on a Lada Priora, it is best to replace the rear parcel shelf with an acoustic one made of wood. Since the original shelf simply loses its shape and bends at extreme summer temperatures. In addition, a standard shelf creaks quite often.
Installation of the 5th gearbox support
On 16 valve engines, 4 engine mounts are installed from the factory. Two guitars and two props. On 8 valve engines there are 3 supports. Two supports and one gearbox cushion. Most owners of 16-valve cars prefer to install such a support on their engines. This support allows you to reduce the rattling of the gear shift lever, its jerking when moving and simply helps to securely secure the engine in the engine compartment. It should be noted that after installation, some vehicles experience increased vibration at idle.
Required
The Itelma instrument panel with navigation can be of two types (externally they are no different):
- 2170-3801010-50 without CAN bus;
- 2170-3801010-60 from CAN bus.
They are not interchangeable, so before purchasing, you should determine whether your vehicle uses a CAN bus or not.
- until 06.2012, cars were produced without a CAN bus;
- remove the instrument cluster and look at the article number or at the block with wires (see pinout of connectors below).
For Kalina (VAZ 1117, 1118, 1119) - all cars without a CAN bus.
- Right steering column switch with joystick (catalog number: 1118-3709340-20);
- Antenna (for roof installation): 1118-7903074.
You can also buy ready-made kits (device + antenna + switch):
- for Lada Priora - 2170-3801010-55;
- for Lada Kalina 1 - 1118-3801010-55.
Description
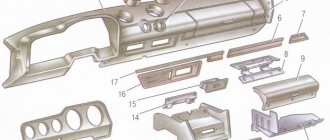
Many owners of Lada Priora 1 cars update the appearance and decorative elements of the interior by installing parts from Lada Priora 2. We also did not ignore the instrument panel , so we present to your attention a set of parts with which you can convert the old panel into the panel of a new one sample
Installed to replace the old panel trim.
Completeness:
— Center console assembly (emergency warning button, compartment for buttons, plug)
— Air ducts (central with guides, side nozzles — 2 pcs.)
Hi all! The winter was long, and we had a lot of time to think about our future plans. Something is already on the schedule;) Spring is gaining momentum, the season is coming =) Today about one of the future changes. On the agenda is “A set of parts for the Priora 2 instrument panel for the conversion of Priora 1 to Priora 2.”
Why a kit and not a finished torpedo?
There are several “buts” that significantly influenced my choice.
1)
The most important! Previously, a torpedo of the first edition was already purchased in excellent condition, minimal mileage and manufactured in 2013 (under the Panasonic climate). Bought for reasonable money + several spare parts were delivered at once. At the time of the search it was like this:
Before the purchase, it was sold with a black fuse box cover and a dark glove box...
They reduced the price and added gray parts from the 10th year. Now I bought them a replacement and black ones!
2)
It was difficult to find a Priora 2 panel in the desired condition and configuration. The item is popular and so are the prices! Plus, all the offers are far from my city, delivery costs about 1500-2000 rubles. And don’t forget about the risk of damage during transportation... Ps: the first one arrived without any jambs.
3)
“A set of parts for the Priora 2 instrument panel for the conversion of Priora 1 to Priora 2” are completely new, factory parts and a guarantee of an almost perfect appearance. Delivery from the store. Relatively inexpensive delivery due to its smaller size and volumetric weight (an important criterion for assessing the cost of transporting TC). In addition, it was possible to purchase other necessary items in one order.
So far I don’t see any significant downsides to such a purchase. There are still some issues with mounting it on the frame and removing the old cover. I would like to do it according to the factory and no worse =) In any case, it can be solved!
I’ll add (03/13/2016) Additional problems have come to light! The central part of the buildings (where the instruments and radio are) is different and 100% there will be problems with installing the Priora 2 tunnel, inserting the upper air ducts, and the upper and middle fastening of the console trim. As sad as it may be, “refinement with a file” is planned...! Previously, I thought the frames were completely identical and, according to the comments of the stores, they should be 1 in 1.
About the prerequisites that led to thoughts about the Prioro Salon.
Anyone in the know knows about the already installed Euro torpedo to replace the S.O. torpedo. Selection: Part 1 Other parts: Frame, Differences in wiring, Buttons, Assembly nuances, Installation of gear motor 2170., Pads and wiring, In the car
During the process of alterations, I answered a large number of questions on the topic of choice and I will say that now my position has not changed. Externally, I continue to like both options; the euro is good in its own way.
Design (appearance) is the first factor that often forms the first impression of a thing. The other side of the coin is the technical features and mechanical part. According to this criterion, the Priora torpedo is ahead.
Everyone evaluates external attractiveness in their own way, there is no point in arguing here because people have different tastes, but constructive solutions can be considered more objectively.
I will describe the most important ones for me.
1)
Air flow distribution system. Now the climate control is Panasonic, the flow direction pattern does not coincide with the standard geometry of the air ducts and damper complex. For example, by turning the handle of the unit to the foot blowing position, you get a direction towards the windshield. It is not possible to use the defroster (the function of blowing dry and warm air onto the windshield).
I think it’s clear) The electronics work correctly, but the mechanical part does not match the plastic.
2)
Internal air ducts in the form of pipes.
More powerful air flow, good performance due to a minimum number of joints and losses. Compactness.
3)
Fuse box compartment. Here it is radically changed, there is more space and a huge plus - a removable lid! Convenient access to electrics thanks to a completely open space.
Installation
Replacing the old instrument panel without CAN with a dashboard with navigation without CAN (2170-3801010-50) is carried out without modifications. We remove the old panel and install a new one in its place, insert the connector with wires, connect the antenna (we fix it on the roof) and, if necessary, change the right steering column switch.
If the old instrument cluster without navigation, but with CAN, and instead of it it is planned to install a new dashboard with navigation with CAN (2170-3801010-60), then you need to rearrange contacts 10-11 to 28-29 (if after connecting it still does not work, change 28 and 29 places). See instrument cluster pinout.
After installing the new instrument panel, the mileage will be reset to zero.
Navigation in the instrument panel runs on Windows CE 6.0 along with Navitel software. It is possible to update the software and download navigation maps from a USB card via a special USB input. Operating the car will become much more pleasant, the only drawback is the high price.
Installing a Priora panel on a VAZ 2110
Replacing the entire torpedo or its lining may be necessary not only because you don’t like it, and that’s that. Although this option is not the last one on the list of reasons, since the designers did not show too much imagination when developing the instrument panel.
Panel trim for old VAZ 2110
But not all car owners know how to do the replacement themselves, and also how to make the dashboard on a VAZ 2110 look cooler and more modern, and not squeak like an old cart, although they would certainly like to learn this. Let's start with the question: why might this be needed at all?
Panel trim VAZ 2110 Kashtan
Required
The Itelma instrument panel with navigation can be of two types (externally they are no different):
- 2170-3801010-50 without CAN bus;
- 2170-3801010-60 from CAN bus.
They are not interchangeable, so before purchasing, you should determine whether your vehicle uses a CAN bus or not.
- until 06.2012, cars were produced without a CAN bus;
- remove the instrument cluster and look at the article number or at the block with wires (see pinout of connectors below).
For Kalina (VAZ 1117, 1118, 1119) - all cars without a CAN bus.
- Right steering column switch with joystick (catalog number: 1118-3709340-20);
- Antenna (for roof installation): 1118-7903074.
You can also buy ready-made kits (device + antenna + switch):
- for Lada Priora - 2170-3801010-55;
- for Lada Kalina 1 - 1118-3801010-55.
Appearance
Currently, tuning for VAZ cars has a wide range of choices. Since Russian-made cars are quite inexpensive, this attracts their buyers. Tuning for Lada cars is also available and can be found in almost any city.
Tinted glass
To give your car a beautiful appearance, the first step is to tint it. Car tinting is relatively inexpensive, ranging from 2,000 to 3,000 rubles. But after tinting, your car will shine with new colors. It is legally possible to tint car windows only from the rear. Since the light transmittance of the film is not so high, viewing in the evening will be difficult.
Lip installation
To give the car a stylish look, you can install a lip on the front instead of the standard fangs under the bumper. There are several types of lips. The rubber lip “Samurai” and the plastic lip from the Chevrolet Cruze fit perfectly on the Priora bumper. The lip should be secured under the bumper with self-tapping screws. The price of the lip is from 500 to 1000 rubles.
Lipspoiler
In the days of the nines, when our fathers raised the rear of the car by installing spacers under the rear shock absorbers and installing huge spoilers like in Need For Speed. Nowadays, it is stylish to lower a car; by the way, you can read how to properly lower a car on our website, and install a small spoiler that is glued to double-sided tape. The price of such a spoiler varies within 1000 rubles.
Alloy wheels
Everyone knows that the wheels of a car are the floor of the car, so the wheels of your car should be beautiful and you like them. On the Lada Priora you can install wheels with a radius ranging from R14 to R17. When installing R16 and R17 wheels, you will have to buy low-profile tires, which is very expensive and not practical, but at least beautiful. When installing disks with a large radius, comfort is lost and the chassis begins to work rougher since the rubber does not “eat up” minor road irregularities.
It is best to install R14 and R15 wheels. Such wheels are relatively inexpensive and the tires for such a radius are high profile. It follows that the comfort of driving a car will not be lost.
SE caps and mirror repeaters
In order to give your car a little luxury, you can install turn signal indicators in the prior mirrors and turn signal plugs in the wings on the SE. This modification is relatively expensive, but it significantly changes the appearance of the car and gives it a certain “richness”.
Sabers and bars
This is an amateur modification and is most often suitable for cars with a dark body color. The rear chrome-plated trunk saber and the front chrome-plated hood saber are painted matte black. This modification is very cheap and simple, but it has its own zest and is relevant when the chrome on sabers begins to swell, which is very common on Priors.