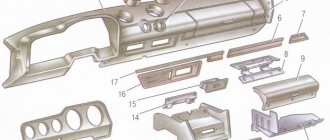
| If you decide to soundproof the engine shield, or tuning the panel (re-tighten or paint), then carefully study the instructions on how to remove and install the Lada Kalina panel with your own hands . |
Depending on the year of manufacture of the car, it may be possible to remove the Kalina panel with or without a heater. In this article, dismantling a dashboard without a stove:
List of required materials and tools
The designers have developed a clear dismantling scheme; the instrument panel can be removed using a Phillips screwdriver. Tip type PH (standard), number “1” or “2”. Rod length 50-150 mm. There are no deep mounting units in the Kalina dashboard mounting scheme; all screws are located in the visible area.
It is not recommended to use a screwdriver to install the shield. The reason is that it is difficult to adjust the fastener pressure, and the panel may be damaged.
Additional materials and tools:
- lighting devices (flashlight, portable lamp), since the light in the cabin will not work;
- pliers or thin-nose pliers for replacing light bulbs;
- WD-40 or equivalent for “stuck” screws;
- a clean rag to clean the hidden elements of the shield from dust.
Before starting work, you need to warm up the interior to room temperature. This makes polymer components more ductile and reduces the risk of chips and cracks.
This is a minimum of accessories; the list can expand if you need to remove the entire front panel of the car. Most of the elements are fixed with latches. The glove box has a removable lid held in place by hinges and 4 latches. No tools are needed to dismantle it.
Possible faults
The following malfunctions are possible with the dashboard:
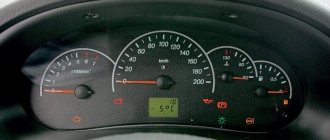
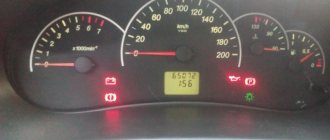
- Fuel level or temperature gauges do not work. The reason may be faulty sensors or damaged wiring.
- When the tank is full, the fuel level needle drops to the zero position.
- The arrow on the fuel level indicator moves abruptly and often drops to the zero position.
- The fuel reserve indicator does not go out.
- If any indicators on the device do not light up, the reason may be burnt out light bulbs, insufficient contact between the light bulb socket and the printed circuit board, oxidation of contacts, broken wires, or a malfunction of the indicator sensor.
- If the speedometer is not working, the reason may be in the flexible drive shaft of the device: the nuts are poorly tightened, a break, mechanical damage, etc. (video author - RasH19).
Removing the instrument panel on Lada Kalina 1
The first step is to disconnect the battery from the power supply system. Disconnect the negative terminal from the battery. If the temperature in the cabin is below +15°C, it needs to be warmed up to +20°C. The dashboard of Lada Kalina 1 is well illuminated by a flashlight, but additional light sources can be used.
The procedure for dismantling the shield:
- The steering column is installed in the lowest position.
- Removing the instrument cluster trim, unscrew the 2 screws at the top.
- Pull the cover towards you, overcoming the efforts of the two lower clamps.
- Use a Phillips screwdriver to unscrew the 2 screws located on the sides of the instrument panel.
- Move the top part of the shield towards you, tilting it.
- Disconnect the connector with wires by turning the lock.
- Remove the instrument cluster from the recesses into which the structure's shafts are inserted.
Tip: the screws can fall behind the panel while unscrewing. It is recommended to use a screwdriver with a magnetic tip.
After this, the Lada Kalina 1 dashboard is repaired or replaced. You can replace the light bulbs by turning the desired socket counterclockwise.
The lighting devices are assembled with a socket, the power of each is 1.2 W. EEC designation W1,2W.
Let's sum it up
In addition to the irresistible desire of LADA Kalina owners to defeat the “crickets” in the panel, there is another reason for removing the structure, this also applies to the removal of the torpedo. This is a noble goal of tuning, especially since now many people know how to disassemble the instrument panel.
The domestic manufacturer has deprived the LADA Kalina of a chic design and quality of panel material with a variety of lights and electronic gadgets. The diehard owners did not give up here either, and boldly installed fashionable instrument panels with a neon glow into the standard design, repainted individual components, installed lighting (including for the feet), and also performed a great variety of modern “tricks.” The main thing is to achieve a good fit of the parts and the panel will thank the owner with a soothing silence.
Installation of the dashboard Kalina 1
Installation is done in reverse order. For prevention, all surfaces are cleaned of dust and dirt, checked for defects and damage. The rag is dry; moisture may get on the surface of the electrical connector. Before installing a new instrument panel, check the correct location of the fastening units.
Installation steps:
- Install the plug connecting to the car's electrical network.
- Turn on the battery and check the operation of the dashboard.
- Disconnect the battery.
- Insert the lower rollers into the mounting recesses.
- Fix the shield, tighten 2 screws.
- Install the cover plate into the lower latches and screw in the mounting screws.
Several types of instrument panels have been developed for the Lada Kalina. They differ in appearance and functionality, but their installation diagram is the same.
When connecting the plug, you need to carefully move the latch to the “closed” position. This part is made of thin plastic and may break if pressed hard. First, insert the plug tightly, then turn the latch.
Removing the trim from the driver's door
Installation of dashboard 2105 to 2107
The algorithm for disassembling the driver's door structure is similar, but there are some subtleties of this process:
- First, the plugs are removed from all fasteners. They are pryed off with a screwdriver.
- The panel plastic will be easier to remove if you first unscrew the fragment for adjusting the mirror structures. Unlike the passenger door, the driver's door has one screw. It is located under the plug.
- The opening mechanism is removed last.
- If your car is equipped with electric mirrors with remote control, then to remove the rear view adjustment panel you need to unscrew the screw located at the bottom.
The procedure for removing the instrument panel on Lada Kalina 2
The dismantling steps for Lada Kalina 2 differ from the first model. The reason is that engineers increased the number of attachment points, which reduced the “rattling” effect after long-term use. Correct replacement of the dashboard is carried out in compliance with standard conditions: heated interior, lighting, disconnected battery.
How to remove the panel on Lada Kalina 2:
- Removing the protective plug located in the lower left part; it is secured with latches. In early models, it is necessary to unscrew the screws to completely remove the fuse box cover.
- Unscrew the 2 screws of the decorative trim and dismantle it.
- Remove 4 bolts on the dashboard (2 each on the bottom and side).
- Tilt the shield, disconnect the connector by turning the lock.
- Remove the panel.
To remove plastic parts, you can use a set of polymer pullers. It will also be needed to replace moldings, clips, and decorative overlays.
After dismantling, the on-board computer readings are reset to factory settings, with the exception of mileage. If the machine is used for personal purposes, you can reconfigure the system yourself. In company vehicles, it is recommended to record the data before starting work. They may be needed to check the condition of the machine.
General diagram of electrical equipment of Kalina
On the electrical circuit of the Lada Kalina model, the pinout of connectors is carried out in several stages. According to the factory drawings, the general position of the elements is initially revealed, then each node is deciphered separately.
- Right front headlight assembly.
- Sensor indicating the position of the hood lock.
- Powering the horn.
- Starter terminal block.
- Battery power cables.
- Generator working unit.
- Voltage supply terminal for the wiper drive.
- Left head optics contact block.
- Right door lift chip.
- Likewise for the glass lift gearbox.
- Output to driver's door speaker.
- Driver's door lock drive.
- Windshield washer reservoir motor.
- Overboard temperature meter sensor output.
- Standard ECM connection connector.
- Same as 12 for the front passenger.
- Indicator of the remaining brake fluid in the expansion tank of the system.
- Same as 11 for the front passenger.
- The front passenger door power window switch, located in the driver's control unit.
- Driver's door window lift key.
- Lock button.
- Power supply for the lift gearbox for the front passenger door.
- Input of the mounting assembly.
- Anti-theft control unit.
- Likewise for signaling.
- Pinout on the dashboard.
- Right turn.
- Glove compartment lighting.
- Glove box light switch.
- Stop key switch.
- Anti-theft ignition switch terminal.
- Headlight design.
- Supply current to the steering column lever connector.
- Left turn signal.
- Right rear speaker block.
- Rear right door electric lock drive.
- Window window heating unit.
- Reverse blocking.
- Hazard breaker.
- Adjusting the stove fan.
- Auxiliary resistor for the stove.
- Stove motor.
- Power supply for rear left speaker.
- Rear left door lock terminal.
- Power supply for fuel pump and float.
- White reverse lamp switch.
- Stop button.
- Cigarette lighter power supply.
- ZX blocking – solenoid power supply.
- Chips for a tape recorder or speaker system.
- Illumination of used ventilation and stove.
- Supplying voltage and signals to the EUR.
- Interior lighting lamps.
- Rear right lampshade.
- Power to the trunk lid lock.
- Cargo compartment lighting drive.
- State license plate illumination.
- Auxiliary stop lamp.
- Directly heated windshield.
- Cargo compartment illumination lamp.
- Left stern light.
The following is the pinout of the first generation Kalina wires for each section individually. This was done due to the increased complexity of the main circuit, where all elements of the on-board circuits are indicated at once. An inexperienced user will not be able to navigate the generalized instructions.
Correct installation of the Kalina 2 dashboard
Mount the instrument panel according to the standard scheme. First, clean the parts from dust and clogging. Check the integrity of the housing and replace the light bulbs if necessary. The temperature in the cabin should not fall below +15°C. In winter, it is recommended to carry out work in a heated garage or similar room.
Installation of the instrument panel:
- Connect the electrical connector and battery.
- Check the operation of the instrument module.
- Disconnect the battery.
- Screw the shield with 4 bolts.
- Install the decorative panel and secure it with 2 screws.
- Replace the protective plug or fuse box cover.
Without removing the dashboard and panel
Read:
Another way. dismantle the “furnace” without removing the torpedo. Sequencing:
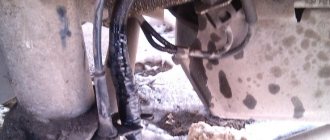
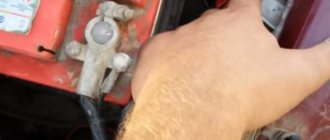
- Coolant drain.
- Removing the radiator cap and gas pedal. Unscrew the three nuts by 10. To remove the heater without disassembling the torpedo, you need to unscrew the cover
- Removing the retaining ring on the brake booster rod. Removes brake pedal rod with retaining ring
- Cut out the panel behind the radiator so you can pull it out without removing the dash. The radiator is removed through the split shell
- Removing the radiator with the brake pedal depressed. Before removal, the nozzles in the engine compartment are disconnected.
Finally, the radiator is removed!
The above method is good because it produces less labor and time wasted, but then it will be necessary to fix the hole left in the shell using soundproofing material or vibroplast.
Dismantling the console containing the stove control unit
As you know, some trim levels of the Kalina-2 car do not have climate control. Here the driver can only control the operation of the stove. The stove control panel is held in place by 4 clips. In general, the mount used here is the same as in versions with climate control, but you won’t be able to remove the control unit panel unless you first remove the three control knobs.
Central console of Kalina-2, Standard equipment
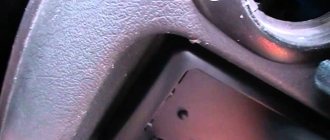
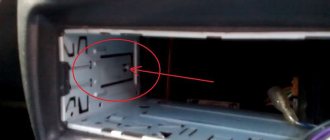
Let's say we managed to dismantle the stove control unit panel. Then, all that remains is to remove the top flap, which is adjacent to the air ducts. This part itself needs to be pulled towards you from below, but first you need to unscrew two screws (they are circled in the figure). You won’t be able to simply grab and pull out the panel; you need to tighten the side clips with a screwdriver. In fact, the entire process is shown in the video we've posted below.
Any device of standard size 1 DIN can be installed in the compartment intended for the radio. You don't need to dismantle anything to do this. It is difficult to imagine a situation in which it is really necessary to remove the center console panels, if we consider the “Normal” or “Standard” equipment. However, you can use the information provided here. Remember that the owner performs all actions at his own peril and risk.
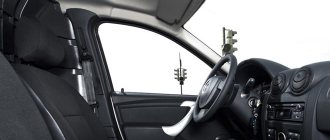
How to remove a torpedo on Kalina? Step-by-step instruction
Many motorists today want to know how to remove a torpedo on Kalina. There is nothing complicated in this operation, but it is carried out in view of various manipulations. In particular, when it is necessary to soundproof the entire cabin, it will be impossible to do without this procedure
So, let's find out how to do this, and most importantly, what nuances are important to know. Let us note right away that it is better not to get down to business without instructions for the Lada Kalina
How to remove a torpedo on Kalina will be useful to know not only for beginners, but also for experienced drivers. There are two ways to remove a torpedo on a VAZ 2192 (although they are also suitable for 1118):
- Implying dismantling the heater;
Implying the “old-fashioned” method, which does not require draining the coolant at all.