How to remove the dashboard on a VAZ 2107
You can hear a complaint from many car enthusiasts that the “native” design of the dashboard (or in common parlance, “torpedo”) on the VAZ 2107 is extremely laconic, stingy, even boring.
Others claim that yes, the pad is simple, but nothing distracts the driver. The instrument panel, or trim, is a broader concept, “all” the plastic that is located in the front part of the car’s interior. It is with the desire to change the appearance of the instrument panel with your own hands that professional tuning of not only the interior, but the entire car, often begins.
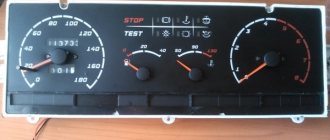
Let us remind you what the factory trim on the VAZ 2107 is:
And here’s how you can do the tuning yourself, change the instrument panel and embed a screen into the trim (not to mention the steering wheel):
But here is an almost professional tuning of the VAZ 2107 interior:
I can’t even believe that this tuning was done by hand!
To properly change the appearance of the front part of the cabin, change the instrument cluster, or install a new audio system, you often cannot do without removing the dashboard.
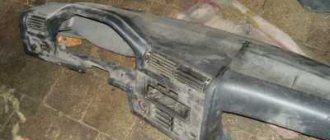
The torpedo consists of almost two dozen parts. Below is a schematic view of the torpedo.
In fact, it is very simple to remove and install the torpedo with your own hands. You will need a flat-head and Phillips-head screwdriver and a 10 mm open-end wrench.
Sequence of actions when removing a VAZ 2107 torpedo.
Attention! First, remove the negative terminal from the battery.
- Remove the negative terminal from the battery.
- Now you need to remove the shelf located in front of the passenger. To do this: unscrew the screws (2) on the right and one on the left;
- the last, fourth screw is fixed in the depth of the shelf, now it can be removed.
- using a flat-head screwdriver, pry up the additional central panel from either side, release the latches from the grooves, and pull it out along with the filling, then disconnect the connector going to the light switch:
- Using a flat-head screwdriver, carefully press out the switches, release them from the connectors and remove:
- first you need to separate the front and rear halves of the casing: unscrew the screws (4 pcs.), and one unpaired screw securing the lower half and separate it with both hands:
- Using the same screwdriver, we remove the tips of the heater levers and the deflectors through which air is supplied:
- after that, we “push” the meter into the dashboard, then unscrew the right screw of the shield and lift the shield on the right side. In the gap between it and the torpedo, unscrew the nut of the cable going to the speedometer, then lift the left edge of the shield and remove the economizer hose going to the fitting (on the VAZ 2107 on the left):
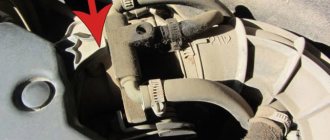
- Using small pliers, unscrew the nut securing the main cylinder of the corrector and also push it inside the panel:
In order to do torpedo tuning with your own hands, you can think about the following directions:
- replacement of standard dials and hands;
- surface flocking;
- installation of LED lighting (light tuning is a separate topic);
- inserting non-standard devices into non-standard holes (navigators, TVs), etc.
Removing the panel
You can repair a VAZ 2107 with just a few screwdrivers in your arsenal. In particular, to remove the panel you only have to unscrew one Phillips screw.
Photo gallery: what tools should be on hand
How to properly remove the instrument panel
To quickly dismantle the shield, you need to follow the algorithm below:
- Pry up and remove the plate located to the right of the stove. It shows the corresponding icon.
Using a screwdriver, remove the plate to the right of the stove
Using a Phillips screwdriver, unscrew the screw hidden under the plate.
The lower heater control knob has already been removed
The right edge of the panel is tilted to the right and towards itself
To remove the panel, disconnect the contacts from the heater switch button
The gray thick hose is pulled to the side and the wing nut on it is unscrewed
Unscrew the nut from the daily mileage reset handle
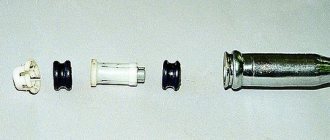
According to the experience of auto mechanics, there is no particular need to mark the plugs; it is almost impossible to plug them back in incorrectly.
The first white plug is removed, the second, located a little deeper, is also removed
The white econometer wire is located a little further from the opposite edge of the panel
The last of the three plugs is red and can also be removed
The removed panel was in your hands - dismantling was carried out successfully
The panel remains in your hands. The entire operation usually takes a quarter of an hour.
The panel is assembled in the reverse order.
The VAZ “Seven” became the last classic model of the Volga plant. Nevertheless, the owner of such a car can solve most problems on his own. He can even change the dashboard himself.
Why do you need to remove a torpedo on a VAZ-2107
The need to dismantle and disassemble a torpedo is often faced by car enthusiasts who:
- intend to tune the dashboard, bring it in line with the latest fashion trends;
- carry out repairs of one of the devices that has failed;
- they are going to replace the speedometer cable, which has become unusable;
- restore the functionality of one or more indicators located on the panel.
During the tuning process, after dismantling the dashboard, you can install a new, more modern radio, additional heated glass and other high-tech devices, as well as reupholster the panel using some of the latest materials to improve its appearance.
If your main goal is repair, then simply replace the broken part and install the product in its place.
The most common reasons for dismantling
There are a lot of reasons for removing the tidy on a VAZ 2107, and some of them can be called banal, but nothing can be done. The most common reason when you need to remove the instrument panel is a burnt-out backlight bulb. Replacing light bulbs in the dashboard of a VAZ 2107 is carried out only when dismantling the device, and this procedure is simply impossible to perform otherwise.
The dashboard on the VAZ 2107 must also be removed for a number of the following reasons:
- Malfunction of pointer indicators.
- Failure of the instrument lighting, as well as lack of functionality of the arrow indicators.
- Replacing the device with a new one, for example, if a digital panel is installed instead of the factory instrument panel.
- Tuning or upgrading the device.
As practice shows, most often the need to dismantle the dashboard arises precisely because the backlight bulb burns out. If the device is dismantled for this reason, it is recommended to immediately replace conventional light bulbs with LED ones.
Required Tools
Before starting work, you will need to prepare the necessary tools so that you do not have to be distracted during the process. Despite the fact that the work of removing the device in question is quite labor-intensive, to implement it you will need a small set of tools, including:
- Phillips and slotted screwdriver.
- Electrical tape to indicate chips that are disconnected from the device.
- Work gloves for unscrewing the speedometer cable.
When all the tools are prepared, it remains to make sure that the parts and elements that are planned to be installed or replaced on the dismantled device are available. After this, we proceed to perform the main part of the work.
How to dismantle the instrument panel: step-by-step instructions
First of all, you need to open the hood of the car and remove the negative terminal from the battery in order to de-energize our dashboard. After this, the work is performed in the following sequence:
- unscrew the dashboard shelf and the glove compartment body using a special screwdriver;
- turn off the power to the light bulbs that illuminate the interior of the glove compartment in your car;
- We very carefully remove the additional dashboard along with the clock and other devices. To do this, you will need to pry the part with a screwdriver and pull it out of the special grooves;
- turn off the cigarette lighter and warning lamps by removing the corresponding wires located behind the additional panel;
- we remove the switches located in the immediate vicinity of the gearbox lever and disconnect them from the on-board network;
- We unscrew the screws that you will immediately see under the switches and the bolts intended for fixing the main console of the torpedo. After this, you can freely remove it without fear of damaging the wires;
- remove the steering column cover;
- remove the heating system cover together with the air duct deflectors;
- dismantle the heater control unit;
- unscrew the last nuts holding the torpedo. For this purpose you need to use a key of 10.
Removal and installation procedure
Before starting removal work, it is necessary to turn off the power to the car. To do this, simply disconnect the negative terminal from the battery. For some, it is enough to turn off the ground, while others simply remove the terminal. The following order will be:
- Removal will be hampered by the control knobs for the interior ventilation and the coolant supply valve to the heater radiator. In this case, a screwdriver comes to the rescue;
- The next step is to release the daily mileage reset handle. It is located on the right side of the dashboard near the hazard warning switch. You need to unscrew the fastening nut, remove it along with the washer and push it inside the panel;
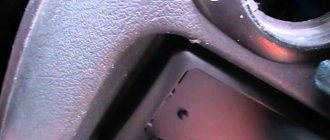
- On the right side of the “tidy” in the area of the heating and ventilation control levers, there is a plug that needs to be removed. A thin slotted screwdriver does this well. There is a self-tapping screw under the plug that needs to be unscrewed;
- After this, you need to lightly pull the right side of the panel towards you. It is not yet possible to pull it out any further. This is prevented by the speedometer cable, econometer hose and wires;
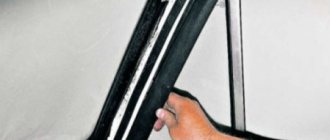
- The speedometer cable is secured with a knurled nut, which can be unscrewed without much effort. The only problem that can “spoil” the image of a repairman is the presence of grease on the speedometer cable sheath. Therefore, it is better to perform this operation with gloves. It is best to dismantle the cable from the right side of the panel or from above; this will not be possible in other places;
- Next, you need to remove the hose that supplies vacuum pressure to the econometer. It attaches without clamps, you just need to pull it towards you. Some effort may be required;
- This is not the end of the removal procedure; the shield is held in place by wires. They are combined into multi-colored plastic connectors. When releasing them, remember how they were located, so that later when assembling they are correctly installed in place.
After this, the shield can be easily removed outside for repairs, tuning or other work. The installation operation is performed in the reverse order of removal. You just need to be careful about installing the connectors with wires in their places.
As can be seen from the above, there are no problems when dismantling the “tidy”. We hope that any reader who reads this article will understand how to remove the instrument panel on a VAZ 2107. As in any matter when working with complex mechanisms, you should not rush in order to avoid “accidental” breakdowns or damage.
Recommendations to avoid problems during the process of removing the torpedo
If you intend to remove the dashboard in a VAZ-2107 car for the first time, be sure to follow the following rules:
- When removing the upper part of the steering column protective cover, be careful not to damage the ignition switch O-ring. This part is made of rather flimsy rubber that cannot withstand strong mechanical stress;
- Mark all connectors, wires and switches that you remove to gain easy access to the dashboard. They will avoid confusion during the installation process;
- When removing the additional dashboard, do not try to use force, as there is a fairly high risk of breaking the plastic clips. Finding a replacement for them will not be so easy.
To remove the torpedo, it is better to use special tools, so we recommend preparing in advance a regular and medium-sized Phillips screwdriver, pliers and a set of open-end wrenches. This will help you remove all the necessary parts, as well as unscrew the nuts and bolts that hold the dashboard in place. In order not to make any mistakes during the work process, we suggest watching a video that describes in detail each stage of removing the torpedo.
Features of shield 2107
The peculiarity of the seven dashboard is that it has its own special way of attaching to the dashboard. On the six, you can remove the panel quite simply - just disconnect the wiring harness chips from the terminals on the shield and unfasten the latches. In the five, the scheme for dismantling the tidy is similar to the seven, but there, too, everything is somewhat simpler due to the changed shape of the front panel and fairly good access to the mounting screws.
The VAZ 2107 dashboard received a completely different architecture and acquired new functions that were not available on the same 2105. For example, now before the driver’s eyes there was an economizer dial, which approximately showed the optimal driving mode for saving fuel, although few people pay attention to it. A much more useful thing was the ammeter, which disappeared in the top five. Due to the compaction of the architecture and the large number of devices and lamps, the design of the main printed circuit board changed - now the lamps were connected not by wires, but by socket contacts directly to the board.
We independently remove the dashboard of a VAZ 2107
For a novice car enthusiast, removing the dashboard may not seem like a very difficult task. But this impression is deceptive. Before the VAZ 2107 instrument panel is completely removed, you will have to do a lot of manipulations, which we will tell the reader about in this article.
The most common reasons for dismantling
- One or more devices have failed.
- The panel joints began to creak while driving, and the car owner decided to glue them from the inside to eliminate this annoying creak.
- Several light bulbs on the panel burned out.
- The speedometer cable has become unusable and needs urgent replacement.
Required Tools
- Set of open-end wrenches.
- Flat blade screwdriver (medium size).
- Phillips screwdriver (medium size).
- Pliers.
What does the panel consist of?
The panel consists of a large number of elements that are responsible for the operation of certain components of the VAZ 2107 car. The instrument panel is located in the car interior and is directly embedded in the dashboard on the driver’s side. The main elements are located under a special plastic transparent glass, which protects them from mechanical damage. The elements of the instrument panel include the following elements:
- Accumulator charging;
- speedometer;
- odometer;
- tachometer;
- motor temperature sensor;
- ECON – instantaneous fuel consumption indicator;
- additional signaling elements;
- resettable odometer;
- and 10 – fuel level in the gas tank and warning light.
Let's briefly look at the purposes of each of these elements.
Instrument distribution diagram on the control panel of a VAZ 2107 car
- Speedometer. The device located on the right side of the panel is called a speedometer. Serves as an informant for the driver about the speed of the vehicle. The scale has values from 0 to 180, which indicates the speed of the vehicle. There are two dials on the device that keep track of the distance traveled by the “seven”. One of them has the ability to adjust, but the bottom one does not.
- Tachometer. The device located on the left side serves to inform the owner about the crankshaft rotation speed in relation to a unit of time. Most drivers do not really understand the purpose of this element and rarely pay attention to it. But this element is very important, since it is a direct indicator of the quality of engine operation. The closer the arrow gets to the red mark, the more the motor is overloaded. And when it crosses the red line, the car’s movement should be stopped immediately, since the engine is operating in critical mode.
- ECON flow indicator. The indicator, located in the upper left corner of the instrument panel, performs the function of indicating the consumption of the fuel mixture in instantaneous time while the engine is running. When driving at speeds above 90 km/h, fuel consumption increases and the arrow moves to a yellow position. A very useful feature for the driver to be able to save fuel.
- Temperature indicator. Designed to indicate the motor temperature value. Above 100 degrees Celsius, the needle moves to the red mark, which indicates overheating.
- Fuel indicator. Using this indicator, drivers determine the amount of fuel in the tank, which is transmitted through an electronic sensor and level.
- Battery charge. Indicates how good the battery is; position on the red mark indicates the need to recharge.
Important points
- Before removing wires and connectors, it is recommended to mark them to make reassembly easier. It is convenient to apply these marks with a black marker or felt-tip pen (because most of the connectors under the dashboard are white).
- You need to carefully remove the upper part of the steering column protective cover, as you can damage the rubber ring on the ignition switch (it gets caught on the edge of the cover and breaks easily).
- When removing the additional panel, do not tilt the screwdriver too much: the clamps that hold this panel are plastic and break very easily.
As can be seen from this article, removing the dashboard on a VAZ 2107 is a labor-intensive task, but it is doable. The main thing is to adhere to the instructions outlined above and not to use too much effort when removing: the panel material, despite its apparent strength, breaks quite easily.
If you find an error, please select a piece of text and press Ctrl+Enter.
Self-production: frame
Creating a VAZ beard entirely with your own hands may seem like a difficult task, but in reality this is not entirely true. It is enough to select special drawings on the Internet, stock up on materials for work and read the tuning instructions. Initially, the driver must work on the frame, choosing the optimal model as a template. Practice shows that birch plywood is the most popular. Its thickness should be seven millimeters. It has won positive feedback from owners largely due to its quality and increased level of strength as part of the tuning parts.
To do the work yourself, you will also need vinyl leather, wooden blocks with a cross-section of 2x2.5 centimeters and one tube of epoxy glue. Before you start processing plywood, you must first create a cardboard template. For this, cardboard material with good strength is used. Each mark must be transferred to the plywood. You can make adjustments before cutting the holes and shaping them into the desired shape. The phrase “measure twice, cut once” perfectly fits the description of this stage. After perfectly copying the applied dimensions, you can pick up a jigsaw and begin to carefully cut out the console structure along the contours.
Materials and tools
Console tuning usually consists of making a new VAZ 2107 beard, on which mounting locations for switches, indicators, control devices and other equipment are pre-provisioned. The most affordable material for making your own beard is plywood. The thickness must be at least 6 mm, otherwise it will not be possible to achieve the required rigidity of the product. For finishing, artificial leather is most often used, matched to the color of the interior elements, or, more recently, carbon fiber of a suitable color.
Sometimes tuning the beard of a VAZ 2107 is accompanied by a comprehensive redesign of the interior design with the replacement of finishing materials for the door trim and trim of the front panel with carbon fiber or leatherette. To make a tuned VAZ 2107 beard, in addition to finishing materials, the following devices and tools are needed:
- jigsaw;
- electric drill or cordless screwdriver;
- “grinder” (angle grinder);
- locksmith corner;
- pencil;
- ruler (roulette);
- glue gun (tube of glue);
- furniture stapler (for fastening leatherette).
The new console (beard) is installed in place of the standard one, which should be dismantled to free up space and take the measurements necessary to create the workpiece drawings.
How to create a beard: step-by-step instructions
Creating a beard with your own hands is a rather difficult task that must be performed with extreme precision. After making the frame, you can create bars and then insert them into the designated place. Once their installation is completed, you can begin tightening the frame using self-tapping screws. Since we are creating a VAZ beard with an armrest, it is recommended to steam the plywood in hot boiled water before starting work. This will allow you to achieve better ductility of the material during processing. Steaming the plywood will also make it possible to solve the problem associated with the transition to a narrower part between the front seats and a wider one where the radio is located. As soon as the entire tuning structure is ready, it must be dried. This process usually takes about two days.
Next, the owner must create a bent plywood insert with his own hands, in which there is a small hole. It is used to create free space for placing a lever. The workpiece will have to be boiled to give it the desired shape. Some VAZ owners use a simple kitchen sink wall. Once the part is processed, the element will have to be completely dried.
The issue of hardening must be taken seriously, since the durability of the product as a whole depends on it. Place a caprolon stocking on the tuning part, then fill in several layers of epoxy resin. After the part has completely dried, you need to drill a hole for the gearbox lever. To fasten the finished panels with your own hands, use glue. The structure must first be puttied and cleaned of dirt/sawdust. Once the part is processed, you can begin to create the covering. Without it, the center console will look too simple.
conclusions
The beard of VAZ cars makes it possible to significantly simplify driving comfort. Both the driver and the passenger will not have to reach for the radio. Depending on the design, you can also place additional cells here to store parts or small personal items. It usually takes several days to create a part. You need to be prepared for this right away. Under no circumstances should you start by cutting plywood, as there is a high chance that you will not be able to install it. A cardboard blank will allow you to modernize the design taking into account individual needs. Of course, in addition to creating a beard with your own hands, you can also seek help from a specialized car service. But why, if this method will save a lot of money? Therefore, feel free to take on interior tuning, starting with the console!
Changing the torpedo
Some drivers are not satisfied with the appearance of the torpedo on the VAZ 2107. Sometimes this element from the “five” may be installed on the car. In this case, a purely practical inconvenience is added to the unpleasant appearance. You have to close the glove compartment with a universal “lock”, or rather, seal it with tape. Otherwise it will constantly open. Therefore, you can change the torpedo.
Of our models, the best fit is a spare part from a VAZ 2115. You just have to use polyurethane foam to seal small non-joints. Of the foreign cars, the best fit here is a torpedo from a BMW E30
. She will look much more advantageous.
There is another option, install a torpedo from a Toyota Camry
.
It is slightly wider than the standard part. Therefore, for a more accurate installation, you will have to trim the torpedo a little from the bottom on the sides. But even in this case, it will interfere with the window regulators. So get ready to install electric lifts right away. This will be the best option. You will also have to struggle with installing the steering wheel cover.
The standard cover will not fit into the steering wheel opening on the BMW dashboard. Therefore, craftsmen usually perform adjustments. Some people cut the panel, but it is much easier to cut off the excess from the casing. It is better to use standard mounts from the original torpedo, only they are slightly bent. Often the torpedo can sag downwards, so it is advisable to immediately provide support.
Connecting the stove
. Many drivers cannot connect the stove. The problem is that the air ducts do not match. Therefore, you will have to make special adapters. To do this, you can use air ducts from the Gazelle. All that remains is to adjust them a little and secure them. It is best to use a cable from the heater from BMW. It is much easier to connect it to the stove than a native Zhiguli to a new torpedo.
Beard VAZ 2107
A beard is more than just facial hair. This is a device in the car interior in which the radio and other adjacent systems are located. In the VAZ 2107, unfortunately, the center console is located at the bottom, so reaching the radio in a relaxed state is very problematic.
Owners of this car model can use one of two ways to create tuning:
- seeking help from a specialized tuning company (usually a car repair shop), which can create a console for the interior;
- DIY beard making.
The first method, although it saves time and effort, still has a lot of negative aspects. For example, making a custom console is not cheap. Secondly, it is not always possible for an auto repair shop employee to perform tuning in strict accordance with the customer’s requirements and expectations. Accordingly, even if you decide to use the services of a specialized company, this does not guarantee that you will be completely satisfied with the result.
Features of the “tidy” on the seven
This unit in the car interior is designed to provide various information to the driver during the operation of the car. It informs about the speed of movement, shows the distance traveled by the car, and signals the occurrence of malfunctions in the main components and assemblies of the car. Unlike the “tidy” of previous models, it not only has a changed appearance, but is also endowed with a wider range of control and alarm functions.
So, a voltmeter has been added to its composition, showing the voltage of the vehicle’s on-board network, and an econometer, which helps to continue driving in the most economical mode. For models with an injection engine, the instrument panel contains a power unit health indicator. The designers changed the mounting of the signal lamps. If in older models wires were connected to each of them, then in this model they are absent.
Self-production: frame
Creating a VAZ beard entirely with your own hands may seem like a difficult task, but in reality this is not entirely true. It is enough to select special drawings on the Internet, stock up on materials for work and read the tuning instructions. Initially, the driver must work on the frame, choosing the optimal model as a template. Practice shows that birch plywood is the most popular. Its thickness should be seven millimeters. It has won positive feedback from owners largely due to its quality and increased level of strength as part of the tuning parts.
To do the work yourself, you will also need vinyl leather, wooden blocks with a cross-section of 2x2.5 centimeters and one tube of epoxy glue. Before you start processing plywood, you must first create a cardboard template. For this, cardboard material with good strength is used. Each mark must be transferred to the plywood. You can make adjustments before cutting the holes and shaping them into the desired shape. The phrase “measure twice, cut once” perfectly fits the description of this stage. After perfectly copying the applied dimensions, you can pick up a jigsaw and begin to carefully cut out the console structure along the contours.
How to create a beard: step-by-step instructions
Creating a beard with your own hands is a rather difficult task that must be performed with extreme precision. After making the frame, you can create bars and then insert them into the designated place. Once their installation is completed, you can begin tightening the frame using self-tapping screws. Since we are creating a VAZ beard with an armrest, it is recommended to steam the plywood in hot boiled water before starting work. This will allow you to achieve better ductility of the material during processing. Steaming the plywood will also make it possible to solve the problem associated with the transition to a narrower part between the front seats and a wider one where the radio is located. As soon as the entire tuning structure is ready, it must be dried. This process usually takes about two days.
Next, the owner must create a bent plywood insert with his own hands, in which there is a small hole. It is used to create free space for placing a lever. The workpiece will have to be boiled to give it the desired shape. Some VAZ owners use a simple kitchen sink wall. Once the part is processed, the element will have to be completely dried.
The issue of hardening must be taken seriously, since the durability of the product as a whole depends on it. Place a caprolon stocking on the tuning part, then fill in several layers of epoxy resin. After the part has completely dried, you need to drill a hole for the gearbox lever. To fasten the finished panels with your own hands, use glue. The structure must first be puttied and cleaned of dirt/sawdust. Once the part is processed, you can begin to create the covering. Without it, the center console will look too simple.
conclusions
The beard of VAZ cars makes it possible to significantly simplify driving comfort. Both the driver and the passenger will not have to reach for the radio. Depending on the design, you can also place additional cells here to store parts or small personal items. It usually takes several days to create a part. You need to be prepared for this right away. Under no circumstances should you start by cutting plywood, as there is a high chance that you will not be able to install it. A cardboard blank will allow you to modernize the design taking into account individual needs. Of course, in addition to creating a beard with your own hands, you can also seek help from a specialized car service. But why, if this method will save a lot of money? Therefore, feel free to take on interior tuning, starting with the console!
What is tuning and how is it useful?
Car tuning (from English tuning - setting, adjustment) is a modification, technical improvement of a car, making changes to the factory characteristics in order to improve its characteristics. In simple words, tuning is a modification of a car to suit individual needs and tastes.
Almost everything in the car is subject to tuning: engine, transmission, suspension, wheels, brakes, seats, steering wheel, dashboard, lights, headlights, bumpers, mirrors and much more.
Tuning the appearance of a car (painting it in unusual colors, installing cast or forged wheels, stickers, airbrushing, tinting windows, installing spoilers, changing headlights, etc.) is also called styling, as it allows you to create an individual style for the car, making it stand out in traffic.
With the help of tuning you can turn your favorite “seven” into a sports car
According to my observations on the city streets, “classics” are often subject to tuning of both external elements and the interior. There were “sevens” that were almost as good as modern foreign cars in terms of comfort: with air conditioning, electric windows, powerful acoustics, comfortable seats, and beautiful dashboard lighting.