Added Mar 30, 2015 to Dashboards
Without a doubt, in terms of repairs, VAZ 2101-07 cars can be called the simplest among all the cars produced by the automaker AvtoVAZ. It is for the ease of repair and the relatively low cost of spare parts that the VAZ 2101-07 models are valued by car enthusiasts.
However, in this article we will not discuss the advantages of the VAZ classic. Our topic is the process of removing the dashboard from cars such as the VAZ 2101-06 Zhiguli and VAZ 2107 Lada. By the way, dismantling the dashboard may be required not only to perform certain repair work, but also for tuning. For example, this could be replacing the standard backlight with LED (as an example: tuning the GAZ 3110 Volga instrument panel)
First of all, of course, we will consider removing the dashboard from the predecessor of all VAZ cars - the VAZ 2101. Note that the process described below is correct for all modifications of the Kopeyka: 2101, 21011, 2102, 21013.
So, dismantling the dashboard from a VAZ 2101 looks like this:
1. Put the car on the handbrake and disconnect the negative terminal from the battery.
2. Remove the decorative and protective casing of the steering column shaft, for which we unscrew the corresponding mounting screws. We also remove the decorative lining of the windshield pillars.
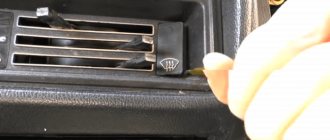
3. Remove the instrument cluster. To do this, use a straight screwdriver to remove the decorative cover of the radio socket and, through it, press the right spring clamp of the instrument panel by hand. Carefully push out the instrument cluster, disconnect the speedometer cable and the connectors with wires from it.
3. Use a straight screwdriver to pry up the heater switch, disconnect the wires and remove it.
4. Disconnect the wires that provide power to the glove compartment lamp. After this, unscrew the screws securing the side parts of the “glove compartment” to the dashboard.
5. Remove the handles of the heater control levers.
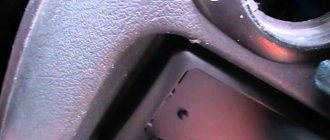
6. Unscrew the screws securing the instrument panel to the cross member of the front part of the body, according to the diagram:
7. Unscrew the fastening nuts: two of them are in the “glove compartment” opening, and two are in the instrument cluster opening.
8. Remove the dashboard from the car. Installation is carried out in the reverse order of removal.
How to remove the instrument panel on a VAZ 2101
How to remove the tidy from a VAZ 2101
I decided to change the design of the panel. Home appliances are an economical option, don’t judge too harshly) There are still many configurations.
Unscrew the screws securing the right decorative trim. windshield and remove it. Remove the left pillar trim in the same way.
Remove the decorative and protective shaft from the control column shaft. To do this, loosen the 5 screws and carefully remove the top and bottom covers.
Using 2 straight screwdrivers, we cut out the clamps with which the composition of the device is fixed. Pulls the visor of the device.
Remove the speedometer drive nut. Disconnect the cable and set it aside.
Make sure that the wire connectors that go into the devices are labeled so that they do not get mixed up when installing the device panel in its original location. Disconnect the connectors and remove the tool group 100 percent.
Using a screwdriver, move the electric clock located in the center of the dashboard, disconnect the wires from it and completely remove the clock. We do the same thing with the heater mode switch.
Using a small straight screwdriver, loosen the heater control knob latches and remove them from the control arms.
Disconnect the wires from the glove cartridge.
Remove the screws that secure the sides of the compartment. Remove sides. We unscrew the nuts that secure the instrument panel to the body, which are located under the glove cap.
Remove the screws that secure the instrument panel to the bottom of the chassis. We also unscrew the two nuts securing the panel at the location of the device.
READ How to remove the interior lamp of Niva Chevrolet
Lift the device panel slightly and remove it. Install in reverse order.
AutoNews / Reviews / Tests
Airbrush as a radical and simple way to change the “Kopeyka”
The easiest cosmetic product to make your “Kopeyka” unique and unique in appearance and for everyone is airbrushing, which is impossible to remain silent about.
Interesting painting and vinyls are really important components of experiments, if we are talking about VAZ’s first-born.
Autographs of reputable cars emphasize the personal preferences or status of the owner, while airbrushing on a Kopeyka is a unique way to “get away.” Amateurs often depict… a penny on the “Kopeyka”.
Artist Andrey Bilzho also boldly painted his “Kopeyka”.
According to him, it pleases city transport passengers.
Citizens, generous with ideas, place domestic cats with fat bellies and hungry eyes in their VAZ 2101.
And wild, freedom-loving tigers.
But not only the outer part of the car body can be airbrushed.
Even the engine compartment is decorated with airbrushing, which, “strewn” with crystals and stones, looks surreal.
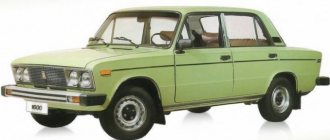
In general, summing up everything that has been said, it must be said that if you are afraid to spoil a new foreign car, and they are afraid to breathe on a very old retro Rolls-Royce, then the Lada-01 is that unique car that no one is afraid to spoil, therefore any tuning of it is characterized by incredible courage .
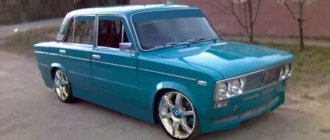
The fact that the VAZ 2101 tuning in the photo simply amazes the imagination of many car enthusiasts is the main proof of the correctness of the decision to revive the legendary “penny”. Car modernization has gained well-deserved popularity due to its simplicity of design, good dynamic properties, low cost, unpretentiousness and maintainability.
Remaking the body of a “penny” is not a simple process. It is often accompanied by increased structural rigidity. This is done with the help of additional arcs and beams. Thanks to deep body tuning (which is most often done), a radical change in the appearance of the car is achieved.
A seemingly simple grille located along the entire front of the car will look quite stylish.
When choosing a lattice, you should pay attention to the size of the cells. It's better if they are not large
The installation of a new voluminous bumper, which will also improve the aerodynamic parameters of the car, will help make the car's design more sporty and aggressive.
Upgrading car headlights can be done using:
- painting the substrate;
- mask painting;
- tinting;
- installation of LED strip;
- replacing the standard backlight.
We remove the dashboard from a car of the VAZ 2101-07 family
Added Mar 30, 2015 to Dashboards
Without hesitation, in terms of car repairs, the VAZ 2101 -07 can be called the most ordinary among all the cars that were produced by the automaker AvtoVAZ. It is precisely for the ease of repair and the relatively low price of spare parts that the VAZ 2101 -07 model is valued by car owners.
But in this article we will not talk about the advantages of the VAZ classic. Our topic is the process of removing the dashboard from cars such as VAZ 2101-06 “Zhiguli” and VAZ 2107 “LADA”. By the way, dismantling the dashboard may be required not only to perform certain repairs, but also for tuning. For example, this could be replacing the standard backlight with LED (as an example: tuning the device panel of the GAZ 3110 Volga)
First, of course, we will look at removing the dashboard from the predecessor of all VAZ cars - the VAZ 2101 . Note that the process described below is correct for all modifications of Kopeika: 2101, 21011, 2102, 21013.
So, dismantling the dashboard from a VAZ 2101 looks like this:
We put the car on the handbrake and disconnect the negative terminal from the battery.
We remove the decorative and protective casing of the steering column shaft, for which we unscrew the corresponding mounting screws. We also remove the decorative lining of the windshield pillars.
We remove the instrument cluster. To do this, use a straight screwdriver to remove the decorative cover of the radio socket and, through it, press the right spring clamp of the instrument panel by hand. Carefully push out the instrument cluster, disconnect the speedometer cable and the connectors with wires from it.
Use a straight screwdriver to pry up the heater switch, disconnect the wires and remove it.
We disconnect the wires that provide power to the glove compartment lamp. After this, unscrew the screws securing the side parts of the “glove compartment” to the dashboard.
Remove the heater control handles.
We unscrew the screws securing the instrument panel to the cross member of the front part of the body, according to the diagram:
We unscrew the fastening nuts: two of them are in the opening of the glove compartment, and two are in the opening of the instrument cluster.
Remove the dashboard from the car. Installation is carried out in the reverse order of removal.
Technique for tuning a “kopek” torpedo
Of course, the VAZ-2101 dashboard looked interesting many years ago, but now it is outdated both morally and practically. It is this fact that guides car owners to consider options for tuning the VAZ-2101 torpedo.
Experienced craftsmen indicate that there are two options. The first option involves installing a cool torpedo taken from a foreign car.
Unfortunately, this option impresses only a few. Firstly, it will cost you a tidy sum, which is not always justified. Secondly, some torpedoes from foreign cars are categorically not suitable for a “penny”, so it will be quite difficult to install an instrument panel in the vacant space. Even if everything succeeds, it is unlikely to be accompanied by high aesthetics.
The second method involves the use of a torpedo removed from another VAZ car. This is a more practical method, since it is possible to choose the best option for a successful replacement.
Preparatory work
To find a suitable instrument panel for the VAZ-2101, and then do the tuning yourself, it is important to collect information regarding which instrument panels are installed on other “relatives” of the VAZ-2101.
The most popular is a torpedo installed because it is equipped with a tachometer. However, to face the truth, calling it the most profitable option for tuning the VAZ-2101 instrument panel is not entirely reasonable.
The VAZ-2105 torpedo has special mechanisms that ensure glass blowing, but at the same time it lacks the same desirable tachometer.
Having considered all the options for the instrument panel of VAZ cars, we can conclude that the best option is the “Seven” torpedo, which has a tachometer, and is additionally equipped at the factory with a central air duct and a heating system that ensures maintaining comfortable conditions in the car interior.
Now that the choice has been made, you can begin the practical part of replacing the VAZ-2101 torpedo with your own hands.
First, you will have to focus your efforts on dismantling the old torpedo. Such actions should be carried out carefully, without haste.
The algorithm of actions will be accompanied by the following sequence:
- removing the instrument panel;
- dismantling the glove compartment shelf;
- unscrewing the fasteners securing the panel to the engine compartment;
- dismantling the cable.
After this, you should move on to the next dismantling of the steering column. It is also secured with four nuts, which you, of course, need to unscrew, and then loosen the screw that secures the shaft to the gearbox.
Before performing the following steps, open the hood of your “penny” and remove the entire pedal assembly. Due to the fact that the radiator is partially affected, it is useful to drain all the antifreeze from it in advance.
Installation of a new torpedo
After completing the preparatory part, feel free to proceed to the more important part, which, for all your efforts and efforts, will provide you with incredible positive results from the result obtained, the tuning of the panel of your VAZ-2101.
How to Remove the Instrument Panel on a VAZ 2101
Replacing the instrument panel on a VAZ 2103, VAZ 2106
Welcome! Dashboard. It occupies a very important place in the car's interior, because if it doesn't, how will you know how fast the car is going, what the engine temperature is, and so on. To replace the instrument panel with a VAZ 2106, read below.
The note! To replace the panel, you will need the following tools: the first pliers and two screwdrivers, and you may need a basic set of wrenches and a marker!
Question? And for what purpose do you change the dashboard in your car? (Write your answer in the comments)
So the available source materials:
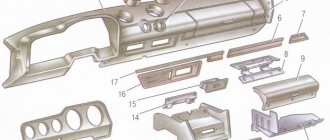
Instrument panel assembled with instruments Fig. 1. (positions 1, 5-9,15-19 are required. Positions 2,3,10 can be taken from 2101, bracket 14 is required when installing console 2106)
Figure 1 – Instrument panel
In Figure 2, in the “glove compartment” section, element 2101-5303015 is shown as the side of the glove compartment, which in fact does not correspond to reality (probably a typo in the book), because panel 2106 in cross-section has a different configuration - you can try to find the part on the market or cut out of plastic according to location.
Figure 2 – catalog numbers
The next necessary spare part is the wiring harness for devices 2106 - Figure 3 - 2106-3724030.
Figure 3 – Wiring harness and instruments
When I asked for a harness on the market, they offered me an “adapter from 2101 to 2106”, upon detailed study it turned out that the difference from those shown in the diagram is that the “adapter” does not have an output to the handbrake lamp relay (2101-3803150), because . on the 2101 relay it hangs on the wires entering the cabin. That is, you can take the standard 2106 harness without any hesitation and move the relay.
Although on the new 2106 circuits there is no relay on the handbrake at all, in this case the “adapter” can essentially just be a harness from the electrical equipment 2106 of the new model.
Limit switch for suction – Fig. 3 – 2101-3803130
Choke, or its handle with a protrusion for the switch - Fig. 4 - 2103-1108100
To connect to the 2106 wiring harness, you need an empty 8-pin connector (female)
In order for the oil pressure indicator to work, you need to buy an MM393A sensor (2103-3810300 - Fig. 4) and a tee (2103-3810610, 10282460), a rubber boot for the contact of the MM393A sensor (2101-3724114)
Removing the instrument panel from a VAZ 2107
Removing the dashboard of a VAZ 2107 is almost completely similar to the process of removing the dashboard in the VAZ 2104, VAZ 2105 models. The dismantling procedure itself is as follows:
Use a flat screwdriver to pry off the panel on the console on which the clock and cigarette lighter socket are located. We take out the panel and unscrew the two fastening nuts. Then remove the end cap of the console and unscrew the two screws that secure the console to the body.
We remove the console, having first disconnected the connectors from the switches that are located on it.
Remove the heater control handles. After this, remove the plugs and unscrew the screws. We also unscrew the nut of the daily mileage reset handle.
We unscrew the screws connecting the upper and lower parts of the decorative casing of the steering column shaft. Remove the casing elements.
READ How to remove the rear wiper of Renault Sandero
We take out the instrument cluster. We disconnect the econometric hose, the speedometer cable and three blocks with electrical wires. We completely remove the instrument cluster.
We unscrew the screws securing the storage shelf, which is located under the glove compartment. Two self-tapping screws are located at the bottom of the shelf, and one at the top. We remove the storage shelf.
Open the glove compartment lid and unscrew the screws on the right and left sides. Disconnect the glove box illumination lamp and completely remove it from the instrument panel.
Using a screwdriver, remove the headlight level control knob. Using needle-nose pliers, unscrew the corrector nut, and then push the corrector inside the panel.
Using a small Phillips screwdriver, unscrew the screws securing the dashboard to the car body. First of all, unscrew the lower screws, and then the screws that are located near the windshield.
With a certain force, we squeeze out the air duct pipe from the side. Using an open-end wrench, unscrew the four nuts securing the dashboard to the car body.
We remove the dashboard. Its installation is carried out in reverse order.
Removing the instrument panel
Using a slotted screwdriver, release the handle latches and remove them from the heater levers.
Using a screwdriver, we remove the two nozzles of the central air duct.
We disconnect the wire lugs from the switch terminals, marking the order in which they are connected.
Using a thin screwdriver, remove the plug.
Use a Phillips screwdriver to remove the self-tapping screw securing the instrument panel.
Unscrew the nut securing the trip odometer handle.
Putting your hand between the shield and the instrument panel, unscrew the nut securing the speedometer drive cable.
Moving the shield to the right, disconnect the hose from the econometric fitting.
and connecting blocks from the terminals of the instrument cluster
The pads differ in color and number of connectors, so there is no need to mark them.
Install the shield in the reverse order of removal.
Before installation, having connected all the electrical connectors, connect the battery, turn on the ignition and make sure that all devices are working correctly.
Then we attach the shield to the instrument panel.
Another version of the VAZ-2101 scheme
Outdoor Lighting
1 – Headlights 2101 2 – engine compartment lamp; 3 – battery; 4 – generator; 5 – reverse light switch; 6 – fuse block; 7 – indicator lamp for external lighting in the instrument cluster; 8 – glove box lighting lamp; 9 – instrument cluster lighting lamp; 10 – plug socket for a portable lamp; 11 – instrument lighting switch; 12 – external lighting switch; 13 – brake light switch; 14 – ignition switch; 15 – lamp switches located in the front door pillars; 16 – lamp switches located in the rear door pillars; 17 – lampshades; 18 – trunk lighting lamp; 19 – rear lights; 20 – license plate light; 21 – reversing lamp
Turning on the headlights 2101
1 – headlights VAZ 2101; 2 – battery; 3 – generator; 4 – fuse block; 5 – headlight switch; 6 – external lighting switch; 7 – ignition switch; 8 – indicator lamp for high beam headlights in the instrument cluster
Direction indicators
1 – sidelights VAZ 2101; 2 – side direction indicators; 3 – battery; 4 – generator; 5 – ignition switch; 6 – fuse block; 7 – relay-interrupter of direction indicators; 8 – indicator lamp for direction indicators; 9 – direction indicator switch; 10 – rear lights
Sound signals 2101
1 – sound signals; 2 – battery; 3 – fuse block; 4 – sound signal switch; 5 – generator VAZ 2101.
Wiper circuit
1 – generator VAZ 2101; 2 – battery; 3 – ignition switch; 4 – windshield wiper switch; 5 – windshield wiper relay; 6 – windshield wiper gearmotor; 7 – thermobimetallic fuse; 8 – windshield wiper switch located in the glass washer pump; 9 – fuse block.
Useful: Connection diagram and pinout of the VAZ power window button
Heater fan Zhiguli
1 – generator VAZ 2101; 2 – battery; 3 – ignition switch; 4 – fuse block; 5 – heater switch; 6 – additional resistor; 7 – heater fan electric motor.
Ignition block diagram
The lock is attached to the steering shaft. Some of the power circuits, which are protected by fuses, are connected directly to the battery, regardless of the position of the key:
- interior lamp;
- sound signal;
- cigarette lighter;
- stop signal.
To adjust the voltage generated by the generator, a relay regulator is provided in the circuit. Its responsibilities include monitoring the voltage at the output of the generator, and when the readings drop, the relay sends a signal to the control lamp located on the instrument panel. If the charging voltage is low, the battery may discharge prematurely and not have time to recharge, which can damage it. If the charging voltage is too high, the electrolyte in the battery may boil, which will also not lead to anything good.
| Key position | Contact under e.g. | Switched circuits |
| "Parking" | "30"-"INT" | Exterior lighting, windshield wiper, heater |
| «30/1» | — | |
| "Turned off" | «30», «30/1» | — |
| "Ignition" | "30"-"INT" | — |
| «30/1″-«15» | Exterior lighting, windshield wiper, heater | |
| "Starter" | «30″-«50» | Starter |
| «30″-«16» |
Replacing instrument cluster indicator lamps
Emergency indicators for the brake system and heated rear window are installed in the radio panel insert.
All other indicators are located in the instrument cluster.
To replace a faulty lamp, remove the instrument cluster.
Turn the lamp socket counterclockwise.
We replace the faulty lamp together with the socket.
The most common reasons for dismantling
There are a lot of reasons for removing the tidy on a VAZ 2107, and some of them can be called banal, but nothing can be done. The most common reason when you need to remove the instrument panel is a burnt-out backlight bulb. Replacing light bulbs in the dashboard of a VAZ 2107 is carried out only when dismantling the device, and it is simply impossible to perform this procedure otherwise.
The dashboard on the VAZ 2107 must also be removed for a number of the following reasons:
- Malfunction of pointer indicators.
- Failure of the instrument lighting, as well as lack of functionality of the arrow indicators.
- Replacing the device with a new one, for example, if a digital panel is installed instead of the factory instrument panel.
- Tuning or upgrading the device.
As practice shows, most often the need to dismantle the dashboard arises precisely because the backlight bulb burns out. If the device is dismantled for this reason, it is recommended to immediately replace conventional light bulbs with LED ones.
READ How to remove the ignition switch on a VAZ 2105
What can be changed in the “Six”
If you have a Six, tuning can be done in various ways - it all depends on how much money, effort and time you are willing to spend on it. One of the simplest and most accessible means is airbrushing - many people do tuning of the VAZ 2106 using a creative approach and brighter colors.
Tuning a VAZ 2106 is done by changing the design of the car's hood, installing a new plastic body kit, and choosing alternative optics instead of standard ones.
There are very interesting and unusual solutions in this regard.
The upholstery of a car can completely copy that of a limousine - for this, some owners choose velor or velvet.
The dashboard is designed in the same spirit - it looks unusual and vintage. It even has a small TV with a kinescope built into it. The sound system speakers are located above the driver.
We talked above about how optics can be improved - in the video you can see how it looks on the “Six”
The process of removing the instrument panel
Experts draw the attention of readers to the fact that the description of the process of removing the VAZ-2107 dashboard corresponds to the description of other models of all editions. Having prepared the tools, as well as new parts, you can begin dismantling. In this case, you should adhere to the following order:
- Before starting work, be sure to de-energize the VAZ-2107 car by removing the negative terminal from the battery to avoid a short circuit.
- Using a flat (slotted) screwdriver, remove the three caps that are responsible for the operation of the heater and are placed on the levers.
- Using a slotted screwdriver, remove the plastic plugs that have a heating sign.
- Unscrew the nut and washer, which are located near the emergency alarm button.
Having completed all of the above, the VAZ-2107 dashboard, or rather its right side, will weaken. Next, you need to perform a few more manipulations in order to finally dismantle the device. You should pull out the right side, thereby freeing up a free passage to the rear, and then disconnect all the wires and chips. First of all, remove the power button chip of the VAZ stove. It is important to remember the exact location of all wires. Our experts recommend taking photographs of everything to ensure proper reassembly.
The next step in removing the VAZ-2107 dashboard is to remove the speedometer cable, which is attached with a nut. It is easy to unscrew without the help of screwdrivers. Next, the chips are removed. All of them are an integral part of the instrument panel. They differ from each other in the form of different fastenings, so they cannot be confused during assembly. Next, you need to remove the hose from the fitting, which is located to the left of the device. After all that has been done, the VAZ-2107 dashboard is dismantled.
After completing all the work of removing the panel, you can easily diagnose all the lamps and control devices located under this device. Assembly is carried out in reverse order. The process does not cause any problems. Any motorist and VAZ owner, even those without experience, can handle it.
Once again, it is worth paying attention to the fact that removing the dashboard is not at all difficult. The work takes approximately two hours. This time also includes the replacement of all non-working elements. By setting aside just a couple of hours and following the description for removing the VAZ-2107 dashboard, it is possible to eliminate all problems that have arisen, as well as carry out additional tuning.
What changes can be made to the VAZ 2102
This model also has room for your imagination to run wild. We start with the air intakes on the bumper - they make the appearance much more modern and dynamic. In addition, the engine cooling system works more efficiently.
At the same time, you can install a radiator grille that will protect the engine compartment from dust and dirt particles that get there while driving.
Fiberglass thresholds are inexpensive, but they significantly reduce the likelihood of corrosion from constant exposure to moisture and chemically active reagents.
Today, there are many options for changing the optics of a car - headlights, side lights, cornering and fog lights are subject to changes that are suggested by the imagination of the owners. Very often, when making adjustments to the optics, LED backlighting is used, which has recently been in great demand among motorists.
The most common material in this case is fiberglass - it allows you to create interesting configurations and provides good performance when colliding with an obstacle.
Radiator grilles are a separate element on which the “facial expression” of the car depends. They must be dense enough to keep out dust and dirt, but at the same time they must provide complete cooling of the engine compartment.
Some drivers do not like to frequently clean the area under the hood of dirt, and they are willing to sacrifice the degree of cooling. In this case, choose a product divided into “honeycombs” - the area of space for dust to enter is significantly reduced.
Inside the cabin, you can reupholster the seats, replace the dashboard, add lighting for the instruments, etc. It all depends on the amount of money and energy that you are willing to spend on improving the interior of your car.
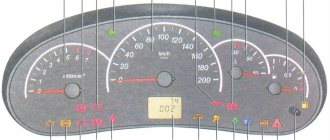
Instructions for dismantling the tidy on a VAZ 2107
The most important part of the interior is located in the front part - this is panel or tidy. It contains different types of indicators that inform the driver about the health of the car, and also provide other important information, such as driving speed or crankshaft speed. Sometimes it becomes necessary to dismantle this part, and therefore drivers wonder how to remove the instrument panel on a VAZ 2107 on their own, which you can learn from the material.
Removal and repair of the instrument panel of a VAZ-2107 car
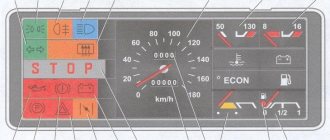
On the dashboard there is a panel with a combination of instruments, which combines in one housing:
— speedometer (with total and daily mileage counters);
— coolant temperature and fuel level indicators with fuel reserve indicator;
— a block of indicators (battery charge, high beam, turn indicators, side lights, parking brake, insufficient oil pressure and closing the carburetor air damper).
An additional signaling unit (heated rear window and emergency brake system) is installed in the radio panel insert.
The connection diagram for the instrument panel is shown in Figure 1.
The connection diagram in the instrument panel is shown in Figure 2.
Sources:
https://sarterminal.ru/uhod-za-avtomobilem/kak-snyat-panel-priborov-na-vaz-2107-video-po-snyatiju-pribornogo-shhitka.html