How to remove the visor of a high instrument panel without disassembling the entire panel
- Sometimes there is a need to remove only one visor on the high instrument panel of a VAZ 2109 without removing the entire panel. Often this point is not described in the manuals; the emphasis is on dismantling the entire dashboard and disconnecting it from the car body. At the same time, to access the instrument cluster, for example, to install LEDs for dial illumination instead of standard lamps or install another instrument combination, there is no need to dismantle the entire instrument panel; it is enough to remove only one visor.
- In this article we will look at how you can do this yourself.
- Before starting any work on the vehicle's electrical wiring, it is necessary to disconnect the negative terminal from the battery to avoid possible short circuits in the wires.
- Remove the headlight/low beam switch button from the panel using a screwdriver. The button is tight, you need to be careful not to damage it.
- Disconnect its connector from the button.
- In the same way, remove the emergency button. It will be more difficult to pull it out, we also need to be careful.
- Disconnect its connector.
- Using a Phillips screwdriver, unscrew the two screws securing the tidy console trim, also called the “beard.”
- Having unscrewed the screws, we bend the beard down, holding it from below with another self-tapping screw.
- We take out the radio and disconnect all its connectors, or the standard plug if you do not have a radio in your car.
- There are 3 metal latches (2) on the top of the visor, and 2 plastic tabs (1) on the bottom edges. To remove the visor, you need to press them out one by one and release the instrument panel visor.
- We start with the two top latches, use a screwdriver to press them through the niche for the radio, and slide the visor towards you. Caution is also necessary here as the latches are fragile and can come off.
- Next, use a screwdriver to press out the two lower plastic fasteners of the visor and lift the visor up.
- Raising the visor, unhook the third upper mounting bracket, located on the left. Well, having disconnected the electrical connectors of the cigarette lighter, its illumination and the emergency signal lamp, we release the visor.
- That’s it, access to the instrument cluster is free, just don’t forget that the connectors and speedometer cable are holding it at the back. If you need to remove the instrument panel combination, for example, in order to illuminate the instrument scales from the inside, do not forget to turn off the whole thing.
The interior design of the VAZ-2109 depends on the year of manufacture of the car. In any case, dismantling the panel is a very labor-intensive job that takes a lot of time. Let's figure out how to remove a high or low instrument panel on a VAZ-2109.
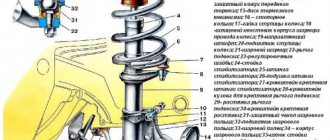
Instrument cluster
As for the instrument cluster of the VAZ 2109 with a low panel, it has the following diagram.
Dashboard
According to the image shown, the components of the instrument cluster are as follows.
| Number | What is this |
| 1. | Speedometer |
| 2. | Coolant temperature gauge |
| 3. | Voltmeter |
| 4. | Fuel level indicator in the tank |
| 5. | Fuel reserve warning lamp |
| 6. | Econometer |
| 7. | Vehicle mileage meter |
| 8. | Vehicle mileage meter |
| 9. | STOP lamp |
| 10. | Battery charge level indicator lamp |
| 11. | Air damper warning lamp |
| 12. | Hazard warning light activation indicator |
| 13. | Low brake fluid level warning lamp |
| 14. | Handbrake activation warning lamp |
| 15. | Warning lamp for low oil pressure |
| 16. | Indicator lamp for turning on the direction indicators |
| 17. | Indicator lamp for turning on side optics |
| 18. | Indicator lamp for turning on the rear fog lights |
| 19. | High beam warning lamp |
| 20. | Rear window heating indicator lamp |
Instrument scale
Low version dismantling procedure
A low dashboard is used in some VAZ-2109 cars, as well as in the Baltika modification. If the situation forced you to disassemble this part of the interior, then do the work like this:
- First of all, remove the 3 knobs from the panel for switching stove modes.
- Removing the airflow control knob is simple - slightly pull it towards you.
- On both sides of the shield, remove the fasteners of the decorative trim, then slide it towards you.
- Disconnect the connectors with wires from the fog lights and heated rear window switches. There is another wire going to the latter that needs to be disconnected.
- De-energize the hazard light switch and the cigarette lighter illumination.
- Now you can begin to remove the cigarette lighter wiring and decorative trim from the stove.
- On the stove control element you will see 4 fasteners that will need to be removed.
- Next, remove the 2 fasteners from the instrument panel.
- Remove the dashboard visor.
- Compress the spring clips and remove the housing from the instrument cluster.
- Unscrew the speedometer fastener and disconnect it from the drive cable.
- On the instrument panel, find the block with white wires and disconnect it from the power.
- Find the econometer fitting and remove the hose from it. After this you can remove the cotter pin.
- Then disconnect the speedometer from the cable, which is used to record the readings of the device for the day.
- Disconnect the red wire from the power supply.
- Pull the hydraulic corrector and light switch handles towards you.
- Unscrew the two fastening nuts that are located at the hydraulic corrector socket and next to the instrument backlight switch.
- Remove the steering wheel, along with the switches that are located under it.
- You can only remove the power pads from the ignition switch if you turn it to position 1 with the key.
- Remove 2 fasteners and the same number of nuts from the steering column.
- Remove the steering column along with the ignition switch.
- Pull the choke handle towards you to remove it from the rod. This rod is held in place by two fasteners that need to be removed.
- Remove the bolts from the left side and bottom of the instrument panel. Do the same on the right side.
- Inside the glove compartment there is another fastener that needs to be unscrewed.
- Remove the last fasteners and carefully remove the panel.
Removal and installation, disassembly and assembly of the instrument panel VAZ 2108, VAZ 2109, VAZ 21099, Lada Samara
Disconnect the wire from the “–” terminal of the battery. Set the wheels to the straight ahead position.
Disconnect the rod from the carburetor choke lever and the speedometer cable from the gearbox.
Ignition switch trim.
1.
Remove the decorative steering wheel trim.
2.
Unscrew the steering wheel nut so that the end of the nut is flush with the end of the steering column shaft.
3.
Use sharp blows to knock the steering wheel off the steering shaft splines.
4.
Finally unscrew the nut and remove the steering wheel.
5.
Unscrew the six screws securing the lower steering column casing of the VAZ 21099.
6.
Remove the lower steering column cover and ignition switch trim.
7.
Remove the upper steering column cowl.
8.
Loosen the bolt securing the base of the steering column switches.
9.
Remove the base from the shaft and disconnect the two blocks with wires from the horn contacts.
10.
Disconnect the connector with wires from the windshield wiper and washer switch lever.
11.
Disconnect the block with wires from the lever of the direction indicator and headlight switch of the VAZ 2109.
12.
Pull the carburetor choke handle towards you until a draft appears, and remove the handle from it.
13.
Remove the two screws securing the instrument panel console trim.
14.
Remove the trim from the console.
15.
Remove the cigarette lighter socket from the socket.
16.
Remove the ashtray from its slot by pressing the cigarette extinguisher plate.
17.
Remove the heater fan switch handle.
18.
Remove the three heater control knobs by prying them up with a screwdriver.
19.
Disconnect the wiring harness from the heater fan switch under the heater control panel.
20.
Disconnect the two wires from the contacts of the backlight lamp of the VAZ 2108 heater control panel.
21.
Remove the headlight hydraulic adjustment handle by pulling it towards you.
22.
Remove the instrument cluster light switch handle.
23.
Unscrew the nut securing the instrument cluster lighting switch.
24.
Unscrew the nut securing the headlight hydraulic corrector.
25.
Push the instrument cluster lighting switch and the headlight hydraulic corrector inside the panel.
26.
Remove the side nozzles on both sides of the instrument panel using a screwdriver.
27.
Unscrew one screw securing the trim on both sides of the Lada Samara instrument panel.
28.
Use a screwdriver to pry the exterior lighting switch out of the panel.
29.
Disconnect the block with wires from the exterior lighting switch. Push the block inside the instrument panel of VAZ 2109, VAZ 21099, VAZ 2108, Lada Samara.
30.
Using a screwdriver, use a screwdriver to remove the radio socket. If a Lada Samara, VAZ 21099, VAZ 2109, VAZ 2108 car has radio equipment installed, first remove it.
31.
Remove the screw securing the instrument panel trim.
32.
Insert two screwdrivers to pry open the plastic tabs.
33.
Lift up the instrument panel trim.
34.
Disconnect the block with wires from the cigarette lighter block.
35.
Disconnect the block with wires from the cigarette lighter illumination block.
36.
Disconnect the block with wires from the hazard warning light switch illumination lamp.
37.
Disconnect the block with wires from the hazard warning switch and finally remove the instrument panel trim of the Lada Satellite.
38.
Gently press down and remove the speaker trim on the left side of the instrument panel. Be careful - the latches break off easily.
39.
Disconnect the block with wires from the heated tailgate glass switch.
40.
Remove the block from the rear fog lamp switch.
41.
Remove the two screws securing the instrument cluster.
42.
Remove the instrument cluster from the panel, unscrew the fastening nut and disconnect the cable from the speedometer.
Disconnect the connectors from the additional equipment wires, if installed on your vehicle.
43.
Disconnect the red block with wires from the instrument cluster.
44.
Disconnect the block with wires from the on-board control system.
45.
Disconnect the white block with wires from the instrument cluster.
46.
Disconnect the ignition switch block with wires from the ignition relay.
47.
Disconnect the ground wire of the ignition relay.
48.
Disconnect the block with the wires of the air damper opening warning lamp.
49.
Unscrew one screw of the lower fastening of the instrument panel on both sides.
50.
Disconnect the connector with the glove box illumination lamp wires.
51.
Unscrew the two fastening screws and lower the heater control panel down.
52.
Remove the two screws securing the air damper guide rod to the instrument panel.
53.
Remove two screws from the upper mounting of the instrument panel on both sides.
54.
Use a screwdriver and remove one plug from both sides of the instrument panel. Remove one instrument panel side mounting screw on both sides of the panel.
55.
Unscrew the screw of the central fastening of the instrument panel.
56.
Remove the instrument panel of VAZ 2108, VAZ 2109, VAZ 21099.
Reinstall the panel in reverse order. After installation, check the operation of switches and devices to ensure they are connected correctly.
How to remove a torpedo on a VAZ 2109 and 2110? Step-by-step instructions
Download PDF
As a rule, this is done to modernize the dashboard.
Tuning a torpedo involves various nuances. But replacing a panel always improves the interior design, although it requires additional modifications. Removing the torpedo is easy to do on your own. The article describes in detail how and what to do. How to remove a torpedo on a VAZ 2109 and 2110 without spending a lot of time and effort? This is easy to do if you have a figured (phillips) screwdriver, a head and a key at hand. No additional tools are needed.
Content
- Reasons for dismantling
- Algorithm for removing the dashboard
- Replacement
Reasons for dismantling
First, let's look at the main reasons why the dashboard on VAZ cars is dismantled:
- The dashboard is dismantled in order to replace it with a new one. Over time, the panel deteriorates, scratches, cracks, etc. appear on it;
Algorithm for removing the dashboard
To begin with, we note that in VAZ 2109 and 2110 cars the dashboard can be assembled in different ways. Accordingly, the process of removing the panel will be different.
How to remove the old-style dashboard? To do this, we arm ourselves with the tools that we provided above and begin:
- Remove the battery terminals (one is possible);
- Next, you need to remove the elements (there are 3 of them) that are responsible for controlling the speed of the stove;
- We also dismantle the handle of the stove itself;
- The cover is held in place by screws on the sides that need to be unscrewed. It moves towards itself;
- We find the wiring harness from the rear headlight switch and disconnect it;
- We do the same with the pads from the rear window heater and emergency lights. The car's exterior light control, which is located on the left, must also be disconnected from the connector;
- The cigarette lighter wiring harness is disconnected;
- Now you need to remove the screws securing the dashboard visor (where the instrument scales are located);
- We remove it, and then bend the clamps and remove the entire instrument cluster housing;
- The speedometer cable is disconnected. To do this, you just need to unscrew the corresponding nut;
- We find an element with white wires and disconnect it;
- We dismantle the hose from the econometer;
- We take out the cotter pin, and then disconnect the meter reset cable from the speedometer;
- We find the red wire element
and dismantle it too; - The headlight and lighting control knobs are removed. It will be enough to pull them towards you;
- Here we find nuts that will also need to be unscrewed using a socket;
- We dismantle the steering wheel and steering column switches. Don’t forget to set the key in the ignition switch to the zero position, and only then disconnect the block with wires;
- Find the steering column pipe clamp and unscrew its bolts;
- The steering column pipe is dismantled. The ignition switch also comes out with it;
- The choke handle is pulled towards itself until the thrust becomes visible. After this, you need to remove the handle from the rod;
- Unscrew the torpedo screws located near the air damper;
- On the left, unscrew the screw that secures the panel on the side;
- Also unscrew the screw from below;
- We do the same on the right side;
- We unscrew the screw that is located inside the glove compartment;
- Unscrew the remaining screws and remove the torpedo.
- De-energize the power source;
- Lower the car steering wheel to the lowest position;
- The screws securing the dashboard must be unscrewed. First, unscrew 2 screws on the right and left on the central tunnel;
- Remove the plug near the parking brake lever;
- We unbend it with pliers or another tool for fastening devices;
- Carefully remove the torpedo.
- Some elements of the dashboard can be secured with M5 bolts.
- Disconnect all connectors.
Now we’ll find out how to remove the new model torpedo:
Replacement
An alternative replacement for the instrument panel on these cars can be various torpedoes. Here are two of them for comparison:
- AMC
- instrument panel from VAZ 2115 and Chevy Niva. There are obvious differences from the VAZ 2109 and 2110 torpedoes. In particular, this is an integrated oil pressure indicator. In addition, the dashboard looks much more interesting than the standard one; - Pro-Sport
. Sports instrument panel. Among the features include a beautiful blue backlight with the ability to adjust the intensity.
Using the instructions above, removing the instrument panel will not be difficult. Knowing how to remove a torpedo on a VAZ 2109 and 2110, you can independently replace it with a more integrated one.
Dashboard
We will take a look at the dashboard diagram and its components using the image below.
Dashboard
This diagram contains the following elements.
| Number | What is this |
| 1. | Instrument cluster |
| 2. | Ignition switch |
| 3. | Dashboard |
| 4. | Central nozzles of the interior heating and ventilation system |
| 5. | Side nozzles of the interior heating and ventilation system |
| 6. | Glove compartment lid |
| 7. | Shelf |
| 8. | Stub |
| 9. | Heated glass switch on the tailgate |
| 10. | Rear fog light switch |
| 11. | Hazard switch |
| 12. | Central switch for outside light |
| 13. | Control panel for interior heating and ventilation system |
| 14. | Radio socket |
| 15. | Gear shift lever |
| 16. | Hand brake lever |
| 17. | Ashtray |
| 18. | Cigarette lighter |
| 19. | Windshield washer and wiper control lever |
| 20. | Gas pedal |
| 21. | Brake pedal |
| 22. | Clutch |
| 23. | Choke closing handle |
| 24. | Horn switch |
| 25. | Trip counter reset knob |
| 26. | Instrument panel light switch |
| 27. | Control knob for hydraulic headlight adjustment |
| 28. | Hood lock drive lever |
| 29. | Control lever for headlights and turn signals |
Why is a torpedo removed?
- over time, the torpedo deteriorates, mechanical damage appears on it (scratches, cracks, erased paint);
- to install a noise and vibration isolation system in a car, you also need to disassemble the dashboard on the VAZ 21099;
- setting up the operation of air ducts.
To disassemble the torpedo on a VAZ 21099 with a high panel, a pair of hands is enough, but it is better to work with an assistant who will tell you how to connect the wires. This is necessary at the end of re-fastening the torpedo structure, so as not to confuse the connection. But you can get by with a camera.