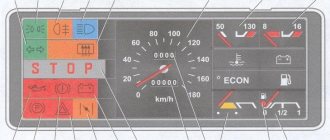
Stove tap device
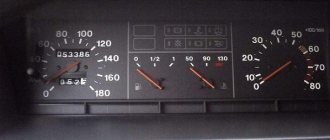
Externally, the faucet of the VAZ 21099 stove from the interior looks like this:
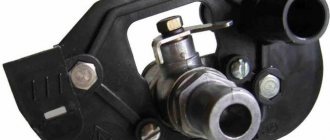
The arrow points to the valve control lever, which is driven by a sheathed rod (“cable”). The tap on the passenger compartment side is connected by pipes to the heater radiator, on the engine compartment side - to the cooling system.
In the photo above it is in the open state, corresponding to the extreme right position of the knob on the stove control panel (bottom photo).
“Souring” of the damper prevents the valve from opening/closing, while incorrect adjustment of the draft increases the free movement of the lever, as a result of which the damper does not open completely and interferes with coolant circulation.
Which one is better to choose?
Both the duration of its operation and the reliability of the entire system largely depend on the quality of the new crane.
In total, there are three types of this unit on the Russian market. This means:
- standard, that is, native, used by the manufacturer;
- ball valve;
- ceramic.
The first one is very inexpensive, but usually lasts a fairly short period of time. For this reason, it is worth choosing it only when the car enthusiast does not have extra money or if he was unable to buy anything else.
The ceramic model is more expensive and quite durable, but its disadvantage is its relatively low throughput. If you live in the southern regions, then feel free to take this option. Otherwise, a ball valve is ideal.
This type of locking fittings is different:
- great reliability;
- strength;
- good throughput.
However, the latter option may also turn sour over time.
Where is the heater valve installed on the VAZ 21099?
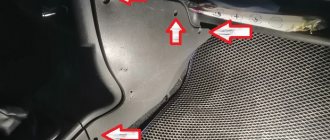
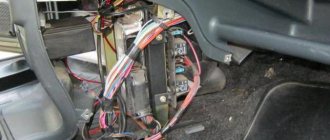
The part is attached to the front panel with two M6s (10 wrench). In the cabin it is located almost exactly in the center of the car, near the floor. The photo shows a view of the faucet with the instrument panel, heater assembly, console and floor tunnel casing removed:
As you can see, it is installed from inside the cabin and secured with two M6 bolts (or studs); the nuts are screwed onto them from the engine compartment side.
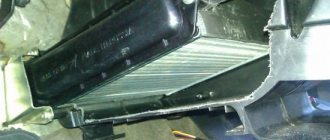
In the engine compartment it is located under the steering rack:
Malfunction - characteristic symptoms
The following signs indicate that the faucet is leaking:
- traces of liquid are found on the floor in the cabin;
- A characteristic smell of antifreeze appeared in the car.
Having discovered one of the above symptoms, it is necessary to inspect the failed unit. It is important to understand that if the breakdown is not repaired in a timely manner, then repairs will subsequently cost much more money, and it will most likely not be possible to do it yourself.
How to perform an inspection? You will need to get under the hood on the engine side. It should be noted that leaks can occur in various places in the cooling system, so you will need to inspect the entire system.
It is more convenient to do this with a flashlight. Coolant, in particular, often drips from:
- radiator;
- joints of hoses and pipes.
When it turns out that the faucet is the culprit of the malfunction, the owner needs to start replacing it as soon as possible.
This requirement is even more relevant if it is winter, because without heating in a car it will be very uncomfortable to move and, moreover, dangerous if you have a long trip through a sparsely populated area.
Replacing the faucet of a VAZ 21099 stove with a high panel with your own hands
Before work, drain the antifreeze from the cooling system - in any way convenient for you. If the heater tap is replaced on an injection machine, disconnect the battery. Loosen the clamps and remove the pipes from the tap fittings.
Remove the floor tunnel and console. If the engine is fuel-injected, then disconnect the block from the ECU (“brains”) mounted inside the console. Having removed the pipes from the tap fittings on the interior side, unscrew the nuts securing it located outside and remove the tap along with the seals.
Before installing a new product, check the damper lever linkage adjustment. The rod shell is secured with a special metal clamp:
By changing the position of the shell, ensure that the tap closes and opens completely when moving the lever on the panel.
Before connecting the pipes, apply sealant to the tap fittings - as a preventive measure against antifreeze leaks.
Having completed the repair, proceed to pouring antifreeze. After opening the expansion tank cap, fill to about. Close the lid and start the engine, and when the coolant temperature begins to rise, turn it off. After opening the lid, wait until the level drops and add liquid to the maximum mark.
Sometimes this procedure has to be repeated up to three times. The pressure generated in the cooling system when the tank is closed will gradually “push out” the air pockets.
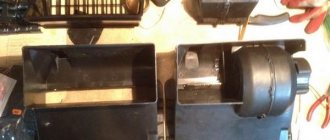
Radiator check
In most cases, there is a failure of one part of the VAZ-21099 stove. The check can begin with the radiator of the heating system.
In this case, it is advisable to carry out the check after any of the following manifestations appear in the cabin:
- specific smell;
- steam coming from exhaust vents;
- rapid evaporation of the liquid used for cooling.
In such situations, it is initially recommended to check the radiator, and any actions are best carried out after the engine has been turned off and it has had time to cool down.
If, nevertheless, no problems were found in the radiator, most likely the VAZ-21099 heater valve will need to be replaced. However, additional steps are required before this happens.
First of all, you need to carefully inspect the radiator you are using for potential leaks and the condition of its design.
How to check the radiator before understanding whether the heater valve of a VAZ-21099 car needs to be replaced or not.
- At the very beginning, you need to disconnect and remove the car battery.
- After this, the antifreeze is drained from the cooling system.
- The next stage is the sensor and motor.
- Now you can remove the casing fasteners and carefully disconnect all the wires.
- In addition, you can remove the protective cover.
- The final stage is to disconnect the hoses, slightly tilt the radiator to the side and pull the part out.
- In most cases, replacement of rubber shock absorbers installed on special radiator holders is required.
- After removing the unit, you will need to install tight plugs on the pipes or holes to which they are connected. According to this scheme, air is gradually pumped into the radiator. It is important to note that the air pressure should not exceed 0.2 MPa. Then it is allowed to lower the radiator into a bath of water, remembering that the unit must be completely covered. The appearance of air bubbles indicates a leak in the seal and the need to replace the radiator. If there are no bubbles, the unit is only clogged and requires flushing to clean it.
After the preliminary action, care should be taken to adjust the tap of the VAZ-21099 stove and ensure full heating of the car interior.
Problems with VAZ 2108-99 heaters with a high panel
Almost all owners of these cars note that cars with a high panel have a “colder” stove. Moreover, measures such as replacing and adjusting the heater tap, replacing an aluminum stove radiator with a copper one do not bring the desired result.
The point is a flaw, or, more precisely, a miscalculation in the design of the heater as a whole. For comparison, look at how heaters with low (a) and high (b) panels are arranged:
The heater control damper 8, working “paired” with a tap, on a stove with a high “torpedo”, is structurally designed to create less resistance to air movement, which contributes to better “purging” of the radiator.
But in reality, it constantly warps, as a result, cold air is not cut off (when the tap is open), but gets into the cabin in addition to the radiator. It’s practically impossible to eliminate this on your own, so some owners change the stove body by installing the “old” version.
Selecting a heating tap and cost of the part
A driver faced with a leaking heating tap will inevitably be faced with the question: which tap to buy as a replacement? The question is not as simple as it might seem at first glance. Because there are three types of heating taps, which differ not only in cost, but also in design. Let's list them:
- faucet with membrane. This is exactly the crane that the manufacturer installed on the “nines” that came off the production line. Cost - from 400 rubles. This is the cheapest faucet that can be found on the market today. However, the low price should not deceive the car owner: the reliability of membrane taps leaves much to be desired. And you can purchase them only in one case: when you couldn’t find anything else;
- ball valve As the name suggests, the locking element in this device is a massive ball, which is much more reliable than a standard membrane. However, the above ball is made of steel. And therefore susceptible to corrosion. Therefore, a car owner who decides to open the tap with the onset of cold weather may be in for a very unpleasant surprise. The cost of such a crane starts from 550 rubles;
- ceramic faucet. The most reliable and at the same time the most expensive option. Corrosion is not a problem for such devices: their body is made of plastic, and the antifreeze is locked by two tightly pressed ceramic plates. The cost of a ceramic faucet starts from 700 rubles, and if the car owner is not short of money, then ceramics should be purchased.
Which to choose
Every driver wants his car's heater to work flawlessly. Therefore, when a faucet breaks down, a person begins to think about which one is best to choose as a replacement.
There are three main types of shut-off valves on the market. They are distinguished not only by price, but also by design features.
The most budget-friendly faucet option is the previously mentioned membrane faucet. The stove is equipped with it at the factory. The unit will cost about 400 rubles. There is nothing cheaper in nature. The trouble is that the savings are often quite conditional, because the unreliability of membrane models is already legendary.
Ball valves are often used for replacement. They are much more convenient than membrane ones, but slightly more expensive - for one piece you will have to pay at least 550 rubles. At the same time, in cheap options, the locking ball is made of ordinary steel, which is relatively easy to corrosion.
Ceramic stove models are considered the most reliable. They are not afraid of aggressive environments and do not turn sour. The price of the crane is about 750 rubles. This option is recommended by everyone who has used it.
Replacement procedure
If you have been using the car, be sure to let its power plant cool down - otherwise the coolant will be very hot, and this is dangerous.
The car must be placed on a ramp or pit, since you will need access to its bottom.
Before changing the shut-off valves discussed in this article, set the stove regulator to the extreme right position, that is, to maximum heating. Only in this case will you be able to completely drain the coolant from the radiator.
When the preparation is complete, unscrew the cap of the distribution tank slightly and place a bucket under the car to collect the leaking antifreeze. The radiator is the first to be freed from it - it has a special plug. Next, drain the liquid from the cylinder block and hoses leading to the tap.
From the hood side, loosen the pipes that go directly to the tap. The clamps on them often rust, and therefore it is recommended to treat them with VD-40 before unwinding. The screws are unscrewed with a flat screwdriver. Go to the salon. Here, remove the side trims of the center console. They are held in place by screws, which can be unscrewed using a Phillips screwdriver.
Actually, the heater valve is located on the front passenger side. It has two pipes fixed with clamps. Carefully loosen the latter and very carefully remove the hoses (there is a risk that there is still antifreeze left in them).
Now you need to release the tap - to do this, just unscrew the three 10 mm nuts. Before this, the drive cable is disconnected from it. All that remains is to dismantle the damaged unit and install a working one in its place.
Reassemble everything in reverse order and check how the heater works, and also make sure that everything is sealed in the places where the pipes are attached.
Why do breakdowns occur?
As noted above, the shut-off valves of the heater are a very vulnerable element of the VAZ-2109. If it fails, then it will not be possible to ignore the breakdown. First of all, on the floor, at the base of the passenger seat in the first row, a puddle forms under the carpet. In addition, leaking antifreeze emits a very characteristic odor, which should also suggest a malfunction of the stove.
Leakage occurs for three main reasons:
- use of low-quality cranes by a domestic automaker;
- oxidation;
- mechanical destruction.
The Volzhsky plant supplies its products with membrane-type locking fittings. This system has one inherent drawback - poor tightness. Even with careful use, such taps break very quickly.
- VAZ 2115 heater valve: replacement, where is it located
The second malfunction occurs due to the fact that the heating system is not used for at least 4-5 months a year. This period is quite enough for the valve casing and moving elements to become covered with sediment. As a result, his insides literally stick together. The owner of the car makes a significant effort to open it, and as a result the unit simply collapses. That is, a third type of breakdown occurs.
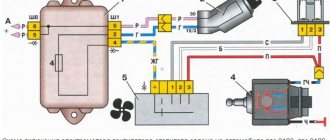
Cable location
Gazelle stove faucet business electrical connection diagram
Learn more about how this process is carried out in the video below (the author of the video is the Engine Repair channel! And interesting!).
So, get your pliers ready and remove the upper part of the dashboard. By the way, you can do without dismantling, but this way you can clearly see where the central damper of the VAZ-2109 heater is located, assess its condition and control the adjustment process. After removing the panel, find the fastening cable, which is located to the right of the accelerator pedal and, using pliers, carefully bend the wire.
In the “nine”, the VAZ heating system operates using an electric drive. The instruction manual for the VAZ 2109 high panel shows an electrical diagram of the stove's operation. The interior heater connection diagram consists of:
- fan motor;
- the ignition switch, which turns on the stove;
- operating mode switch;
- additional resistor;
- fuse mounting block (fuse F4 is responsible for the stove in the “nine”).
Kia Rio 2022 DISCOUNT RUB 190,000.
- Official dealer
- Credit 4.5%
- Installment plan
- Trade-In
- 95% approval
- No down payment
The first thing you need to do is turn off the power to the car. To do this, simply remove the negative terminal from the battery. Remove the panel trim in the area of the ashtray, radio and the mounting of the heater control levers - to do this, unscrew the 4 fastening bolts. Disconnect the wires from all switches: lights, foglights, radio, etc. Move the front seats all the way back or, in general, remove them so that they are not in the way. Remove the seat belt anchors on the floor. Also remove the plastic trim that holds the gear lever boot on. From under this casing you will need to remove the lower air duct
Very carefully disconnect the clamps from the faucet, and then the cables themselves. To make it convenient, first disconnect the leg heating flap rod (3), then the windshield heated flap rod (14), then the rod that controls the valve (19) and the rod that controls the flap (20).
On the back of the heater, disconnect the wires that control the fan speed and the fastenings of the wires, backlights and levers. Not quickly, so as not to damage it, lower the heater control lever diagonally downwards. Now you can remove the cable and replace it with a new one.
As you know, on the VAZ 2109, interior heating is provided by air heated by a radiator. On the VAZ 2109, the heating and ventilation of the interior are interconnected and represent a kind of special system. In this article we will look at the general principles of operation of the heating and ventilation system of the VAZ 2109.
Like most repairs, this procedure is carried out on an overpass. Replacement requires the following tools:
- Container for draining coolant;
- Classic set of wrenches and screwdrivers;
- Sealant;
- WD – 40;
- New faucet with a set of rubber gaskets.
Operating procedure:
- 1. Display the VAZ 2109 car;
- 2. Place the prepared empty container under the motor and, opening the drain hole, allow the coolant to drain;
- 3. Next, you need to unscrew the pipes running from the engine to the heater. To do this, just loosen the fastening clamps. It happens that they do not give in, then it makes sense to use a “bucket” and clean the threads of the crane bolts;
- 4. Remove the pipes and drain the remaining antifreeze;
- 5. Remove the side trim of the dashboard in the car interior. Here, too, unscrew the pipes;
- 6. Then, using a 10mm wrench, loosen and unscrew the faucet fastening nuts. It's under the car. Continue working inside the car again and tighten the tap on the passenger seat side. Then remove the clamp. Disconnect the control cable;
- 7. The next stage is the installation of a new tap. First of all, it must be connected to the control cable. Now put the spring clip in place. Tighten the fasteners. When installing pipes, use sealant.
Where is the heating system on the domestic nine? How to disassemble and remove hoses for repair, for what reasons may the device stop working? If the VAZ 2109 stove does not heat up, first of all you need to understand the reasons why this is happening.
Radiator device for heating system
- Replacing the radiator of the VAZ 2109 stove - Lada master
- What to do if the VAZ 2105 stove does not heat well
- Repair of generator on VAZ 2108, VAZ 2109, VAZ 21099
- Starter 2108, how to make repairs yourself. How to repair a VAZ 2108 starter. Repair and replacement of a VAZ 2108 starter.