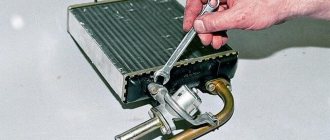
Today our regular customer arrived in a still peppy 4, antifreeze appeared on the carpet at the passenger’s feet and the heater was blowing cold at idle, slightly warm at speed.. To make sure what exactly is leaking, the radiator, pipes or tap, remove the right side panel torpedoes.
In our case, there was a combo, a replacement radiator and heater valve. I want to immediately dispel all the myths that you can replace the heater radiator on a VAZ 2114 without removing the panel; you don’t have to remove it entirely, but you will need to unscrew it and move it a little! In order not to confuse anyone, I divided the article into two parts; in the first, we will consider replacing the radiator of the VAZ 2114 stove, and in the second, replacing the stove faucet.
Preparatory operations
Attention! Be sure to let the car cool down!
- Remove the engine protection.
- Drain the antifreeze. I remove the pipes from the heater tap in the engine compartment, having previously placed a special trough for clean antifreeze. This allows you to drain as much coolant as possible from the heater radiator. Just remember to open the stove tap. As soon as the antifreeze has stopped flowing, unscrew the two 10-point nuts securing the stove valve (if you are going to change it!).
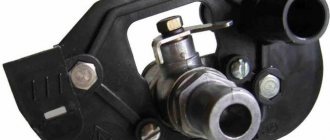
Heater valve fittings in the engine compartment.
Refilling a new radiator
Coolant refill
Finally, “Tosol” or antifreeze should be poured into the expansion tank of the new radiator. Basically, approximately 5-8 liters of liquid are poured into the new cooling system to cool the engine. After filling with antifreeze, the car must be started and left running for a few minutes so that the thermostat opens and the antifreeze goes into the engine cooling system. Replacing the 2114 radiator, like any other VAZ model, should be carried out in a warm room or in the summer season.
Replacing the radiator of the VAZ 2114 stove
- Remove both sides. (first photo in the article)
- Unscrew the seven screws on the center console.
Fastening the instrument panel frame.
- Moving the console aside, you don’t even need to disconnect any plugs; you just need to remove the fan speed switch knob and the plastic handles from the stove’s air flow control levers.
- We remove the glove compartment or, as it is called in foreign cars, the glove compartment. Six screws, four on the inside and two on the bottom.
Glovebox mount.
- Unscrew the bolts securing the iron frame of the panel on both sides. Head 8.
- We unscrew the screws securing the panel at the side pillars on the right...
- ... and to the left
- There are also a couple below left and right
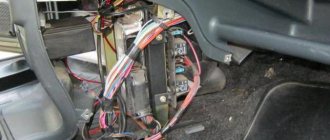
- Move the panel towards you.
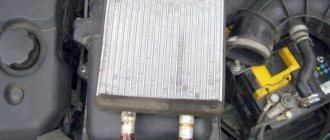
Retracted panel.
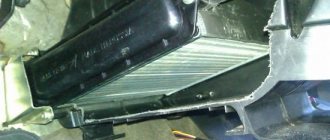
- Now we have access to the stove radiator. Loosen the clamps and remove the pipes from the heater radiator. Place a rag as a little antifreeze may spill out. Unscrew the three screws securing the heater radiator.
Stove radiator mount
- Lift the panel all the way up and remove the heater radiator.
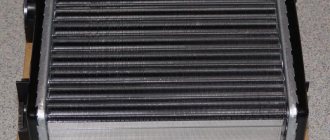
Old stove radiator.
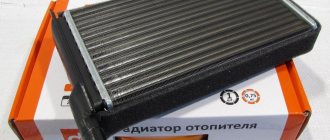
- new heater radiator
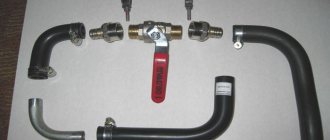
New radiator and heater valve.
- If you do not change the heater faucet, then install a new heater radiator in place, connect the pipes, assemble the panel, fill in antifreeze and enjoy the warmth in the car.
How much does this repair cost?
With proper skill, you can dismantle the old heating element yourself, even without removing the console. It is clear that the procedure is much easier to carry out with the console removed, but if there is not enough time, you can carry out the replacement this way. You don't need a pit or a lift to work, but you shouldn't do any repairs on cold days. If there are no conditions, it is better to seek qualified help from service technicians. The price for this work, depending on the region, starts from 1,500 thousand rubles and above. For repairing a breakdown on a VAZ, this price is quite high, but it is due to difficult access to the element being replaced.
Replacing the heater valve VAZ 2114
- Unscrew the two 10mm nuts on the engine shield. (photo at the beginning of the article)
- If you are changing both the faucet and the radiator, then remove the faucet along with the pipes after disconnecting them from the radiator
- Remove the latch and cable
Stove valve control cable.
- We insert mounting bolts into the new stove faucet, and also mount the pipes in the position in which they were on the old faucet and tighten the clamps so that there is no pain later.
A small life hack. After installing the bolts, drop a little superglue on the seats, so they will not jump out when installing the faucet in place.
- Before installing the stove tap in place, we connect the cable and check that the tap opens and closes completely when changing the position of the manual heat-cold switch.
- If everything is normal, we install the faucet in place, connect the pipes and fill in antifreeze and enjoy the hot air from the heater even when idling.
Just for fun, I measured the air temperature at the outlet of the vent on the center console; with the engines fully warmed up and the outside air temperature +12, the thermometer showed +43 degrees in the second position of the fan.
Everything is very simple, it took about 1.5 hours to replace the radiator, and 30 minutes to replace the faucet. This procedure is easy to perform with your own hands, in a regular garage, even without an assistant.
Good luck on the roads. Not a nail. Not a rod!
Reasons for removing a cooling system element
When a car breaks down, some reasons lead to the need to remove the radiator. The main ones:
- various types of mechanical damage;
- individual radiator tubes are clogged with dirt, deposits in the form of scale and rust;
- getting a car into an accident.
Replacing the device in question is not always required. Sometimes it can be repaired, washed, soldered. Modern radiators often have an aluminum core and a plastic tray. Such models are very difficult to repair.
To eliminate the malfunction or replace it, you will need to dismantle the device. You need to take this work very seriously and do it carefully. In order for the process to be carried out efficiently, you need to at least briefly know what parts the radiator assembly consists of. It includes:
- device body;
- expansion tank;
- Electrical engine;
- engine casing;
- impeller (fan);
- rubber cushion;
- drain plug;
- various hoses;
- a pump that is powered by a drive belt.
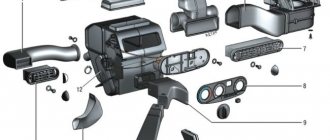
Cooling system: 1 – expansion tank plug; 2 – expansion tank; 3 – radiator supply hose; 4 – hose from the radiator to the expansion tank; 5 – radiator outlet hose; 6 – left radiator tank; 7 – aluminum radiator tubes; 8 – sensor for turning on the electric fan; 9 – right radiator tank; 10 – drain plug; 11 – radiator core; 12 – electric fan casing; 13 – electric fan impeller; 14 – electric motor; 15 – pump gear pulley; 16 – pump impeller; 17 – camshaft drive toothed belt; 18 – heater radiator outlet pipe; 19 – pump supply tube; 20 – hose for supplying fluid to the carburetor starter; 21 – carburetor heating block; 22 – exhaust pipe; 23 – heater supply pipe; 24 – hose for draining fluid from the carburetor heating unit; 25 – thermostat; 26 – hose from expansion tank to thermostat
Aluminum or Copper
Trivial advantages of a duralumin radiator:
- the presence of lateral ribs is much larger than that of the opponent
- the width of the channels for air flow is greater (this fact can significantly reduce the risk of breakage, and also increases the efficiency of heat supply at idle)
A trivial disadvantage of a duralumin radiator:
- heats up very quickly and cools down just as quickly (heat loss is 209.3 W/m.deg)
- As soon as the leak was found, it needed to be replaced; such a unit cannot be resuscitated
Trivial advantages of a copper heater:
- takes a long time to heat up and also takes a long time to cool down (faster, the advantage is the 2nd part of the radiator characteristics), heat loss is 389.6 W/m.deg
- can be revived: as soon as the leak appeared, you just need to solder the hole
Trivial disadvantages of a copper heater:
- fewer ribs than the opponent
- the channels are small and narrow, they tend to clog quickly, which aggravates heating and adds reasons for repairs
- At idle it doesn't actually heat up.
- it is difficult to find a high-quality copper heater, because virtually everyone who makes units from such material uses impurities and can paint the original material, which naturally reduces the heat loss property
Today, duralumin radiators are obviously more popular than copper ones. And this is primarily due to the difficulty of finding a high-quality copper unit. And if fortune smiled on you, then... and copper from 1700 rubles! This is also great if you install it without the help of others; the radiator replacement service will cost 800-1000 rubles, on average. By the way, if you cannot solder a leaking copper heater without the help of others, then taking it to service every time will be very expensive, you can save up for a limousine. And because all VAZ spare parts tend to be imperfect, keep in mind that you will have to deal with this one way or another. So think about it, it’s worth taking a copper radiator for the VAZ 2114 .
Some useful tips
Advice from professionals.
- To drain the coolant, you need to unscrew the plugs on the radiator, on the expansion tank and on the engine cylinder block.
- If the cooling system is not functioning well, the culprit may be a liquid cooling pump whose shaft bearings or seals have failed. It needs to be repaired or replaced with a new product.
- The cause of failure of the cooling system may be improper operation of the thermostat, which must be repaired or replaced.
- It is more convenient to remove the radiator together with the fan. The fan can be removed later if necessary.
You can check the tightness of the removed radiator as follows:
- fill the bathtub with water;
- lower the product into water and apply pressure of approximately 0.2 MPa;
- bubbles will show where leaks have appeared.
Sometimes, to bring the radiator into working condition, it is enough to rinse it with water. It's done like this. The antifreeze or antifreeze is drained and clean distilled water is poured in. The engine starts and runs at 3000 rpm. The temperature should be monitored. They turn off the car and after 7-8 minutes drain the water. If it is not completely clean, the procedure can be repeated. If the fluid has changed color, it needs to be replaced.
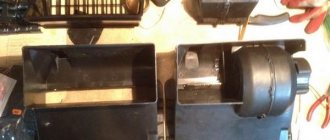
The coolant should be changed: antifreeze - after 2 years, antifreeze - after 5 years. The best choice for cooling fluid is antifreeze. The standard cooling system fan is quite noisy. Therefore, it makes sense to replace the original four-blade impeller with a new eight-blade one. When purchasing an impeller, you need to remember that the shaft for its attachment can have a landing thread of 8 mm and 6 mm.
Thermostat problems
When the temperature reaches 95 degrees Celsius, the liquid begins to flow through the thermostat. Due to the operation of this unit, the engine requires a minimum of time and resources to warm up. The thermostat is located between the radiator and the engine.
Most often there are two types of faults.
- The valve closes. If the engine is not warmed up, it is difficult to maintain speed. It may simply stall.
- The valve opens. During frosty periods, you can operate the car, but you must turn on the heating at maximum speed. Otherwise, the power unit will simply overheat.
If you are unable to move the valve while repairing the thermostat, don't be afraid to lightly tap the housing with a simple screwdriver. This will solve a common problem.
When the thermostat is completely disassembled, the pipes are hermetically sealed, which will prevent coolant leakage. Only after this can you start working.
In general, the choice between antifreeze and antifreeze should not be a problem for you. Choose antifreeze. Although it is more expensive, it lasts longer and allows you to minimize possible problems with wear and tear of the cooling system. The imaginary savings due to antifreeze are not called that for nothing. In the future, you will pay much more to fix the damage caused by the use of antifreeze.
Sources:
https://tuning-vaz2106.ru/3-2/kakoj-radiator-na-vaz-2114-luchshe-kakoj-radiator-oxlazhdeniya-luchshe-na-vaz-2114.html https://luxvaz.ru/vaz -2114/48-sistema-ohlazhdeniya-inzhektornogo-dvigatelya.html