Heater malfunctions in any car cause a lot of trouble. It is especially difficult to correct the situation when the problem has already started and coolant has leaked.
Replacing a heater on a car is not an easy task, since in order to get to it, you will have to disassemble half the car and it will take a lot of time. Unfortunately, not everyone knows how to remove and replace the stove on a VAZ-2115, and therefore they turn to a car service center.
But you shouldn’t rush to give your car into the wrong hands because of this procedure alone, because:
- Work to replace components costs about 1500–2000 rubles.
- It’s not a fact that they will do everything efficiently.
- Very often, car service workers treat their work anyhow and can break something when dismantling the panel.
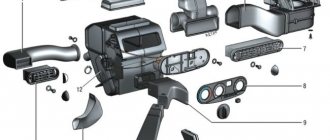
How to diagnose the performance of the VAZ-2115 heater
- Turn on switch 1 first, then second and third speeds.
- Using levers 2 and 4, you can adjust the desired direction of the air flow, and the latter also makes it possible to select the desired temperature.
- A faulty fan means the stove does not work at all.
- If the radiator still shows signs of life, then the breakdown may be a failure of the additional resistor or the interior heater does not respond to switch commands.
- But the stove tap can also leak or become stuck, in which case it must be urgently replaced.
- When the fan is running at full power and the temperature is at maximum, and the engine is warm, then perhaps the heater radiator is clogged. To clean or replace it, you will need to disassemble it.
Heating system repair
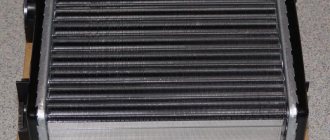
Having identified such problems, you will probably ask the question: is repair possible or will the radiator of the VAZ-2115 stove still need to be replaced? It can be solved only by establishing what metal it is made of. Radiators can be made of either copper or aluminum. The former, of course, are more expensive, but they last much longer, and in some cases they can be repaired (soldering the depressurization area). Aluminum models are less reliable, but more common due to their low price.
In any case, the first thing you need to do is remove the radiator of the VAZ-2115 stove, and only then plan further actions.
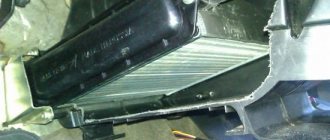
Replacing the radiator of the VAZ-2115 stove
Replacement is necessary when the heater radiator leaks or is clogged. If the radiator is clogged, you can blow it out with a Karcher, but keep in mind that it can deteriorate under high pressure.
How to disassemble the stove and remove the radiator
In order to remove the radiator, you must first drain the coolant and disassemble the dashboard. If the coolant is still good, it can be refilled again after replacing the failed elements.
To save time, you don’t have to remove the panel completely, but just do partial disassembly.
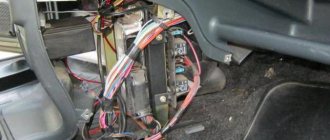
- Initially, you will need to remove the console and glove compartment. To do this, unscrew the panel fasteners on the left side. Then pull the panel towards you and remove the radiator, but, most likely, you won’t be able to do this alone and you will need to turn to someone for help, since it’s more convenient to work together.
- Unscrew the panel fastenings on both sides and loosen the brackets coming from the floor (where the ECU is located), and also remove the glove compartment completely. Bend the panel and, with the help of an assistant, remove the radiator.
When you get to the heater core, disconnect the wiring harness from the heater motor. After which you will need to unscrew two fastening nuts on the right side and two nuts on the left. After this, loosen the clamps that hold the pipes and disconnect the radiator.
How to install a new stove radiator
Installation is carried out strictly in reverse order. It is also important, after a long service life, to simultaneously replace the clamps and pipes with new ones, preferably reinforced ones. Replacing hoses for VAZ-2115 stoves is also a very lengthy and painstaking procedure, since you will have to change all the elements, otherwise there will be little benefit from a partial replacement.
Old hoses will fail over time and coolant may begin to leak.
The final assembly step is to install the dashboard and add coolant.
When all replacement steps have been completed, start the engine and check how the heating works, whether it heats up well and quickly. If there is no heat for a long time, then the air lock may not have been completely removed.
Unscrew the pipes
After draining the liquid from the system, you need to unscrew the pipes leading to the radiator. Be careful, there may be liquid left in the radiator.
Then we unscrew the three screws that hold the radiator itself and pull it out.
Don't forget to clean the inside of the stove from leaves and other debris. Then we install a new radiator and reassemble in the reverse order.
This method helped me save a lot of time and did not require complete disassembly of the dashboard, which is good news.
Changing the faucet
A leaking faucet is considered one of the most annoying problems with a heating system. If the problem is not detected in time, it may simply flood the car interior with coolant. To diagnose a leak, it is enough to have a flashlight with you and visually inspect the condition of the faucet. But leaks can also be caused by cracks in the pipes or radiator.
Faucet replacement procedure
It is better to carry out replacement in a special repair pit:
- Drain the coolant.
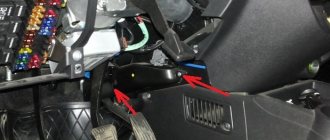
- Get to the pipes that connect the engine and the heater valve. Loosen the pipe clamps and clean the threads of the 2 studs that secure the faucet. To do this you will need a metal brush and WD-40.
- Disconnect all the pipes one by one. In this case, coolant may leak.
- After that, in the cabin you will need to remove the side trim of the torpedo and, if necessary, replace the pipes.
- Then you will have to go back under the car and use a 10mm socket to unscrew the nuts securing the faucet.
- Return to the cabin again and pull the faucet towards you, then remove the spring clamp and disconnect the faucet from the control cable.
- Then, when the tap is unscrewed, you can replace it with a new one. Then put everything back together in reverse order.
Troubleshooting
To find the source of a leak in the heater radiator, pay attention to the following points:
- The primary sign of a leak in the interior heating system is an increased frequency of adding antifreeze to the expansion tank. At the same time, it is impossible to guarantee that the problem is in the radiator itself;
- Examine the condition of the heater valve and pipes;
- If the culprit is a faucet, it is not difficult to determine. If there are no unpleasant sweetish odors inside the cabin and the floor is not covered with traces of coolant, then this is definitely not it. The presence of such signs indicates that the stove tap needs to be replaced;
- The presence of deformations and cracks in the pipes can only be determined by visual inspection. Therefore, dismantling work will have to be carried out;
- Having discarded the options with pipes and tap, there is only one option left - damage to the heater radiator itself.
You should not delay repairing the radiator, since this will first lead to the need to spend extra money on antifreeze (moreover, you yourself will breathe in the antifreeze vapors, which can lead to poisoning). A liter of coolant costs about 100 rubles. And over time, the problem will worsen, antifreeze will fill the interior, begin to corrode the floor covering, and cause a lot of other troubles.
Main reasons for replacement
There are not many reasons why it may be necessary to replace the radiator of the interior heating system. One of them is the appearance of a leak.
Heat exchangers are made of non-ferrous metals - copper or aluminum.
Gradually, these metals oxidize due to exposure to liquid, which leads to the appearance of cracks through which coolant flows out.
The second reason for replacing the heater radiator is clogging of the tubes with contaminants. The coolant, circulating through the cooling system, washes away corrosion products, small particles, etc.
Moreover, the liquid cannot contain them and these polluting elements settle on surfaces, including the stove radiator.
As a result, the heating system first loses efficiency, and later (if it is heavily contaminated) it simply stops working.
In some cases, radiator blockages can be eliminated by flushing using chemicals.
But if the blockage of the tubes is severe, then the plugs can only be removed from the dirt mechanically. And this can only be done with the radiator removed.
Before you start disassembling, you should first make sure that the problems arose with the radiator.
So, a leak of this element is manifested by the appearance of traces of antifreeze on the floor in the cabin.
But the same result can also be caused by damage to the radiator pipes or loss of tightness at the point of their connection with the heat exchanger.
A decrease in heating efficiency can occur not only due to blockage of the radiator tubes, but also due to severe clogging of its honeycombs.
Dust, fluff, leaves, and insect remains get clogged between the cooling fins, making it difficult to transfer heat to the air.
But in this case, it is very easy to identify the problem - turn on the stove fan at full power and check the air flow from the deflectors.
If it is not strong, the radiator should be cleaned, which also cannot be done efficiently without removing the element.
The stove may also stop heating due to the radiator becoming airy, which often happens when replacing the coolant. Often the cause is a malfunction of the cooling system elements, especially the thermostat.
In general, before removing the heater radiator, you should make sure that it is the cause of poor interior heating that is hidden there. And for this you will have to check almost the entire cooling system.
Dismantling process
- After draining the antifreeze, you can begin replacing the radiator itself.
- Remove the screws that hold the front panel in place.
- Unscrew the fasteners located on the rear wall of the glove compartment.
- You also need to remove the screw, which you will find near the side mirror on the passenger side.
- Once these fasteners are removed, the front panel will move freely up and down on the passenger side.
- To make your work easier, lift the panel as high as possible and insert something like a wooden block into the resulting gap. Usually you need a stopper about 7 centimeters thick.
- Lie on your back on the floor on the passenger side, unscrew the three fasteners that hold the heater in place. Get her out. The radiator has been removed.
- Apply a rubber seal to the new unit and insert the device in place of the old radiator. Don’t forget to clean the unit’s landing site first.
- Reassemble the unit.
- Fill the system with old or new coolant. This is an excellent reason to change the antifreeze if the old one has been in use for a long time.
Antifreeze should be added sequentially. First add fluid to the reservoir up to the MAX mark. After this, you need to start the engine so that it runs for about 15 minutes. The antifreeze level will drop, and you can add the missing amount.
The work is completed. The old radiator is recycled, the interior is tidied up and you can enjoy the result.
Didn't find the information you are looking for? on our
forum
.
If you find an error, please highlight a piece of text and press Ctrl Enter.
Methods for replacing a radiator
There are two ways to remove the heater radiator on a VAZ-2113, 2114, 2115. The first involves completely removing the front panel
, which is necessary to access the heat exchanger.
Note that complete dismantling is a relative concept, since the panel itself is not removed from the car, but is only disconnected from the body, which allows it to be moved and thereby allow access to the radiator.
You will also have to move the torpedo itself.
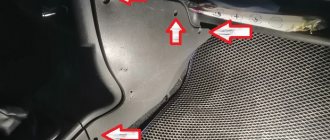
Second method - without removing the panel
. But it is not suitable for everyone, since to provide access it is necessary to make cuts in some places so that it is possible to tilt the lower part of the panel in the area where the heat exchanger is located.
The disadvantage of the first method is that it is labor-intensive, since you will have to unscrew a lot of fasteners and disconnect the wiring, of which there is a lot that goes to the panel.
As for the second method, the panel itself will essentially be damaged, although it is cut in places hidden from view.
Also, after completing the replacement, you will have to think about how to reattach and secure the cut parts.
But since the stove radiator can leak at any time, ease of access to it is very important, so the second method is preferable.
Lower nozzles
Fuses and relays for VAZ 2114, 2115, 2113
Next, we will upgrade the air ducts for the legs. When disassembling the panel, you will see that there is a large gap between the nozzles. We seal it with a corrugated tube. We take the standard air distributor out, and in its place we also install a corrugation. The diameter should be 4 centimeters. This way, the air will be clearly directed to the feet, without leaks. As for the windshield blower, it is being modified in a similar way. Additionally, the owners fill the extra cavities with polyurethane foam in order to eliminate the creaking of the panel when moving (this problem has plagued the Samara since the first generation). Judging by the reviews, this method works.
Selecting a replacement radiator
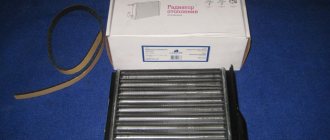
But before you begin the removal and replacement operation, you should first select a new heat exchanger.
You can buy a factory heater radiator, catalog number 2108-8101060. But analog products made by DAAZ, Luzar, Fenox, Weber, and Termal are also quite suitable.
As for the material, it is recommended to use copper heat exchangers, but they are much more expensive than aluminum ones. Although this is not an acquired taste, many people use aluminum products and are quite satisfied.
In general, the main thing is that the radiator is designed specifically for these cars.
The designers used the same front panel design on the VAZ-2113, 2114 and 2115 models, so the replacement algorithm is the same for them.
Next, we’ll look at how to remove the radiator of the interior heating system using the example of a VAZ-2114, and how this is done in different ways.
Inconvenient design solutions
VAZ-2114 and 2115 cars are quite modern and quite popular cars in the economy segment.
But these cars, like most new models, have a not very pleasant feature.
By increasing the comfort of the interior and the layout of the front panel, designers significantly complicate the maintenance of the heating system.
The heater radiator in these cars is hidden deep under the panel and is not so easy to get to.
But the heating radiator is a rather vulnerable element of the cooling system. And if the interior heating has deteriorated, in more than half of the cases the problems are related to the heat exchanger.
And all this despite the fact that the element itself is practically not repaired and is often simply replaced.
Cylinder head gasket
Sometimes the cause of a faulty heater is a blown cylinder block gasket. This malfunction can be identified by several signs. Firstly, there is a smell of gasoline or exhaust gases in the antifreeze. Secondly, a certain mixture – “mayonnaise” – forms on the dipstick and oil filler cap.
View gallery
It occurs due to mixing of car oil with coolant. Also, characteristic white smoke will be visible from the exhaust pipe while the engine is running. If at least one of the above symptoms is present, you should diagnose the condition of the gasket and urgently replace it.
Useful tips
I would also like to give some useful tips on how to extend the life of your heater radiator.
- Don't skimp on coolant. Cheap coolant is the main cause of problems with the heater core.
- Check the coolant level regularly. This will not only help identify its leak, but will also protect the engine from overheating.
- In the summer, open the heater tap at least once a month to allow coolant to flow into the radiator. This solution will prevent the faucet shut-off mechanism from souring, and will also allow the radiator not to “dry out”.
- When replacing coolant, be sure to flush the system with a special fluid. This will slow down the scale deposition process.
- Having identified problems with the system, do not delay repairs.
Preparatory work
To begin with, it is recommended to warm up the car engine a little. After installing the machine in a pit or lifting it on a lift, you need to remove the engine protection.
Before replacing the radiator of the VAZ-2115 stove, you need to drain the coolant from the system. Having determined the location of the drain plug on the cylinder block (do not confuse it with the oil plug on the crankcase), place the prepared container, and then unscrew it. When the coolant drains, the plug needs to be tightened.
Next, we will look at how to replace the radiator of a VAZ-2115 stove with your own hands. This is not an easy task, but it is quite doable.