Hi all! Any problems associated with the braking system of vehicles are potentially very dangerous. Therefore, every motorist should know why the brake caliper jams, what can provoke such a situation, how to diagnose and eliminate it. On your own or with the help of specialists, decide for yourself.
Our regular readers remember that we have previously talked about situations when the caliper knocks. Now let's consider a slightly different situation. Moreover, it is even more dangerous and unpredictable in terms of possible consequences if nothing is done after noticing the symptoms.
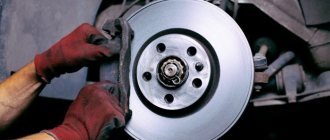
Let's start with the theory. The caliper on a car is part of the brake system. It is used in the design to press automobile brake pads when the corresponding pedal is pressed against the brake disc. As you understand, the node is extremely important.
But sometimes it can jam and creak because of this.
Choosing how to lubricate car door hinges to prevent them from squeaking
- VAZ 2110;
- VAZ 2109;
- Lada Kalina;
- Chevrolet Lanos;
- Lada Priora;
- VAZ 2114;
- Chevrolet Niva;
- Lada Kalina;
- VAZ 2112;
- Daewoo Nexia;
- Volkswagen Polo Sedan;
- Skoda Octavia;
- Mercedes E class, etc.
Regardless of whether it is installed on a Niva or a BMW, the caliper must be in constant working order.
This is the direct task of the car owner himself. Or persons responsible for maintaining the machine and maintaining it in proper technical condition.
Before determining why it does not press out and what to do to prevent the car caliper from jamming, you need to understand the principle of its operation.
In optimal condition, when the brake assembly is working properly, the operating diagram looks like this:
- the driver presses the brake pedal;
- pressure is built up inside the braking system;
- this pressure is transmitted to the piston group of the auto calipers;
- the calipers, being under high pressure, bring the brake pads to the disc;
- the braking disc is attached to the car wheel;
- friction force arises;
- wheel rotation slows down;
- the car stops;
- or reduces the speed to the required values.
As you can see, in theory there is nothing complicated. But in fact, the caliper is rightly called an extremely complex element.
For the brakes to work effectively, it is important to ensure that the pad is parallel to the disc.
Friction during active braking causes heat production. This heats up the pad, brake fluid and our caliper.
Therefore, it is extremely necessary that the car caliper be made on the basis of a material that does not change its properties and characteristics during the process of strong heating. Plus, there are increased requirements for strength.
Adjusting the brake system
As already mentioned, the brake system of the VAZ 2114 operates on a hydraulic principle, which makes it dependent on the tightness of the connections and the pressure of the working fluid. Even minor damage to its pipelines can lead to leaks and, as a result, difficult braking.
No less dangerous than a loss of pressure due to a leak is the leakage of air into the hydraulic system. Due to the fact that gases, unlike liquids, have much greater compressibility, even a small amount of air will damage the brakes and the pedal will simply “fail” when pressed, without causing the car to stop.
If the hydraulic system is completely sealed, but the car does not brake as its owner wants, the question arises - how to improve the brakes on the VAZ 2114?
The first thing you need to set up the brakes is a level area. The second is a nominal set of keys and a slotted screwdriver.
The operation itself is performed in the following order:
- Drive the car onto a level area, turn off the engine and, pressing on the rear, rock it slightly from side to side (this will help bring the suspension to the middle position).
- Remove the front adjusting bolt on the brake pressure regulator.
- Using a slotted screwdriver, establish a small gap - about 2 mm - between the spring and the lever (for greater convenience, there is a special protrusion on the lever).
- Tighten the front adjustment bolt.
After the brakes are adjusted, they should be checked with the help of an assistant. To do this, on a flat straight road you should accelerate to 40 km/h and brake.
If the car stops quickly, does not pull to the side, and the front wheels lock a little earlier than the rear wheels, then the adjustment is made correctly.
If the rear wheels are blocked first, then the setting should be repeated, increasing the gap even more, and if the rear wheels are very late, then the gap, on the contrary, should be reduced.
After adjusting the brake system, you should check the operation of the brake system on well-inflated wheels with the same pressure.
Finishing the conversation about the design of the 14th brakes and the principle of their operation, we need to say a few words about one more important point. When driving through deep puddles or a small ford, the brake structures of the car become very wet and it is very difficult to stop when you press the pedal.
In order to correct this situation, you should start, brake, move again, brake again - and so on several times. This will help warm up the brakes and return them to normal operation.
Universal trailer for boats and cargo: what they are, how to make them
It is the creaking that indicates that the element is seriously worn out. In the near future, the unit must be replaced without fail, which the car literally and figuratively screams about. It is extremely difficult not to hear such a creak. But for some reason, thousands of motorists still stubbornly ignore it. As a result, they pay a rather high price. Sometimes even to the point of road accidents resulting from brake failure while driving. To prevent this, you need to understand the issue and understand the essence of what is happening.
The first step is to look at the possible causes. In fact, there are several potential problems to look for. Some of them arise due to the fault of the motorist, others are caused by the natural process of wear and tear.
In any case, the appearance of a squeak as a symptom is a harbinger that at the most inopportune moment the caliper may simply jam.
If you know the reasons, you can prevent them and troubleshoot them by contacting a car service center or solving the problem yourself.
The reasons are:
- The brake pads were initially installed incorrectly. As a result, they are not strictly parallel to the response drives. Because of this, creaking often appears;
- The brake discs are seriously worn out. The reasons are natural wear and tear and aggressive use of the car;
- There is no lubrication in the unit. Initially there was little of it, or it was used up;
- The lubricant was selected incorrectly. Many people skimp on lubricant intended for calipers, hence the consequences.
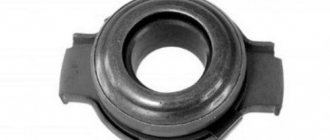
The most undesirable and dangerous situation is rightly considered when the piston does not return and the unit begins to jam during operation.
Imagine that you are driving a car, press the brake, and then accelerate again. But at the same time, the calipers do not release the front brakes. Additional resistance arises, the car tries to move, but cannot. The result is uncontrolled braking, extremely intense wear and serious overheating of the entire system.
How to avoid caliper failure
The procedures described above for completely cleaning the caliper are very complex and require a lot of time. To ensure that they are carried out as rarely as possible, be sure to lubricate the caliper surface with special grease or WD-40 every 6 months to avoid corrosion.
It is also recommended to inspect the caliper annually for corrosion, damage, dirt, and boot rupture.
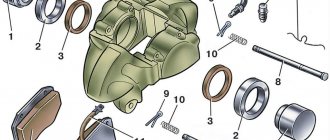
Welcome! Brake cylinders - thanks to them, braking is carried out, and without the pistons that are in them, these cylinders will not work at all, so if a piston fails, then you have to go to a car store and buy a new brake cylinder, because driving without brakes is scary and even more dangerous , but not in all cases the pistons stop working forever, sometimes they can be revived, and we will write in detail about how to do this in this article.
Note! To work, you will need to stock up on: A jack to lift any side of the car, as well as a wheel wrench and you may also have to stock up on bricks, and you may also need a basic set of wrenches and sockets!
Summary:
How to understand that the pistons of the brake cylinder are not working? Let us answer this question before we move on to the repair of pistons, namely inoperative (That is, the pistons do not move in the cylinder), the pistons are recognized if they do not move at all and stand in one place, as a result of which the car, namely the brakes, begins a number of problems occur, that is, the car cannot drive normally because it constantly slows down even though you don’t press the brake pedal at all, or it may be that the car will drive but it will brake much worse than it should, in general, let’s figure it out Why do these cylinder pistons fail?
From time to time, the sealing ring (indicated in the photo below by an arrow) that fits the piston in a circle either wears out, or micro cracks form in it through which dirt begins to get into the piston itself, where the lubricant is located, and as a result the piston becomes unusable.
And also, the piston can simply sour in the brake caliper, and this can happen because of our roads, which in winter are mostly sprinkled with sand and salt, and the brake system is located in the very bottom of the car and therefore is subject to heavy braking. and in general, when moving, all this salt flies which little by little brings the situation to the point where the piston simply rusts, otherwise it simply sours, and therefore it will then be very difficult to move it from its place and thus it stops moving and therefore stops working.
By the way, you can very easily understand if your piston is somehow soured, if your car’s fuel consumption on the highway increases, and also if the car, as already mentioned earlier, starts to drive worse, and also if you notice that In neutral gear, the car began to slow down a little, this can also be understood if the car begins to skid on a winter road from braking, all this indicates that your piston has stopped working.
What to do in such a situation
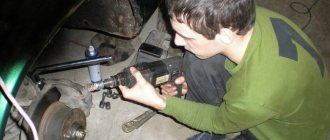
If you were able to diagnose creaking and signs of wedging in this unit, you need to perform a number of measures.
And here it is not necessary to contact a car service. You need:
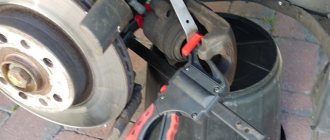
- put the car on a jack;
- remove the wheel;
- unscrew the caliper;
- remove it;
- unscrew the problematic piston;
- remove the piston from the cylinder;
- visually inspect the element;
- check for chips, damage, corrosion;
- if there is rust, clean it;
- if severely damaged, replace;
- drain the working fluid from the element;
- remove the sealing ring;
- clean all surfaces;
- dry;
- fill in new hydraulics;
- assemble in reverse order.
When putting the assembly back together, pay special attention to not accidentally damage the old boot. If you notice cracks on it, then no restoration will help. Replacement only.
Other reasons why front brakes stick
The front wheels do not always jam the same way; this can manifest itself in different ways. Both front wheels can “stick” at once, and you simply won’t be able to move. It happens that they seem to be spinning, but with great difficulty, making a creaking sound. This is a dangerous situation, especially if you ignore the problem and continue driving. Only one front wheel can jam, while the other spins freely. Let's look at the possible reasons.
- The brake pedal is poorly adjusted or has no free play at all
.
There must be sufficient clearance between the master cylinder piston and the pusher for the pedal to move normally. This is adjustable.
Brake pad tension spring is faulty
.
This does not mean that it is cracked or completely torn, perhaps just stretched. There is such a thing as metal fatigue, and a weakened spring will no longer function normally; it is better to replace it.
It can jam for several reasons. The diaphragm may be swollen, or the protective cap or lid seal may be pinched.
Pay attention to the amplifier adjusting bolt. It shouldn't be too tight. It is important that it protrudes slightly above the surface of the master cylinder.
There is something wrong with the brake pad friction lining.
.
The problems can be different: the gasket wears out, breaks, or becomes too thin. This usually leads to damage to the pad itself, so in this case both it and the lining have to be replaced. Important: if you are changing a worn gasket, then the pair to it should also be replaced; they must be the same in thickness, otherwise the car will be pulled off the line of movement to the side.
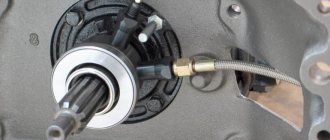
The reason that the front brakes are sticking may be a stuck piston in the wheel brake cylinder.
.
This kind of trouble can happen in any car, so you need to be able to deal with it. The reasons for this situation are different: low-quality brake fluid, uneven position of the cylinder body in the caliper, rust and corrosion on the working surfaces of the piston. Disassemble the problematic cylinder, clean all components, rinse with brake fluid, reassemble the system and bleed. Fill with good quality brake fluid.
The cuffs on the wheel cylinder have lost their shape or are swollen
- This is also one of the reasons why the front brakes jam.
The cuffs of the master cylinder or wheel cylinders swell from fluids such as oil, gasoline and others that have entered the brake system. This jams the cylinders, which results in a problem with the brakes. But you just have to replace the cuff, and everything will work out. It is recommended to at least occasionally check the condition of the cuffs, and when disassembling the car (no matter for what reasons), replace them, even if these elements appear to be completely intact.
Normal quiet braking
When riding a motorcycle, there is most often no need to brake urgently. You calmly react to predictable road conditions, calmly approach a traffic light, or slow down before turning. In this case, it is optimal to use the following algorithm:
- Start braking with the rear brake. This will lead to a reduction in speed and loading of the front wheel (improving its grip on the asphalt);
- Smoothly apply the front brake for a controlled stop;
- Depress the clutch even when decelerating strongly, so as not to lose traction on the rear wheel (and therefore control over the motorcycle).
Everything described above and below concerns braking on asphalt or other durable, level surfaces. We’ll talk about deceleration and stopping techniques for enduro, on wet ground and in a swamp, another time.
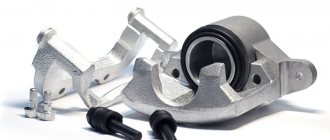
Front brake caliper - design types
The development of these mechanisms is reflected in their division into 2 categories, depending on the layout:
- Fixed design - it consists of a body made of metal, and there are working cylinders on both sides of the brake disc. Their arrangement is symmetrical. In this case, the body itself is fixed on the steering knuckle. At rest, the pads are held in place by special springs, and during braking they are compressed, causing them to be pressed against the surface of the disc. To ensure the operation of such a design, it is required that brake fluid be supplied simultaneously to all cylinders, which is achieved through a whole system of hoses, pipes and various tubes. Such brakes are highly efficient, making them ideal for cars with powerful engines and large weight - racing and executive models. World famous brands - Brembo and others - specialize in such calipers.
- A floating caliper is the fundamental difference between such a caliper and a fixed one in that one of the pads is in a constant position. Its design involves the presence of a bracket, as well as a cylinder, which is fixed on the inside. Typically, such calipers are single- or double-piston. The braking process is as follows - the piston presses the pad and presses it against the disc, and at the end of this phase, the bracket (floating type) begins to move towards the piston, sliding along the guides. Due to this, another pad is pressed against the surface of the disc.
The best brake pads for VAZ 2114 Price
The best brake pads for the VAZ 2114, according to most car enthusiasts and owners of the 14th Lada model, are HQ pads. This nonsense produces very high-quality brake pads that can last many thousands of kilometers. Their cost depends on the region, but on average the price for a set of HQ front pads varies within 1000 rubles.
Bleeding brakes on a VAZ 2114
Having decided in what order the brakes are pumped, you can begin. Note that it is convenient to pump in a pit. Step by step bleeding the brakes of a VAZ 2114 looks like this:
- Get to the rear wheel and find the bleeder fitting with a cap on the drum.
- Remove the protective cap and clean the surface from dirt.
- Next, put a hose of a suitable size on it, the other end of which leads into a container to collect the liquid.
- An assistant presses the brake pedal several times and leaves it pressed.
- Using a size 8 wrench, unscrew the fitting half a turn.
- The liquid from the fitting is drained until bubbles stop appearing. During the process, you need to add liquid to the tank and keep it at least at the minimum level.
- Next, go to the front wheel and carry out the same actions as described in paragraphs 3-6.
It is not recommended to carry out the work independently, without the help of a partner, because... To do this, the front wheels of the car will have to be hung. You will also have to find a way to supply pressure to the system.
Never add plain water to the tank. When frost sets in, the hoses will freeze and burst, making it impossible to stop the car. Carry a spare bottle of DOT4 fluid with you. If the reservoir level is low, add DOT4 to the correct level and locate the source of the leak.
Do not forget that at the moment when the air leaves the brake system, you must not allow the level in the reservoir to drop below the minimum. If this happens, the system will air again. To visually study the process, we recommend watching the video with step-by-step instructions.
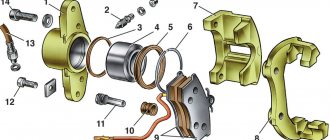
Rear wheel brake
Rear wheel brake on VAZ 2114
- Hub nut
- Hub flange. The brake drum is attached to it
- Lower tension spring
- Left pad
- Thrust spring
- Cylinder
- Upper tension spring
- Guide bar
- Eccentric
- Right pad
- Pad cover
Tip: when driving through deep puddles or fording a river, the brakes get wet. This dramatically reduces braking efficiency. Immediately after overcoming a water obstacle on a straight section and at low speed, brake several times. The pad linings, discs and drums will become hot and dry. The system's efficiency will be restored.
In general, the braking system of the VAZ-2114 is simple and reliable. For a person who has experience driving cars of other brands, servicing it on a “fourteen” will not be a problem. But even those drivers who got behind the wheel of a car for the first time can easily understand the operating principle and operating features of the VAZ-2114 brake system. But remember: it is better to service the brake system at warranty service stations from experienced technicians.
Symptoms of a problem
There are several common signs of a failing brake caliper:
- increased force - this is what needs to be applied to completely stop the machine;
- the car pulls to the side during braking;
- the pedal becomes “soft” - pressing it requires a fairly weak force;
- brake pedal pulsation;
- slight resistance in moving the pedal to the floor;
- brake sticking;
- blocking the rear brakes with great force, etc.