Sooner or later, owners of a VAZ-21099 car are faced with the need to carry out repairs taking into account the requirements for the vehicle. At the same time, replacement of equipment can only be carried out taking into account numerous nuances that determine the effectiveness of the result. It is mandatory to first drain the coolant and disassemble the dashboard, and then replace the VAZ heater radiator. Such a phased implementation of the event guarantees the successful restoration of the heating capabilities of the car interior.
Sequence of actions when replacing a radiator
For most beginners, the question of how to remove a stove radiator is not such a difficult task. You should first prepare containers for small parts and liquid remaining in the hoses. The sequence of manipulations is as follows:
Dismantling
- Unscrew the bolts located on the hose clamps. After which the radiator is disconnected from them. Important! When removing the hoses, you need to be prepared for the fact that residual coolant may spill out of them. In this case, keep a special container on hand.
- Remove the glove compartment.
- Unscrew the fastenings to the floor.
- Next, unscrew all the screws securing the radiator to the stove.
- The fastening of the cable that regulates the windshield blower damper is unscrewed.
- The radiator is disconnected from the stove. At this stage, problems with the torpedo are possible. To lift it up, you should rest your torso against the lower part of the glove compartment.
Installation
Next, a new radiator is installed. Actions are performed in reverse order. The car radiator is carefully installed, the torpedo is lowered down, the screws are screwed in, and they take their rightful seat.
Disassembling the torpedo
First, we prepare a couple of containers; they will be needed for the machine parts.
You can put plastic in one, and different screws in the other. In order for us to get to the torpedo bolts, we need to remove the trim, which is located in its upper part;
Attention: You should prepare and place empty containers nearby; they will come in handy if coolant suddenly starts leaking. Take the volume within 6=7 liters
It's better to have a reserve.
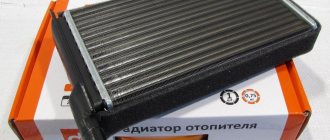
- The most important thing is to purchase a radiator. Before paying, inspect and check it for defects and only after that make a purchase;
- Prepare the necessary tools. Put in a set of sockets and screwdrivers. After this, take a flashlight and you can begin further work;
- Replacing the VAZ 21099 radiator heater begins with closing the tap, and the heater should be set to cold. The engine must also be completely cooled;
- We unscrew the radiator mount, which consists of three bolts, raise the rod, which is located above the radiator and remove the pipes;
- When you remove the first pipe, be careful to place the container. A little liquid should come out of it, about 200 grams. Use clean containers; after repairs are completed, you can use this antifreeze back;
- We plug the first pipe with something and remove the second one. In principle, liquid should not come out of it, if only a small amount comes out;
- Replacing the radiator on the VAZ 21099 stove continues by removing the radiator. Which moves without problems, quite easily, but on the way of movement we will be prevented from doing this by the edge of the torpedo. You can raise it slightly by resting your back against the bottom edge of the glove compartment. After that, we place it on the lower mount, which is located on the passenger seat side. After this, the stove will come out freely;
- We attach foam rubber around the perimeter of the new radiator, which is sold complete with the part. In principle, any other sealant can be used;
- We insert the radiator into the heater housing. We put on the pipes and make the connection using clamps.
Attention: The clamps should be tightened after a couple of days. To avoid antifreeze leakage
Do not forget to lubricate the fittings on the radiator with silicone glue and only put this on the pipes;
Replacement of the heater radiator high panel VAZ 21099 is complete. Only after filling do we immediately check the operation of the stove. And you may be very surprised that it only heats up at high speeds. This may indicate the presence of an air lock. It can be removed in the following way:
- We park the car so that the front is higher than the rear. The higher the better.
- Remove the expansion tank cap;
- We set the engine speed to 4000, not lower. Let it run for 2-3 minutes. Then let it run for a couple of minutes at idle speed. After this, keep it at 4000 for a couple of minutes;
- After this, add antifreeze. Close the lid. Now everything will be fine.
Of course, such a breakdown can happen unexpectedly. But it is better to sometimes check the floor in the cabin under the rugs. This will allow you to detect the leak in time and eliminate the malfunction.
Features of replacing a radiator on various car models
When reinstalling the radiator, the following questions may arise:
Replacing the heater radiator on a VAZ 21099 with a high panel
If the radiator needs to be replaced, the high panel does not need to be removed. You will need to remove all the screws that secure the panel to the car body. Then the steering casing is removed and the right side of the panel is moved into the cabin.
Important! Before moving the panel to the side, you need to disconnect the ignition switch wires and the alarm system from it.
Replacing the radiator of a VAZ 21099 stove with a low panel
If the front panel is low, in order to replace the radiator, it must be completely removed. Then follow the previously described sequence of actions.
Replacing the radiator of a VAZ 21099 stove with a high panel without removing it
If you don’t want to remove the panel every time you replace the radiator, you can file it down and then reinforce it with self-tapping screws. In the future, they are unscrewed if necessary. When replacing the radiator on an injection VAZ 21099, you should be attentive to the relays located under the panel.
After replacing the radiator, it is important to check how the stove works. Those who have done all these simple manipulations, the next time problems arise with heating the car, will not have the question of how to independently change the heater radiator on a VAZ 21099. Everything is simple if you do everything correctly. The radiator service life is approximately 8 years. If used incorrectly, it will fail within 2–3 years. For preventive purposes, the radiator should be removed for cleaning twice a year. And then reliable heat is provided.
Principle of operation.
Before identifying a malfunction, you should know how the system operates. Only then can you judge a possible breakdown.
So:
- This unit has an electric motor with a fan. Which supplies hot air to the car interior;
- Then we have a button for on off;
- Resistance system, they provide the desired fan speed;
- There is a heater radiator through which the liquid passes.
That is, there are not many parts that can lead to failure. It could be a radiator.
Or liquid leakage occurs due to leaky connections.
Heater diagram
The heater is mounted in the cabin under the dashboard using nuts on bolts that are welded to the air supply box. The air heated in the heater through channels (air ducts) enters the interior of the cabin. The air ducts are located at the bottom of the dashboard and have sealing gaskets.
If you plan to carry out repair and maintenance work, or replace failed components yourself, you definitely need to study the design of the stove and become familiar with the location of the components.
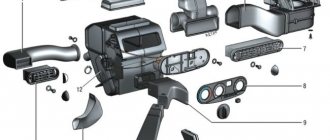
Based on the diagram below, we will introduce you to the design of the VAZ 2109 stove.
Scheme
| Item number | What is this |
| 1. | Bracket for fixing stove casings |
| 2. | Heater control damper |
| 3. | Left heater casing |
| 4. | Flap rod for heating the foot area |
| 5. | Radiator gasket |
| 6. | Radiator |
| 7. | Gasket sealing stove |
| 8. | Electric stove motor |
| 9. | Heater fan shrouds |
| 10. | Fan impeller |
| 11. | Heating damper |
| 12. | Air duct for heated windshield |
| 13. | Side nozzle duct |
| 14. | Side nozzle |
| 15. | Center nozzle flap |
| 16. | Pusher (blades); |
| 17. | Blade axis |
| 18. | The blade itself |
| 19. | Center nozzle closing lever |
| 20. | Heated windshield damper rod |
| 21. | Lever for changing air flow directions |
| 22. | Air heating control knob |
| 23. | Windshield air handle |
| 24. | Leg air handle |
| 25. | Bracket for control levers |
| 26. | Rod sheath fixation bracket |
| 27. | Stove valve control rod |
| 28. | Stove control damper rod |
| 29. | Heated footwell flap |
| 30. | Air control lever axis |
| 31. | Screw clamp |
| 32. | Stove valve |
| 33. | Heater valve body |
| 34. | Valve lever |
| 35. | Hoses connecting the faucet to the heater radiator |
| 36. | Internal ventilation duct |
| 37. | Heated windows for rear footwells |
| 38. | Stove tap |
| 39. | Window for heating the driver's foot area |
| 40. | B-pillar trim |
| 41. | Inner cavity of the central pillar |
| 42. | Exhaust ventilation duct |
| 43. | B-pillar trim |
| 44. | Hood deflector lining |
| 45. | Rubber valve |
| 46. | Deflector housing |
| 47. | Exhaust ventilation deflector |
| I | Heater |
| II | Stove operation diagrams |
| III | Stove tap |
| IV | Interior exhaust ventilation |
Having become acquainted with the components of the VAZ 2109 stove, let's find out in more detail how everything is arranged and functions here.
Device location
How does the heater work?
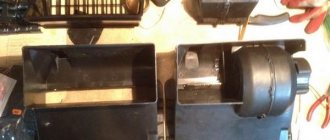
In order to understand how to correctly remove the device, for example, in the case when it is necessary to replace the body of the VAZ-21099 stove, it is worth familiarizing yourself with its design. In this car, the heater is located in the central part of the instrument panel between the engine shield and the dashboard on the air supply line, to which the heater is attached with four bolts. The design of the 99 VAZ stove is represented by two casings made of durable plastic (casing), between which there is a radiator. There is a fan on top of the heater housing that blows heated air to heat the interior. You can get to it through the engine compartment. In order to shut off the supply of hot coolant to the heater and turn it off during the warm season, a special tap is provided. The stove design also contains heat-conducting lines, pipes and rods.
Replacement
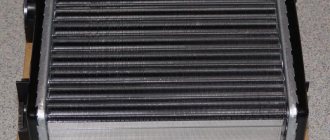
Before you begin replacing the device, be sure to evaluate the condition of the new unit.
A mistake many people make is buying painted radiators. They may look more presentable, but in practice they have poor thermal conductivity. Moreover, the difference with an unpainted radiator is significant. Don't buy such devices.
Replacing the heater core can be done using two methods:
- With removal of the instrument panel;
- Without removing the dashboard.
Removing the panel makes the job easy and quite convenient. But you will have to spend at least 6-8 hours on this, depending on your level of preparation.
The second method does not require removing the panel, which makes the procedure more complicated. But it literally takes 2 hours to work.
Most car owners want to do everything quickly, but efficiently. The process of dismantling the panel takes a lot of time and requires careful fiddling with each fastener. Therefore, the best option for most is without removing the dashboard.
That’s why we’ll tell you about it in detail.
To work you will need:
- Ratchet;
- Set of heads;
- Set of screwdrivers (flat and Phillips);
- Container for draining antifreeze with a volume of 8-10 liters;
- Rubber gloves for protection;
- Spanners;
- Garage with a pit.
When everything is ready and you are ready to work, you can begin.
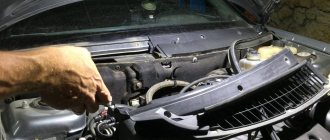
- Get into the hole under the car, having previously turned on the handbrake, placing supports under the wheels and removing the negative terminal from the battery. All in the name of safety.
- Drain the coolant from the radiator by unscrewing the drain plug.
- Next, after draining the antifreeze from the radiator, you will fill the container with approximately 2 liters. Let's move on to the drain plug on the engine. Antifreeze is drained in the same way as from a radiator. A hose with a diameter of 1 cm and a length of about 1 meter can help. All work on draining the coolant must be performed with the engine cooled down and wearing gloves.
- The plug for draining coolant from the engine is unscrewed with a 17 key.
- Loosen the pipe clamps and drain the remaining antifreeze from the stove system. Here you will have to lie down in the cabin with your head towards the engine, since the pipes can only be reached from the passenger side.
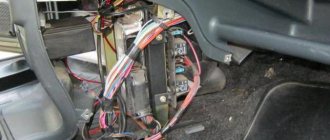
Dismantling process
- After draining the antifreeze, you can begin replacing the radiator itself.
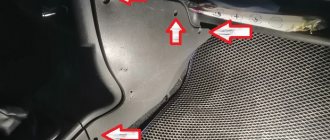
- Remove the screws that hold the front panel in place.
- Unscrew the fasteners located on the rear wall of the glove compartment.
- You also need to remove the screw, which you will find near the side mirror on the passenger side.
- Once these fasteners are removed, the front panel will move freely up and down on the passenger side.
- To make your work easier, lift the panel as high as possible and insert something like a wooden block into the resulting gap. Usually you need a stopper about 7 centimeters thick.
- Lie on your back on the floor on the passenger side, unscrew the three fasteners that hold the heater in place. Get her out. The radiator has been removed.
- Apply a rubber seal to the new unit and insert the device in place of the old radiator. Don’t forget to clean the unit’s landing site first.
- Reassemble the unit.
- Fill the system with old or new coolant. This is an excellent reason to change the antifreeze if the old one has been in use for a long time.
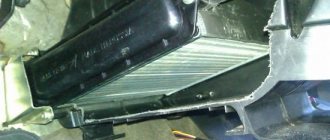
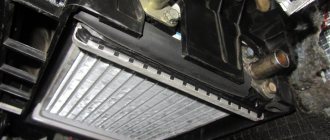
Removed device
Antifreeze should be added sequentially. First add fluid to the reservoir up to the MAX mark. After this, you need to start the engine so that it runs for about 15 minutes. The antifreeze level will drop, and you can add the missing amount.
https://youtube.com/watch?v=-2eZ-KKjBuQ
The work is completed. The old radiator is recycled, the interior is tidied up and you can enjoy the result.
Loading …
Determining faults
We identify a radiator malfunction. The first signal that there is a malfunction is the frequent pouring of antifreeze into the tank. In this situation, it is impossible to say for sure that the problem lies precisely in the radiator. The culprits may be the pipes or tap of the heating system. To isolate the option with a tap, it is enough to check the interior of the car for an unpleasant odor and drops of antifreeze on the floor covering. If there are none, the problem is definitely not in the faucet. To determine the condition of the pipes, gain access to them to visually inspect them. This way you will understand whether they are leaking or not.
If there are no problems as such, the problem lies in the radiator. The problem must be solved quickly enough, since antifreeze can get into the interior and ruin the carpeting.
Replacement process
It's puddles like these that make drivers scratch their heads and wonder what action to take. Not every VAZ-2108 car owner knows how to replace a cracked pipe. We hasten to assure you that the replacement process itself is unlikely to seem like one that requires the use of great physical force. However, along with this, you need to prepare yourself for the fact that you will have to lose some time, since getting to the problem pipe will not be so easy. You will need to unscrew and remove some other devices that prevent access to the pipes.
Algorithm of actions
First of all, remember that replacing elements involved in the cooling and heating system can only be done after the engine has completely cooled down. For this reason, give your car a chance to sit, rest after a long trip, and allow the engine to cool down. At this moment, you can afford not only to drink a cup of coffee, but even watch your favorite movie. You can personally spend the same time allocated for forced waiting by visiting specialized stores. Search for all the necessary auto parts, including purchasing an intake pipe.
The store specialist will definitely ask you what diameter the heater pipes of your VAZ-2108 have. If you do not have such information, then either measure in advance or find the answer to your question on the Internet. Once you have everything in place to carry out the replacement, and the engine has already cooled down, you can begin to take immediate action. By the way, when dismantling devices, we recommend that you visually inspect them to make sure that they are in good working order, and not bite your elbows when, in a few days, such a lengthy disassembly is required again due to the failure of another device
Pay special attention to hoses and rubber products
Prepare a large container into which to drain the coolant.
This is important, because when the components are disconnected, willy-nilly, the liquid will not just begin to flow out, but will flow in a continuous stream. Of course, if the fluid has already been used up, it’s not a shame to lose it, but if you just recently changed it, it’s better to keep the fluid so as not to expose yourself to additional unforeseen financial expenses.
In most cases, the hose is secured to the fittings using clamps. Take a screwdriver in your hands and loosen the clamp, then move it up a little to release the intake pipe. If you recently changed it, it can be removed without any problems, but if the installation process was carried out several months ago or even years, it will not be so easy to remove it. The pipes turn out to be “stuck” to the fittings. It is impossible to use physical force to disconnect a cracked pipe, since both it and the fittings are not very strong elements, so brute force can cause additional problems.
In cases where your careful efforts have not brought you closer to your cherished goal, pick up a hacksaw for metal and carefully cut off the pipe. Then cut the remaining part in several places and carefully remove it too.
Before putting the new pipe on the fitting, apply a special sealant to it. After this, tighten the clamps tightly to ensure a secure fit. All that remains is to refill the coolant. We recommend that you first remove the mixing chamber heating pipe that goes to the carburetor. This little trick will allow you to prevent the system from becoming airy.
So, replacing pipes is not a complicated procedure, especially if you first read the recommendations
It is only important to accompany each action with extreme care so as not to provoke damage to additional elements of the heating and cooling system
How to remove the stove VAZ 21099 High Panel
Device on the device panel
Sometimes you open the car door, sit in the driver's seat, put the key in the ignition, start it, and fluid starts dripping from under the center console. And from time to time it doesn’t just drip, it pours. If you are an inexperienced car owner, immediately think about what happened. And if you have no experience, you know very well that the internal heating system does not work. Let's see how to remove parts of the VAZ 21099 stove for diagnostics without the help of professionals, repairs, and possibly modifications.
Let's first look at the design of this device. The VAZ 2108-21099 plate is located under the central panel, between the dashboard and the engine shield. Attach with 4 bolts to the air box. Consists of 2 plastic shells. left and right. There is a radiator plate inside the cases. It consists of 2 rows of tubes, heat transfer plates and 2 plastic reservoirs attached with 3 screws to the right shell. An electric fan is installed on the top of the heater; this is necessary to supply air to the cabin. It can be removed from the engine compartment. There is also a mixer for the stove. a miracle device that allows you to store hot antifreeze outside the heater, as well as draft and mixing pipes.
In the event of flooding in the cabin, you must first move the control knob to the last left position. This will save you from burns, engine overheating and the need to take another bucket of antifreeze. If the valve is closed, but coolant flows out from under the dashboard, this means that the pipes, hoses or valve have burst. In this case, you need to immediately brake, turn off the engine and either take the car to a service center, or remove the necessary tools from the trunk and begin repairs.
How to replace a VAZ 21099 radiator plate
To find out the scope of work, you need to find out the cause of the leak. First you need to look under the dashboard with a flashlight. The most common option is that if the inlet hose breaks, it will be immediately visible. Replacement takes minutes using a repair kit and a screwdriver. But the most common cause of leaks in the heating system is cracks in the radiator housing. Replacing the stove radiator. complicated thing.
In the engine cooling system, the interior heater is located immediately after the cylinder block jacket. All particles washed from the walls of the block enter the radiator tubes and become heavily clogged over time. The coolant enters the plate under enormous pressure, and the buildup causes this pressure to increase even more and break through the worn areas. Reality confirms the theory: where he is thin, where he breaks down.
Usually the motorist is accused of depressurizing the furnace, which was not checked, the device was not cleaned, and the hoses were not changed. This must be done without fail at least every 3 years.
First you need to figure out whether your car's center console is low or high. If the panel is low, then you are definitely out of luck. You have to sweat to take it off.
- First, turn the front wheels so they look straight.
- Then open the hood, remove the negative terminal from the battery, remove the suction cable from the choke lever, and disconnect the speedometer cable from the transmission.
- Remove the faucet handles.
- Remove by pulling the electric fan handle.
- Remove the 4 screws that secure the beard cover and put it on
- We disconnect all the plugs, marking or remembering which connectors will need to be connected later.
- Loosen the 4 screws that secure the control panel to the cooktop.
- Loosen the 2 screws that secure the visor to the instrument panel and remove it.
- Squeeze the clamps of the device panel and remove it from the dashboard.
- Disconnect the speedometer cable from the instrument panel and remove all plugs and fittings.
- Once you've pulled it out, remove the headlight levelers and instrument panel light switch.
- We unscrew the nuts for securing the headlight control and instrument panel lighting.
- Remove the steering wheel and change the jumpers.
- The ignition key is set to position “0” and disconnect the ignition switch connector.
- Unscrew the screws and remove the center panel.
Checking the system
Before you start work, you need to make sure that it is the heater radiator that is to blame for the malfunction.
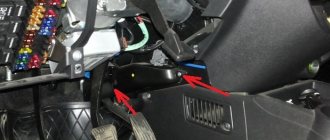
- We bend the center console where the computer is located. We disconnect the shield from the overhead torpedo, here we will see the body of the heater itself;
- We take a flashlight and look, it should be visible if water is leaking. We immediately check the tap and pipes.
- Let's look at the leaks. The fact is, if the leak is not large, you might not notice it in the cabin.
Therefore, it is worth inspecting everything with sufficient quality.
You can watch the video on replacing the stove radiator on a VAZ 21099 on our website. But only after a thorough inspection can you begin to work.
Instructions for this topic are given below.