How to replace the radiator of a Priora stove without air conditioning
In winter, as you know, car enthusiasts turn on the stove to avoid freezing. Its normal operation ensures a comfortable temperature inside the car, and this, in turn, is the key to safe driving. However, there are times when this unit stops supplying warm air. The reasons can be very different, for example, problems with the radiator. Many people, including owners of Lada Priora, both equipped with air conditioning and without it, encounter malfunctions of this kind.
In some cases, it will only take a minute to fix the problem because you just need to replace the blown fuse. But there are situations when more serious repair work, such as replacing a radiator, cannot be avoided. However, there is nothing particularly complicated here. Everything can be done with your own hands - you just need the appropriate desire and a little time.
How to remove the heater radiator on a Priora without air conditioning
Since the beginning of production, AVTOVAZ has installed a heater from the “ten” on the Priora (catalog number: 21110-8101012). The disadvantage of this design was that the heater radiator is removed towards the vacuum brake booster, which allows this to be done. As a result, the heater assembly has to be dismantled.
The procedure is as follows:
- Remove the wipers.
- Remove the frill (wind flap).
- Remove the soundproofing of the engine shield.
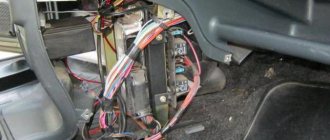
- Disconnect a bunch of connectors with wires.
- Unscrew the heater mountings.
- Divide the heater into two parts (left and right).
- Remove the right side of the heater (in the direction of travel).
- Move the left side to the side to gain access to the heater radiator.
- Drain the antifreeze.
- Replace the heater radiator.
The whole procedure took several hours. This is shown in more detail in the video:
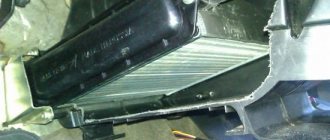
There is another way to replace it. To gain access to the heater radiator, instead of the heater housing, it is necessary to remove the vacuum brake booster along with the brake pedal. This allows access to the left side of the heater (in the direction of travel) and to the radiator itself.
Replacing the heater radiator on a Priora with air conditioning
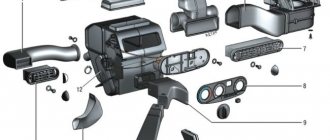
After some time, the manufacturer began to equip its cars with air conditioning (climate control), for example, HALLA or Panasonic (article: 21703-8101012). The design of the new Priora heater from a maintenance point of view turned out to be much more convenient. Now, to replace the stove, you do not need to dismantle the frill, windshield wipers, heater or vacuum brake booster.
It is only necessary to: remove the sound insulation of the engine shield, remove the engine air filter hose and the seal in the area of the heater radiator hoses. All! Drain the antifreeze and remove the radiator towards you, towards the engine.
Video instructions are attached:
Thus, replacing the radiator of a Priora stove depends not only on the type of heater, but also on the chosen method of replacing it. How did you remove the heater radiator on your car? Which method suits you best? Let us remind you that solutions to other problems with the stove can be found in this article.
Share on social networks:
Found an error? Select it and press Ctrl+Enter..
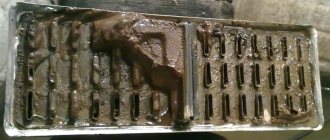
A customer arrived with a complaint about leaking antifreeze. He told me that somewhere along the way, they changed the pipes going to the heater radiator, but nothing changed. Since antifreeze flows down the engine shield, it is either the return pipe or the heater radiator itself. In our case, the heater radiator leaked.
- Necessary tool
- Removing the Priora heater
- Replacing the stove radiator
- Video of replacing the heater radiator on a Priora without air conditioning
Fan doesn't work
But sometimes another problem occurs with the Priora stove. The driver turns the heater switch, and in response there is silence. The electric motor is not working. What is the reason. There may be several of them:
- The fan motor burned out.
- The heater control unit has failed.
- The fan speed resistor has burned out.
- Broken electrical wiring.
The easiest way to determine if a resistor is broken. In this case, only the maximum speed is turned on, and the stove does not respond to other positions of the handle.
The control unit is checked either by computer diagnostics or by a simple replacement. There are no other options.
The condition of the electric motor can be determined by checking with a test lamp. It is enough to remove the top frill and gain access to the motor connector. Disconnect this connector and insert a test lamp instead of the chip going to the fan. When you turn on the stove handle, the light should light up if the unit and wiring are working properly. If there is no signal, start checking the wires sequentially. If the lamp lights up, replace the electric motor.
Replacing the motor
Although Hallo and Panasonic fan electric motors differ in size and installation point, they have one thing in common. Their location is in a vertical position. This allows you to dismantle them without removing the entire heater. As with a standard heater, the heater fan motor on a Priora with air conditioning is secured with 3 screws.
So, replacement. As in the case of a radiator, first of all you need to open access to the stove. That is, remove the frill and protection. Then disconnect the electrical connector. Now just unscrew the 3 fastening screws and remove the fan with the motor. That's it, you can install a new unit in its place. But this is only for the Hallo heater. With the Panasonic compressor, everything is somewhat more complicated. The fact is that it is also separated from the engine compartment by a plastic casing. According to factory documentation, it is necessary to remove the entire heater to replace the electric motor. And this is draining and refilling freon. But our craftsmen found a way out.
Cut the protection at the narrowest point approximately in the middle of the compartment and remove it by unscrewing 2 fasteners. After this, access to the part being replaced is open. Sometimes, however, in most cases, the engine mount prevents you from pulling out the motor. Don't panic. This problem can be solved by disassembling the motor on site. That is, separate it into 2 halves and pull them out separately. Then insert a new one using the same method.
But still, just in case, before replacement, it is better to consult with car service specialists in advance about possible refilling of the air conditioner with freon in case of damage. This is to replace the motor. But with a radiator, such problems, as a rule, do not happen.
Video on the topic of replacing the radiator of a Priora stove with air conditioning:
Video of replacing the heater radiator on a Priora without air conditioning
With the onset of cold weather, the driver's interest in the operation of the heater increases sharply. The motorist checks the stove for various faults. In some cases, a radiator failure is detected. How is the radiator of a Priora stove replaced? As a rule, this component cannot be repaired and must be replaced. Having opened the dismantling manual, the driver may discover that the parts in his Priora are located differently than in the instructions. It's all about the air conditioner. The process of removing the heater radiator in older versions of Priora without this option differs from dismantling it in new cars where air conditioning is already present. We will look at both options.
Modern Priors are equipped with Halla or Panasonic air conditioners. There are differences in the operation of the two models, but the location of their installation does not differ, depending on the air conditioner brand, so the process is the same. As an example, we will consider a Priora with Halla air conditioning.
Main aspects of repair
If the fan does not work or the stove generally stops working, then you need to understand that the repair process is a rather labor-intensive procedure. Before you remove the heater radiator on a Priora or how to remove the fan, you need to do diagnostics. First, the functionality of the thermostat is checked. If the lines connected to the device are warm, then the part is working.
If the fan does not work, first of all you need to check its contacts. Replacing the stove fan does not always solve the problem, especially if it involves oxidation of the contacts. Sometimes simply cleaning the connector from the device is enough to solve the problem. You can always remove the heater fan, but the heater fan does not fail very often. If the stove blows only at maximum speed, the stove rotation speed resistor has burned out.
Symptoms of a problem
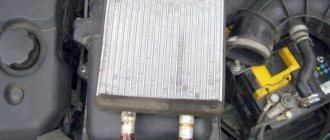
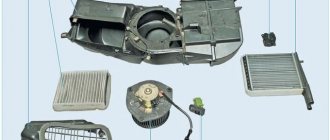
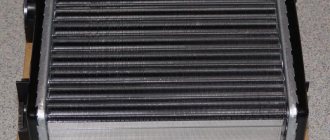
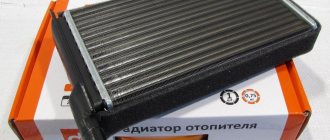
The Lada 2170 model received a liquid heater, which is connected to the engine cooling system. The radiator is a heat exchange device; due to this component, the air entering the Priora’s cabin is heated. Coolant constantly circulates through the radiator; this part of the heater is subject to wear.
It is worth checking the radiator in the following cases:
- The stove stopped heating properly.
- The coolant level drops.
Once you disassemble part of the heater system, you will see a rusty and most likely leaking radiator. There may also be leaks in hoses, pipes and the junctions of these elements. You should check the heat exchanger of the stove only after you have made sure that there are no defects in the operation of the gearmotor and damper.
Comments and reviews
After replacing and flushing the cooling system on the Priora, the heater blows cold air... There is no air in the system. I don’t understand what happened.
No matter how good a car is, parts break down from time to time. This also applies to the radiator (heat exchanger) of the Priora stove. What to do in this case? On the first car models, these parts were made of copper and bronze. In the event of a leak or other breakdown, they were soldered. Now they are made of plastic and aluminum. So there is no point or possibility to repair them. They can only be replaced.
Well, for the radiator of a standard Priora stove, the owner himself, who knows how to use tools competently, can independently replace it. You just need to carefully read the presented article.
Replacing the radiator of the Priora stove
To work, you will need a standard set of tools, which includes socket wrenches 10 and 13, side cutters, a Phillips screwdriver, and a wrench 8. In both cases, you will have to disconnect the heating system hoses; the remaining coolant will pour out of them, so immediately place containers under the pipes heater Then the liquid can be returned to the system.
With air conditioning
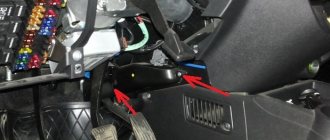
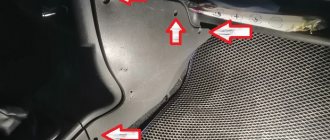
- First of all, we need to remove the rubber seal of the windshield to gain access to the parts;
As you can see, dismantling the radiator in a Priora with air conditioning does not require draining the antifreeze. Coolant will only come out of the expansion tank and the heat exchanger itself. Removing the radiator in a VAZ 2170 with Panasonic air conditioning follows the same scheme, only a few fasteners may differ. Now you can replace your worn-out heater with a new one!
Without air conditioning
- Work begins by disconnecting the negative terminal of the battery. We remove the windshield trim along with the windshield wiper arms, as these elements will interfere with operation;
- The next step is to remove the coolant supply pipes to the engine injectors;
- The windshield trim is held in place by seven screws. Unscrew it to completely remove the element;
- Now we move on to the hood seal, in its center you will find a tightening screw - unscrew it;
- The engine noise insulation closes the passage to the heater system - pry up the plugs with a flat screwdriver and unscrew the plugs;
- We unscrew the screws and dismantle the sound insulation. Remove both covers;
Clean the heat exchanger and inspect it for damage. If cracks are found on the plastic elements, then you will no longer be able to repair the part - only replacing the stove radiator on a Priora, which is done in the reverse order, will help here.
Video instructions for replacing a leaking stove:
- Priora instrument panel: indicator designations, error interpretation
- Do-it-yourself PTF Priora installation
- Signs of malfunction, replacing the speed sensor on a Priora
Enter the text of the comment: the climate control does not work, not old, not new, the heater damper opens and closes all the way to the MMR, I change it every year in the spring, the damper does not close, I have to remove the MMR in the fall, everything is new on the computer, the regulator works
I unscrewed the 4 screws that hold the plastic plate near the heater radiator pipes, but for some reason it does not come out of the heater. Priora with Panasonic. I would be grateful if you could tell me.
You definitely won’t be able to repair the radiator yourself, as this requires special tools and skills. However, you can definitely remove and install a new one. Our instructions will help you achieve your goal. By following consistency in work, you can easily dismantle and replace the radiator.
Diagnostics of climate control equipment "luxury"
Like all electronic control units (ECUs), the heater/air conditioning computer is diagnosed either with a portable scanner or with a full-fledged motor tester. It should be borne in mind that this system is controlled through a separate ECU called the comfort unit.
Just like standard diagnostics, the climate control system scan is connected via the OBD-2 diagnostic connector under the glove box. In general, these tests are carried out in a similar way to diagnosing an automatic heating system. With air conditioning features. That is, checking the actuators and sensors of this device.
How to replace a Priora radiator
First you need to prepare the following tools:
- head for key 10;
- Phillips screwdriver;
- pliers;
- container for liquid.
Next you need to proceed according to this scheme:
- First you need to drain the antifreeze into a prepared container. To do this, open the expansion tank and unscrew the plug.
- The fan shroud is then removed to disconnect the wires.
- The signal is removed.
- Then you need to loosen the clamps and disconnect the compression and outlet pipes.
- Unscrew the radiator mount to the body.
- Disconnect the fastening element.
- Loosen the tie clamp and remove it.
- Pull out the radiator and mounting bushings.
After this, it must be inspected for cracks and deformations in order to understand why it has ceased to function properly. Replacing the radiator follows the same procedure. You can purchase a new heater radiator at a specialized store. There are a large number of companies producing such devices, so you should trust proven ones.
For example, high-quality devices are produced by Halla and Panasonic. You must understand that without air conditioning, the car engine will overheat and eventually burn out. Replacing a motor is very expensive, so you shouldn’t allow such breakdowns. The radiator on a car with air conditioning must always work smoothly to avoid serious problems. Also, be sure to purchase high-quality grilles for this appliance.
If you understand your iron horse, try installing a new radiator yourself. But it’s better, of course, to ask for help from specialists who will do the job faster and better. Today, in every city there are service centers where craftsmen offer their services at affordable prices.
Removing the Lada Priora radiator
We remove the radiator to check it for leaks (if a leak is suspected) or replace it if damaged.
Remove the radiator fan (see “Removing the radiator fan”).
We disconnect the bracket for fastening the sound signal from the security alarm of the upper cross member of the radiator frame (see “Removing the sound signal of the security alarm”) and remove the sound signal from the radiator.
Using the “8” socket, we loosen the clamp securing the radiator supply hose...
...and remove the supply hose from the radiator pipe.
Using an “8” socket with an extension, we loosen the clamp securing the radiator outlet hose.
Remove the outlet hose from the radiator pipe.
Using a 10mm socket, unscrew the two nuts securing the radiator to the upper cross member of the radiator frame.
Radiator attachment points to the top cross member of the radiator frame (shown with engine removed for clarity).
Tilt the radiator towards the engine...
... use a screwdriver to loosen the ribbon clamp securing the steam exhaust hose... Remove the steam exhaust hose from the radiator pipe.
We take out the radiator, removing the pins of its lower mounting from the rubber pads. If it is necessary to replace the rubber bushings of the upper radiator mounting...
...remove the metal spacer sleeve...
...and a rubber bushing from the radiator bracket. Install the radiator in reverse order.
If the rubber cushions came out with the radiator, then when installing it, first insert the cushions into the holes in the lower cross member of the radiator frame. Cushions that are torn or have lost their elasticity should be replaced with new ones. We replace the ribbon clamp of the steam exhaust hose with a worm clamp.
Pour coolant into the cooling system and bring the fluid level in the tank to normal (see.
"Replacing the coolant").
Video on the topic “Lada Priora. Removing the radiator"
Replacing the PRIOR radiator replacing the PRIOR radiator HOW TO REMOVE ENGINE COOLING RADIATOR ON PRIOR LUX HALLA
The radiator must be replaced if a coolant leak is detected from it. In a workshop that has special equipment, the VAZ 2170 radiator can be checked and repaired. You will need: a 10" wrench (a socket head is more convenient), a screwdriver with a Phillips blade, and pliers with long thin jaws.
1. Drain the coolant (see “Replacing the coolant”). 2. Remove the electric radiator fan for the Lada Priora (see “Removing and installing the electric radiator fan with casing”). 3. Remove the horn (see “Removing, installing and adjusting the horn”).
4. Loosen the clamp securing the supply hose to the radiator.
5. . and remove the hose from the radiator pipe of the VAZ 2172.
6. Similarly, disconnect the outlet hose from the radiator.
7. Unscrew the two nuts securing the radiator to the body of the VAZ 2171.
8. Remove the steam hose holder from the hole in the upper cross member of the engine compartment.
9. Tilt the radiator towards the engine. Loosen the strap clamp of the steam exhaust hose...
10. . and remove the hose from the VAZ 2170 radiator fitting.
Helpful advice Tape clamps for fastening hoses are inconvenient to use and are difficult to re-ensure the tightness of the connection. When disconnecting the hoses for the first time, we recommend replacing the band clamps with commercially available worm-type clamps.
11. Lift the radiator up.
12. Remove the two lower mounting cushions from the radiator if they remain on the radiator mounting pins or remove them from the holes in the cross member if they remain on the body of the VAZ 2171. Replace the torn or lost elastic cushions.
13. Remove the rubber-metal bushings from the radiator brackets. Replace torn or loose rubber bushings. 14. Rinse the outside of the radiator with a stream of water and dry. If there are cracks in the plastic radiator tanks, replace the Lada Priora radiator. 15. Check the tightness of the Lada Priora radiator by plugging its pipes and lowering it into a container of water, supplying air to it at a pressure of 0.1 MPa (1 kgf/cm2). No air bubbles should appear from the radiator for at least 30 seconds. If the radiator does not fit completely into the container, check it sequentially from all sides. 16. Install the priora radiator in the reverse order of removal, first placing the lower mounting pads on the radiator pins and inserting the upper mounting bushings into the brackets.
Helpful advice To eliminate the possibility of coolant leakage in the future, before connecting hoses to the VAZ 2172 radiator, lubricate the radiator pipes with a thin layer of sealant.
17. Install the electric fan and all removed parts in the reverse order of removal. 18. Fill in coolant (see “Replacing Prior coolant”).
Removing the Lada Priora radiator
We remove the radiator to check it for leaks (if a leak is suspected) or replace it if damaged.
Remove the radiator fan (see “Removing the radiator fan”).
We disconnect the bracket for fastening the sound signal from the security alarm of the upper cross member of the radiator frame (see “Removing the sound signal of the security alarm”) and remove the sound signal from the radiator.
Using the “8” socket, we loosen the clamp securing the radiator supply hose...
...and remove the supply hose from the radiator pipe.
Using an “8” socket with an extension, we loosen the clamp securing the radiator outlet hose.
Remove the outlet hose from the radiator pipe.
Using a 10mm socket, unscrew the two nuts securing the radiator to the upper cross member of the radiator frame.
Radiator attachment points to the top cross member of the radiator frame (shown with engine removed for clarity).
Tilt the radiator towards the engine...
... use a screwdriver to loosen the ribbon clamp securing the steam exhaust hose... Remove the steam exhaust hose from the radiator pipe.
We take out the radiator, removing the pins of its lower mounting from the rubber pads. If it is necessary to replace the rubber bushings of the upper radiator mounting...
...remove the metal spacer sleeve...
...and a rubber bushing from the radiator bracket. Install the radiator in reverse order.
If the rubber cushions came out with the radiator, then when installing it, first insert the cushions into the holes in the lower cross member of the radiator frame. Cushions that are torn or have lost their elasticity should be replaced with new ones. We replace the ribbon clamp of the steam exhaust hose with a worm clamp.
Pour coolant into the cooling system and bring the fluid level in the tank to normal (see.
"Replacing the coolant").