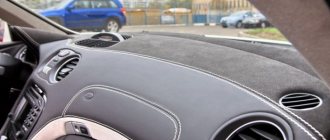
Preparation
Many craftsmen recommend removing the dashboard before painting. When disassembling, disconnect the negative terminal of the battery, put the car on the handbrake, and unscrew the screws. Next comes disconnecting the wires, removing decorative parts and the steering wheel. The panel is carefully processed, the pattern must match the material of the torpedo. Wash off with soapy water. Then degrease with acetone or another substance. Then the plastic is sanded with fine sandpaper and treated with a special primer for plastic. Then degrease again.
Painting with liquid rubber
Before starting work, it is necessary to dismantle the front panel or seal the unpainted areas with tape. The technique of painting with liquid rubber has not been thoroughly studied, and reviews from drivers are contradictory. Some complain that the gloss quickly disappears, others say that such a coating is unreliable, it is easy to scratch and peel off. Still others complain that when they try to paint again, it is impossible to remove this rubber in some places. Liquid chewing gum is sold in cans, usually 400 milliliters, priced from 600 to 800 rubles. The application of a layer of rubber is carried out in 3-4 stages, leaving each layer to harden beforehand.
Rubber paint has a number of advantages and disadvantages:
- The surface is pleasant to the touch. Slightly rough: the rubber surface has a positive effect on a person when touched.
- No reflection of the sun.
- The paint dries quickly.
- Moisture resistant.
- Without smell.
- No seams or bubbles.
- There are no cracks from folding the panel.
Applying paint
To paint the panel you will need appropriate paint in pressure cans. For high-quality coverage, two standard-sized cylinders will be enough. The paint is applied in several passes. First, the first layer is applied - it should be thin and sprayed from a greater distance. After applying it, you will be able to clearly see all the defective areas that were missed during sanding and priming. If there are any, then they are processed again either with an abrasive or a primer.
Liquid vinyl treatment
Liquid vinyl is a modern product that is successfully used for painting automotive parts. A thin layer of this coating decorates and protects many suitable surfaces. This is a high-tech product of excellent quality. Treatment with liquid vinyl will increase the panel's resistance to sunlight, ice, frost and other harmful substances. The beauty of this stuff is that it comes off easily after prolonged use. And this circumstance does not reduce his strength qualities.
Painting with liquid vinyl is a simple and understandable procedure for everyone. The finished part will be matte and clean. Liquid vinyl is usually sold in cans. Before use, you need to shake it, preferably for at least a minute. The paint and solvent must mix perfectly. Do not touch the liquid vinyl until it is completely dry. Otherwise there will be divorces.
The process takes place in several stages. Entry level - collector. They try to make it translucent. This allows the paint to adhere to subsequent layers. The first layer will dry for about 30 minutes, this time must be maintained. The number of layers applied is up to you. The more there are, the stronger the coating will be. The recommended quantity is five. Distance from container to torpedo: 7 - 9 centimeters. If you did not disassemble the dash and glue the unpainted parts, remove the tape and protective material immediately after painting while the vinyl cures. Vinyl drying time is 3.5 hours. All this time it is necessary to protect the drying surface from dust and other bodies.
Painting of domestic models
The technique for painting the dashboard of a VAZ car is no different from other cars. The surface is first cleaned of dust and dirt, and then treated with soft sandpaper. Before degreasing, soil treatment is required. The main thing when spraying is to prevent stains from appearing. This is controlled and achieved by maintaining the correct distance. Before starting the process, shake the can. Plastic is painted in three or four layers. The intervals between visits are from 12 to 25 minutes. Then the panel must dry for more than 10 hours. Then paint is applied. The number of layers is at your discretion (3 or 4). The downtime between calls does not exceed 15 minutes. After complete drying, the panel is put on again.
Choosing material for upholstery in a car + examples in the photo
Currently, there are several materials that car enthusiasts use to reupholster the interiors of their cars. Each of them has both advantages and disadvantages. Let's list the most popular ones.
- Autocarpet.
- Leatherette.
- Vinyl film.
- Alcantara.
- A natural skin.
Now in more detail about each of these materials.
Autocarpet is the most affordable coating. On the one hand, it is a synthetic material. If you pull it too hard during installation, scratches will appear on its surface very quickly, which will be almost impossible to hide. On the other hand, autocarpet is an excellent heat insulator. In addition, it perfectly absorbs noise. It is for this reason that many owners of domestic cars choose it. It should be noted here that the autocarpet practically does not fade, does not fade, and it is easy to install.
Leatherette is the second most popular material for finishing interior parts. It is cheaper than natural fabric, but more expensive than vinyl and velor. Only genuine leather and Alcantara are more expensive than leatherette. If the leatherette is of high quality, then in appearance it is almost no different from genuine leather. But its mechanical properties leave much to be desired. In addition, it does not absorb sound well and does not retain heat in the cabin well.
Leatherette for dashboards
Vinyl film is still considered exotic among domestic car enthusiasts. The person who installs it already has good heat and sound insulation. Interior vinyl is much softer than exterior vinyl. And therefore, it is easier to work with him.
Vinyl film for car showrooms
Genuine leather is a very expensive material; the price per square meter starts from 2000 rubles. There is a reason for such a high price: leather lasts a very long time and absorbs both noise and heat well.
Adviсe
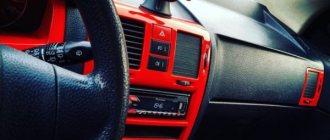
When choosing paint, you should think carefully. So changing the tone will be problematic. Matte black paint is often used. A lightweight car can be improved by painting the dashboard white with a light green, purple or blue tint. These are the most popular options. It is not recommended to experiment with flashy colors. It will look provocative and interfere with driving. The dye has a description that must be strictly adhered to.
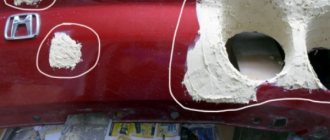
It is recommended to start working with small and ordinary parts. This way you can practice. It is advisable to paint the less visible parts first. And then let's move on to the center console and climate control panel. 60 and 80 grit sandpaper are suitable for sanding. And after the primer has dried, use No. sandpaper. 80 and item 90. The process can be repeated to obtain an ideal surface.
Torpedo restoration options
We can briefly consider the available methods for restoring a car dashboard. These include the following methods:
As mentioned above, the easiest and cheapest way to return a decent appearance to a torpedo with your own hands is painting and applying a layer of varnish. Some people prefer matte enamels, since deep gloss can cause glare from the sun and interfere with driving. It all depends on the shape of the torpedo and the taste of the owner of the car. In most cases, preference is given to a glossy surface.
Price
The pricing policy for painting car panels is formed according to a number of indicators. The cost of painting, the complexity of the work, possible repairs during painting work, and the responsibility when painting luxury cars are taken into account. In monetary terms, everything starts from 1500 rubles and above. If there is competition, there is not much difference: a provincial city or a metropolitan car service center.
Hello everyone, dear friends and readers
I haven’t written anything for a long time, I didn’t have time, and finally I was able to do what I’ve wanted for a long time, namely, paint the torpedo in the “Oltremare” color. I took paint and primer to work)))) as usual I take everything. Well, what can I tell you about painting: we disassemble the panel, first clean all the parts to be painted, then degrease, prime and apply paint layer by layer, I didn’t need paint, since this paint is not covered with paint. In fact, the picture was not painted in one day. I dyed my beard on the balcony because the weather at first did not allow it due to the cold, after a week, that is, today I dyed everything else - this is the upper and lower balcony, plus soap dishes and door handles. I’m very pleased with the result, the paint was perfect, when you open the door and the sun comes into the interior, everything sparkles and shines, it’s a pity that it’s hard to see on camera. Now it’s time to improve the acoustics, but that’s a completely different story)))))
Good luck to everyone))) and the implementation of your plans))))) don’t forget to rate)))
Tuning the instrument panel of VAZ 2114
Today, many car enthusiasts are interested in tuning the VAZ 2114 panel, this is due to its design, which is ideal for this activity.
In general, if we are talking about the 2114 model, it should be noted that this is one of the last well-designed and executed models of the “family” of VAZ cars. For the most part, do-it-yourself VAZ 2114 tuning in general and interior improvement in particular is just a matter of replacing seat covers.
However, this is a deep misunderstanding; there are many items in the cabin that could be beautifully updated. Throughout the history of the VAZ 2114 brand, it was believed that interior tuning is a complex of large-scale and multi-level work, consisting of many different actions to improve various elements and, of course, among other things, the instrument panel.
Comprehensive modernization of the VAZ-2114 instrument panel: first steps
Most often, a set of works to modify the dashboard of a VAZ 2114 is an important and necessary task, but, at the same time, interesting and serious. The main task is to choose the right parts and arrange them beautifully. It is always better to think through any actions related to various updates in advance.
Consequently, this will avoid unnecessary mistakes and misunderstandings. The right decision would be to draw up a work plan that you will follow and thanks to which you will not make mistakes, and the whole process will give you complete pleasure.
How to replace the backlight
Sometimes it is necessary to disassemble the dashboard if a car enthusiast decides to modify it.
The backlight may simply not suit the car enthusiast with the color of the lamps and the intensity of their work. In order to completely update the backlight, you will need to calculate the number of lamps for each sensor and purchase them. When installing LEDs into sockets, it is important to observe their polarity. You may need to carefully grind down the sockets to get the bulbs to fit into place. After you assemble the new backlight, check its functionality by connecting it to power. You can check the build quality with a special device.
The next step is to connect the new backlight to the main board and to the lamp circuit. Carefully secure the LEDs so that they do not interfere with your installation of the panel. When assembling, check the position of the instrument needles; they must be set to zero during assembly. The arrows should not bend or deform.
Next, all you have to do is secure the entire structure with screws and carry out the final reassembly. It is important not to try to assemble the panel completely at once; do not fasten the decorative parts so that you do not have to remove them again. After connecting the instrument panel to the electrical circuit, check the build quality and operation of the sensors using the on-board computer. If everything is normal, then finally secure the panel and complete the assembly.
Source
Tuning the dashboard can be performed in the following sequence:
- First you need to disassemble the “device” of the car. Every motorist should know how to remove the dashboard of a VAZ 2114. There is nothing complicated here, everything is quite clear, and the process itself does not require special skills or knowledge.
- Then it is necessary to complete the finalization of elements and details. There can always be many nuances here. They depend on what you want to change and improve in your car. Everything must be very carefully thought out.
- Finally, you need to install the converted and updated "panel" into place.
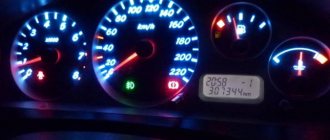
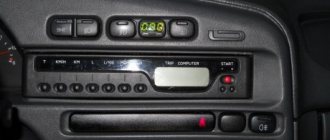
Burnt out light bulbs
Dashboard lights operate under less than ideal conditions. They are regularly exposed to shaking, power surges in the car's electrical network and temperature changes. All this significantly reduces their service life.
Especially if these are not LEDs, but ordinary incandescent lamps, which were equipped with the first VAZ 2114 models. There are a total of 19 lamps (but this number also varies depending on the year of manufacture of the car, and the number of lamps should be specified in the technical documentation for the car).
Another reason for light bulbs to burn out is their improper installation. This is most often observed on early VAZ 2114 models, where drivers decide to independently replace obsolete incandescent lamps with new LEDs, making some changes to the electrical circuit. Without proper qualifications, this operation is not so easy to perform. Here's what the sequence for replacing light bulbs looks like.
- The steering column is lowered to the bottom position until it stops. Above it is the dashboard cover with four mounting screws. They are unscrewed with a Phillips screwdriver. To move the dashboard cover, just unscrew 5 bolts
- To the right of the panel there is a row of buttons. Next to it there is another screw hidden by a plastic plug. It is pryed off with a knife (or a flat screwdriver). The screw is unscrewed.
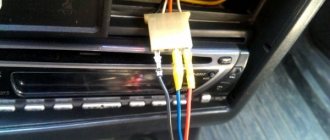
- Now you need to remove the car radio from the niche by unscrewing its mounting bolts, and also remove the plastic handles from the heater controls.
- The instrument panel casing is freed from its fasteners. It should be pulled towards you, extending it 15–20 cm. This will be enough to gain access to the rear wall of the instrument unit.
- A number of recesses with light bulb sockets are visible on the wall. They are removed manually. To do this, the socket together with the lamp is turned counterclockwise until a characteristic click is heard. The arrow on the back wall shows the socket with the light bulb; it is unscrewed by hand
- Burnt out lamps are replaced with new ones, then the instrument panel is reassembled.
How to easily update the “tidy” of a VAZ 2114
Improving the 2114 dashboard is actually not as complicated a process as it might seem at first glance. Purchasing such a “device” is quite simple. You should consider what options owners can use to update their VAZ 2114 wardrobe (examples in photos and videos).
1. AMC. This model has several features.
- To begin with, it is worth noting that you can order its design yourself;
- This panel is equipped with a built-in oil indicator, which is not available in the classic version. Its appearance is associated with the very persistent requests of many car enthusiasts to install this “component” as standard.
- This dashboard looks more interesting due to the color scheme with chrome trim.
2. PRO-SPORT. This “neatness” is made in the form of an overlay on the dashboard of the presented model. The updated design of this device gives them an impressive and completely new look. There are two options for its execution: with a light and dark substrate. The backlight of the VAZ 2114 panel has a special brightness adjustment, but there is only one color - blue. The stairs are glued after installing the insert. This will give this element of the car an original look.
3. AMS-2. The highlight was the speedometer, which was moved from left to center. The white dials give a sporty look to the entire panel. This allows you to quickly read the necessary information from it. The backlight has been redesigned and LEDs have been used, making it easy to read information at night. It is recommended that the installation be carried out by qualified specialists, since during its installation a significant “redevelopment” of the classic model is planned.
4. STORM STREET. The main feature of this model is the color combination. Nothing has changed in the classic arrangement of instruments,
the emphasis was on the color scheme. The “appearance” of the instrument panel has undergone some changes, but its style harmoniously fits into the existing interior. It is worth noting that another feature of this model is its backlight. During the day it lights up with red symbols. In the dark, you can safely change not only the brightness, but also the color.
5. "North Wind". This model is distinguished by its appearance. The developers have proven that even with a standard arrangement of instruments, the entire panel looks dynamic and bright. The sporty characteristics are clearly visible on it. The highlight color depends on the shadow of the input scales.
Impressions and experience of use
Over more than two years of operation, neither flocked nor painted surfaces have lost their appearance. True, the flock has turned a little yellow and has rubbed off from dirty hands. It can be washed, rubbed with a brush - it holds firmly, so there are no problems with this, there is no need to be afraid. Once it was dirty at a service station, but it was washed off with a stiff brush, carpet cleaner and soap, and then rinsed generously with water. Looking now at the photo of standard VAZ-2108 interiors, you understand that you don’t want to be in that grayness - a light, contrasting interior sets a different mood.
Tuning for your pleasure
The main thing in the process of modernizing any car is efficiency. Every owner wants his car to be original and at the same time feel comfortable. Oddly enough, one of the favorite parts of tuning enthusiasts is the dashboard. It can be modified in different ways and, thus, distinguish your own car from a huge number of similar cars.
At the initial stage, it is necessary to prepare the material for work. Replacing a VAZ 2114 panel or its original modernization requires dismantling the standard panel. You will only need to remove the protective glass of the speedometer. It's important not to break it. After removing the protective glass, you need to “uninstall” the pointer arrows.
It is important to be careful as the arrows are very fragile. After that, take out the standard card. Then you need to change the backlight bulbs. The standard ones were green, the purchased ones were blue. We replace standard light bulbs with purchased ones, then check how they work. Next, install a new card.
All this will look very impressive. Finally, we install the arrows and protective glass. If you customize your car like this, it will look very cool.
Experience of car enthusiasts
The 10 and 14 have absolutely identical panels. I immediately installed the cover and changed all the light bulbs to LEDs... and in general I installed LEDs everywhere I could. Energy consumption on the car has dropped significantly.
https://www.2114.ru/forum/showthread.php?t=73
The overlay is the same combination of arrows, you don’t need to remove anything extra on top of the original one, everything that is sold ready-made, like a new panel, is basically *waste, they take a standard Vase panel, put inserts there and sell it for 5 rubles more.
https://www.2114.ru/forum/showthread.php?t=73
3.5 years have passed, the panel feels great) the paint is not peeling, everything is fine in this regard) You can safely paint it.
https://www.drive2.ru/l/8309496/
Folks, I generally found a simple solution for myself. This paint is sold under the name BMWSHWARTSMATT or what it is (I don’t remember exactly). The paint is specially designed for painting the dashboard in matte black (It turns out one to one like on a BMW. Hence the name