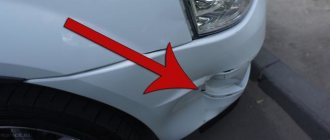
Even experienced drivers are not always able to foresee situations that can lead to damage to the car's bumper. One of the common violations of the integrity of the coating is cracks and chips of the part. Changes make further operation of the machine difficult and affect the appearance. Service station specialists will help you repair the damage. However, in order to save money, you can solve this issue yourself by following certain recommendations using special tools.
Achieving the ideal appearance of a bumper is difficult without the use of putty. Depending on the surface area to be repaired, work is divided into:
- local;
- full.
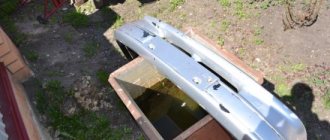
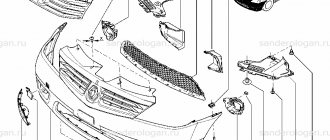
In the first case, the part can not be removed from the car and the coating can be restored in place. In case of large amounts of damage, the front part is removed for this purpose. To achieve quality results.
Technical characteristics and composition
Bumper putty differs from other types of mixtures in its properties. The technical characteristics are as follows:
- increased adhesion of material to plastic;
- resistance to mechanical damage;
- lightweight grinding;
- elasticity of the solution.
Manufacturers produce special formulations that consist of two components.
- Base - which contains polyester resins, dispersed fillers and pigments.
- Activator - promoting hardening of the solution.
The size of the base filler fraction determines the type of putty; the pigment allows you to bring the color of the mixture as close as possible to the material that is being processed.
Calculation of putty per 1 m2
The required amount of putty is determined by the amount of work required to eliminate defects. The average weight of the substance ranges from 200 to 1800 grams. Therefore, the manufacturer produces mixtures in such containers. The exact quantity is indicated on the packaging that accompanies the can of putty.
Peculiarities
Elastic putties are resistant to vibration and mechanical stress due to their composition and adhesive properties. In order for the coating on the bumper to last as long as possible, it is necessary to properly dilute the chemical compounds. It is important to maintain the proportion when making the solution. Mix the product in the following ratio:
- 5% is the hardener;
- 95% is the total mass of the main substance.
The main condition when creating putty is the quick connection of the components and application to the surface, taking into account the high rate of hardening of the solution. The layer hardens within 5 minutes, so you need to have time to distribute the mixture on the bumper.
Tool selection
High-quality bumper putty requires careful preparation. To do this, you need to take care in advance of purchasing additional materials that will be needed for the work. The necessary tools are presented:
- grinding machine;
- soldering iron with a power of about 300 W with a wide flat tip;
- sandpaper with varying degrees of grit for initial and final sanding (from P 80 to P 1200);
- a wooden block with a mount for sandpaper;
- solvent or white spirit;
- polishing paste;
- putty;
- primer solution exclusively for bumper treatment;
- paint;
- varnish;
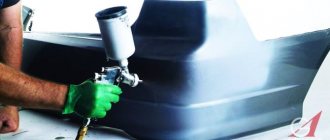
- with a brush or spray gun.
Important! Additionally, you should prepare special change of clothing, a mask and a respirator to prevent small dust particles from entering the respiratory tract.
Do-it-yourself bumper repair: soldering, putty, painting - detailed repair instructions
Get straight to the point! First of all, to repair the bumper you will need the following tool:
- A grinding machine is a must-have tool; most of the work is done with it. It can be replaced with an electric drill with special attachments.
- Foam adapter connecting the sole of the machine and the abrasive wheel.
- Soldering iron - the more powerful, the better.
- Sandpaper.
- Solvent - you should take White Spirit, this petroleum product is popular, used in the construction and repair industries, so buying it will not be difficult.
- Consumables - you need to buy varnish, putty, primer and paint.
And be sure to take care of your own safety: mask, gloves, goggles.
Types of putty mixtures
Manufacturers produce putties for various purposes. Bumper repair includes leveling deep and minor surface defects. Therefore, there are such basic types of coverage.
- Filling - has a coarse-grained structure.
- Finishing - contains fine-grained filler.
- Universal - combines the properties of the first two options.
The first option allows you to eliminate deep blockages and deformations. The latter serves as a finishing layer or removes minor irregularities, making the part smooth and durable, easy to apply and quickly sanded. Universal putties are convenient to use because they do not require additional costs for purchasing several types of mixtures. Most modern car models have a plastic bumper. Therefore, the use of putty is obvious. However, for some outdated models, other mixture options are relevant.
Putty options depending on the source material
The choice of filling putty depends on the source material of the car part. The mixtures are presented in the following types.
- Reinforced with fiberglass - the material is well suited if it is necessary to repair significant deformation of a part or if it is rusty. The mixture has high reinforcing properties, is durable and densely fills defects. Indispensable for through cracks on metal surfaces. However, it is not recommended for use on large areas, since the putty is not elastic enough and is not resistant to vibrations.
- Reinforced with aluminum - the mixture is used to process parts that are exposed to high and low temperatures. The composition includes metal powder, which has a coefficient of thermal expansion close to that of metal. Therefore, the putty can withstand sudden temperature changes. It has a fine-grained structure and does not shrink significantly after application to the coating. Given the longer drying period compared to other solutions, it can be applied to large areas.
- Lightweight - due to the content of hollow glass beads, the putty does not weigh down the machine parts during processing. Easy to process. Experts recommend using the suspension when repairing large surfaces - bumper, hood, panels.
- Classic - have a medium-grained structure. They adhere well to surfaces, including fiberglass coatings, without additional sanding. However, they definitely require finishing material.
- Finishing mixtures - used for final work after closing large defects. They have a fine-grained composition that makes the surface smooth without defects. Most often they are white or black and are highly elastic.
- Liquid - released in the form of a spray. Convenient to use, especially for large surfaces. Dries quickly, creating a thin, durable layer. Easy to sand.
- For plastic, special mixtures are used that have high adhesion to plastic.
Preparatory stage
Puttying a car bumper requires preparation. At this stage, the necessary tools and materials are selected:
- degreaser;
- enamel paint to match the color of the car body;
- priming;
- special primer, putty for plastic;
- sandpaper of different grain sizes, ranging from 150-500;
- tape made of non-woven abrasive material, reminiscent of loose felt in texture.
Preparing the bumper for putty
Everything indicated should be at hand before the immediate start of work. Then putting putty on a plastic car bumper with your own hands will not be difficult.
Choice of putty
The choice of putty is a very important part of the procedure. The composition must meet several requirements:
- high elasticity - should not become cracked during operation;
- strength - must withstand local shocks and vibration, have a long service life;
- increased degree of adhesion to all polymer materials;
- resistance to manual grinding - reliably fill any defects.
Choice of putty
Car bumper putty is a one- and two-component fine-grained mass based on polyesters, pigments, and dispersed accumulators. Apply it to the surface to be restored with a spatula or other suitable tool. It is extremely important not to treat acrylic coatings or cellulose with this material.
There are now several varieties of putties on sale, differing in method of use, chemical composition, and base. For example, materials with fiberglass are used to eliminate serious damage, deformation and rust. They differ in density, strength, and good reinforcing properties. Also for these purposes, it is recommended to use lightweight options, including empty glass balls, which make the mass quite light.
Making your own putty mixture
The price of finished putty can be high for many car owners. In this case, it is possible to make the mixture yourself. Here's how it's done:
- The crushed foam is placed in a convenient container.
- Pour it with acetone and dissolve it, stirring.
- The sediment remaining at the bottom is used as putty.
Making your own putty mixture
The only disadvantage of this method is that the homemade mixture hardens quickly, so puttying the car bumper must be done immediately.
The use of fiberglass in the repair of a plastic bumper
If there are cracks or deformations in the car, they must be eliminated. Some craftsmen use fiberglass with epoxy resin and putty with fiberglass for these purposes. However, experienced specialists strongly recommend avoiding such procedures. They don't follow the right technology. A bumper repaired in this way may, under unfavorable conditions or an impact, crack again at a weak point, especially during mechanical impact or impact, which will require repeated repair of the fault.
The ideal places for applying fiberglass-based putty are pillars, thresholds, and arches, which bear a significant force load.
The work should be performed using special rods made of a material similar in composition to the bumper being repaired. Deformations are corrected with a hot hairdryer. Further work is carried out sequentially with the obligatory use of elastic putty.
Preparatory work
Do-it-yourself bumper repair involves preparatory work, soldering, putty, priming and painting. Puttying is carried out only on a clean surface. Therefore, before performing them, the car should be washed using special cleaning products. After this, dry the car, paying attention to problem areas. After this, the surface is degreased using a solvent or white spirit. The old paintwork must be cleaned and sanded. If this is not done, the new coating will deteriorate over time with the appearance of defects and cracks.
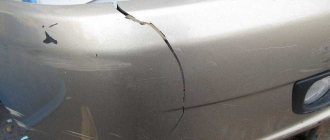
Soldering the bumper
If a crack is found, soldering will be required. You can do it yourself by following certain instructions. The best option is seam soldering of plastic. This type of repair includes the following steps.
- First, the part is fixed with a clamp.
- Make a hole with a drill at the end of the crack.
- First of all, the parts are connected from the inside to determine the properties of the material and eliminate the possibility of defects appearing on the visible surface.
- They grab the edges of the plastic in the crack area, moving gradually in one direction. The tack size is 10 - 15 cm. Then full soldering is performed.
- Reinforce the bumper using stapler staples step by step, keeping a distance of 2 cm between them. Attention! The legs of the staples should first be shortened to avoid piercing the material through.
- Next, solder the staples and straighten them along the seam.
Soldering the bumper with a soldering iron
Using a soldering iron, you can repair cracks and chips on plastic bumpers. It is best to solder bumpers made of polyamide with a soldering iron; worse, those made of polypropylene; it is better not to repair bumpers made of ABS plastic with a soldering iron.
The soldering iron does not have the ability to adjust the power, so it is very difficult to maintain the desired temperature, which leads to overheating. It is very difficult to heat the plastic to the required depth and temperature with a soldering iron, which makes it impossible to obtain a homogeneous monolithic connection.
To solder bumpers made of polyurethane, polypropylene, polyvinyl chloride (PVC), use an 80-watt soldering iron. To solder bumpers made of polyamide and ABS plastic, use a 100-watt soldering iron.
When repairing a bumper made of thin plastic, if the damage site has uneven edges or is located at the edge of the bumper or has a difficult shape, then a metal reinforcing mesh is used for soldering. When repairing minor damage, instead of metal reinforcing mesh, you can use metal staples for a construction stapler, which are soldered in 2 cm along the entire length of the crack. Minor damage can be sealed without reinforcement at all.
Soldering a plastic bumper using a soldering iron is carried out in the following order:
- A patch is cut out of a metal reinforcing mesh, slightly larger in size than the damage on the bumper.
- The reinforcing mesh is soldered with a soldering iron into the inner surface of the bumper, connecting the torn edges of the crack. You should try to bury the mesh as deeply as possible into the plastic, but without damaging the front side of the bumper.
- Use a soldering iron to solder the seam on the outside of the bumper, covering the reinforcing mesh with molten plastic.
When repairing minor damage, when reinforcing mesh is not used, use a sharp soldering iron tip to make transverse notches every 1–2 cm on the inside of the bumper to preliminarily fix the edges of the damage, then use the flat side of the soldering iron tip to fill the remaining gaps and level the surface. Then do the same on the front side of the bumper.
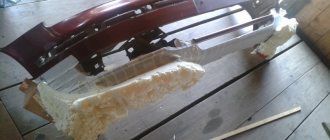
Puttying and painting the bumper
Bumper putty is an important stage of restoration work. It is necessary in order to eliminate small and large defects, irregularities, and make the surface smooth. This step is mandatory before painting. If this is not done, the varnish will quickly crack and peel off. The work is performed in the following sequence.
- Determine the types of starting and finishing putty that are needed for the coating.
- After preparing the mixture, quickly apply the mixture to the area of defects and distribute evenly over the surface before it has time to harden. First use the base composition, and then the finishing one.
- Each layer is carefully sanded using sandpaper or a sander. After the final application of the finish, rub the bumper with soft sandpaper with a grit of P 180 - P 220.
- Matting is done with abrasive P 220.
- After blowing, the bumper is coated with a primer. For these purposes, the best option is a two-component acrylic primer. It is undesirable to allow the solution to leak during processing. The composition is applied several times, waiting for the previous primer layer to dry, after which they move on to the final stage of repair.
Important! Complete polymerization occurs within 24 hours. You can use an infrared lamp, which can reduce the hardening process to 3 hours.
- After grinding, the surface is blown and degreased.
- The paint is applied in 2 - 3 layers, each of which must be allowed to harden well. Drying should be at least 10 minutes.
- The final stage is varnishing in 2 layers with intermediate drying.
Do-it-yourself bumper putty
If the bumper has been repaired and has areas of untreated plastic, first of all you need to cover these areas with a special primer. After a certain time (each composition has its own drying period), prime with acrylic filler, and after it hardens, putty the car bumper, level with fine sandpaper, degrease and paint.
Body kit repair requires the use of special materials. Depending on the type of coating, the composition differs. Find out how to putty a car bumper with your own hands, what you need for this and how much.
Grinding stage
Before covering with putty and further painting the bumper, the plastic is sanded. To do this, resort to using a grinding machine. The optimal wheel option for equipment No. 240. It is necessary to carefully handle chips and irregularities. In hard-to-reach places, smooth the surface manually. Use sandpaper P 120. Sand the seam very carefully so as not to damage it. After sanding, the bumper is blown to remove dust that has settled on the surface. In this way, hidden cracks can be detected. If such a defect is discovered, soldering should be done. If red spots appear during sanding, this indicates problem areas that require re-processing.
Ideal bumper putty
If the bumper is “naked”, not covered with anything, it must first be coated with a primer. It is enough to degrease the plastic body element before direct application. Next, it is recommended to sand to remove minor marks in the work. After this there is a pause of 20 minutes. Then just paint is applied.
It is noteworthy that some parts are sold with a gray primer already applied. Such models should be immediately sanded with a fine abrasive and then painted over.
If the bumper has been repaired and has areas of untreated plastic, first of all you need to cover these areas with a special primer. After a certain time (each composition has its own drying period), prime with acrylic filler, and after it hardens, putty the car bumper, level with fine sandpaper, degrease and paint.
Bumper putty
Several mandatory rules that must be followed during the work process in order to properly putty the car bumper:
- treatment of the area is carried out by gradually expanding the area around the furrow;
- before applying the putty, the repaired part of the coating is properly treated with a primer;
- It is recommended to use a factory-made or home-made rubber spatula as a tool;
- if you prepare the putty with your own hands, then you need to do it in small portions;
- when mixing with a hardener, you must adhere to the recommendations presented in the instructions - if you add more solution, it will set in a short time, will not allow you to completely stretch the entire working plane and will crack;
- It is advisable to sand the dried layer of putty with paper of P220 grit, and then P320 - after this the primer is applied, then the surface is sanded to a matte state with an even finer number;
- After treatment with Scotch Brite, the surface is degreased and painted.
Thus, putting putty on a plastic car bumper with your own hands will not be particularly difficult. However, you must have the appropriate skills and knowledge.
Tips and tricks
In order to achieve a good result, experts advise following the following rules.
- All stages of work must be followed.
- Maintain time intervals for drying layers of putty and paints.
- Purchase bumper products from trusted manufacturers in certified product stores.
- Select a putty that matches the material from which the bumper is made.
Proper repairs will ensure a high-quality and beautiful coating that will last for many years.