Bumper damage is a common type of car breakdown. It mainly happens due to road accidents. Accidental mechanical damage cannot be excluded. For example, the buffer can become very cracked due to a careless collision with the curb, due to parking on low fences or fences, which are found every now and then in courtyards. The article contains information on how to glue a bumper yourself with instructions, photos, and video lessons.
- Do-it-yourself bumper repair: what are your options?
- How to glue a bumper at home: glue for plastic parts
- Popular types of adhesives
- Sealing process - preparation
- How to glue a bumper: let's get started
- Final stage
- Results
If the damage is critical, then you will only have to completely replace it. However, small cracks can be eliminated in other ways. When repairing most damage, adhesives for spare parts are used. Let's take a closer look at repairing a fiberglass bumper with our own hands.
Do-it-yourself bumper repair on a car: what are the options?
By choosing high-quality glue for plastic or specialized equipment in the form of a soldering iron and a powerful stapler, you can easily get rid of a lot of damage to an integral part of each car.
It should be immediately clarified that it will be possible to repair the vehicle on your own if chips, cracks up to 10 cm, small dents and punctures in the body of the car’s bumper are detected.
If part of the part was torn off and lost, then it is quite difficult to correct the excess without turning to professionals, but in other situations you can safely tune in to the work process.
How to repair minor damage to a plastic car bumper
Bumper damage comes in many different types, from minor scratches and small dents to serious cracks. Small dents and scratches can be removed yourself.
If the car bumper is made of thermoactive plastic, then minor damage to it can be easily eliminated using the polishing method with special chemicals. means.
Related article: We remove chips and scratches on the car body with our own hands
For example, if there is a shallow scratch, it can be treated with WD-40 universal cleaner.
In order to polish a scratch or chip, you will need a sponge, a soft rag and a chemical reagent. First, you need to clean the damaged area from dirt and dust with a sponge and water. After applying chemical. spray or sponge. Next, the damaged area is intensively polished with a rag until no damage is visible on it.
The second way to eliminate small dents and scratches on a plastic car bumper is to straighten the damaged area with a hot air gun. The essence of the method is that the damaged surface is evenly heated with a hair dryer. Due to heat treatment, the damage is leveled and straightened.
The method is simple and does not require special skills to perform, but it is not without its drawbacks: there is a possibility of deformation of the plastic; heating with a hairdryer can only be used on unpainted areas.
Also, a wax pencil is considered a simple and inexpensive way to eliminate minor damage to a plastic car bumper.
With its help, scratches and chips are simply painted over. Chem. the composition of the pencil fills the damaged areas, leveling them with the general surface and forms a protective layer. The process of removing chips and dents with a wax pencil takes no more than 5 minutes.
What materials are used to repair bumpers?
The set of components directly depends on the chosen method of fastening the edges of the part; most often, workshop technicians resort to using materials such as:
- Specialized glue for bumper repair or tape.
- Epoxy or polyester resin.
- Fiberglass.
- Degreaser.
- Automotive putty.
- Enamel.
- Primer.
Without a certain tool, it will not be possible to achieve a good result and significantly speed up the process; we are talking about an angle grinder with attachments, as well as a construction stapler capable of driving staples deep into the structure of the material.
Polyurethane-based gluing adhesive
This mixture has a lot of positive aspects; it does not spread over the surface and creates high-quality adhesion.
Immediately after the layer has completely hardened, the seam can be sanded and brought to perfect condition, without spoiling the appearance of the vehicle. A composition called Novol 710 is popular among professionals; the fixing solution goes well with plastic and metal.
When applied to acrylic primers, the beneficial properties of the product remain unchanged; upon completion of the manipulations, you can level the surface and paint it in a suitable shade.
Universal superglue
When understanding the intricacies of the question of how to seal a bumper, it is worth taking note of this potent composition; you can choose a manufacturer at your personal discretion; the list of successful brands looks like this:
- Alteco Super Glue Gel comes from Singapore and has a breaking force of 111 N.
- DoneDeal DD6601 (USA) has a rating of 108 N.
- Permatex Super Glue 82190 from Taiwan is more powerful, 245 N.
- “Strength Superglue” created in China has an indicator of 175 N.
The part does not have to be carefully prepared before starting work, and the mixture itself dries quite quickly; literally after 5-15 minutes the master gets a reliable adhesion of the edges.
Gluing with fiberglass and epoxy
One of the popular techniques involves purchasing a two-component fixing mixture and directly preparing it before application.
When faced with specific components in the bumper, it would not be superfluous to replace the epoxy with polyester glue, and at the same time prepare pieces of fiberglass. The auxiliary material will not only help eliminate space up to 10 mm, but also give the product strength.
Experts unanimously say that it is not recommended to join fiberglass parts using an epoxy solution; even if it is a two-component solution, they can be glued together with a polyester compound.
What bumper damage can be repaired at home?
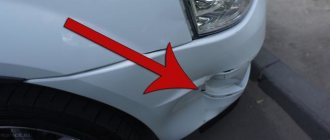
Without the help of car service specialists, it is possible to eliminate various types of bumper defects. The easiest to restore are scratches, which can be almost imperceptible superficial or deep, reaching the inner layer of the part. Repair in the second situation will be more difficult, since deep scratches often turn into cracks. If the bumper is cracked through and through, it is not recommended to use the car until the problem is completely eliminated, since when the car is moving, a vibration load is applied to the front part of the body, which can cause the crack to expand. This will affect the condition of the entire body and its performance characteristics.
In addition to scratches and cracks, dents, punctures and chips may form on the part. Dents appear as a result of strong external influence and must be corrected. Breakdowns and chips often occur due to a collision with an obstacle located at an angle.
See also
What is better and how to properly glue glass to wood, features and choice of composition
Rules for choosing an adhesive composition
When preparing to solve the problem of how to glue a bumper, it is important to correctly and carefully consider the purchase of the main component, we are talking about the fixing mixture. The solution must be fully suitable for the material from which the part is made, and also meet other generally accepted requirements.
Initially, a person checks whether the glue can create an integral structure, whether it will not burst in severe frosts, and how high its resistance to increased temperatures is.
As the vehicle is driven, the layer will certainly become exposed to an aggressive environment in which drops of oil or gasoline occur; the frozen seam should not be destroyed under the influence of these reagents.
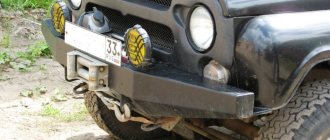
Bumper protection
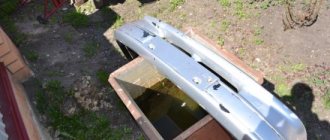
Getting on a steep descent or climb can seriously damage the bumper. Protecting the bumper yourself will reduce the likelihood of defects in this part of the car.
Such protection can be made industrially or with your own hands. With some skill and the availability of tools, it is possible to make yourself a so-called power bumper, which perfectly protects the car from all possible consequences of road accidents.
Before starting to manufacture the protection, you need to think about what the new part will look like: establish where the attachment points will be, whether arches are needed. It is worth constructing a protection drawing and calculating everything in such a way that changes are not considered a serious structural modification of the car. Attention is also paid to analyzing the weight of the bumper and its maximum load.
It is better to have a specialist weld the bumper frame and do the installation yourself. Reinforced bumpers are attached to the frame or side members. To protect the power bumper, a guard is used.
Making bumper protection with your own hands can have unexpected and not very pleasant consequences, because it is not known how such a part will cope with its task in the event of a car accident.
Bonding technology
Every professional will no doubt say that glue for a car bumper is applied and distributed using a special technology; the master’s action algorithm is often divided into the following stages:
- Dismantling the part.
- Carrying out preparatory activities.
- Then you can seal the damaged area.
- Sanding will help level the surface.
- The final touch will be coloring.
By following this sequence, you will be able to carry out the process at home; for this you need to decide how to glue the bumper together, and also prepare a suitable set of tools.
Preparation
Half the success and the quality of adhesion of two damaged pieces depends on the condition of the surface; bumper adhesive will not lose its useful properties and characteristics only if the following actions are performed:
- Before gluing the bumper, it is washed and cleaned of stubborn dirt stains.
- The problem area is sanded with sandpaper or special attachments.
- To enhance adhesion to the material, the area is wiped with a solvent.
- Upon completion of the manipulations, the damaged area is reduced.
To seal the future seam, it is possible to use masking tape; it will protect the vehicle owner from spreading the mixture, and will also help save the solution.
Auxiliary adhesive tape is applied to the outside or inside of the part; if you choose the hot gluing method, it is better to use metallized tape to avoid ignition of the component.
Materials and tools
Having figured out which glue is ideal for repairing a plastic part of a car in a particular situation, you should prepare a table and also collect tools and materials.
A list that is used by all professional auto mechanics and straighteners will help in solving this problem; the list looks like this:
- Set of brushes.
- Primer.
- Degreaser.
- Enamel.
- Knife.
- Sandpaper of different fractions.
- Epoxy resin.
- Fiberglass.
Resin-based glue hardens up to 36 hours, depending on the temperature, the ideal reading on a thermometer would be 18-20 degrees with a “+” sign.
If you violate one of the rules given in the instructions for the product, when cold weather sets in, the seam will crack, and the service life of the mixture will definitely not please the car owner.
Repair process
Before performing the main stage of fixing the damage, you need to prepare a solution; for this, take 10 parts of epoxy and 1 part of hardener, thoroughly mix the contents of the container, and get rid of the sediment at the bottom.
Before the composition is ready, let it sit for 5 minutes, while the jar is placed in a warm place where the temperature does not drop below 20 degrees.
Then you should use the step-by-step instructions:
- Coat the damaged area with glue.
- Attach a suitable piece of fiberglass.
- The fabric is applied in several layers, after each application the area is lubricated with the composition.
- The last layer should hide the peculiar fiberglass structure.
- It is better not to disturb the vehicle part for 24 hours.
Experienced craftsmen do not recommend laying the bumper on its side so that the distributed mixture does not create smudges; the problem area should be approximately in a horizontal position. At the end of the work, the person adjusts the appearance of the component to an ideal state by sanding and painting with enamel.
Materials, equipment and facilities
When carrying out a process such as self-repairing a plastic bumper, you will need to prepare special tools and materials. Among the most important of them are:
- Special hair dryer for vehicles. This accessory is used for drying applied compounds. Unlike a conventional device used to dry hair, it produces hotter air, which, if necessary, can not only dry, but also melt the plastic.
- Soldering iron. Any device is suitable here, even one intended for use at home. If possible, it is better to buy or rent a more powerful device.
- Metal grid. The material is necessary for high-quality and durable fastening of individual parts of plastic. If it is not possible to purchase a mesh, you can use material from a previously used and no longer needed air filter.
- Primer. This is a special composition that is sold in ordinary cylinders. It is advisable to ensure that you have a special compressor or gun for convenient application of the primer.
- Putty. This product is necessary to eliminate cracks of different sizes and depths. You need to know that the composition can only be used in places hidden from outsiders.
- Sandpaper. Required for grouting the applied putty during the final stage of repair work. To work with the bumper, it is better to purchase sandpaper No. 800.
- Rags - you will need it for washing the bumper and for treating the surface with a hairdryer, preventing the risk of burns from the flow of hot air.
When preparing tools and equipment for bumper repair, you need to take care of your protection. It is worth purchasing a special respirator mask, safety glasses and gloves.
Well-thought-out protection will allow you to comprehensively protect your respiratory organs, eyes and hands from exposure. This automatically guarantees that the body will not be harmed by the spray of harmful substances in the air and from high temperatures.
Fiberglass bumper repair
The base material is truly unique and requires a special approach; body kits of this type often have UP or PUR engraving on the body, which determines hot and cold molding.
Having undertaken the independent implementation of the process, it is necessary to prepare for the use of polyester resin or resin, and the surface should be ideally prepared for the application of fixing materials.
The manipulations do not differ from the principle of their implementation when repairing plastic models, but experts advise approaching the choice of components as seriously as possible.
Repair errors
The main mistakes during repairs usually relate to the final part of the processing - painting. If you make a mistake with the choice of materials and technology, then the repair simply will not take place.
There are four main mistakes that can result in a repaired bumper quickly losing its attractiveness:
- poor processing of plastic with cleaning agents. The cleaner should remove not only dirt, but all types of oils and fats;
- wrong type of putty. The putty should be specifically for plastic, not metal;
- The old paintwork has not been cleaned well enough. Before priming, the bumper must be sanded completely from the front side. This way the surface of the old paintwork will be “matted” and the primer will adhere equally well to the entire part.
They “forgot” to improve surface adhesion. The bumper must first be treated with adhesive primer. And then apply primer-filler for plastic, base and varnish.
How to restore the shine and uniformity of paintwork at the site of a crack
The original shade is quite difficult to repeat, this is because the fixing mixtures make adjustments to the condition of the base. Even with careful sanding and priming, the problem area becomes slightly visible.
The part is also not completely painted, and in this case it is simply impossible to achieve the ideal combination. Polishing soft wheels on a grinder or drill can help get rid of fading; professionals often use colorless acrylic varnish for their work.
Mismatches of tone can be avoided or minimized, but many people will find the work painstaking, and you need to be patient.
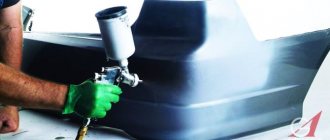
Bumper painting
Painting a plastic bumper with your own hands is a simple procedure that almost any car owner can perform. To do this, you should purchase tools and materials:
- Drill with attachments, orbital sander.
- Adapter made of foam rubber.
- Sandpaper.
- Soldering iron.
- Solvent.
- Putty, primer.
- Paint, varnish.
- Spray gun. If desired, and for additional savings, you can do it yourself.
To prepare for painting the bumper, perform the following steps:
- Washing the bumper. Then they are treated with a solvent.
- Grinding. We clean the entire surface with a sander. Where there is no access to it, we clean it manually. The sandpaper used is P120.
- Putty. Apply fiberglass putty to the surface. After hardening, grind it (P120). Apply finishing putty. We grind P180-220.
- Next grinding with P220 abrasive: remove coarse sandpaper. Then standard procedures of air blowing, degreasing and anti-silicone treatment.
- Padding. The bumper is restored using a two-component acrylic primer. They dry it for a day. However, when using an infrared heater, the drying time will be much shorter and will be 3 hours. The dried primer is sanded. Before grinding, it is advisable to use developing powder to detect possible errors in the work. The sanding paper should be P320-400. After the next layer of primer, grind P400-500.
The painting procedure itself is preceded by degreasing. The paint is applied in two or three layers and dried for 10-15 minutes. Then several layers of varnish are applied, also with intermediate drying.
No driver is insured against road accidents. And if the bumper is damaged in an accident, you should not rush to the auto repair shop or rush to buy a new part. It is better to collect the fragments and try to repair the car bumper yourself.
How to solder a bumper with your own hands
When resorting to using a tool capable of generating high temperatures, it is important not to overdo it, so as not to completely ruin the part; lack of experience often led beginners to disastrous consequences.
To avoid common mistakes, you can use the step-by-step instructions shared by professionals; you should not deviate from the sequence, otherwise the car owner will be forced to buy a new part.
Preparing to restore a plastic bumper
First of all, an integral component of the vehicle is dismantled; if fragments fall off during the execution of actions, they need to be collected and put in one place.
The elements are cleaned of contaminants and dried; it is better to pre-treat the material with a solvent, removing greasy traces as well as reagent deposits.
The temperature regime that will be used during repairs or the relevance of melting in principle depends on the condition and characteristics of the bumper. Fiberglass parts are connected exclusively using fixing bases; special equipment will not give the desired result.
Soldering the bumper with a soldering iron
A regular model of a 100-watt unit is perfect for the process; the tool is used when connecting boards or thin wires, so every electrician has a soldering iron.
The tip is first cleaned of possible accumulations of solder or other small particles, after which the device is connected to the network for subsequent heating.
The material from the edges where the crack has formed is gradually pulled into the middle of the damaged area, thereby creating a thin layer on the edge that holds the fragments together.
To achieve maximum results when solving the problem of how to seal chips, in some cases craftsmen introduce reinforcing mesh or staples; these components are fused into the body flush, the metal does not stick out to the front side.
The finished seam, which has dried over a certain period of time, is sanded with sandpaper or special attachments; you can start with a coarser fraction and end with a small stone.
Sealing the bumper with a hot air gun
The process is somewhat similar to working with an acetylene torch; anyone who has already encountered such methods will immediately understand the essence of the matter.
A nozzle of minimal size is considered the best option for realizing your plans; the hair dryer comes with several samples in the set, which you can choose at your personal discretion.
You can’t do without a piece of filler material; you can buy it in a store or take it from the part being repaired; after heating the edges, the solder is simply pressed against the problem area.
After soldering is completed, the front side of the product is processed using improvised means; in some cases, grinding even takes longer than the process of eliminating the chip due to protruding areas of the additive.
Soldering a plastic bumper using a torch
We are talking about small samples of burners that can be found on sale without any problems; the cylinders already have a convenient nozzle, with its help you can regulate the gas flow.
The flame will come out of the nozzle quite wide, it is important to avoid overheating the part, because in this case, smudges will appear on the surface, which will require additional removal.
To avoid incidents, car owners often use burners exclusively to heat reinforcement with a prepared tip, and then use this device to join the seam.
Welding the bumper with a rod
This type of repair has become popular among professionals due to the low painstaking nature of the process. The rod performs two functions, it serves as a filling and reinforcing element; triangular shapes of the component are most often found on sale.
By heating and pressing the addition into the crack, the master gradually fills the problem area and eliminates the damage. Before applying the material, you can provide for a chamfer; for this, the pieces or seam are pre-ground with a small nozzle.
Thanks to this approach to the implementation of the technique, upon completion, a neat and slightly noticeable joint is formed on the bumper, and after sanding, priming, painting, it completely disappears from view.
Soldering the bumper with special tools
There are several professional devices that can speed up the process and reduce the free time spent on performing actions.
But such accessories may simply not be at hand, because special tools are most often bought by craftsmen who are constantly engaged in straightening and repairing damage.
A soldering iron or hair dryer with attachments can be rented if there are companies providing such services in the city where the car owner lives.
In other cases, it is worth using fixing mixtures; adhesives can also help achieve positive results, and when working with them there is no need to stock up on special aggregates.
Bonding the bumper with composite material
When faced with heat-stable material samples, previous methods will not give positive results; for such parts, professionals provide repair kits.
The product package often includes epoxy resin or other fixing mixtures, and the addition is fiberglass, cut into pieces of a suitable size.
When preparing the surface, the master achieves a decent roughness of the material so that adhesion remains at a high level; specialized fabric is laid in several layers.
In addition to filling the gap space, it is necessary to cover the edges with fiberglass cloth for several millimeters; ignoring such recommendations, there can be no talk of reliable repair of the damage.
The described technique helps to get rid of even large holes larger than 10 mm, replace lost fragments, and also create an even and smooth plane. After sanding and painting, it is simply impossible to notice from the outside the place where the defect was, which indicates the effectiveness of the method of implementing the plan.
Preparatory activities
Before you glue the plastic bumper, you will need:
- Remove the cracked body element from the car.
- In the body kit that has burst, you will have to drill holes at the ends of the crack. This will prevent further damage to the part.
- Wash and dry the body kit thoroughly. Degrease the working surface of the bumper.
- Using sandpaper, remove the paint in an area from 3 to 5 cm from the edges of the crack. Apply a layer of soil to the damaged area.
- The places where the connection of the restored body element will pass must be carefully sanded. If you have a milling machine, then grooves in the form of a Latin letter V are made on the edges of the crack, which makes the gluing more reliable.
- If the body kit is cracked in many places, without removing it, you will need to fasten all the elements together (using a construction gun), and only then dismantle the element.
Answers to frequently asked questions
Although the entire sequence of actions of a person who has undertaken to implement one of the above techniques has been described in detail, some beginners may feel unsure of their own abilities.
There is no need to rush to give up saving money, because without turning to specialists at a service station, the car owner will save a certain amount of money.
Answers to frequently asked questions will clarify most of the unclear points, after which those interested in self-repairing the bumper will more thoroughly understand the situation and begin the actual process.
How to solder the ear mount of a plastic bumper
To create a reliable seam, it is difficult to do without reinforcement; all experts recommend additionally introducing a metal mesh or staples.
Such auxiliary elements, after immersion in the body of the part, will become invisible, but the service life of the vehicle component will increase significantly.
How to solder a large crack on a car bumper
Such defects are not uncommon, but it would be foolish to panic at the sight of a hole; it is better to figure out how to eliminate the excess on your own.
In fact, the process is quite easy, by tightening the edges with staples or pieces of wire, the master will create a frame on which the fiberglass with a fixing mixture similar to epoxy resin will be successfully attached.
Is it possible to solder a bumper with a metal rod?
The element is unable to be completely compatible with the structure of the vehicle part, so it is most often used as a heating device.
Metal solder can fall off over time even due to strong vibrations inherent in driving on uneven terrain, after which the car owner will again discover a crack.
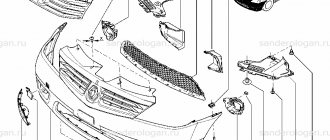
Types of bumpers and materials from which they are made
Modern car bumpers can be made of metal and plastic.
You need to know this: How to remove scratches on the plastic of a bumper with or without painting
In turn, plastic ones can be made from 2 types of material:
- thermoactive;
- thermoset.
What is the difference between thermosetting plastic for car bumpers and thermosetting plastic?
The main difference between a thermoactive material is that it can be subjected to secondary heat treatment. Under the influence of high temperature, the material easily melts, becomes elastic, soft and can take any shape.
Thermosetting plastic, on the contrary, is very durable, resistant to high temperatures and mechanical damage.
Car bumpers made of thermosetting plastics, as a rule, are rarely subject to cracks due to the strength and reliability of the material.
The following types of thermoactive materials are distinguished:
- Polyethylene - used in the production of food containers, bags, etc.;
- Polystyrene - various insulation materials are made from them in construction, etc.;
- Polypropylene - used in the production of auto parts, including car bumpers, food industry, etc.;
- Polyvinyl chloride - production of insulating coatings for cables, window technologies, etc.
Thermosetting materials are divided into:
- Polyurethane - most plastic auto parts, both small and large, are made from this type;
- Epoxy resins - used for joining and gluing different parts;
- Fiberglass - used in the production of heavy-duty auto parts, including bumpers;
- Phenol resins - needed in the manufacture of small auto parts, computers. boards, etc.
In conclusion
Almost any car enthusiast can repair a bumper using glue at home, without causing damage to the family budget. In terms of reliability, a sealed part will not be inferior to a sealed one.
There are many options available on the market and everyone can choose the right adhesive composition.
We recommend watching another method for repairing bumpers in this video:
A car bumper is not only a decorative element, it performs an important practical function. This part is used to protect the body from damage in minor accidents. It is the bumper that is the first to suffer in case of unsuccessful parking, hitting a high curb, or in a number of accidents. If a crack occurs, you can find out how to seal the bumper and carry out the repair yourself.
Content:
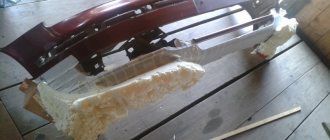
Repair with fiberglass
The technology is used to eliminate damage to body kits made of fiberglass, since the previous method will not work in this case. What you will need for work:
- fiberglass for bumper repairs;
- polyester (epoxy) resin complete with hardener;
- soft brush;
- stationery knife or scissors;
- latex gloves.
Polyester resin with hardener
Advice. If a bulge or depression has formed at the site of the impact, then immediately after cleaning, level it using a hair dryer to heat it.
Since fiberglass patches will have to be applied on both sides of the damaged area, it is better to remove the bumper from the car. After completing all the preparatory work, including stripping paint and degreasing, proceed in the following sequence:
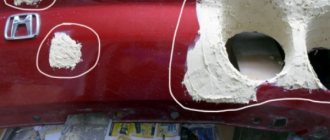
- Using a grinder with coarse sandpaper (P80-P120), make a recess in the body of the bumper from the front side, covering a radius of 3-5 cm from the crack. This is necessary so that the fiberglass overlay does not ultimately protrude beyond the plane of the part.
- On the back side, sand with coarse sandpaper, but without deepening. Degrease the area and let it dry.
- Cut out patches from fiberglass. On the front part you need to make a neat patch that follows the shape of the recess, and on the back you can glue a rectangular overlay.
- Mix the resin and hardener in the proportions indicated on the package. Apply the composition with a brush to the surface, apply a patch (several layers are possible) and saturate it with resin.
- Carefully observe the time specified for curing the epoxy composition (written on the resin container), and then thoroughly clean the repair area with fine sandpaper. The task is to level the surface by removing protrusions.
This is what fiberglass for sealing bumpers looks like
Note. Initially, coarse sandpaper is used to create a roughness on the surface of the plastic that promotes better adhesion of the polyester adhesive.
At this point, the work on repairing the plastic itself is completed; then cleaning, priming and painting are carried out using standard technology. The last operation is polishing the bumper; it is necessary to give the element a uniform shine.
Photo of fiberglass body kit repair
View after the initial cleaning of the crack When a depression is made, the crack appears more pronounced Patches are cut to fit the area Several layers of fiberglass impregnated with epoxy resin The patch after hardening and cleaning
Video about sealing defects with fiberglass
Which glue to choose
The quality of the gluing directly depends on the quality of the chosen glue. When drying, the glue turns into a full-fledged polymer layer. The point is that after hardening the glue has the same properties as the bumper. For repairs of this kind, special adhesives based on polyurethane or epoxy resin are used.
What is important to pay attention to:
- The adhesive composition must have high adhesion (adhesion of surfaces) to the plastic.
- If heat will be used during painting, the heat should not change the properties of the adhesive in the joints.
- Thermoactive and thermoplastic adhesives can be used if the bumper will be painted immediately after repair.
Below are several high-quality and effective adhesive compositions:
- Weicon Construction
(high strength and elasticity, resistance to various weather conditions). - AKFIX
(high quality and strength, does not require pre-priming, suitable for spot gluing). - Power Plast
(easy to use, gives reliable results). - Moment
(high-quality gluing, low cost, waterproof, but toxic). - Two-component composition for gluing 3M plastics
(has high adhesion to most plastics, does not spread, is easy to sand and paint).
epoxy (polyester) resin must be used as an adhesive material
.
What affects the reliability of gluing
The reliability of the seam is influenced by a number of conditions. All of them are important, and failure to comply with any one can lead to the fact that what is glued at home will fall off, despite compliance with all the others. So:
Compliance of the product material and adhesive composition. Correspondence of the type of adhesive composition to the magnitude of the forces that the connection will experience
The direction of these efforts is equally important. Thus, compounds that produce hard seams are not suitable for repairing, for example, shoes - after all, the sole will bend and twist during use, despite the fact that the tensile force will be small
At the same time, this composition can successfully glue, say, a hook to glass, and hang tens of kilograms on it. Compliance with application technology. Everything is important here - how many seconds or minutes the surfaces need to be compressed, and how to degrease them, and how long to keep the parts pressed against each other. All this depends on the properties of a particular “plastic-glue” pair, is described in detail in the instructions and must be followed verbatim. A deviation of one second in the exposure time or premature start of use of the product can lead to secondary failure. Mechanical part of the process. It is important to thoroughly clean the surface from dust and roughen it. In addition, the direction of pressing the parts against each other must be perpendicular to the surfaces being glued. You should not allow the parts to move mutually after pressing - this will also lead to failure.
Gluing plastic tightly is not so easy. Carefully following simple rules by the home craftsman will allow you to obtain strong and durable connections. The main thing is not to forget about safety precautions: do not inhale vapors of the adhesive and do not allow it to get into food, skin or mucous membranes. If accidentally swallowed, consult a doctor immediately, making sure to take the tube with you.