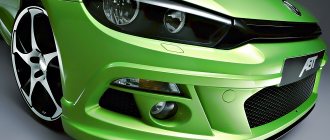
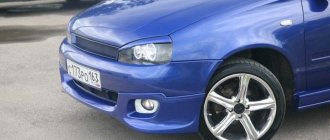
Many car owners strive to give their car individuality. This can be done in different ways. Some people put original drawings on the body, while others put a hand-made fiberglass bumper on the car. Many car enthusiasts will be interested in learning how to make this part in their garage and what is needed to paint it correctly.
- 2 The manufacturing process of a fiberglass bumper
2.1 What is required to glue the product2.1.1 Photo gallery: materials for work
- 3.1 Consumables and tools
Why do bumper tuning
A car owner may have several reasons to change a body element (or create a new one):
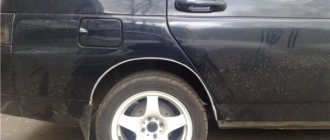
- Car tuning. Obtaining a bright and unique appearance of the car is achieved by installing a new original part.
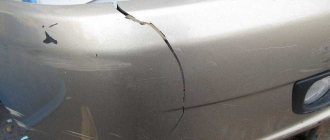
- Component failure. If the protective element is broken, it needs to be repaired and the design needs to be improved.
- Improving the driving characteristics of the car. Changing the design of the front and rear bumpers allows for better pressing of the car body to the ground while driving. As a result, aerodynamic drag is reduced.
It is advisable to entrust the production of bumpers to professionals. Especially if you need to replace a broken part with a new one. However, if the component only needs to be given individuality, then they do the bumper tuning themselves. To change the design of an element, you will need patience, accuracy and perseverance. To make a bumper with your own hands, you must have certain knowledge, skills and the ability to work with complex tools.
How to make a bumper with your own hands
Making a bumper for a car with your own hands is a complex and time-consuming process. Many motorists are only engaged in reworking an existing part; this operation requires accuracy, free time, patience and perseverance. But the result of the work will please you. Before you remake a part yourself, you need to think through a plan for the operations to be performed in advance.
It will look like this:
- Planning work, creating a project “on paper”.
- Preparing the necessary tools and materials.
- Execution of work.
- Carrying out the necessary modifications.
Subsequent modernization should not affect the protective properties of the body component. Only after building a plan on how to make bumper tuning should you start working.
Main part
Further production of the working part is similar to the previous manipulations. A fiberglass power bumper can be obtained by doing the following:
- Apply the separation compound to the matrix, and then the gel primer.
- Cover with resin and then glass material. Two layers of material with a density of 300 grams per meter are enough.
- After the resin has completely hardened, all that remains is to remove the fiberglass bumper from the matrix.
- Cut off all unnecessary parts with a cutter and correct them using sandpaper.
All procedures should be performed carefully. It is recommended to use protective equipment (gloves and carbon filter). The fiberglass power bumper must be removed from the matrix slowly. In this case, some use wooden wedges that are inserted into the gaps. Some experts advise making a second bumper yourself. This will prevent you from having to repeat the manipulation again, if necessary.
After the fiberglass power bumper is removed from the main matrix, the final stage begins. It is better to paint after strengthening the part on the car. This is necessary to eliminate possible distortions. After which you should carefully polish the surface using zero-grade sandpaper. When all uneven surfaces have been removed, you must:
- Apply primer and let it dry completely.
- Cover with paint.
- After the paint has completely dried, coat the product with varnish.
It is important to approach coloring seriously. Perhaps the best solution would be to entrust this work to a professional who can not only apply the paint evenly, but also choose the right shade.
A fiberglass power bumper is an important part in any car. Therefore, its production should be approached with all responsibility, especially if you carry out all the processes yourself.
Materials and tools
After creating the project, you should decide on the materials and tools for the work. The final result depends on this.
Depending on the selected materials, the set of tools required for work and the nuances of changing the body kit depend.
Also, before you start upgrading the body kit, you will need to use a mock-up or create a matrix; its peculiarity is that it is a “negative” in relation to an existing part. When designing a bumper, the material of the future body part is applied to the matrix, and a “cast” is obtained. It is used when upgrading or repairing an original body element.
To create a matrix, it is recommended to use technical plasticine. The material is not afraid of exposure to high temperatures and is easy to process.
Polyurethane foam
The material is used both to create a bumper from scratch and to modify an existing one. To construct the part, you will need the following materials and tools:
- Polyurethane foam (approximately from 3 to 5 cylinders);
- Foam gun;
- Masking tape;
- Epoxy resin;
- Fiberglass;
- Cooking foil;
- Fiberglass;
- Sharp stationery knife and replaceable blades;
- Sandpaper of different grain sizes;
- Automotive putty.
To create a bumper from polyurethane foam, it is important to have a developed eye, “straight hands”, patience, accuracy and master the skills of manual processing of materials. Only in this case, the quality of the manufactured element will be at its best.
To make a bumper from polyurethane foam yourself, follow the following steps:
- Creating a base from polyurethane foam.
- Use of fiberglass.
- Primer and painting.
You can get a bumper made of polyurethane foam through a step-by-step process:
- Remove the original component. It will serve as a template for creating a new product.
- Cover the internal cavity of the dismantled element with several layers of masking tape.
- Apply foam evenly.
- After drying, separate the frozen workpiece from the bumper.
- Using a knife, cut out the main holes on the new component.
- Carefully sand the resulting part with sandpaper.
- After the foam has dried, putty the workpiece. Afterwards, you should also process the future part with sandpaper, while gradually reducing the grain size.
Before you shape the future bumper, you need to make markings. This way you can achieve a symmetrical, neat part.
The application of fiberglass is carried out as follows:
- Cover the workpiece with foil. It will protect the product from exposure to aggressive materials and make it easier to remove frozen foam.
- Use epoxy resin. Place a layer of pre-cut fiberglass on top of it.
- Smooth the applied material with a rubber or plastic scraper. Do not allow wrinkles or air bubbles to appear on the surface to be treated.
- Repeat the procedure 4-5 times. Wait until the material hardens and dries.
- Remove the foam, make adjustments using putty, treat the surface with sandpaper, prime and paint the body part.
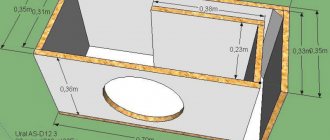
Matrix manufacturing
- When manufacturing the matrix, we take into account that the flange in this case is one of the main technological surfaces. This removable element is needed to simplify inserting and removing the bumper. We make a bevel at the ends of the template, the width of which is 5-6 cm at an outer angle to the form of about 30 degrees.
- Apply Teflon polish to the surface in three layers. This is necessary to ensure that the product does not stick to the mold. Instead of polish, you can use wax.
- As the first layer, apply gelcoat with aluminum powder. This is essentially resin, but after drying we get a smoother, shiny surface. Then we apply polyester resin - lay it in a thin layer. We put fiberglass on top.
Reinforcement of the matrix with fiberglass - First, we lay out grade 300 fiberglass fabric, place it exactly in shape, pierce it, releasing the air. Then we apply 600 grade fiberglass fabric in two layers.
- We reinforce the edges along the perimeter with the same material.
- We turn the mold over, take out the plasticine bars around the edges, wash the flanges with kerosene and put in a separator - wax.
- Next, we form removable strips along the edges of the matrix - from them a detachable model will be formed. During hardening, you can use a mold made of planks that will hold the springform pan around the edges.
- After drying, we separate the sidewalls and the main part of the matrix. Remove the plasticine from the inside. We remove car wax and plasticine with white spirit. We heat the stuck fragments with a hairdryer and remove them with a cloth.
Matrix of the new bumper - We process the inner part with sandpaper. After this, the matrix is ready, and you can start making the bumper.
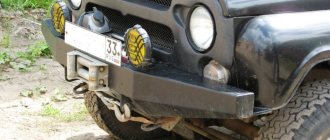
How to make a power bumper
power bumper" width="660″ height="440″ />
The part is mainly installed on SUVs. Thanks to it, the vehicle, when driving off-road, will be able to overcome serious obstacles without risking its integrity. The passive safety of the driver and passengers will also significantly increase. The power bumper is made of iron. Homemade elements, in addition to safety, “give” the SUV an aggressive appearance. With a homemade power kit, you can drive. To obtain this permit, changes to the design of the vehicle must be registered with the traffic police.
Before starting work on creating a power element, you need to draw up a plan on how to make a bumper, and only after that, start working. To complete this you will need the following tools and materials:
- Tape measure, tape, marker, scissors.
- Sheet metal (up to 3 mm thick), and cardboard.
- Grinder, cutting and grinding wheels, welding machine.
The work process is slightly different, depending on the method used to create the bumper:
- Constructed from a single piece of metal.
- Construction from several parts.
Despite the differences, the process has some similar operations:
- Creating templates from cardboard.
- Cutting out the necessary elements from metal, or creating the desired shape from a single piece.
- Connecting several parts into one piece using a welding machine, or forming a structure by bending sheet metal (practically impossible at home, since powerful equipment is required).
- Primer and painting.
- Installation on a vehicle.
The power bumper is painted in dark colors or left unpainted (if stainless steel is used as the material).
Coloring
Once the fiberglass has completely cured, you can begin the creative part - painting. It all depends on your taste and choice. You can choose a paint that best matches the body color, or you can choose a bright contrasting color. Someone will want to make not only a bumper, but also a spoiler, hood trim and other styling elements, and then paint them in the same color scheme and give the car a sporty look.
Required Tools
To paint a fiberglass bumper you will need the following tools:
- a set of sandpaper;
- orbital sander;
- gray scotch-brite;
- several spatulas of different sizes;
- blow gun;
- gun for soil;
- spray gun or spray paint.
- paint brush.
Necessary materials
Prepare all materials for painting in advance:
- putty;
- priming composition;
- degreaser;
- solvent;
- dye;
- varnish;
- varnish hardener.
It is best if the varnish and paint are from the same manufacturer.
Process
The process is not much different from the usual painting of a car part. It can be divided into the following stages:
- Sanding the surface of the product.
- Puttying.
- Cleaning the putty.
- Padding.
- Coloring.
- Varnishing and polishing.
First of all, go over the part with a sander. Even if its surface seems perfectly smooth to you, small cracks or bumps may remain somewhere. When finished with sanding, blow out the bumper using a special gun. This will help remove dust and also get rid of air bubbles.
After this, thoroughly putty the part. If there are any unevenness left on it, they need to be smoothed out at this stage. Let the putty layer dry and then sand it with a P220 grit abrasive.
Before painting, it is necessary to carry out all preparatory procedures
When working with putty, use only the dry sanding method. The putty actively absorbs water, which can negatively affect the overall appearance of the part.
Priming can begin one day after filling. First of all, degrease the surface of the product. Next you need to apply a thin layer of sticky primer over the plastic. This layer will serve as a kind of base (or primer) connecting the fiberglass fabric and the main layer of soil. You can skip this step, however, this will cause the paint to chip and crack quickly.
Next, apply a layer of pore-filling primer. You should not use compounds with an anti-corrosion effect, as the substances they contain may conflict with the epoxy resin. Allow 10-15 minutes between each new coat.
Once the primer is completely dry—usually up to 16 hours—sand it thoroughly with first 800-grit sandpaper and then 1000-grit sandpaper to remove any minor imperfections. Finish with gray Scotch Brite. Thoroughly clean the primed surface from any accumulated dust, and then degrease it.
All surface leveling operations are best carried out in bright directional lighting. This way you will be better able to see all the imperfections of the coating.
After all these manipulations, you can proceed to the staining process. Decide on the color and type of coating: now there are regular glossy, metallic and even unusual prismatic paints on sale. Each type must have a special approach, so consult with the employees of the automotive studio.
Add solvent to the paint according to the instructions on the package. Apply the composition from the spray gun in an even, thin layer. Since the bumper has a complex shape, start painting by working on the ends and contours of the part, and then move on to the main area. Each new strip should partially overlap the previous one. Apply the second layer perpendicular to the first, creating a kind of lattice.
Hold the tool at a 90° angle to the surface so that the paint is distributed evenly. Avoid leaks. The number of coats usually depends on the type of paint and the desired effect.
For high-quality coloring, you must use the tools correctly.
When the coating is completely dry and matte, you can start varnishing. To do this, add a special hardener to the varnish. It can be applied using the same tool as paint. The first light layer is applied quickly, because it should lie quite thin. After a few minutes, add another layer, but more dense.
At this stage, it may be difficult to select the optimal speed: if the movements are too fast, bald spots may form in the varnish layer, and if the speed is too low, it may flow.
Additional tuning elements
Motorists, trying to give their vehicle a unique design, tune the bumper. Basically, these alterations concern the installation of the following elements:
- Lip. It is a kind of protrusion, which is located at the bottom of the protective structure. It is made of fiberglass and polyurethane foam, as a result of which the lip is primed and painted to match the color of the car.
- Diffuser. Decorative trim for the lower part of the rear bumper. Foamed PVC is used to create it. Markings are created on the material, after which the sheet is heated with a construction hairdryer and the parts are given shape. They prime and paint, and then attach it to the car using sealant.
- Fangs. A decorative element that is installed on both metal and plastic body elements. For mounting on “plastic”, fiberglass is used. To install fangs on iron parts, use metal and a welding machine.
Also, to give the car an individual look, stickers are placed on the bumpers, or parts are covered with carbon fiber.
Create a preliminary part
The matrix is needed in order to use it to form a well-fitted fiberglass element for the car. After all, sometimes it happens that it may not fit in size, the seats are poorly designed, and this will not allow the part to be installed correctly. To create a matrix, do the following:
- Take an old part. You can have a damaged version, but repair and straighten it before use. Clean and wash the surface thoroughly.
- Apply release agent to the part. After drying, polish and reapply the compound.
- Cover the top with gel primer (2 mm). After two hours the product hardens. Although it remains sticky when touched.
- Apply fiberglass. It is advisable to use three layers with a density of 300 grams per meter.
- Resin is applied on top using a brush. It needs to saturate the material without forming air bubbles.
After it has dried, the bumper can be safely painted in the desired color.
An option with polyurethane foam is possible. To make a matrix, foam is applied to the old part and quickly processed, removing all excess. The advantage of this material is the ability to later make a power bumper from fiberglass of any shape.
Advantages and disadvantages of tuned bumpers
Body elements that have undergone tuning have their advantages and disadvantages. The list of advantages includes:
- Individual design.
- More durable construction compared to the standard one.
- Relatively low financial costs for creation.
The list of shortcomings includes:
- Large time and labor costs for tuning the rear and front bumpers.
- The need to register homemade bumper covers as modifications to the design of the car.
Bumper tuning is a great way to give your car a bright and unique design. He also helps to repair an old broken body part. Professional tuning costs a lot of money. It is much more profitable and efficient to independently change the design of a body element, or even create a new part.