Why do bumper tuning
A car owner may have several reasons to change a body element (or create a new one):
- Car tuning. Obtaining a bright and unique appearance of the car is achieved by installing a new original part.
- Component failure. If the protective element is broken, it needs to be repaired and the design needs to be improved.
- Improving the driving characteristics of the car. Changing the design of the front and rear bumpers allows for better pressing of the car body to the ground while driving. As a result, aerodynamic drag is reduced.
It is advisable to entrust the production of bumpers to professionals. Especially if you need to replace a broken part with a new one. However, if the component only needs to be given individuality, then they do the bumper tuning themselves. To change the design of an element, you will need patience, accuracy and perseverance. To make a bumper with your own hands, you must have certain knowledge, skills and the ability to work with complex tools.
Changing the external data of the gazelle bumper
It will not be superfluous to know how to make tuning of a gazelle bumper with your own hands. The easiest way is to manually replace the old bumper with a new model.
Replacing the bumper may be necessary in the following situations:
- for better air entry into the radiator cooling system;
- if necessary, add fog lights to the front of the car;
- to make changes to the aerodynamic resistance of the machine;
- change in appearance.
The price of a bumper made of good plastic varies between 2-5 thousand rubles. The bumper can be chosen without painting, or in an identical color to the body.
Initially, Gazelle car owners get a new body kit. In this case, the front bumper is installed independently.
The product consists of plastic and also has holes for fog lights. In auto stores you could purchase a bumper that fits the original mounts. And installing it yourself won’t take much effort.
In this case, you will need to disconnect the fasteners on both sides, remove the existing bumper and replace it with a new one. The video shows the process of tuning a bumper with your own hands.
You can choose a shade of the product that is similar to the body color.
It will not be difficult for the car owner to install plastic linings on the body part. At the same time, the car can be transformed by placing decorative plastic thresholds.
To decorate the Gazelle, as well as its ability to easily move off-road, car enthusiasts can place protective metal arches on the sides of the bumper.
So, any vehicle is subject to wear and tear over time. However, the car can be tuned at your discretion. Thus, car enthusiasts will be able to maintain the appearance of the car at the highest level.
How to make a bumper with your own hands
Making a bumper for a car with your own hands is a complex and time-consuming process. Many motorists are only engaged in reworking an existing part; this operation requires accuracy, free time, patience and perseverance. But the result of the work will please you. Before you remake a part yourself, you need to think through a plan for the operations to be performed in advance.
It will look like this:
- Planning work, creating a project “on paper”.
- Preparing the necessary tools and materials.
- Execution of work.
- Carrying out the necessary modifications.
Subsequent modernization should not affect the protective properties of the body component. Only after building a plan on how to make bumper tuning should you start working.
What are the best bumper covers?
You can choose overlays from various materials. They are also classified according to the method of fastening:
- the overlays can be glued to the bottom of the threshold;
- The covers can be secured with bolts.
Manufacturing classification:
- factory;
- private masters and tuning studios.
Classification of linings by material:
- stainless steel;
- high strength plastic;
- rubber.
To soften and absorb shock, the inner side of the stainless steel pads has a rubber backing. As for plastic bumper covers, they are cheaper and more often in demand.
Materials and tools
After creating the project, you should decide on the materials and tools for the work. The final result depends on this.
Depending on the selected materials, the set of tools required for work and the nuances of changing the body kit depend.
Also, before you start upgrading the body kit, you will need to use a mock-up or create a matrix; its peculiarity is that it is a “negative” in relation to an existing part. When designing a bumper, the material of the future body part is applied to the matrix, and a “cast” is obtained. It is used when upgrading or repairing an original body element.
To create a matrix, it is recommended to use technical plasticine. The material is not afraid of exposure to high temperatures and is easy to process.
Polyurethane foam
The material is used both to create a bumper from scratch and to modify an existing one. To construct the part, you will need the following materials and tools:
- Polyurethane foam (approximately from 3 to 5 cylinders);
- Foam gun;
- Masking tape;
- Epoxy resin;
- Fiberglass;
- Cooking foil;
- Fiberglass;
- Sharp stationery knife and replaceable blades;
- Sandpaper of different grain sizes;
- Automotive putty.
To create a bumper from polyurethane foam, it is important to have a developed eye, “straight hands”, patience, accuracy and master the skills of manual processing of materials. Only in this case, the quality of the manufactured element will be at its best.
To make a bumper from polyurethane foam yourself, follow the following steps:
- Creating a base from polyurethane foam.
- Use of fiberglass.
- Primer and painting.
You can get a bumper made of polyurethane foam through a step-by-step process:
- Remove the original component. It will serve as a template for creating a new product.
- Cover the internal cavity of the dismantled element with several layers of masking tape.
- Apply foam evenly.
- After drying, separate the frozen workpiece from the bumper.
- Using a knife, cut out the main holes on the new component.
- Carefully sand the resulting part with sandpaper.
- After the foam has dried, putty the workpiece. Afterwards, you should also process the future part with sandpaper, while gradually reducing the grain size.
Before you shape the future bumper, you need to make markings. This way you can achieve a symmetrical, neat part.
The application of fiberglass is carried out as follows:
- Cover the workpiece with foil. It will protect the product from exposure to aggressive materials and make it easier to remove frozen foam.
- Use epoxy resin. Place a layer of pre-cut fiberglass on top of it.
- Smooth the applied material with a rubber or plastic scraper. Do not allow wrinkles or air bubbles to appear on the surface to be treated.
- Repeat the procedure 4-5 times. Wait until the material hardens and dries.
- Remove the foam, make adjustments using putty, treat the surface with sandpaper, prime and paint the body part.
The method, despite being painstaking, is easy to implement and accessible to almost anyone.
What are their benefits and practicality?
Car rear bumpers are not difficult to damage. But to buy them, you need to spend quite a bit of money. Plus, for some cars, finding a good overhang is a real problem. You need to look for suppliers, wait for the order to arrive, etc.
To prevent the additional financial costs required to replace, repair or restore the old rear bumper, trims were invented. Moreover, initially these elements were intended exclusively for the front part. They were in great deserved demand, which is quite justified. This entailed the appearance of rear structures designed to be installed in the luggage compartment area as close to the ground as possible, since this is the area that suffers the most during vehicle operation. The assortment is now huge, and buying such an overlay will not be difficult.
It is important to understand that the pads are not intended solely to protect against the consequences of impacts and collisions. In fact, the pads are more needed in normal everyday use. It is at this moment that the rear bumper is subject to active wear, various pebbles and road debris fly into it, they can cling to curbs or scratch while driving on some light or medium off-road.
At the same time, the linings have a fairly impressive list of advantages.
Based on the purpose and capabilities, we can highlight the following advantages:
- protective function;
- wide choose;
- adequate price;
- attractive appearance;
- the ability to choose for a specific car;
- the presence of linings made of different materials;
- addition for the main bumper;
- ease of installation;
- basic dismantling;
- the ability to do it yourself;
- versatility.
Whether to buy or do it yourself is rather a secondary question, and depends on the desires and capabilities of the car owner himself.
The only fact is that the pad is truly a useful gadget.
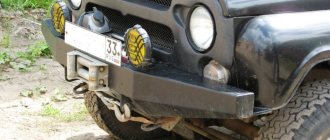
How to make a power bumper
The part is mainly installed on SUVs. Thanks to it, the vehicle, when driving off-road, will be able to overcome serious obstacles without risking its integrity. The passive safety of the driver and passengers will also significantly increase. The power bumper is made of iron. Homemade elements, in addition to safety, “give” the SUV an aggressive appearance. With a homemade power kit, you can drive. To obtain this permit, changes to the design of the vehicle must be registered with the traffic police.
Before starting work on creating a power element, you need to draw up a plan on how to make a bumper, and only after that, start working. To complete this you will need the following tools and materials:
- Tape measure, tape, marker, scissors.
- Sheet metal (up to 3 mm thick), and cardboard.
- Grinder, cutting and grinding wheels, welding machine.
The work process is slightly different, depending on the method used to create the bumper:
- Constructed from a single piece of metal.
- Construction from several parts.
Despite the differences, the process has some similar operations:
- Creating templates from cardboard.
- Cutting out the necessary elements from metal, or creating the desired shape from a single piece.
- Connecting several parts into one piece using a welding machine, or forming a structure by bending sheet metal (practically impossible at home, since powerful equipment is required).
- Primer and painting.
- Installation on a vehicle.
The power bumper is painted in dark colors or left unpainted (if stainless steel is used as the material).
What are door moldings made of?
Now let's talk about car door trims. The main functions of this element have already been listed above, namely protection, decoration and creation of a visual effect. Now let’s look at the design, material and installation features. So, this part is made in the form of a plate of durable material. Moldings made from thermoplastic elastomer are extremely popular, but there are models made from ordinary plastic. The first ones have excellent characteristics. They are both quite strong and resilient, but at the same time elastic. At the same time, the protective linings retain their properties regardless of temperature. They are not afraid of the heat of the southern regions and even Siberian frosts.
Thermoplastic elastomer moldings on a car door
Plastic products also have good characteristics and are not afraid of temperature fluctuations. Today you can find chromium-nickel stainless steel moldings on the market. Of course, the material of the product determines its cost. The choice depends on your personal preferences and financial situation. The appearance of the stripes is very diverse, so everyone can find one that suits them. There are wider elements that can give the car dynamism or, conversely, narrow elements. But that’s not all the differences; they can be chrome-plated, stainless steel, transparent, plain, or have some kind of inscription. For example, the logo of a car model will look natural on the door.
Additional tuning elements
Motorists, trying to give their vehicle a unique design, tune the bumper. Basically, these alterations concern the installation of the following elements:
- Lip. It is a kind of protrusion, which is located at the bottom of the protective structure. It is made of fiberglass and polyurethane foam, as a result of which the lip is primed and painted to match the color of the car.
- Diffuser. Decorative trim for the lower part of the rear bumper. Foamed PVC is used to create it. Markings are created on the material, after which the sheet is heated with a construction hairdryer and the parts are given shape. They prime and paint, and then attach it to the car using sealant.
- Fangs. A decorative element that is installed on both metal and plastic body elements. For mounting on “plastic”, fiberglass is used. To install fangs on iron parts, use metal and a welding machine.
Installation methods
Installation can be done in one of 2 ways.
The first option involves the use of self-tapping screws that will hold the protective strip on the surface of the bumper. In the second case, double-sided tape is used.
If you have chosen a fairly heavy design, then it is better to use fasteners and securely fix the product to the machine. But in general, the pads weigh little, which is why motorists prefer to use adhesive tape.
Advantages and disadvantages of tuned bumpers
Body elements that have undergone tuning have their advantages and disadvantages. The list of advantages includes:
- Individual design.
- More durable construction compared to the standard one.
- Relatively low financial costs for creation.
The list of shortcomings includes:
- Large time and labor costs for tuning the rear and front bumpers.
- The need to register homemade bumper covers as modifications to the design of the car.
Bumper tuning is a great way to give your car a bright and unique design. He also helps to repair an old broken body part. Professional tuning costs a lot of money. It is much more profitable and efficient to independently change the design of a body element, or even create a new part.
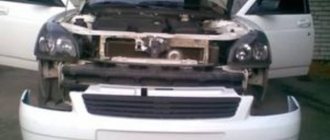
Making your own rear bumper! VAZ 2111 Everything is done for the first time and only with our own efforts! This is what we should get in the final version.
So, let's begin! We remove the bumper and make stands so that the foam with which we will build up the bumper will hold on and not slide until it hardens. I used iron slats for the central part, but forgot to do the same on the sides, which is why I suffered for a long time because the foam did not hold on, but simply slid down. Next, we cover the bumper with masking tape, since peeling off the foam in the future will not be very easy!
Well, we’re actually starting to foam up the whole thing. I foamed it in 2 passes, first I foamed everything, when everything was dry, the bumper was roughly cut along the contour, then I filled the air voids left after the first time. It is better to hang the bumper upside down and foam the top.
Now we wait until everything dries and begin to give it the desired shape. To do this, draw the edge of our design directly on the foam and cut it along the contour. After which it is VERY IMPORTANT to try the bumper on the car.
For me it turned out to be too low, bulky and the drawing itself turned out to be too big. Use the same marker to mark where and what needs to be cut. We bring the whole thing indoors and cut it off. Now we draw an exact drawing of our future bumper.
We create symmetry and round all corners. READY! Now the bumper needs to be prepared for working with fiberglass; to do this, take some masking tape and cover our bumper. This is done so that in the future we can tear off the foam from our fiber lining and at the same time we use tape to make a more even surface and remove small imperfections.
Pasted? Now you can see how it will look on the car, take the bumper and run to the car. Here we understand how great we are, most of all I was afraid that the bumper would be bulky, but I think I dealt with this problem.
We are starting to use fiberglass. We buy fiberglass and polyester resin at the nearest auto paint selection store, why polyester and not epoxy? Its main advantage is that it dries in 2 hours, while epoxy takes 24 hours. Let's begin! For the first layer I used fiberglass with a density of 150, it is easier to work with as it fits better on the part and dries faster. We wait until it dries.
The layer turned out to be very thin. Now we take fiberglass fabric with a density of 300 and apply 2 more layers with it. VERY IMPORTANT, do not mix a lot of resin with hardener at once, it can turn out like this.
We wait for everything to set and tear off our form from the bumper, thanks to the masking tape that we applied to the bumper in the first part, everything can be removed very easily and without breakage.
Now we need to increase the thickness since the bumper is still thin and can break easily. We take fiberglass fabric even denser, 400, and apply a layer from the inside.
We increase and level the sides to which the net will be attached.
Now let's take care of our old bumper, cut off everything that bothers us. Next, we prepare it for splicing with our overlay. We sand the surface and make notches so that the lining holds as tightly as possible.
Supported item
Using an old part that can be purchased on the automotive market or secondhand is considered the easiest option. Here, all that remains is to bring everything to mind and bring beauty. Let's consider the main technological processes:
The part is washed and cleaned of dirt.
Using a special stripping attachment, it is cleaned of paint and other foreign objects. Next, it is primed and puttied, if necessary.
We paint it and install it on the car.
The bumper cover is ready for use.
It is worth noting that the products must be selected according to the make and model of the car, since otherwise modifications will have to be made.
Content
Modern car enthusiasts often perform car tuning with their own hands. In addition to modernizing the technical part, vehicle owners often pay attention to the appearance of the car. One of the most popular and effective types of car exterior modernization is bumper tuning.
During the use of the vehicle, parts of the body are constantly subject to destruction. As you know, the bumper is one of the most fragile parts of the body. Regardless of the driving style and accuracy of the car owner, the bumper constantly takes on some loads. Temperature changes and mechanical stress gradually cause the car bumper to malfunction. In addition to its protective function, the body element in question is an important part of the car’s exterior. A damaged bumper reduces the attractiveness of the vehicle. In this regard, a rare car enthusiast will remain indifferent to mechanical damage to a body element.
If the standard bumper installed by the car manufacturer malfunctions, there are three ways to solve the problem: restoring the damaged body element, purchasing a new original element from the manufacturer, and do-it-yourself bumper. A more original solution to the problem, of course, remains the independent production of front part protection. A self-made component will make the car stand out from the crowd and make it unique. Buying a new original product will cost several times more than making it yourself. At the same time, by doing the work with his own hands, the vehicle owner gets a large field for creativity.
You can make a new body protection without spending a lot of money on materials and tools. In addition, by doing the work yourself, you can save a significant part of the cost of installing the element in a professional workshop. A considerable number of car enthusiasts successfully manufacture and install a new vehicle exterior element with their own hands. Without exaggeration, we can say that every car owner can make a new bumper. You can often find cars with original body parts on the roads. In most cases, a unique element is made by the hands of the car owner.
Let's answer a question that interests a considerable part of car enthusiasts - how to make a new bumper yourself?
Do you need door or bumper protection?
First of all, such accessories protect car parts from mechanical damage, scratches, chips, etc. But this would hardly force owners to cover their vehicles with covers. Therefore, designers also got involved in implementing the idea of moldings. Today it is not only protection, but also a tuning item, and quite popular.
Such an overlay on the rear bumper is especially important, because it is in the danger zone. Road dust and dirt, small and relatively large pebbles jumping out from under the wheels. And what can we say about collisions, even minor ones, while parking. All this has the most negative impact on the condition of the bumper. In principle, the door molding performs a similar function. After all, all you have to do is park close to a neighboring vehicle and scratches on the surface cannot be avoided. Plus, you can use it to create any visual effect, for example, add dynamism. And there are often cases when, with the help of such an accessory, they simply try to hide existing defects. And, by the way, very successfully.
Stages of making a foam bumper.
1. Making a mock-up of a new body element. To make the work easier, you can also put on paper an approximate drawing of a new part of the car.
2. The next step is to make a mold using the material used. The most economical and easy-to-manufacture materials are polyurethane foam and polystyrene foam.
3. Next, you need to first prepare the working surface for installation of the new part.
4. After this, it is necessary to coat the manufactured part with fiberglass or resin.
5. One of the final stages will be treating the finished element with putty and finalizing the shape of the bumper.
6. Finally, it is necessary to prepare the new body element for painting and give it the desired color scheme.
One of the most affordable solutions would be to create a new element from construction foam.
Installation of plastic protection
Attaching plastic protective covers to a car door is much easier, since you can do without drilling. All we need is double-sided tape or special glue, a hair dryer and, of course, the decorative elements themselves. First you need to prepare the surface. It should be clean, well dried and fat-free. Therefore, we wash it and treat it with special products or alcohol. You should also pay attention to weather conditions, especially if the garage is not heated. To ensure reliable adhesion, the temperature in the room where the work will be carried out must be within 21 degrees.
We apply adhesive to the inner surface of the part or fix one side of the tape to it. Then you need to secure the element to the surface of the car. If you use tape, carefully remove the edge of the protective film. Under no circumstances remove it immediately. The fact is that it is difficult to apply the pad perfectly evenly the first time. And if you expose the entire adhesive side of the tape and lean the part against the door, then adjusting the position will become problematic.
Fastening plastic moldings to the surface of the car
In principle, to make your work a little easier, you can draw the outlines of the future decorative element on the surface. But anyway, first remove only the edge of the protective film and bend it so that it protrudes beyond the part. We treat the attachment site with a primer to enhance the adhesive properties of the glue. We put the overlay in place. If necessary, adjust its position and pull the tip of the protective tape. After removing it, you should press the part to the surface.
We leave the car alone for at least a day, and, of course, during this time there is no question of any water procedures. If you want to speed up drying a little, then treat the newly attached accessory with a hairdryer, but it’s still better to give the machine a rest. That's it, after the specified time has passed, you can use the vehicle again and enjoy its new look. The trim on the front bumper and trunk lid are attached in the same way.