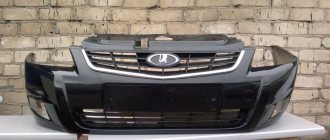
In the previous post: Polishing headlights: the first damn thing is lumpy. I coated the headlights with varnish and polished them. The right headlight was left without a protective coating and cracked under the influence of the solvent from the can. In general, I recently noticed that the headlight, which was left without a protective coating, began to turn yellow. Not only is it cracked, but also yellowed. This will not work. I looked for used headlights on Avito, but found nothing. There were options, but for 2500, which is expensive for a used one, in my opinion. Therefore, I decided to change the glass. This is the cheapest option. I took off the headlight. I found a suitable cardboard box and placed the headlight in it. I made a hole in the box and put a soldering gun in it. You can use construction. It turned out to be an improvised oven.
I closed the box and sealed it with masking tape. Turned on the hairdryer. I found experimentally that a temperature of at least 100 degrees must be created inside the box, otherwise nothing will come off. First, I removed the rubber plugs and pulled out the bulbs.
Smooth transparent polycarbonate glass for headlight for Lada Priora 2170 cars
Full transparency and light transmittance - the level of transparency fully corresponds to glass. Weather resistant. Lightweight – almost twice as light as glass. Excellent strength (shockproof) qualities - the sheet is almost impossible to break. It is much stronger than glass.
If desired, DCR E22 can be hot-stamped on the inside of the glass for marking under the xenon lens. Marking costs 300 rubles/set
In our online store PTFR.RU we have smooth polycarbonate headlight glass for installing bi-xenon lenses for Lada cars
Installing smooth glass headlights can be done by a person who does not have special knowledge, skills and tools.
You only need smooth Lada polycarbonate headlight glasses, butyl rubber sealant, and a little time. The savings are obvious. In our online store PTFR.RU you can buy inexpensive left and right smooth glass headlights for Lada cars with delivery throughout Russia (cash on delivery). The catalog of headlight glasses for Lada is widely presented.
How to remove glass from a Priora headlight?
Sometimes a situation arises that it is simply absolutely necessary to change the glass on the headlight on the Priora.
For example, a pebble bounced off the side of the road, bad parking and cracked glass. Or the ventilation has been disrupted, the inside of the headlight has fogged up and become dirty, and you even need to, if not replace, then at least wash this glass. But to do this, the headlight must first be removed, and then also disassembled. But this procedure for the Priora is not as simple as on previous models. The only VAZ car on which removing the headlight is just as difficult is the Lada Kalina. But now we’re talking about Priora. Attention! When performing any work on electrical equipment, the battery must be disconnected first.
Removing the headlight from the car
The particular difficulty of removing the headlight on a Priora to replace the glass is that the lower edge of the headlight unit is covered with a bumper, and it also controls the glass, and under it there are two lower mounts for the headlight itself. Therefore, whatever one may say, for a trivial replacement, you will have to remove the entire bumper.
Removing the Priora bumper to repair or replace headlights
This action will require both effort and tools. In general, you will need the following equipment:
- Phillips screwdriver;
- flat screwdriver;
- socket wrench with a “10” head.
Attention! Before removing the bumper, it is advisable to lay a blanket or an equal piece of thick fabric on the floor, since although it is light, it is massive and can get scratched if dropped.
First you need to unscrew the lower mounting screws. They are located along the lower edge of the bumper and along the edge of the front part of the wheel arch. The Priora has 6 mounting bolts on each side: three on the bottom and three on the fender liners. Next, unscrew the 4 bolts securing the bumper to the upper front part of the body wall - the cross member, and the 2 bolts securing the headlight casing. Carefully inspect the fog lights in the bumper, if installed, for repair or replacement. Remove and set aside the bumper.
Removing the headlight to replace the glass
On top of the front light there is a plate covering it - a casing. It is secured with 3 screws to the upper cross member of the engine compartment. After removing it, you will have access to the upper mounting bolt of the Priora headlight. Since the bumper has already been removed, all that remains is to unscrew the top and 2 bottom screws. That's it, you can carefully move the headlight forward and disconnect the control wire harness from the connector. The Priora headlight has been removed. You can disassemble and replace the glass.
Disassembling the Priora headlight
Unlike the VAZ-2110 headlight unit, the Priora headlight glass is secured with a sealant, and not with latches alone. Therefore, to replace the main headlight glass you will need the following tools and materials:
- household hair dryer;
- replacement glass;
- new Abro brand sealant for headlights;
- thin screwdriver or knitting needle.
Important! Work must be carried out on a clean, dry and preferably soft surface. We recommend treating your hands with something degreasing so as not to leave streaks on the new glass prepared for replacement.
Place the headlight in the prepared area and warm the glass with a hair dryer set to maximum heat until the sealant softens and begins to melt. Use a thin screwdriver or a knitting needle to pry up the glass and pull it out, being careful not to damage the protective edge. Thoroughly clean the seat from any remaining old sealant and allow the surface to cool.
Fill the landing ditch with a fresh layer of adhesive, spreading it evenly over the surface. You need to fill the groove to about half the depth. Quickly and carefully install the new glass prepared for replacement. Press firmly. It is best to secure it by pressing the repaired Priora headlight with adhesive tape and leave it to dry.
We recommend keeping the glass for at least 12 hours.
After the specified time has passed, carefully remove the adhesive tape and begin assembling the Priora back. Reinstall the headlight after replacing the glass. Connect the wiring harness. Secure the upper protective cover and put back the front bumper. The repair of this unit is now complete. Check whether the headlight turns on and off.
All that remains is to adjust the beam of light. There are many instructions on how to do this yourself by drawing the necessary marks on the wall. But practice shows that it is still better to contact a service to do this using the device.
shows the removal of headlight units on a Priora in order to repair or replace it:
In what cases does it become necessary to remove the headlights on a Priora?
The purpose of the front lights is known to everyone, so let’s immediately move on to consider the question of in what situations it is impossible to do without removing the devices in question. If you need to replace burnt out light bulbs, you do not need to remove the headlight unit. Its dismantling is carried out in the following cases:
- Replacing the device or its individual components (glasses, reflectors, etc.). Lights are damaged in an accident, and depending on the severity of the impact, they cannot always be repaired. The glass on the lamps can also be damaged by a stone thrown from under the wheels of an oncoming or overtaking car. To replace the glass, you need to remove the headlight from the car.
- Modernization or tuning. The process of improving standard headlights is popular among Prior car owners. To do this, LED strips, lenses, angel eyes, etc. are installed in the devices. This can only be done with the lights removed.
- Product repair. Car owners often encounter this problem when the headlight fogs up in the cold season or in rainy weather. The reason for the formation of condensation is a violation of tightness. The problem is solved by replacing the sealant on which the glass is attached, but this will require dismantling the headlight.
What kind of lamps are installed in the Priora headlamp?
The Priora's rear light has 4 lamps, which are responsible for turning on the turn signal, dimensions, reverse, brake light and PTF. They are almost the same, but have some differences.
- The turn signal lamp is marked PY21W and is orange; when installing a regular white lamp, the turn signal will blink white.
- The size and brake lamp has two spirals, which are responsible separately for braking and illumination.
- The reverse lamps and PTF lamps are the same.
Tail light lamp marking table
| Purpose of lamps | Marking | Peculiarities |
| Reverse | P21W | White |
| Turn signal | PY21W | Orange color |
| Brake light and dimensions | P21/5W | Two spirals for dimensions and a brake signal |
| Rear PTF | P21W | White |
Disassembling the Priora headlight
Unlike the VAZ-2110 headlight unit, the Priora headlight glass is secured with a sealant, and not with latches alone. Therefore, to replace the main headlight glass you will need the following tools and materials:
- household hair dryer;
- replacement glass;
- new Abro brand sealant for headlights;
- thin screwdriver or knitting needle.
Place the headlight in the prepared area and warm the glass with a hair dryer set to maximum heat until the sealant softens and begins to melt. Use a thin screwdriver or a knitting needle to pry up the glass and pull it out, being careful not to damage the protective edge. Thoroughly clean the seat from any remaining old sealant and allow the surface to cool. Fill the landing ditch with a fresh layer of adhesive, spreading it evenly over the surface. You need to fill the groove to about half the depth. Quickly and carefully install the new glass prepared for replacement. Press firmly. It is best to secure it by pressing the repaired Priora headlight with adhesive tape and leave it to dry. We recommend keeping the glass for at least 12 hours.
After the specified time has passed, carefully remove the adhesive tape and begin assembling the Priora back. Reinstall the headlight after replacing the glass. Connect the wiring harness. Secure the upper protective cover and put back the front bumper. The repair of this unit is now complete. Check whether the headlight turns on and off.
All that remains is to adjust the beam of light. There are many instructions on how to do this yourself by drawing the necessary marks on the wall. But practice shows that it is still better to contact a service to do this using the device.
The video shows the removal of headlight units on a Priora in order to repair or replace it:
Painting Lada Priora headlights
After I studied a lot of materials on the Internet on the topic “Why do you still paint headlights?”, I realized that there is not much practicality in this. Painting headlights attracts those who want to improve the aesthetic appearance of their car and make their desires come true. This article will give an example of painting headlights, or rather reflectors from these headlights for a Lada Priora car. If you decide to paint the reflectors on your car, a different model, then these general recommendations are quite suitable for you.
Tools and materials needed for painting headlight reflectors
— A construction hairdryer, — alkyd or acrylic paint (color of your choice), — a primer for plastic (preferably), — a stationery knife, a flat-head screwdriver, a hacksaw for metal (you will need these tools if the headlight glass is glued with hard glue and not for sealant), - sandpaper, - sealant, - masking tape,
- solvent or gasoline.
Technology for disassembling headlights for painting reflectors
First of all, you will need to remove the headlights from the car. You can see how to remove the headlight on a Lada Priora car in the article “Removing the headlight unit on a VAZ 2170 2171 2172 Priora car.” Headlights from various manufacturers are installed on Lada Priora cars. Bosh company and located in the city of Kirzhach, Vladimir region. If we talk about the features of both headlights, then in Bosh headlights the glass is held on by a soft sealant, and the glass of headlights produced in the city of Kirzhach is glued to glue, which hardens as it hardens.
Similar methods of glass fastening are found on other car models, including foreign cars. Depending on the method you choose for attaching the glass to the headlight, you will have to make a further choice whether to paint the headlight reflectors or not. The fact is that the glass that is held on by the sealant is much easier to remove by heating the sealant. If the glass is fixed with glue, then it will be necessary to mechanically carefully cut the glass to get to the reflectors. If you have definitely decided, let’s continue.
We cover the headlight glass with masking tape, this is necessary so as not to scratch it when disassembling the headlight.
Next, if you have a Bosh headlight, then heat the sealant around the perimeter of the glass with a hair dryer. Direct the air flow towards the sealant, monitor the condition of the plastic in order to prevent clouding of the glass and changing the shape of the plastic. There are options for removing glass without a hair dryer. The headlight block was placed on a board in the oven and waited for the sealant to soften. At the same time, constant monitoring of the condition of the headlight glass is also necessary. Afterwards we tear the glass away from the body. The sealant is removed with a rag soaked in solvent or gasoline.
Disassembling the Priora headlight
Unlike the VAZ-2110 headlight unit, the Priora headlight glass is secured with a sealant, and not with latches alone. Therefore, to replace the main headlight glass you will need the following tools and materials:
- household hair dryer;
- replacement glass;
- new Abro brand sealant for headlights;
- thin screwdriver or knitting needle.
Place the headlight in the prepared area and warm the glass with a hair dryer set to maximum heat until the sealant softens and begins to melt. Use a thin screwdriver or a knitting needle to pry up the glass and pull it out, being careful not to damage the protective edge. Thoroughly clean the seat from any remaining old sealant and allow the surface to cool. Fill the landing ditch with a fresh layer of adhesive, spreading it evenly over the surface. You need to fill the groove to about half the depth. Quickly and carefully install the new glass prepared for replacement. Press firmly. It is best to secure it by pressing the repaired Priora headlight with adhesive tape and leave it to dry. We recommend keeping the glass for at least 12 hours.
After the specified time has passed, carefully remove the adhesive tape and begin assembling the Priora back. Reinstall the headlight after replacing the glass. Connect the wiring harness. Secure the upper protective cover and put back the front bumper. The repair of this unit is now complete. Check whether the headlight turns on and off.
All that remains is to adjust the beam of light. There are many instructions on how to do this yourself by drawing the necessary marks on the wall. But practice shows that it is still better to contact a service to do this using the device.
The video shows the removal of headlight units on a Priora in order to repair or replace it:
How to change the glass on a Priora headlight
One of the main disadvantages of the Lada Priora is the ill-conceived design of the headlights; they are inseparable, therefore, to replace glass in headlights or incandescent lamps, you need to take the latest headlight or turn off and disassemble the old one. “Come to our brother. not the first time,” as they say, there were more complex cases. But despite this question, how to disassemble a spotlight on a Priora is a big problem. The thing is, it takes a lot of time and effort, as well as some experience. The Priora has headlights from two manufacturers: Kirzhach and BOSCH. The first one is even more difficult to make out, but it can still be done. Now I'll tell you how to do it right so you don't have to buy new lights.
The headlight consists of 2 parts, which are held together with a very strong sealant or glue. To disassemble a Prior headlight, you will need a household hair dryer to heat the glue, after which the sealant melts and becomes watery, allowing you to separate the two parts of the headlight assembly.
How to disassemble a Lada Priora headlight. step by step guide
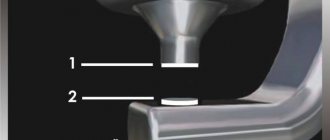
2. Take a hair dryer, heat it to 250° and heat the joint as in the photo. Heat the sealant around the headlight moderately until it melts.
READ Renault Scenic 1 Reverse Gear Won't Engage
Notes: Several "masters" when disassembling Priora headlights recommend cutting the plastic board that runs along the edge of the headlight. This will certainly simplify the process, but, as practice shows, this is not the last need, it can only be slightly bent. If the joint is completely warm, then the headlights can be "open" without damaging the headlight housing.
3. When the headlight assembly connection warms up, carefully separate the front section while continuing to warm up. BOSCH headlights also require four mounting brackets.
4. After disassembling the headlight, it is necessary to clean the surface of the sealant and other third-party components. To do this, I recommend using a utility knife and fine sandpaper.
5. After completing the repair work (replacing the headlight glass, replacing the lamp, reflector, etc.), assembly is performed in the reverse order.
6. Apply sealant to the joint and align the two parts of the headlight assembly.
7. Then secure the headlight in this position to seal the resin. For better effect, I recommend wrapping the headlight with adhesive film and then with adhesive tape, this will create a "push" effect, this connection will be more effective. If you just wrap it with duct tape, you'll have an obstacle when removing it, and then you'll need to wash off the adhesive from the tape left on the surface of the headlight. As for the film, it is simply cut, connected to the tape.
Instructions for replacing fog lamp glass
Replacing PTF glass can be done by a person who does not have special knowledge, skills and tools.
- To replace the fog lamp glass, you need to find out how the PTF is attached to the bumper or to the car body? As a rule, the headlight is attached to the bumper with screws or nuts. The most convenient way is to partially or completely remove the bumper from the car. There is nothing complicated about this; to make the process easier, use the instructions for repairing your car.
- Then disconnect the PTF terminals from the on-board network.
- Inspect the removed fog lamp, determine the integrity of the reflective surface of the headlight.
- Remove old glass. This can be done simply by breaking the glass, then using pliers and a screwdriver, remove the remaining sealant and glass carefully without damaging the PTF housing. Attention! Use safety glasses and gloves!
- Degrease the PTF glass and headlight rim. For better adhesion, acetone, solvent or the like is necessary. degrease the PTF glass and the headlight rim where the adhesive-sealant is applied. Let dry.
- Apply a sufficient amount of adhesive-sealant to the dry, grease-free rim of the headlight so that the layer of sealant fills the entire space between the glass and the headlight housing; you can use any water-heat-resistant adhesive-sealant that meets the operating conditions of the PTF: temperature from -45°C to +150 °C
- Press the glass firmly against the headlight body (you can use a clamp for a better result) until the sealant is completely dry. That's the whole procedure for replacing PTF glass.
- Now install the light bulb, attach the PTF to the bumper, connect the terminals and put the bumper back in the reverse order.
How to replace headlight glass
Now we’ll find out how to replace the glass itself. First, let’s find out the design of the lantern, what it consists of.
What does the headlight consist of?
As you know, the main link of any lantern is its reflector or reflector. It is a concave mirror component, which serves to form a light beam of the desired shape.
Types of lamps for flashlights
As for the light source, they are car lamps. They can also be different. Currently known:
- ordinary incandescent lamps;
- halogen lamps;
- xenon lamps.
A conventional incandescent lamp is a sealed bulb containing a vacuum or inert gas. Inside the lamp there is a tungsten spiral, which, under the influence of electric current, is heated to a temperature of 2600-3000 K, thus emitting light and heat. As for the efficiency of such lamps, it is about 3400 K.
A halogen incandescent lamp operates similarly to a conventional incandescent lamp. Such a lamp contains minor additions of halogens, such as bromine, chlorine, etc. With the help of these substances, the bulb and glass of the headlamp are darkened. According to experts, the use of halogen headlights on car headlights doubles their service life and prevents rapid failure of the bulb.
Finally, a xenon lamp is a gas-charging version that contains xenon. Such lamps are also called HID lamps and their emission spectrum is identical to that of daytime sunlight. This lamp consists of two bulbs and quartz glass. Such a lamp consumes only 35 W of electrical power, instead of 55 W for a halogen lamp.
Lantern glass
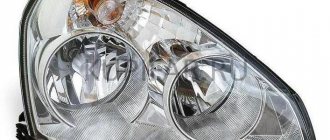
The headlight also consists of corrugated glass, which will be discussed in this article. The most popular types of glass are transparent.
Although tinting headlights is becoming more and more fashionable now.
Transparent glass headlights VAZ 2114
Although reflective options are also known, crystal, modular, lensed, etc.
Replacing lamps
After the lamp is removed, you can begin replacing the lamps.
- To do this, unscrew the lamp socket by turning it counterclockwise.
- We take out the cartridge. The lamp should be removed from the socket by slightly pressing it and turning it counterclockwise 90 degrees. After this, the lamp should come out of its seat.
- Install new lamps in reverse order.
How to change a headlight on a Priora
Replacing headlights on a Priora and adjusting the light
Lada Priora is a very good car, but very often owners have a desire to change something in the appearance of the car, for example, to perform tuning optics. Often there may also be an urgent need for configurations such as changing lighting on a priority basis. For those who decide to do this procedure themselves without the help of a professional mechanic, it will be useful to read the recommendations below. Let's find out what the prerequisites are for replacing headlights and how to do it yourself. Below is an explanation of how to disassemble the headlight and adjust it correctly.
The main reasons for replacing and adjusting headlights
The main condition for replacing headlights can be considered its failure or inability to fulfill its functional purpose. For Priora, the main reasons for the need for replacement are:
- cracks and fractures of the body;
- failure of electronic headlight connectors;
- damage to reflectors;
- fastener defects;
- cloudiness ( the headlight sweats or gets dirty).
The replacement process not only restores the original characteristics of the lamps, but also improves driving safety. By replacing a tail light or headlight, the driver provides better control of the vehicle both at night and for other drivers on the road.
Replacing the headlight. This is one of the steps that cannot be done without adjusting the lighting as the light must be diffused correctly. Headlight alignment is critical to improving safety. Because knowing how to replace headlights or taillights is only half of the entire replacement process, where proper adjustment of new headlights plays an important role.
Rules for replacing headlights
An experienced mechanic can change both the front and rear lights in a short time and without much hassle. But to do this job yourself, you will need the following tools:
To remove the headlights, first disconnect the wire from the “-” battery terminal and then remove the bumper from the Priora. Then you need to release the latch, which will allow you to freely disconnect the headlight wiring from the harness. Remove the 4 retaining clips by pulling out the side mounting screw. If you are removing the housing, you should be aware that the top mounting bolts will need to be removed in the future. Now that you know how to remove the headlight , you need to install the new one and place all the tools in reverse order.
Replacing the previous headlight (removal and installation)
How to remove headlights on Priorat
. Video review and visual repair guide.
How to remove a headlight on a Priora
How to remove headlights on Priorat
.
How to remove the bumper | a priority
.
How to properly remove a priority
. As.
The rear lights are removed in the same way. First, disconnect the wires from the battery terminal, then remove the trim line from the lighting element. Then press the latch and disconnect the rear wiring harness from the jumper wiring. rear lights . After unscrewing the fastening, it is necessary to remove the gasket from the side of the last element being replaced, then remove the wiring and remove the headlights. Installation, as in the case of headlights, is carried out in the reverse order.
In some cases, owners may need to disassemble the headlight in a Priora car. This often occurs due to faulty components of the device, if the light dims (condensation due to cold air) or the lamp burns out. Before disassembling the headlights, it is necessary to prepare an industrial hair dryer, since the sealant is separated from the body of the rear lights and melts at 300 °. Keep the hairdryer 2 cm away from the lamp. Half a minute is enough to warm up the priority lamps. Using a screwdriver, pour the glass, after which you need to cut the sealant under it and remove the last element.
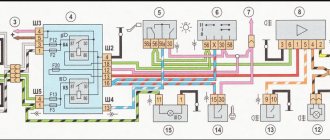
Headlight connection diagram for Lada Priore.
1 backlight unit; 2 signaling devices for turning on headlights in the instrument cluster; 3 mounting blocks; 4 steering column switches for headlights;
5 lighting control module; 6 ignition switch (lock); K7 headlamp; And to the main fuse box (F3);
Connect "14" in the electrical unit controller
Headlight adjustment
To adjust the headlights of a car, you need to choose the right place and prepare the following tools:
Tight and inflated tires should be placed in the garage or in an area where there is a vertical wall for marking. The main condition is to correctly adjust the headlights; you can travel the distance required for the adjustment process by 5-10 m. The essence of the procedure is to create a static imitation of the lenses, as if the Priora is moving along the road.
Comments
Guests cannot leave comments on the site, please log in.
Products for LADA at the best price
A selection of accessories for LADA from AliExpress
Published: March 23, 2016
I welcome you to the website dedicated to automotive optics and lighting devices - FaraInfo.
Today in the “Repair” section I will tell you how to disassemble the headlight on a Lada Priora at home. Disassembling a headlight is an activity that does not require special skills or special equipment. tool. However, without knowing the various subtleties and not following a certain sequence, you can fumble for a long time or break something.
Why do you need to disassemble the headlight?
Disassembling the headlight may be necessary when you want to do headlight tuning, for example, you decide to tint the headlights or give angel eyes to your car.
Before you disassemble the headlight on a Priora, you need to understand something. The fact is that the headlights on the Lada Priora come in two types - produced by Kirzhach and BOSCH. Visually they are not different, the difference between them is only during disassembly. It is not difficult to disassemble Kirzhach headlights, which cannot be said about BOSCH headlights. German quality and the powerful sealant used in the manufacture of these headlights make them an “impregnable fortress”. The headlight glass is glued with a hard sealant and holds so tightly that during disassembly, due to the need to heat the sealant very much, the body of the headlight itself melts. There is, however, a way out to simplify the process; you need to cut off the top plastic strip that runs around the entire headlight and along with it some of this sealant with a utility knife.
As I already said, the headlamp consists of a plastic body and curved glass, which are securely glued together using sealant. Disassembling the Lada Priora headlight will require you to have a household hair dryer (we will use it to heat the joint), a stationery knife (with its help you can cut off the plastic strip that was discussed at the beginning), as well as several screwdrivers (with which you can separate the two parts block headlights).
Engine turbocharger
TDI engines use a turbocharger with variable geometry, which allows the air that is absorbed to be compressed. Due to this, the volume of absorbed air in the chamber increases. As a result, engine power increases at the same volume and at the same speed.
Two turbines form the turbocharger device. The turbine located in the exhaust tract begins to rotate from the outgoing mass of exhaust gases. It begins to move the compressor wheel, which compresses the air directly at the inlet. The air heated during compression is cooled and then enters the chamber. Since when the temperature decreases, the volume of air also decreases, there is more of it in the chamber.
How to remove a headlight on a Priora? Manual for front and rear
Quite a lot of people are interested in how to remove a headlight on a Priora. The fact is that the fastenings on this model are quite sophisticated. In fact, the work is not difficult, but it requires some skill. You can replace this lighting fixture yourself. The main thing is to remember that you will have to work with electricians. Be careful and take standard precautions. When purchasing a replacement headlight, you should definitely pay attention to its compliance with the standards.
There are quite a lot of fakes on the market now, so be careful. The “left” part may not fit the fastenings, and it will also fail quite quickly.
How to remove a headlight on a Priora? This question often arises during various breakdowns. Often the reason for replacement is glass damage. It can crack if hit by a stone thrown from under the wheels of an oncoming car. The headlight also needs to be replaced after an accident that causes damage to it.
The reflector tends to fade, in which case the headlight also needs to be changed.
- What will you need?
- Replacing the headlight
- Removing the taillight
- Useful tips
The Priora headlight mount is not too complicated. You don't need many tools to get the job done. Prepare the following set:
- A set of keys;
- Crosshead screwdriver;
- Pliers.
In some cases, asterisks may be needed. On some cars these screws were used for fastening.
To remove the headlight, you will need to remove the bumper. It is secured with a pair of bolts and 5 self-tapping screws. Also, before starting work, you need to disconnect the battery, this will avoid an accidental short circuit.
The headlight is removed in the following order:
- We press the latch and disconnect the block of wires powering the headlight;
- Unscrew the front mounting bolt;
- We move on to the side bolt, and also unscrew it;
- Use a screwdriver (Phillips or asterisk) to unscrew the 4 screws securing the headlight housing;
- Remove the casing from the car;
- Remove the top screw securing the headlight;
- Remove the headlight from the car.
Reassembly is carried out in the same order. Many car enthusiasts install ordinary screws instead of sprockets during assembly. This makes assembly easier, as well as removal if necessary.
Removing the taillight
Here you won't need to remove the bumper. As part of the preparatory work, you will need to disconnect the battery. The headlight is dismantled in the following order:
- Unfold the trunk trim near the rear light;
- We press out the clamps securing the wire block and disconnect it;
- Remove the headlight mounting bolt;
- Wing nuts are unscrewed from the fastening studs. Only 3 pieces;
- We remove the headlight.
Assembly occurs in reverse order. Sometimes, when removing, people forget to disconnect the wires. In this case, there is a high risk of tearing or damaging the tourniquet. This will subsequently lead to a short circuit.
Replacing brake light bulbs and parking lights
With the release of the restyling of Priora 2, a large number of details have changed in it. The rear lights are especially noticeable; they have become LED. Now the dimensions have become lower, which gives the car a wider appearance in the dark. To achieve this effect, it is not at all necessary to buy and install LED lights.
To do this, just swap the backlight from the top position to the bottom. We don’t touch reverse and turns!
After such a replacement, when you press the brake pedal, the brakes will light up where the side lights and fog lights were previously illuminated. And the dimensions and rear PTFs will glow from the bottom of the lamp.