Injectors are part of the injection system of the VAZ 2112 car. They serve to supply fuel to the combustion chamber and create a gasoline-air mixture. To do this, a very thin hole is drilled in the nozzle. Passing under pressure through this nozzle, gasoline is divided into small droplets and turns into an aerosol. We see the same process, for example, when “sprinkling” with a can of deodorant.
Problems with injectors
The first thing that can happen to the injectors is that the internal channels become clogged. The smallest speck, which is even difficult to see with the naked eye, if it gets into the injector, will disrupt the operation of the engine.
Engine injectors
Considering the “high” quality of our gasoline, the injectors need to be regularly cleaned of contaminants, approximately every 50 thousand kilometers, at least. There are several methods for cleaning.
Cleaning injectors
The simplest method of cleaning injectors is to fill the fuel system with a special liquid that cleans out contaminants, working instead of gasoline. This method requires additional equipment. The advantage of this method is that the injectors do not need to be removed. The method is quite effective.
If this method is not possible, the nozzles are usually removed for cleaning. After removal, the injectors are also cleaned in different ways. The fact is that the design of the nozzles is non-separable. This makes the task very difficult.
The general principle of such cleaning: it is necessary to drive a cleaning liquid, such as Carb Cleaner or solvent, through a nozzle under pressure of several atmospheres. This is done in a lot of different ways. At the same time, current from the battery is supplied to the electromagnet power connector to open the injector. An ultrasonic treatment device is also used. But after ultrasound you still need to blow out the nozzle.
Replacing injectors
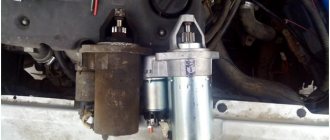
But more serious breakdowns of injectors, magnet failure, etc. also happen, in which there is nothing left to do but remove the injector and replace it with a new one. This process is quite simple. You need to remove everything that prevents you from getting to the fuel rail, remove the rail and replace the injector.
It is not difficult to determine which injector is faulty. With the engine running, it is enough to disconnect each of the four injectors in turn and remove the terminal from it. If the injector is faulty, there will be no noticeable change in engine performance. And vice versa.
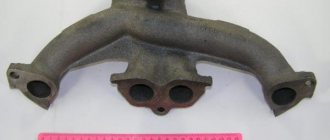
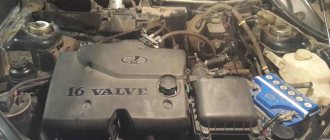
16 valve engine
As you know, VAZ 2112 cars are supplied with engines with 8 and 16 valves. Naturally, their design is significantly different. Replacing injectors is also slightly different. If we have a VAZ 2112 engine with 16 valves, we proceed as follows:
- Unscrew the plastic manifold.
- Let's move it to the side.
Replacing injectors on an 8-valve engine
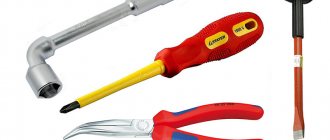
There is a slightly different scheme of work here. First, remove the negative terminal from the battery. Next we need to relieve the pressure in the fuel rail. After removing the cap, use the tip of a screwdriver to press on the valve (see photo).
We return the cap to its place. Loosen the clamps securing the manifold air duct and remove it from the air filter. You don’t have to remove it at all, just turn it on its side.
Using two 16mm wrenches, unscrew the fuel supply hoses. It is important to mark them somehow so as not to confuse them when connecting.
Disconnect the ramp power connector. Unscrew the bracket securing the fuel pipes. Use a hexagon to unscrew the ramp fastening. Remove the hose from the pressure sensor.
Together with the injectors, carefully pull the ramp up. And carefully pull it to the side, to the right.
We remove the fixing brackets and remove the injectors.
Removing the injectors
Don't forget to replace all O-rings, gaskets and washers. Having replaced the injectors, we put everything back in place in reverse order.
Video
This article describes step by step how to correctly replace washer nozzles on a VAZ 2112. The features of maintenance and adjustment of these devices are also fully disclosed. Some measures have been proposed to improve the performance of injectors in general. Many car enthusiasts and professionals quite often encounter such a problem as incorrect operation of the windshield washer nozzles. In adverse weather conditions, any defect in the washer nozzles can cause a lot of trouble. Impaired visibility of the road is a very serious issue and all problems associated with it must be eliminated in advance. In this case, replacing the VAZ 2112 washer nozzles is not a panacea for the above problem. It would be appropriate to consider it in conjunction with such activities as maintenance and adjustment of this unit.
Defective injectors
First of all, the car must be installed on a site convenient for work. Defects of the nozzle are carried out by simply turning it on. Using the steering column switch lever, you need to turn on the VAZ windshield wiper and observe the operation of the nozzle.
List of problems with washer nozzles
- Washer fluid does not flow through the nozzle nozzle at all.
- The washer fluid pressure is very weak.
- The jet of liquid supplied is directed to the side and does not provide complete cleaning of the windshield.
- The pump supplying washer fluid or its motor has failed.
- The washer fluid supply tube is damaged.
- The injector has mechanical damage.
- The injector nozzle is clogged with foreign material.
- The nozzle adjustment is incorrect.
Causes of problems
Attention: In order to quickly determine the area where the defect is located, it is recommended to disconnect the washer fluid supply tube from the nozzle and turn on the washer. If the fluid supply pressure is normal, then the problem is in the injector.
Repair
Before removing the injectors from the dismantled rack, it is advisable to check their functionality. To check you will need:
- four identical containers,
- tester,
- wires.
Functionality check
- Connect the gasoline supply and drain hoses and the power connector to the rail with injectors.
- Place the rack over the measuring cups.
Place the rack over the measuring cups
The shape of the cloud should be approximately the same for all nozzles
After the war, Germany received a ban on the development of injectors for aircraft engines. And engineers began adapting direct injection systems for passenger cars, discovering another important advantage compared to carburetors - efficiency.
Vladimir Berestenev
Replacement or flushing?
Some problems can be eliminated by cleaning and flushing. Others are “treated” only by replacement.
Table: problems with injectors
| Malfunction | Remedy |
| reduced performance | flushing, replacement if flushing fails |
| leakage | flushing, replacement if flushing fails |
| increased productivity | replacement |
| valve sticking | replacement |
| unstable valve sticking | flushing, replacement if flushing fails |
| overestimated or underestimated winding resistance | replacement |
In these cases, flushing is not a panacea. This method should be used taking into account the mileage and quality of service during operation.
During operation, the injector nozzles inevitably become coked and clogged with resinous deposits. The picture is aggravated by low-quality fuel, which can introduce additional pollutants.
For some time, fuel atomizers continue to operate without any visible changes, but sooner or later contaminants accumulate, changing the shape of the spray and reducing performance.
Injector life expectancy is limited even when using the cleanest fuel. Manufacturers recommend changing them every 100–120 thousand kilometers. Due to the fact that motorists use imperfect gasoline, and the one that can be bought at gas stations, the part has to be changed after 80-100 thousand km.
There is an opinion among motorists that “there is no need to interfere if everything works fine.” This opinion is justified, but only if the owner is ready to replace the nozzles with new ones approximately every 50 thousand kilometers.
The fact is that by getting rid of minor deposits as they accumulate, the owner extends the life of the consumable, since pollutants do not have time to cause irreparable damage.
Clogged injectors begin to interfere with normal operation after 30–50 thousand km. Initially, negative processes manifest themselves only in increased fuel consumption. Owners do not always associate the increased “appetite” of the engine with injectors, since there are many reasons for this phenomenon.
In the range of 50–80 thousand km, pollution, having accumulated, can cause interruptions in engine operation, which is no longer undetectable. It becomes clear that “you have to get into the injectors,” but cleaning them at this stage may be useless. When a clogged part is used for a long time, the diameter of the nozzle often increases. Flushing will remove contaminants, but the original parameters will not be restored.
To extend the life of trouble-free operation and delay replacement, you should regularly, after approximately 3-5 thousand kilometers, fill the tank with cleaning fluid for injectors or use it in another way recommended by the manufacturer.
Removing the nozzle
In order to carry out high-quality maintenance, restore the functionality of the nozzle or replace it, first of all, it is necessary to disconnect the wind cover or, as it is popularly called, “jabot”. Or rather, its upper part. To do this, you will need a 10-mm head, a flathead and a Phillips screwdriver.
How to remove the upper part of the windshield
- Using a 10mm socket, unscrew the two nuts located along the edges of the cladding.
- Next, unscrew the four self-tapping screws that secure the cladding. The screws are located under the plugs.
- Then you need to disconnect the sound insulation, which is attached to the wind window trim with six self-tapping screws.
- Carefully remove the top part of the windshield.
Having thus gained access to the washer nozzles, we proceed directly to dismantling them.
To dismantle the injectors you must:
- Disconnect the washer tube from the tee.
- Unscrew the screws securing the injectors, as shown in the photo above.
- Remove the injectors.
Now you can perform all further operations with the injectors. Assembly is carried out in reverse order.
How to remove parts from the engine
Dismantling steps:
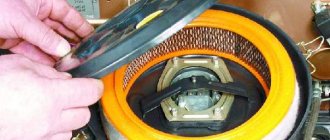
- Remove the air filter box (it will interfere with free access to the engine).
- Remove the wiring harnesses from the injectors.
- Then you will need to disconnect the wires from the idle speed control and from the throttle sensor.
- Next, remove the vacuum seal from the pressure regulator (it has a white braid).
- Using a 17 key, unscrew the bolts that secure the fuel frame to the body. To make it more convenient, you can remove the gas cable.
- It is better to unscrew the fasteners of the plate with which the ramp is pressed using a hexagon.
- The fuel rail must be removed very carefully, with the nozzles facing up.
- On a 16-valve engine, dismantling will take longer, since the ramp has a more complex structure and several types of fasteners.
- Next, you can remove the injectors themselves - to do this, disconnect the fastening brackets of the electrical connector with your finger, and then the injector bracket. During removal, gasoline may leak; it is recommended to place a cloth under the ramp.
To install a new injector, the socket is first thoroughly cleaned of dirt and fuel, and only then can the product be screwed in. It is better to drop a few drops of gasoline onto the rubber ring before installation - this will make the nozzle fit into the mounting hole more easily. All work is then carried out in reverse order.
[custom_ads_shortcode3]
Cleaning the injectors
Before replacing the injectors, if they are thoroughly clogged, you can try to revive them. To do this, it is necessary to flush the injectors. The service manual for components and assemblies of the VAZ 2112 car does not indicate how to flush the injectors. But, even for a novice car enthusiast, this procedure is not very difficult. To do this you need:
- Soak the nozzle in white spirit for 3-4 hours.
- Clean the nozzle with a thin soft wire.
- Flush the supply channel with high-pressure water.
- Blow out the channel with compressed air.
If necessary, the procedure must be repeated several times. In particular, on a VAZ 2112 car, washing the injectors does not take much time. And it’s not the price that worries us in this case. Much more important is the knowledge and experience that we acquire in the process of performing these works.
Attention: Do not clean the nozzle with a sewing needle. The tip of the needle may break and completely jam the washer fluid supply channel.
Procedure for cleaning and replacing rubber seals
It is best to remove the injectors from the fuel rail and blow and clean each of them, and at the same time inspect them for wear on the rings. This method has a huge advantage over using an additive, since you can visually check how well the restoration work was carried out.
What tool can you use to make repairs?
To dismantle and replace seals you will need:
- diamond key 8;
- carburetor cleaner;
- a can of compressed air;
- rubber hose (you can use a vacuum cleaner);
- syringe with outlet diameter 10 mm;
- wire approximately 2 meters long;
- standard set of rings for injectors (includes eight products);
- rubber seals for fuel lines.
The repair and cleaning process is as follows:
- Remove the rubber seal from the nozzle.
- Place the rubber hose on the tail part of the nozzle.
- Connect the wire to the battery (you can choose any terminal).
- On the reverse side of the hose, connect an aerosol tube through a syringe to flush the carburetor.
- Holding the entire structure with your hands, spray the cleaner several times until the jets emitted become uniform.
- After cleaning, it is recommended to use the same principle to blow out the injectors with air from a can.
- Next, it is recommended to immediately put new rings on the product, after moistening them with gasoline.
In the photo the nozzle is in critical condition
The injector repair procedure can be considered accessible to beginners and inexperienced drivers. The only difficulty is dismantling the fuel rail, since you will have to first relieve the pressure in the system. Cleaning and replacing the rings on the injectors with your own hands gives the driver the opportunity to carry out the highest quality repairs of these elements and be confident that repeating the procedure will not be necessary for a long time.
Adjusting the nozzles
If you managed to flush the injectors on your VAZ 2112 car yourself, then you can confidently handle the task of adjusting them. To do this, you need to understand a little about the design features of this device. On a VAZ 2112 car, two types of washer nozzles are used - jet and fan. In turn, jet nozzles can be: single-jet, two-jet and four-jet. This terminology is defined by the method of spraying washer fluid onto the windshield. In the jet nozzles, at the outlet of the washer fluid, a hinged bell is installed. This is a small ball with a through hole. Fan nozzles are equipped with a narrow slot-shaped bell. Now let’s start adjusting the injectors with our own hands:
- The direction of the jet in the jet nozzles is adjusted by turning the hinged bell.
- We insert a thin wire into the hole of the ball and turn the bell in the desired direction.
- Adjustment of fan nozzles according to their design is carried out only in a vertical position; the bell rises or falls to the desired direction. But this is not important; turning them left or right is also possible.
And, in general, no instruction can prohibit you from implementing any technical solution that helps improve the performance of vehicle components.
Self-check of injectors
Let's start with the fact that automobile injectors are divided into several types, of which two types have found widespread use at different times: mechanical injectors and electromagnetic (electromechanical) injectors.
Electromagnetic injectors are based on a special valve that opens and closes the injector to supply fuel under the influence of a control pulse from the engine ECU. Mechanical injectors open as a result of increased fuel pressure in the injector. Let us add that modern cars often have electromagnetic devices installed.
To check the injectors with your own hands without removing them from the car, you can use several methods. The simplest and most affordable way to quickly check injection nozzles without removing them from the car is to analyze the noise emitted by the engine during operation.
Injector maintenance
To ensure uninterrupted operation of the injectors, attention must be paid to them periodically. An extra inspection of the injectors won't hurt. If the injectors have not been turned on for a long time, they must be checked for functionality. Clean and adjust if necessary. In the winter season, it is imperative to use antifreeze washer fluid. Freezing of injectors leads to their wear and premature failure. If you follow the recommendations proposed in this article, then you will not need to replace the washer nozzle on the VAZ 2112 for a long time. And the windshield will be washed as the video shows.
List of problems with washer nozzles
- Washer fluid does not flow through the nozzle nozzle at all.
- The washer fluid pressure is very weak.
- The jet of liquid supplied is directed to the side and does not provide complete cleaning of the windshield.
- The pump supplying washer fluid or its motor has failed.
- The washer fluid supply tube is damaged.
- The injector has mechanical damage.
- The injector nozzle is clogged with foreign material.
- The nozzle adjustment is incorrect.
[custom_ads_shortcode2]
Removing and cleaning VAZ 2110-2112 injectors
Cleaning the injectors of a VAZ 2110-2112 is a job that should be done only if necessary, because the ramp in which the injectors are located and the injectors themselves are practically the very heart of the engine.
That is why they need to be cleaned only if there are problems with the engine - increased fuel consumption, tripping, a significant decrease in power. Only when there is reason to believe that the injectors are clogged can they be cleaned.
Fuel additives are supplied to the market to clean the injector, which must be added to gasoline, but they do not always cope with their job and do it efficiently. And in some cases they can harm the engine, because all the dirt from the injector gets into it, or react with the components of the engine oil.
Removing the VAZ 2110-2112 ramp
Important! All work on removing the VAZ 2110-2112 ramp must be done cold. First of all, we disconnect the wires from the fuel pump, thereby de-energizing it. Then we start the engine and wait until it stalls.
We start it again and so on - we repeat the procedure until it stops starting. Thus, we remove pressure from the fuel supply system. After this, you can begin to remove the ramp.
The first step is to de-energize it by turning off the power - the general wiring is located on the interior side. Then we unscrew the fuel hoses and all the electrics that are connected to the fuel rail of the VAZ 2110-2112 - idle speed regulator, pressure regulator, throttle position sensor.
Next, unscrew the two hex bolts that hold the fuel rail in place. Essentially, we can now remove the fuel rail. It can be removed in the upward direction, but it will hardly be possible to do without improvised means. The fuel rail sits very tightly and must be removed strictly parallel to the ground, since any distortion will only complicate the task.
Cleaning injectors VAZ 2110-2112.
All work on cleaning VAZ 2110-2112 injectors must be done on a clean surface - for this it is advisable to spread a clean piece of cloth on the ground or work table. In addition, you will need to assemble a simple circuit from a 12 V light bulb, an injector, wires and a switch. We connect the light bulb, nozzle and switch in series, after which you can start cleaning the nozzle.
Replacing rubber rings on VAZ injectors
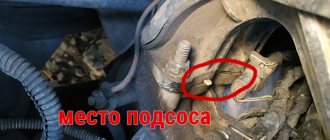
Today we will talk about replacing rubber rings on injectors on VAZ cars (2114, 2110, Kalina, Granta, etc.). Why did I decide to replace them? Because they were not sealed enough and air was leaking through them (the mixture became lean).
The car's speed was constantly floating and error P0171 lean mixture periodically popped up. Using carburetor cleaning fluid, I checked the main places of the intake manifold for air leaks (by spraying them while the engine was running). When liquid hit the injectors, or rather at their junction with the intake manifold, the engine began to react (the speed began to increase). Thus, it was determined that the rubber (sealing) rings of the injectors needed to be changed.
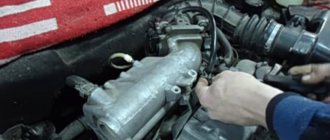
The first thing to do is relieve the fuel pressure in the rail. For this purpose there is a special nipple at its end. After placing a rag under it, we gradually release the pressure.
Be careful, if the engine has been recently stopped, there will be quite a lot of pressure in the rail. Do not allow fuel to enter the exhaust manifold.
Now that the pressure has been released, you can unscrew the injector rail from the fuel supply hose. There are two nuts with a 17mm wrench. Use one wrench to hold the nut on the hose, and with the second we turn the nut on the ramp.
And the last thing left is to remove the injector power connectors. They are fixed with a metal bracket. To remove the connector, you need to press the bracket and pull the connector up.
The ramp itself with the injectors is attached to the engine with two hex bolts. We unscrew them and the ramp can be pulled out freely.
I only replaced the lower rubber rings of the VAZ injectors, since they were the problem. For prevention, you can also change the upper rings of the injectors. They are changed when they begin to leak fuel (a distinct smell of gasoline is heard).
To make it easier to install the ramp back, you can pre-lubricate the rubber rings of the injectors with silicone grease. Later, during engine operation, it will evaporate.
It is recommended to replace the injector sealing rings every time they are removed from the engine in order to avoid troubles in the future (for example, such as I had).
Source
Step-by-step work order
- The most important thing is to remove the air filter housing, the mass air flow sensor (MAF – approx.) and the pipe.
- Then you need to relieve the pressure in the fuel system. If you set a goal not to suffer, and this work is easier to do, put a rag under the pipes and unscrew the connections. This will release the pressure quickly, and the remaining gasoline will flow out onto the rag.
When using two keys, unscrew the fuel line.
The power supply is disconnected.
How to remove injectors on a VAZ 2112 16 valves.
Place the loosened bolts in a safe place.
To remove the ramp, you will have to make an effort.
When the fuel rail is removed, we carry out work to dismantle a specific injector:
How to get rid of excess fuel
To relieve the existing fuel pressure, you need to turn off the fuel pump and exhaust the remaining gasoline:
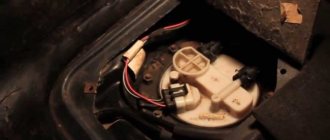
- Fold down the cushion from the back row of seats.
- Below it is the fuel tank hatch.
- Unscrew the screws securing the hatch.
- Disconnect the wiring harness from the pump housing (the wires supply power).
After this, start the engine and wait until it stalls. It is recommended to turn the ignition on several times to ensure that there is no gasoline left in the system. Next, you can begin to remove the injectors. It is recommended to prepare the necessary tools in advance:
- open-end wrench 17;
- a flat screwdriver with a narrow blade;
- Phillips screwdriver;
- hex key 6;
- rags.
All elements of the repair kit are usually at hand for any driver.
[custom_ads_shortcode2]
Replacement or cleaning?
In order to understand what needs to be done with the nozzle, change it or simply clean it, it is better to diagnose them on a special stand. Under such conditions, you can test it in operation under different pressures, and also visually see how tightly it closes, and whether it is “snotty.”
If any of the injectors needs to be replaced, then you should buy a new one with exactly the same part number as the old one. Also, during installation of cleaned injectors, all O-rings should be replaced (2 pieces on each injector - approx.).
KEY-DOP
Installation is carried out strictly in the reverse order, similar to the removal procedure.
Cleaning injectors with ultrasound
And another method that can be easily used to clean them is ultrasound.
Pros and cons of using ultrasound
There is still debate about how useful this method is, and there is no consensus on this. Some say that this method harms the injectors due to the destruction of the mesh, and that such work should only be combined with washing and dismantling. Others say that such work has a very good effect on the condition of the injectors and does not harm them in any way; moreover, the condition of ultrasonic cleaned injectors is comparable to new parts.
In any case, it is up to you to decide whether to use this method. The cost of such work at a car service is 2,000 rubles and takes about 4 hours.
Injector malfunctions
Among the most common causes of injector failure may be the following:
- The injector nozzle is coked - in this case, increased fuel consumption may be observed, vehicle dynamics will decrease, and engine starting will be difficult at subzero ambient temperatures. Otherwise there are no differences.
- The injector valve does not close hermetically (“the injector is snotty” - note) - here there may be increased fuel consumption, “tripleting” and increased detonation (about checking the knock sensor here), unstable idling.
- Valve sticking - engine troubles. In order to diagnose it, with the engine running, turn off the power supply to each injector in turn. With a non-working injector, no changes in engine operation will be observed, but with a working injector, the speed will drop.
If you find a non-working injector on your car, or they need cleaning, you need to know how to properly dismantle them. You could already read more about this above.
Injection vehicles VAZ 2110, 2111, 2112 are equipped with imported injectors. This gives the models increased resistance to low-quality fuel and increases engine life. Owners of cars of the tenth VAZ family can independently repair and change injectors if necessary. The valve replacement steps are not particularly difficult even for beginners.
When is injector cleaning necessary?
In order to understand the condition of the injectors, you need to clearly listen to the “whispering” of your engine:
- increased fuel consumption (consumption rates),
- "triple" of the engine,
- unstable operation at idle,
- breakdowns during engine operation.
These symptoms should alert you and make you think about the stable operation of the system as a whole.
Frequency of cleaning injectors
There is no specific point in time that would indicate the frequency of their cleaning. Remember that if nothing bothers you about the operation of the engine, then there is definitely nothing that needs to be repaired. However, if symptoms appear, it is best to first carry out an analysis and determine the exact cause of the problem.
What will cleaning do?
When the injectors are cleaned, you will immediately feel changes in the operation of the engine. However, note that this depends on the amount of carbon deposits and instability before the cleaning process. Therefore, the more contaminants there are, the better the cleaning is done, the greater the chance of getting serviceable injectors.
What injectors are installed on VAZ 2110–2112 cars
The main advantage of injectors for VAZ cars of the tenth family is that they are interchangeable. There are only two types of sprayers - produced by Bosch and Siemens. And each of them, regardless of marking and year of manufacture, can be replaced with another.
Bosch injectors are traditionally manufactured in black housing
When selecting, there is only one limitation - engine size. 1.5 injectors are not suitable for 1.6 liter engines.
The Siemens injector has a blue tip
Both Bosch and Siemens injectors of any marking can be installed on 8-valve and 16-valve engines.
Table: how to select injectors for VAZ 2110–2112 by marking
| Siemens | Bosch |
| Injector DEKA VAZ 6238 | 0 280 150 996 and 0 280 158 110 |
| Injector DEKA VAZ 6393 | 0 280 158 502 |
| Injector DEKA VAZ 20734 | 0 280 158 017 |
| Injector DEKA VAZ 20735 | 0 280 158 022 |
| Injector DEKA VAZ short 20734 | 280158017 |
| Injector DEKA VAZ short 20735 | 0 280 158 022 |
How to Remove Injectors VAZ 2112 16 Valves
Replacing and removing injectors on VAZ-2112 valves 16 yourself
The injector in a car is perhaps the most important element of the fuel system. After all, in the absence of an engine, the result will be impossible.
The video below describes in detail how to remove injectors on a 16-valve VAZ-2112 engine:
Replacing 16 valve injectors
At the factory, the VAZ-2112 was equipped with Bosch and Siemens injectors, ( preferably Bosch 0 280 158 996. approx.) A resource that is within 50,000 km before the first treatment.
Step by step procedure
- The most important. remove the air filter housing, mass air flow sensor (DMRV. approx.) and pipe.
- Then you need to relieve the pressure in the fuel system. If you want to avoid suffering and make this work easier, we place a cloth under the attachments and unscrew the connection. This way, the pressure will quickly release and the gasoline will flow out onto the fabric.
Using two keys we turn off the fuel line.
The power panel is turned off.
How to remove valve injectors VAZ 2112 16.
Remove the bolts in a safe place.
It takes some effort to remove the ramp.
When the fuel rail is removed, we carry out work to dismantle the specific injector:
as a takeoff and wash the injectors on the sixteen valves of the VAZ 2110 engine.
Capture Report
from a
VAZ
2110
2112
, engine 1.5
16 valves
. Also a way to clean the nozzle.
- Remove the power cord from the nozzle by sliding the device.
The gaskets are removed one by one.
Replacement or cleaning?
To understand what to do with the nozzle, replace it or simply clean it, it is better to diagnose them on a special stand. In such conditions it can be tested at various pressures and visually seen how tightly it closes and whether it sniffs.
If it is necessary to replace any of the nozzles, you should purchase a new one with exactly the same part number as the old one. Also, when installing clean injectors, replace all rings (about 2 pieces per injector).
Installation is strictly in reverse order, similar to the removal order.
Injector cleaning video
Warning! When working with injectors, observe all fire safety measures, as gasoline vapors are flammable and pose a high risk of fire.
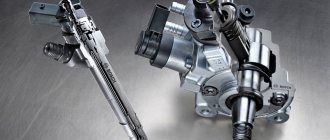
What is a nozzle?
nozzle
This is a special mechanical atomizer located in the "head" of the engine through which fuel is supplied to the cylinders under high pressure.
Injector problems
Among the most common reasons for nozzle failure are:
- Nozzle coke nozzle . in this case, fuel consumption increases, vehicle dynamics decrease, and engine starting becomes difficult at subzero ambient temperatures. Otherwise there are no differences.
- The injector valve does not close tightly (Injector nozzle. note). possible increase in fuel consumption, "triple" and increased knock (about checking the knock sensor here), unstable idling.
- The valve freezes . the engine is shaking. To perform diagnostics, turn off the power supply to each nozzle in turn while the engine is running. On a non-working injector, no changes in engine performance will be observed, and on a working injector, a drop in speed will occur.
Method for replacing injectors on 8- and 16-valve engines
Car owners cannot always diagnose faults in the fuel system. Often, failures in engine operation or unstable idle speed can be explained by completely different reasons, and not just interruptions in the fuel supply.
Symptoms of a problem
If all car systems are operating normally, then the following symptoms will directly indicate injector problems:
- failures in engine operation;
- increased fuel consumption;
- instability of idle speed;
- loss of power;
- black exhaust gas, etc.
Is it possible to determine the cause of the malfunction yourself?
The causes of injector malfunction are often clogged . When using low-quality fuel, the injector nozzle becomes clogged with gasoline deposits over time, which is why its throughput gradually decreases. Accordingly, the engine no longer receives enough fuel, so the engine power sharply decreases and the car’s dynamics deteriorate.
In addition, the rubber seal or ring may lose its tightness. In this case, the nozzle will leak, due to which the necessary pressure will not form in the system. It should be noted that the service life of injectors on the VAZ 2110–2112, set by the manufacturer, does not exceed 150 thousand kilometers.
[custom_ads_shortcode3]
Procedure for removing oil injectors
Before you begin removing injectors from any car of the tenth VAZ family, you will need to relieve the pressure in the fuel system. Removing any element that is under pressure in any way can result in personal injury.
How to get rid of excess fuel
To relieve the existing fuel pressure, you need to turn off the fuel pump and exhaust the remaining gasoline:
- Fold down the cushion from the back row of seats.
- Below it is the fuel tank hatch.
- Unscrew the screws securing the hatch.
- Disconnect the wiring harness from the pump housing (the wires supply power).
After this, start the engine and wait until it stalls. It is recommended to turn the ignition on several times to ensure that there is no gasoline left in the system.
Next, you can begin to remove the injectors. It is recommended to prepare the necessary tools in advance:
- open-end wrench 17;
- a flat screwdriver with a narrow blade;
- Phillips screwdriver;
- hex key 6;
- rags.
All elements of the repair kit are usually at hand for any driver
How to remove parts from the engine
- Remove the air filter box (it will interfere with free access to the engine).
- Remove the wiring harnesses from the injectors.
- Then you will need to disconnect the wires from the idle speed control and from the throttle sensor.
- Next, remove the vacuum seal from the pressure regulator (it has a white braid).
- Using a 17 key, unscrew the bolts that secure the fuel frame to the body. To make it more convenient, you can remove the gas cable.
- It is better to unscrew the fasteners of the plate with which the ramp is pressed using a hexagon.
- The fuel rail must be removed very carefully, with the nozzles facing up.
- On a 16-valve engine, dismantling will take longer, since the ramp has a more complex structure and several types of fasteners.
- Next, you can remove the injectors themselves - to do this, disconnect the fastening brackets of the electrical connector with your finger, and then the injector bracket. During removal, gasoline may leak; it is recommended to place a cloth under the ramp.
To install a new injector, the socket is first thoroughly cleaned of dirt and fuel, and only then can the product be screwed in. It is better to drop a few drops of gasoline onto the rubber ring before installation - this will make the nozzle fit into the mounting hole more easily. All work is then carried out in reverse order.
Dismantling
Before replacing or cleaning the injectors, they will need to be removed from the fuel rail. To achieve this, the following activities are carried out:
- Make sure the engine has cooled down properly. It is not safe to work on a hot engine;
- Disconnect the power wires from the fuel pump to de-energize the device;
- Try to reduce the pressure in the engine power system as much as possible. To do this, the engine starts, and then you need to wait until it stalls at idle speed;
- Repeat this procedure several times until the car simply stops responding to turns of the ignition key;
- That's it, now our goal is the fuel rail. To remove it, you must first remove the terminals from the battery, turn off the power to the ramp itself, disconnect the fuel supply hoses, and also disconnect all electrical appliances going to it. These are pressure, idle, throttle position sensors;
- If you have an 8-valve engine, then you do not need to remove the receiver. This step is relevant for engines with 16 valves;
- Experts do not recommend removing the intake manifold without dismantling the throttle valve and the hose going to it. It is better to unscrew and disconnect everything at once, which will allow you to continue working more conveniently;
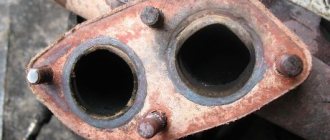
- Cover the exhaust manifold openings with something to protect them from foreign objects;
- Using a hex wrench, you can unscrew a couple of bolts and remove the fuel rail along with the injectors;
- Make sure that there are no distortions when removing the ramp, otherwise problems may arise with the dismantling processes;
- We remove the injectors. To do this, remove the mounting brackets that hold the electrical connector. You also need to remove the bracket that holds the injector in its seat.
After dismantling the elements, be sure to close the seats to prevent debris and other objects from getting in, and place the nozzles themselves on a table or floor, after laying down a dry rag.
Here you can decide whether to change or clean the elements of the fuel system. If replacement is required, install new injectors in place of the old ones and follow the assembly procedure.
Repair of injectors VAZ 2110–2112
Repairing injectors means cleaning the product and replacing the O-rings. Simple measures to restore the functionality of the injectors can significantly increase the car’s power and make cold starts easier. Injector repair is possible in the following cases:
- there are no visible deformations on the body;
- the nozzle has not yet exhausted its service life;
- the car owner wants to optimize the operation of the power unit.
In all other cases (cracks and deformations, long service life), it is recommended to replace the nozzles with new ones.
How to blow out and clean oil molds
On cars of the tenth family, injector cleaning may be necessary after 40–50 thousand kilometers. In this case, it is best to carry out the procedure yourself, since you can always observe for yourself the true condition of the motor and its elements, and also save a significant amount on service station services.
Many drivers prefer to use the simplest method of cleaning injectors - fuel additives. Special liquids, along with gasoline, are poured into the tank and pass through all elements of the fuel system, cleaning them. This measure is justified for new cars in which the degree of pollution is at a minimum level. But additives will not be able to properly clean injectors and other elements of the system.
Video: a simple way to clean injectors using a repair kit
Prices for cleaning injectors
- In order to clean the injectors that have been removed and fixed on the ramp, you will need a total cost of about 500 rubles .
- And to clean them in the service, you will pay about 2000 rubles , and this is the same as when cleaning with ultrasound.
Since such work does not pose any difficulty, it is much easier to do everything yourself.
Injector prices
If, after the cleaning and diagnostic procedure, you come to the conclusion that it is completely faulty and needs to be replaced, then it is worth noting that you should buy a strictly analog nozzle, with the part number indicated on its body. The average price for them is in the range of 1000-1500 rubles.