Removing and replacing injectors
Before dismantling the injectors on the VAZ-2114, you will need to relieve the pressure in the fuel rail. The process is performed by disconnecting the connectors with wires from the fuel pump and then starting the engine. The machine should run in this position until it stalls. The procedure must be repeated until the car can start.
Disconnect the connector with wires from the fuel pump
Removal:
- It is necessary to dismantle the pipe from the air filter;
- Disconnect the wires from the injectors;
Disconnect the electrical connector from the fuel rail
Unscrew the gasoline supply pipes
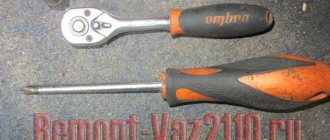
Use a screwdriver to unscrew the bracket on which the fuel pipes are attached.
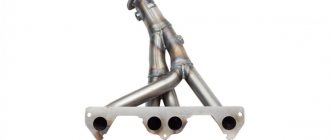
Removing the fuel rail
Remove the injector from the fuel rail hole
Important! If the nozzle will be washed, it is not recommended to place it in a dirty place.
Replacing the injector is quite simple. When the old spare part is removed, install a new one and secure it with a spring washer . After this, you can put the ramp in its place.
Video about removing and installing injectors
Replacement Tips
It is important to remember that you should be extremely careful when dismantling and installing injectors.
Service workers always advise adherence to the following points when replacing:
- Do not damage the injector when replacing.
- It is prohibited to disassemble injectors for repairs.
- You need to make sure that no oil gets inside.
- It is strictly forbidden to immerse parts in any cleaning products. They have electrical connections in the middle.
- There is no need to rush to part with money for new parts; perhaps the problem can be solved by simply flushing the channels.
- To do this, it is recommended to watch a video on proper washing.
Video about proper injector cleaning
Pro tips: how to choose new good quality injectors
All four injectors are removed and installed identically, so we will consider replacing only one injector. The dismantling of the injectors was described in detail above, so we move on to the next stage - replacement.
- First of all, we check the condition of the sealing rings of the fuel atomizer housing.
- Likewise, check the O-ring of the injector spray component. To do this, pry up both rings with a screwdriver and inspect them for wear.
Symptoms for replacement
In fact, there are quite a lot of reasons why injectors may not work well. And below are the most common symptoms:
- Difficulty starting the engine in any weather;
- The engine is running erratically;
- The engine stalls at idle;
- High crankshaft rotation speed at idle speed;
- Loss of power, poor response to the accelerator pedal;
- When you press the gas, shocks or dips may appear;
- High gas consumption;
If the nozzle is dirty or damaged, it should be replaced or cleaned. There is no point in repairing it. It should also be noted that today injectors cannot last even 100 thousand km .
We clean the injectors with our own hands using carburetor cleaning fluid
Checking old injectors
Before replacing injectors, it is recommended to check them. This will allow you to determine whether it is working or not.
The test is carried out on a removed fuel rail, on a special stand.
Such a check can be done in almost any service.
Checking injectors on a bench
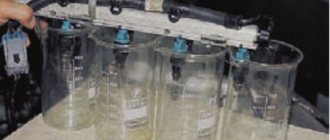
You can also check not all injectors at once, but each one separately. To do this, you will need to apply current to the part and install a container with fuel on it. When current is applied, the valve will operate and gasoline will spray out through the nozzle. But such a check is inaccurate and will still need to be checked at a stand.
How to clean injectors yourself
A sign that the injectors of your fuel-injected car require maintenance are failures in engine operation when you sharply press the gas pedal, weak engine thrust and jerking of the car at low outside temperatures. If this applies to your car, you need to clean the injectors of the engine power system.
It is recommended to carry out maintenance of engine injectors every 30,000 km. These works can be performed at service stations. They provide a service for cleaning engine injectors using ultrasound. This cleaning method allows in most cases to restore the functionality of the injectors. After this operation, the dispersion of the fuel jet improves, productivity increases, fuel is injected evenly by all nozzles, and the fuel atomization pattern in the cylinder is restored.
The result of high-quality maintenance of injectors will be a noticeable increase in thrust at low engine speeds, the absence of thrust failures, fuel consumption will be closer to that declared by the manufacturer for this engine.
The scope of work on injector maintenance in specialized centers usually includes:
— measurements of CO and CH, checking engine operation at idle. — dismantling the fuel rail together with the injectors. — checking the performance and tightness of injectors. — cleaning of injectors with ultrasound. — replacing the filter and injector seals. After all operations and installation of injectors on the engine, a control check is carried out for the tightness and performance of the injectors, the level of CO and CH in the exhaust gases is adjusted, as well as the engine idle is adjusted.
However, you can clean your car's engine injectors yourself and save a certain amount of money.
To do this, we need a liquid - an injector cleaner or a carburetor cleaner. Any domestic spray is quite suitable.
It’s better to immediately buy a couple of spare injector seals, in case they suddenly get lost - you won’t have to go back to the store because of this tiny part.
To remove the injectors, you must first dismantle the fuel rail on which they are attached. If we don’t know how to remove the ramp, look in any manual (every VAZ owner should always keep such a manual in the car, just in case something happens). Squeezing the spring clip, disconnect the injector electrical connector, use a screwdriver to move the injector lock along the ramp and carefully remove the injector from the ramp. Pour injector cleaner into a container and immerse the injectors in it and leave it to sour for a while.
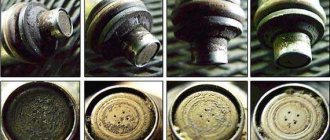
There is usually a layer of coke-like resinous deposits around the injector nozzle; this must be completely removed. We also carefully clean the funnel-shaped surface in which the nozzle nozzle is located from any evil spirits, without damaging the nozzle. To clean we use a spray.
Clean (left) and dirty (right) injectors
Now we wash the fuel supply channel itself, which runs inside the injector. We will need a 12V DC power source; we can use a car battery for this purpose. With it we open the fuel supply solenoid valve inside the injector. In order not to burn the injector winding, we will supply voltage through any automotive incandescent lamp, connecting it in series to the positive wire of the power source.
Our task is to rinse the nozzle channel with an injector cleaner under pressure. To do this, you can use a foot pump with a pressure gauge. Remove the pump hose tip and fill it with liquid to clean the injectors. Now we put the hose on the nozzle and pump up the pressure to 4-6 atmospheres. After the pressure has been pumped up, we apply voltage from the power source to the contacts of the injector solenoid valve. The power must be supplied in short pulses, simulating the operation of the injector in the engine. When the pressure drops, pump it up with a pump. Pay attention to the spray pattern of the nozzle; it should have a characteristic shape and should not vary greatly between different nozzles. If the injector is leaky and leaks when closed, and the amount of fuel injected during a cycle of the same duration differs noticeably from the others, the injector must be replaced.
Nozzle spray pattern
When all the injectors have been blown out in this manner, we put everything back together.
During the cleaning process, you may notice that the fuel channels are covered with black tarry deposits. These deposits are the result of using low-quality domestic gasoline in the car. It is also advisable to remove them periodically, otherwise all this will get into the nozzles and clog their channels. Periodically during the entire period of operation of the vehicle, it is recommended to add a special mild injector cleaner to the fuel tank, following the instructions for use, usually once every 3000-5000 km. This will keep the injector fuel channels clean, gently washing away accumulated dirt. If you haven’t used it before this moment, then it is better to first clean the fuel channels and disassemble them, otherwise you risk washing off all the dirt at once and clogging the injector channels, then replacing them or professional cleaning at a service center definitely cannot be avoided.
And finally, a piece of advice: take care of your original factory VAZ injectors! Often, when replacing them with others, even various foreign branded ones, fuel consumption increases noticeably. The characteristics of injectors from different manufacturers can vary greatly.
During the cleaning process, you may notice that the fuel channels are covered with black tarry deposits. These deposits are the result of using low-quality domestic gasoline in the car. It is also advisable to remove them periodically, otherwise all this will get into the injectors and clog their channels.
Nozzle selection
The VAZ-2114 model can be equipped with different injectors from different manufacturers. Depending on this, durability and their cost also differ.
It is recommended to buy not domestic parts, but from other companies, for example, GM, BOSCH, SIEMENS.
Also, the choice of injectors also depends on the working volume and the number of valves . For 16-valve engines, the performance of such parts will be different than for the 8-valve version. If the parts are selected incorrectly, then most likely, gas mileage will be higher or the car will lose power.
If we talk about choice, then preference should be given to the BOSCH brand at number 0280158502 . This is the serial number that is suitable for an 8-valve engine with a volume of 1.5 liters.
BOSH injectors catalog number 0280158502
Injectors fail not only because of their quality; their performance is largely affected by fuel that contains a lot of dirt or large fractions.
Cleaning injectors at service stations will not be cheap. Therefore, if you do not check and clean it yourself, then you should think about whether it might be easier to buy new parts and replace them.
Source carfrance.ru
Cleaning
There are two ways to clean fuel nozzles, each of which has its own nuances. Choose for yourself which one you like best or is more affordable, taking into account the available funds.
Cleaning method
Necessary materials
Features of the event
- Injector cleaner;
- Carburetor cleaner in spray form;
- Spare O-ring
- Carburetor cleaning spray;
- Pump;
- Pressure gauge;
- Sealing ring
A simple cleaning method
Both operations take approximately 2-3 hours, but cost several hundred rubles. This is ten times cheaper than replacement and about the same amount more affordable than service stations.
After cleaning the injectors, check their operation. If this does not work, you will have to change it.
It is not uncommon to remove injectors on a fuel-injected VAZ 2109 car. You can contact a car service center, where everything will be done at your expense, or you can do the work yourself, gaining invaluable experience and saving an impressive part of your own budget. The choice is yours.
You cannot start a conversation about instructions for removing injectors without first talking about the location of the object you are looking for.
The injectors of VAZ 2109 cars are located on the fuel rail. There are 4 of them in total. This is justified by the fact that any nozzle sprays fuel onto one separate cylinder. Since the nine has four cylinders, we conclude that the number of injectors is logical.
There are several signs that indicate the need to simply remove and check the condition of the fuel nozzles. Next, a decision is made to clean or replace parts.
Pay attention to the behavior of your car and the engine itself. They will tell you if there is something wrong with the injectors. This may manifest itself as follows:
- The engine produces the least power, the previous acceleration efficiency is not felt;
- If the engine is not working well, or there is a lack of power, fuel consumption still increases;
- Poor starting is not a rare sign of injector failure;
- If the engine does not hold idle speed well, the sprayers may be the reason for this;
- The amount of toxic components in exhaust gases increases;
- At idle the speed increases.
Why the check light is on for a VAZ 2110, injector, 8 valves, 16 valves
The engines installed on the VAZ 2110 are electronically controlled and have numerous sensors, information from which is processed by the engine control unit. If there is any problem, the Check Engine light comes on on the dashboard. The presence of such a warning indicates serious engine problems, so it is necessary to take the car to a service center as soon as possible and carry out appropriate diagnostics and troubleshooting. In this article we will tell you why the check light comes on on 8 and 16 valve VAZ 2110 engines.
Broken spark plugs
If the check engine light comes on on the dashboard of your VAZ 2110, first of all you need to pay attention to the condition of the spark plugs and high-voltage wires. Over time, the spark plug gap changes, resulting in a lack of spark in the cylinders, and the corresponding sensors determine whether there is a problem. That is why, as soon as such an alarm lights up, it is necessary to check the spark plugs for the presence of a spark. The car owner should also inspect the condition of high-voltage wires, which may have mechanical damage, which leads to improper operation of the power unit in the VAZ 2110. Remember that the spark plugs must be changed regularly, which will help avoid such problems with the car engine.
Throttle problems
The sensor located on the throttle valve can cause problems. Unfortunately, it is not possible to independently diagnose in this case. The car must be towed to a service center, where, using special equipment, specialists can identify errors with the throttle valve or identify other problems with the engine that may cause the Check Engine light to come on.
Damage to the mass air flow sensor
The faulty engine warning light may also come on if there are problems with the air flow meter. Such a sensor (mass air flow sensor) often fails or starts to work incorrectly, which leads to problems with the motor. Problems with the mass air flow sensor in the VAZ 2110 engine can be indirectly determined by significantly increasing fuel consumption. Note that it is not recommended to operate an engine with such breakdowns, so if the Check Engine light comes on and fuel consumption increases, it is best to go to a service center and carry out high-quality computer diagnostics. The cost of spare parts and repair work in this case is not too high, which will allow you to fully restore the functionality of your car.
Refueling with low-quality fuel
The Check Engine light may come on immediately after refueling with low-quality fuel. Such dirty and low-quality fuel, entering the engine, invariably causes increased detonation and improper operation of the injection system, and as a result, the engine control unit receives errors from the built-in sensors and a check light on the dashboard lights up. If such an alarm lights up immediately or shortly after refueling, it is most likely due to low-quality fuel. It is not recommended to operate the car in this case. You need to call a tow truck and take the car to a service center, where specialists will comprehensively diagnose the car and clean the fuel system. Otherwise, the injector may be damaged, which will lead to expensive engine repairs.
Insufficient oil pressure in the system
The Check Engine light may come on if there are problems with the lubrication system. For example, if there is insufficient oil pressure or in cases of breakdown of the oil pump, which does not pump lubricant, the engine temperature invariably increases and a corresponding warning lights up on the dashboard. At the same time, the low oil pressure light may come on.
Problems with the ignition coils
High voltage ignition coils and problems with these components can also cause a warning to appear on the instrument panel. Such problems can be indirectly determined by the characteristic tremors of the car at idle. The car owner can check whether there is current on the coil and whether the contacts of the high-voltage wires are loose. If there are problems with the coils, it is best to replace them as a set. The VAZ 2110 engine has four high-voltage coils, the cost of which is at an affordable level, and every car owner can handle such a replacement.
Lambda probe failure
On 16-valve modifications of the VAZ 2110 engine, a lambda probe is installed, which is responsible for analyzing exhaust gases. Over time, a layer of used oil appears on the surface of such a lambda probe, which leads to problems with the accuracy of the sensor’s readings. As a result, the Check Engine light comes on, and the car must be taken to a service center. It is impossible to independently determine the problem with the lambda probe. Only when diagnosing a car using special equipment can you determine the corresponding error codes, on the basis of which problems with the lambda probe will be identified. This element cannot be repaired and if it breaks, it is simply replaced with a new one.
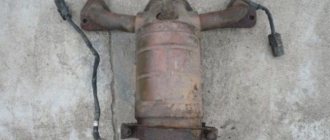
Burnt out catalyst
Problems with the catalytic converter can also cause a Check Engine Light. Such problems can be indirectly identified due to the appearance of an uncharacteristic exhaust sound, while the engine begins to smoke heavily. It is necessary to check the catalyst at a service station and if problems with this unit are identified, it must be replaced with a new one or cut out. It is not recommended to use a car with a damaged catalyst, as this can lead to various types of serious damage, including the need to overhaul the power unit.
Source motorsmarine.ru
VAZ 21099: injector repair - how to do it?
Installing an injector in a VAZ 21099 car
Reliable operation of the fuel system of the VAZ 21099 depends on the injector. Its clogging can lead to large excess fuel consumption, unstable idling and a decrease in engine power, and the car jerking during acceleration. Many gas stations sell low quality fuel that contains dirt, benzene, water, sulfur and olefin. This leads to the accumulation of tarry deposits in the fuel system, rail, and on the surfaces of the injector. This article discusses how to flush the injector on a VAZ 21099 car yourself.
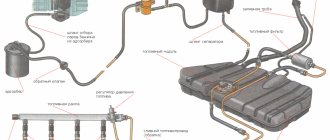
Injection system VAZ 21099
The main elements of the injection system are shown in the diagram:
Diagram of the injection system of a VAZ 21099 car
- 1 – air filter;
- 2 – air flow sensor;
- 3, 4,10, - system hoses;
- 11 – electronic control unit;
- 13 – fuel filter;
- 14 – fuel tank;
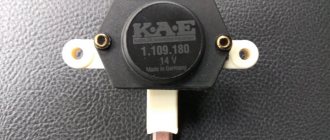
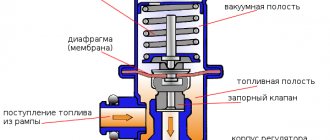
- 18 – pressure regulator;
- 20 – injector ramp;
- 21 – nozzle;
- 26 – cylinder head.
How to properly wash the injector on a VAZ 2109 car
To clean the fuel injectors from tarry deposits that appear due to poor quality fuel poured into the gas tank, it is sometimes enough to wash the injector on a VAZ 2109. This can be done in a specialized workshop or with your own hands. The work process is as follows:
- Purchased: flushing fluid, syringe, set of new candles.
Advice: It is better to do the work with an assistant who will press the accelerator pedal to maintain the required engine speed.
- Mix 1.5 - 2 liters of gasoline, which is usually poured into the tank, and flushing liquid.
- The hood opens.
- On the hose connecting the intake manifold and the vacuum brake booster, the rubber adapter tube is disconnected.
- Using a syringe, the prepared mixture of washing liquid and gasoline is poured into it.
- About 20 minutes is enough for all the growths inside the device to come off.
- The assistant gets behind the wheel and the engine starts. The accelerator pedal must be held down, otherwise the engine will not maintain speed due to the tube being disconnected.
- The mixture is injected.
Tip: High pressure in the tube can cause the syringe to be pulled inward, so you need to gently press it, and the liquid will flow into the tube itself.
- There is no need to pay attention to the black pieces of garbage flying out of it and the emanating puffs of white smoke. All this may be accompanied by various sounds, especially in VAZ 2109 cars, injector cleaning, which has not been carried out for more than three years.
Tip: You need to pour in the washing mixture in small portions, this will wash the device better.
- When all the mixture is finished, the engine is turned off and time is given to cool down.
- A new set of spark plugs is installed.
- The engine workplace is wiped with a dry cloth.
- The hood closes.
For VAZ 21099, how to flush the injector is clearly shown in the video. If the injectors are covered with a crust of dark-colored varnish, it is difficult to clean by simple washing. Therefore, for prevention, it is necessary to fill the gas tank with cleaning additives after 5,000 - 6,000 kilometers.
The price of the cleaning product is affordable; one bottle is enough for 60 - 89 liters of fuel. This method is more often used to clean injectors on new cars.
Tip: There is no need to clean a contaminated injector with solvent. Dirt deposits can travel through the fuel lines from the gas tank to the rail and injectors, which can completely clog the intake channels and settle on injector filters made of nylon. Solvent is ineffective for removing such deposits, so its use is not only dangerous, but also a wasteful exercise.
VAZ 2109 | Checking the voltage supply to the fuel injectors
5.6.2. Checking the voltage supply to the fuel injectors
| GENERAL INFORMATION |
Location of the electrical connector (1) supplying voltage to the fuel injector and connector (2) on the fuel injector
| EXECUTION ORDER |
| 1. Disconnect the electrical connector from the fuel injector of the first cylinder, see fig. Location of the electrical connector (1) supplying voltage to the fuel injector and connector (2) on the fuel injector. |
| 2. Connect the control LED to the connector contacts (1) (see Fig. Location of the electrical connector (1) supplying voltage to the fuel injector and connector (2) on the fuel injector). When the engine cranks with the starter, the LED should flash. |
| 3. Check the voltage supply to the remaining fuel injectors in the same way. |
The LED does not blink on any of the cylinders
Location of contacts on the electrical connector supplying voltage to the fuel injector
| EXECUTION ORDER |
| 1. Connect the control LED to pin No. 1 of the electrical connector to supply voltage to the fuel injector and vehicle ground, see fig. Location of contacts on the electrical connector supplying voltage to the fuel injector. |
| 2. Connect pin No. 2 of the electrical connector to vehicle ground. |
| 3. Turn the engine crankshaft with the starter. In this case, the LED should blink. Otherwise, check the entire electrical circuit supplying the fuel injectors. |
LED does not flash on only one or more cylinders
| EXECUTION ORDER |
| 1. Check the condition of the electrical circuit powering the fuel injectors and determine and eliminate the location of the electrical circuit break or short circuit to ground. |
| 2. Check the operation of the engine control unit. |
Checking resistance Connection points for an ohmmeter to check the resistance of fuel injectors
| EXECUTION ORDER |
| Sequentially disconnect the electrical connectors from the fuel injectors and, using an ohmmeter, check the resistance of the fuel injectors, which should be between 12 and 17 ohms, see fig. Connection points for an ohmmeter to check the resistance of fuel injectors. Warning |
With an engine warmed up to normal operating temperature, the resistance of the fuel injectors increases by 4–6 ohms.
If the fuel injector resistance is not as specified, replace the fuel injector.
VAZ 2109 | Injectors | Lada Samara
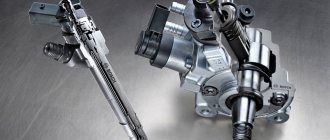
The Common Rail system uses special hydraulically boosted injectors with an electric starting element (solenoid valve) to ensure that the correct amount of fuel is supplied to the combustion chamber.
To ensure the exact amount of fuel injected, the opening of the injector must occur very quickly, which requires a high voltage supply to the ECU. Once the spray needle is fully open, the current supplied to the solenoid valve is reduced to a value sufficient to hold the solenoid valve in the open position. The amount of fuel injected is determined by the opening period of the nozzle and the pressure in the system. After the voltage supply to the solenoid valve is stopped, the nozzle needle moves down and hermetically shuts off the high pressure fuel supply to the combustion chamber.
|
|
- Check the injector for fuel injection. Disconnect the connector from the injector and connect it to the additional injector. If the engine operation does not change, the injector being tested does not inject fuel. If the engine operation has changed, it means that the injector being tested is working properly and is injecting fuel. This test does not allow you to determine the amount of fuel injected by the injector. Replace all fuel injectors if necessary.
- With the ignition off, measure the supply voltage at pins 33 (cylinder No. 1), 36 and 39 (cylinder No. 3), 40 (cylinder No. 2) and 37 of the ECM. Voltage: 0 V.
- If the voltage is not as required, check the condition of the electrical wiring. If wiring is normal, replace the ECM.
|
VAZ 21099 | Checking the voltage supply to the fuel injectors 5.6.2. Checking the voltage supply to the fuel injectors |
| 1. Disconnect the electrical connector from the fuel injector of the first cylinder, see fig. Location of the electrical connector (1) supplying voltage to the fuel injector and connector (2) on the fuel injector. |
| 2. Connect the control LED to the connector contacts (1) (see Fig. Location of the electrical connector (1) supplying voltage to the fuel injector and connector (2) on the fuel injector). When the engine cranks with the starter, the LED should flash. |
| 3. Check the voltage supply to the remaining fuel injectors in the same way. |
The LED does not blink on any of the cylinders
Location of contacts on the electrical connector supplying voltage to the fuel injector
| EXECUTION ORDER |
| 1. Connect the control LED to pin No. 1 of the electrical connector to supply voltage to the fuel injector and vehicle ground, see fig. Location of contacts on the electrical connector supplying voltage to the fuel injector. |
| 2. Connect pin No. 2 of the electrical connector to vehicle ground. |
| 3. Turn the engine crankshaft with the starter. In this case, the LED should blink. Otherwise, check the entire electrical circuit supplying the fuel injectors. |
LED does not flash on only one or more cylinders
| EXECUTION ORDER |
| 1. Check the condition of the electrical circuit powering the fuel injectors and determine and eliminate the location of the electrical circuit break or short circuit to ground. |
| 2. Check the operation of the engine control unit. |
Checking resistance Connection points for an ohmmeter to check the resistance of fuel injectors
| EXECUTION ORDER |
| Sequentially disconnect the electrical connectors from the fuel injectors and, using an ohmmeter, check the resistance of the fuel injectors, which should be between 12 and 17 ohms, see fig. Connection points for an ohmmeter to check the resistance of fuel injectors. Warning |
With an engine warmed up to normal operating temperature, the resistance of the fuel injectors increases by 4–6 ohms.
If the fuel injector resistance is not as specified, replace the fuel injector.
FakeHeader
Comments 18
What kind of brain do you have?)
And on 8k there was a BOSCH one, it seems, with a chip that had to be soldered and programmed for firmware)
Guys, tell me who changed the force to BOSCH 0 280 158 110? Is it necessary to flash it? VAZ 2109i 2001
If you change the forces and their performance differs from the parameters specified in the firmware, then inevitably you need to adjust the firmware, which is complete crap, because A lot of sections vary depending on the “firmware performance” section and parameters. Many sellers simply understand the word “VAZ injector” and that’s it. That’s why they shove it at people who don’t understand and install it. For example, there were Siemens deck 6238 - 4 pcs. with a performance of 1.6537 and one piss began to leak, or worse, flow through the housing or the winding resistance was zero, which is not uncommon. So, a man goes to the store and buys a VAZ injector, and the seller pushes him, for example, Avtelov’s 6393! They look completely identical, only the color is different, but the performance is different! The poor fellow sticks her into the ramp and gets sausage. Then he starts to get his mind blown in the store that the force is dead, and they tell him that we don’t sell dead meat, only fresh stuff. In this performance category, Siemens deck 6238 and Bosch 0280150996 green are identical. But the Boshevsky ones are structurally different and fit a different ramp. Something like this. It’s the same with DMRV 037 and 116. The firmware for them has different calibrations, which need to be changed to the type of DMRV and registered in the firmware. Install spark plugs with resistance that is not suitable for short circuit? And what ? Can you tell me for a moment that it runs and starts? Yes, I agree that perhaps they have less resistance and therefore a stronger spark, but then the question is, how long will the coil last or what is worse than the coil? Even, I didn’t sign for jokes))))) Here is a table of interchangeability of VAZ engines, where the asterisks indicate identity in performance, but this does not mean that they are structurally identical. The plant always swims against the current ((((
Siemens 63 93 forces are the same. four-stage
Is there a sequence for installing injectors? Mine have some letters AG BD, and each has its own letters.
As far as I know they should all be the same and there is no difference.
Is the injector working? I got into mine here. Dropped and broke one. I bought one just like yours. One. There are no relatives anymore.
I sold the car, but I drove it for almost a year with new injectors, without any complaints.
I have an aluminum fuel rail and the master said that for some Boches, as far as I remember, just 996 you need to literally re-drill the fasteners, which are screwed in with hexagons, by 5 mm. And the performance is the same.
Now I have the same problem, no revs, it starts only with the gas pedal, it’s unrealistically dull, it jerks, everything that could be replaced (the head was rebuilt, all sensors, the ignition module, wires, spark plugs were replaced), only the injectors remained (they were washed but the result is the same) the consumption feels like 20 litorv per hundred... I have BOSCH 0 280 150 996... SIEMENS DEKA VAZ 6238 are they complete analogues?
Nobody changes anything from a good life in VAZ engines, especially in the fuel system. If the question arises about which injectors are best to install on the VAZ-2114, it means that the old ones have expired and they need to look for an adequate replacement. Since the car plant does not offer a wide selection of injectors, the task is simplified. However, there are some nuances that you need to know in order to choose the right injectors.