Why are tags needed?
The gas distribution mechanism of the power unit 126 from the Lada Priora, as already mentioned, must work in a certain order. If this order is violated, starting problems begin, or the motor completely fails. Often the cause of engine failure is incorrectly positioned marks after changing the timing belt. Such mistakes are made by novice car enthusiasts and mechanics who have just graduated from college.
The manufacturer has created the necessary phases on the sixteen-valve 126 engine so that the valves open and close alternately. These actions are carried out through the movement of the cams of the switchgear. The phases must not be disrupted under any circumstances.
Attention! The belt must be replaced before it breaks and destroys the engine. Changing this part is done only by experienced mechanics and not by beginners “on the knee” in a garage environment.
A broken belt leads to sharp contact of the valves with the pistons, because there is a mismatch in the angular location of the crankshaft and camshafts. As a rule, the car is brought for major repairs to the service center on a tow truck in case of a broken belt.
Experienced mechanics carry out checking and adjusting the belt on a cold engine. And the timing drive notches can be found in the following places on the 16-valve Lada Priora engine:
- mark on the back cover of the engine;
- mark on the camshaft pulley;
- mark on the cover of the oil pump of the power unit 126;
- mark on the engine crankshaft pulley 126.
The following tools are used to straighten notches:
- TORX key T-30;
- torque wrench with 15mm head.
To start changing the belt, you will need to read the instructions for the 126 engine and see where the marks are so as not to forget any.
How to check if labels match
To correctly set the timing gear drive of the Lada Priora engine, you need to check all the marks on the camshafts, crankshafts and flywheel. To do this, dismantle the protective housing of the gas distribution mechanism drive. Remove the car generator pulley.
The crankshaft is turned by turning the front wheel. To do this, you will need to lift the front part of the Lada Priora vehicle on a jack. The assistant must turn on fifth speed. And only then spin the wheel. Turn the wheel until the marks on the crankshaft and the camshaft are facing each other.
They also check that the marks match when adjusting the belt tension. Just like that, without properly setting the marks, it is not recommended to tension the timing belt.
How to set timing marks on a Priora 16 - Automaster
Asks: Kostikov Vladimir Igorevich.
The essence of the question: I can’t fix the timing marks, how can I set the marks on the timing belt?
I have a problem. When replacing the timing belt, the upper pulleys were not fixed, and now it is not clear how to align them. The marks on the pulleys do not “look” in exactly the same direction. Maybe it would be easier to tighten all the pulleys to the TDC position in cylinder 1? If we are talking about 16 valves, I am familiar with setting the marks on the VAZ-2112: I performed this operation on the timing belt 21124. Well, I have a 1.5 engine. Are there any differences?
Set the timing marks correctly - otherwise you will bend the valves!
The VAZ-21124 engine has a special feature: no matter how its pulleys are turned, it does not bend its valves. With the 21120 engine (16v 1.5 l) such jokes will not work! If the pulley positions are not too far off, try putting on the belt and turning the mechanism to the “TDC 1 and 4” position. From now on, always use the following instructions:
- The crankshaft is set to the required position by checking the mark on the generator drive pulley (photo 1) or on the crankshaft pulley (photo 2);
Alternator drive pulley and crankshaft pulley
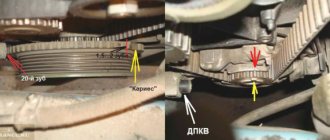
- Let us clarify: there should be 20 teeth between the DPKV sensor and the “pass”;
- The marks on the “upper” pulleys should point straight up (photos 3 and 4).
These pulleys must be fixed, after which the tension can be released; Exhaust and intake shaft pulley - When the belt is loose, the crankshaft cannot be rotated.
- The number of belt teeth between the “upper pulley” marks is exactly 16;
- The mark on the crankshaft pulley sometimes breaks off - use the control method “1” (photo 1) or “3” (bottom photo).
In theory, on the VAZ-2112, marking is carried out the same way, no matter what engine we are talking about. Here are photos for engine 21120.
What it looks like in reality and in the instructions
Take the time to find the inspection window on the gearbox housing. There is another mark under the plug.
How to replace spark plugs on a VAZ 2170-VAZ 2172?
Note! As we said earlier, in order to change a spark plug you will need a special spark plug wrench that is suitable for 16 valve cars, and a special one is needed only because it is equipped with a magnetic insert that will hold the spark plug when you unscrew it and remove it from the hole, respectively, without a magnetic one inserting a candle will be more difficult for you to get!
Removal: 1) At the very beginning of the operation, remove the screen from the engine so that it does not interfere with further work, since it covers most of the engine, and about how to remove it, read the article called: “Replacing a car engine screen.”
2) Then from each ignition module (There are four modules in total, each goes separately to each spark plug, the modules were also shown with arrows in the second photo from above) disconnect the wire blocks (For clarity, the photo below shows only one ignition module, and its block indicated by a red arrow) that are connected to them, these pads are held on clamps by bending them, the pad can be disconnected from the module, and after this operation, pick up the key and use it to unscrew all the nuts that secure the module to the car engine (One nut securing one module is indicated by a blue arrow).
Note! When the fastening nut is unscrewed, remove the module indicated by the blue arrow from the hole in which it is located and then put it aside and make sure that no water gets on it, otherwise it may quickly fail when connected!
3) Now that all the modules have been unscrewed and removed, pick up a special spark plug wrench and use it to unscrew all four spark plugs (the spark plugs are located deep in the holes from which you removed the modules).
Note! When you are about to remove the spark plug, and if suddenly you do not manage to do this, then pick up any ignition module and put it in its place (the module must go all the way into the spark plug itself and lock onto it), so that’s when the module will be fixed on the spark plug, pull it and thereby you will remove the spark plug from the car!
Something else you need to know, many of you have already heard, or maybe not, that any malfunction with the engine can be determined by the spark plug, so I suggest you read the article entitled: “Diagnostics of spark plugs”, everything is in detail in it scheduled!
4) Well, to finish the removal, let’s add a few words about the spark plug, namely, when you remove the spark plug and determine by its appearance that everything is in order with it and it does not need to be replaced, then clean the spark plug itself from dirt, using a special sandblaster for this a device with fine-grained abrasive material, I will note the fact that you are unlikely to have this device in your garage or at home, so travel to car services and find where such a device is used, or simply wrap the spark plug back without cleaning it with anything.
Note! By the way, you cannot clean the spark plug with sandpaper or a metal brush, because all the dust from it will fly onto the spark plug electrodes and if the dust gets on the central electrode, it can easily cause a spark to leak, thereby sometimes tuning up your engine!
Installation: 1. When installing a spark plug, remember the fact that it is installed in the reverse order of removal, but if you are installing the same spark plug again, then using a special probe, check what gap you have between the electrodes, it should be no less and not more than 1.00-1.15. (see photo 1)
Note! If suddenly the gap is different, then in this case take the same special feeler gauge and use it to adjust this gap, the gap is adjusted only by bending or straightening the side electrode of the spark plug, but take into account only the side electrode, the central electrode (It is indicated by a red arrow in photo 2, but it in the photo above it’s hard to see, so you understand, it goes into the spark plug itself, and the side electrode comes from the spark plug and it’s not located in it) you don’t need to touch it, because if you even accidentally get on it, it can lead to because the spark plug will fail, so be careful!
2. And one more thing you should know, namely that the spark plug must first be screwed in by hand and only then it must be tightened using a wrench; the tightening torque for the spark plugs is 30.7-39.0 (3.1-4.0 kg).
It will be useful: This is sva with 542 hp. f-pace from jaguar
Additional video clip: If you are interested in more detail about how to change spark plugs in cars, then check out the instructive video clip that is located just below and which gives a visual representation of how a spark plug on a car is replaced.
Replacing the timing belt on a Priora by marks
The timing belt occupies an important place in the operation of the entire car. Without it, engine operation is impossible, since it ensures synchronization of the movement of the engine shafts: the crankshaft and two camshafts.
A belt inspection is carried out every 40-50 thousand kilometers. Replacing a belt is not an easy task, since if you incorrectly set the timing marks on the timing belt, your Priora will be in repair for a long time.
Negligence and ignoring this procedure will cause valve deformation. And this is an expensive repair. Therefore, prepare thoroughly for replacing the belt: you need a special tool and a partner. The replacement process consists of several stages.
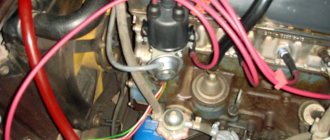
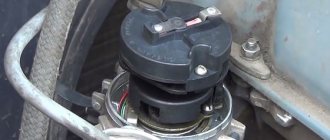
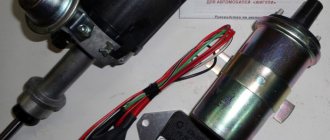
VAZ IGNITION SYSTEM DEVICE
On VAZ models 2101-07, two types of ignition were installed - contact and contactless. The fundamental difference between them is that the contactless SZ does not have a contact group in the distributor, and the role of the breaker is performed by a pulse sensor (Hall sensor). In the contact SZ, at the moment the contacts open, a high-voltage pulse occurs in the secondary circuit of the ignition coil (SC) winding, which is then supplied to the spark plugs using a distributor. The ignition contact diagram looks like this:
In a contactless SZ, the Hall sensor generates pulses, which are then processed by a transistor switch. Otherwise, the principle of the device is the same as in the contact SZ circuit, only the sparking on the spark plugs in such a system is higher quality and more stable. The contactless SZ diagram is shown in the figure below:
Often, owners of VAZ classics convert the ignition to contactless, since such a system is more reliable and stable in operation. To reinstall the SZ, a special kit is sold in car dealerships, which includes:
- Distributor;
- Switch;
- Ignition coil;
- Wires with plugs.
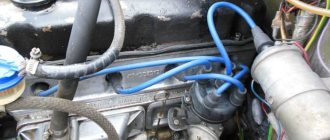
Installing the timing belt
Before installing the rollers, apply thread sealant to the threaded part. We do not completely tighten the tension roller bolt. Before installing the timing belt, check the alignment of the timing marks. It is convenient to control the position of the crankshaft by aligning mark 1 on the crankshaft toothed pulley with mark 2 (rib) on the oil pump cover.
We put the timing belt on the crankshaft pulley, tensioning both branches of the belt, we put the front branch behind the support roller, and the rear branch, putting it on the coolant pump pulley, behind the tension roller. Then we put the timing belt on the camshaft pulleys.
Ignition system sensors and marks
For the ignition system to operate correctly, the computer needs to read the correct information from the sensors. Subsequently, this information will be processed in accordance with the fuel maps hardwired into the injector.
The main signal comes from the crankshaft sensor. This sensor shows what position the crankshaft is in at a given time and, based on it, calculates at what moment it is necessary to inject fuel, and at what moment this same fuel should be ignited, depending on the engine speed, which is also determined by this sensor.
1 – crankshaft drive disc; 2 – crankshaft position sensor; 3 – angle of rotation of the crankshaft; 4 – output signal of the crankshaft position sensor
And this is what a typical signal received by a computer from the crankshaft sensor looks like. Pay attention to 270° - this is like the zero point, showing the computer that the engine has completed a revolution and a new cycle begins. This is achieved due to the absence of a tooth on the crankshaft drive sprocket.
Diagnostic procedure
Checking the drive should only be performed on a cooled engine and consists of the following manipulations:
- Using a hex wrench, unscrew the cover fasteners (there are 5 in total) and remove the protection.
- Inspect the motor and determine whether the belt needs to be replaced. To do this, you need to turn on the 5th speed, lift the right front wheel and make several revolutions clockwise. There should be no cuts, cracks or peeling on the belt. If there are any defects, the drive must be replaced.
- Inspect the condition of the tension roller - it should also not be damaged.
- Check if the belt tension is as required. To do this, you need to press it between the camshaft gears. The deflection should be approximately 5-7 mm, if more or less, adjust the tension.
- Check the timing marks on the Priora.
Replacing spark plugs - step-by-step instructions.
Good day to all. Almost every car enthusiast has at least once replaced spark plugs or glow plugs on their own. We described replacing glow plugs here. Spark plugs are the most important element in the operation of any car. Their purpose is to ignite the fuel-air mixture in the combustion chamber.
The spark plug is the final element on which the entire car ignition system operates. Spark plugs are consumables and require periodic replacement during operation. This article will provide information on how to do this yourself and avoid mistakes.
When to change spark plugs
To understand the specific timing of replacing spark plugs, you need to refer to the technical regulations of the car on which this operation must be performed. This is done due to the fact that depending on the make and year of manufacture of the car, the requirements vary.
What's wrong with the weather and how does it affect spark plugs? You ask. Very simple. Partial dust, sand, dirt, water from the road gets onto the engine. In the process of replacing spark plugs, we observe sand in the wells, oil that flows from under the gasket (Ford), and even water (from above from under the plastic where the wipers are). It's different on different cars. Since the engines are located differently.
How to change spark plugs
Everyone knows this very well, but still many neglect the requirements for replacing spark plugs. Perhaps the rush prevents everything from being done efficiently. Or they do not represent the full responsibility of the matter.
Spark plugs are changed when the engine is cool. It must be taken into account that spark plugs operate at high temperatures, so if you do not cool the car after driving, there is a risk of burns.
In addition, since the cylinder head is aluminum and the spark plugs are steel, they have different expansion coefficients when heated, and a plug that is unscrewed from a hot engine can bite.
The spark plugs really bite and they break off or come out of the cylinder head together with the threads. When unscrewing long spark plugs, they turn 1.2 turns and get snagged. Short candles most often envelop the candle thread.
Preparing to replace spark plugs
Before removing the coils (or wires) and the spark plug itself, it is necessary to thoroughly blow off the working surface so that the dust and sand that accumulate on it do not get inside the cylinder and damage the cylinder mirror and elements of the piston group. This must be done with a professional, powerful compressor.
If there is no compressor, but you need to unscrew the spark plugs, then find one (for example, a tire shop, there is always compressed air there). I do not consider the case when replacement is required in an open field.
If you unscrew the spark plugs without cleaning and blowing out the spark plug well, sand will fall into the cylinder. In engines that are tilted, when starting, the piston will rub sand against the cylinder wall as an abrasive. It will be a bully.
Some will say that this is nonsense. But such cases do occur. The human factor is present everywhere.
How to tighten spark plugs correctly
Go ahead. Let's imagine that you have completed all the preparatory operations and the spark plugs have come out. Great. You are well done. Now you need to screw in the new spark plugs.
First of all, you need to carefully inspect all the new spark plugs one by one. There should be no chips on the ceramic insulator, the threads should be clean, good, and there should be no other externally visible damage.
- Carefully place the spark plug (without throwing it towards the spark plug well, so as not to damage the insulator) into the well.
- Fit the spark plug by hand. In case of biting, go through the thread in the head with a tap (if possible). Be careful not to drop the tap into the cylinder.
- Tighten the spark plug to the required torque using a torque wrench.
If you put a load on the spark plug that exceeds the recommended norm, the sealing ring will be overtightened, overheating will occur and there will be a possibility of destruction of the spark plug, which may simply break.
It is also possible to strip the threads of the cylinder head, which will require an expensive and complex repair. Thus, tightening the candles is an extremely important point and doing it “by eye” is highly not recommended, even though this rule may be neglected even in some services.
Thank you all for your attention. I hope that this information will be useful to all those who are interested in it. subscribe to the channel
Stay up to date with all events in auto repair
subscribe to the channel
. Stay up to date with all developments in auto repair.
Source
Replacing the timing belt without special tools
The method can be used if there is no need to change the rollers.
- Cut off half of the old timing belt with a utility knife.
- Remove half of the old timing belt.
- We put a new timing belt on the crankshaft pulleys.
- We cut the second half of the old timing belt and remove it.
- Pull the new timing belt onto the crankshaft pulleys until the end.
These and other original parts are presented at low prices in our online store. Link to timing kit 8kl, timing kit 16kl.
Step 1: Belt removal
First, unscrew the screws holding the shield that protects the entire mechanism from dirt. After removing the shield, it is necessary to remove the cover protecting the timing drive, located at the bottom front. To do this, you need to unscrew two screws. Then remove the belt from the generator drive. Here comes a very important moment.
It is necessary to install all shafts in the correct position. On the camshaft pulleys and the rear drive cover in the 16-valve version of the Priora car, the timing marks must match. This is done using the crankshaft. It must be turned to the desired position.
In a Priora car, the timing marks should not only be in relation to the camshafts, but also in relation to the crankshaft. To do this, remove the rubber plug in the upper part of the clutch housing and see if the marks match.
If on the flywheel it is located opposite the recess of the upper cover of the clutch housing, then everything is adjusted correctly. Often, when unscrewing a bolt, the valve timing is disrupted. To prevent this, the flywheel should be locked.
To do this, you will need a regular screwdriver of a suitable size. It must be inserted into the clutch housing between the teeth. It will be more convenient to use the help of a partner for this task. Next we proceed to the final stage.
1. Unscrew and remove the bolt for securing the pulley
3. Loosen the bolt securing the belt tension roller with a 15mm head
Which rollers are better for the drive mechanism?
Gates rollers were installed on the Priora from the factory. Reviews say that this is not the best option, since the quality of the material in them leaves much to be desired, and the service life is barely long enough to replace the belt. Plastic, after all, is plastic. Therefore, when replacing a belt, you should still play it safe and install better quality belts and rollers. The Marel KIT Magnum is a pretty good kit, it includes two metal casters and a quality Contitech belt. They are even visually different, although they cost about 4 thousand. In a word, there are no special questions regarding the VAZ belt, but it is better to install the rollers from a third-party manufacturer and certainly metal ones.
Source
How to train a Lada Priora key
Remote control keys serve vehicle owners to quickly control the locking and unlocking of the car lock. Also, in cars of the Lada Priora modification, the keys help control the super-locking of doors, turning on and off the alarm system that responds to touch and vibration. Other useful functions of the remote control include controlling the trunk lid lock and raising and lowering the windows. In addition, it can be used as an electronic code key for the APS-6 immobilizer, which is a standard anti-theft device on the Lada Priora, as well as modifications of Kalina and Grant.
The delivery set includes two unprogrammed keys, as well as a “master key”, which is designed to “train” the entire system.
Structurally, the remote control key is mounted on the blade of the key designed to turn on the ignition of the car. Via wireless communication it provides control of the following nodes:
- signals are sent via the radio channel to the electrical package control unit and the door module on the driver's side;
- via a transponder channel, communication is carried out with the immobilizer control unit APS-6 or APS-6.1 and the electrical package controller.
Initially, the key is unprogrammed, and for its further operation it is necessary to carry out certain manipulations. First of all, it should be “trained”, using a coded, so-called red immobilizer key, after which it can be used by the car owner.
It must be remembered that two independent remote control keys can be used simultaneously with one security system.
The basis of the operation of the gas distribution mechanism
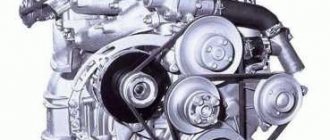
When the mixture is compressed, a spark enters the working cylinder and the mixture explodes, pushing the piston. He pushes the connecting rod, the connecting rod pushes the crankshaft. Everything is known. The valves, by timely opening and closing, ensure tightness in the cylinder at the right moment and free inlet and outlet in other cycles. The camshaft controls these devices by pressing the valve mechanism with its cams. The Priora engine has 16 valves. They are controlled by two camshafts. And the camshafts are driven by the crankshaft via a timing belt.
To ensure that the valve timing matches and the drive is installed correctly, special marks are applied.
Timing timing marking points
They are applied by the manufacturer in several places and are divided into movable and stationary:
- On the body of the Priora engine
- On camshaft gears.
- On the crankshaft gear.
- On the engine flywheel.
Now in more detail about these tags.
On the engine body of a VAZ 2170
Here the mating marks are installed in three places. They are immovable:
- On the lip of the oil pump housing.
- On the flywheel housing.
- Marks on the plastic protection of the Priora timing belt
The first two types of marks are intended for mating the crankshaft.
That is, the risks on the gear and on the flywheel must coincide with them. The crankshaft drive gear is located in the oil pressure pump housing. This is a slot in the metal skirt that half-encircles the gear from above. It is clearly visible in normal lighting. Sometimes it can be “bombarded” with oil and dust. Then you need to wipe this place with a rag, and everything will be visible.
There is a special arrow installed on the flywheel housing, in the viewing window in the starter area. It must be taken into account that the top dead center is determined only by the average of the three marks.
Marks on the timing case
In fact, they are not located on the motor block, but the plastic casing is very firmly attached to it. Therefore, these notches are referred to as marks on the motor. These are triangular indentations in the upper section of the casing. They are perfectly visible and easy to use. Access to them opens immediately as soon as the outer part of the casing is removed.
Repair cost
The average price for replacing a belt and roller in car services ranges from one to three thousand rubles. The price range is due to the fact that replacing parts on foreign cars costs approximately 2–3 times more than on domestic cars.
If it turns out that you also need to change the engine water cooling pump and the crankshaft oil seal, then the price will increase by another 1 - 1.5 thousand rubles.
Although there is a huge selection of products on the market at different price levels, you should only choose brands recommended by the manufacturer or their high-quality analogues. Using cheap parts can lead to serious damage and expensive repairs.
Why and when you need to change the timing belt
As is clear, the timing base is the camshaft, which is located in the cylinder head and pushes the intake/exhaust valves. The camshaft is driven from the crankshaft by a drive belt. Timely opening and closing of valves must be carried out in a strictly established order and in accordance with the engine operating cycles.
In other words, during the intake stroke the intake valve must open, so air or a fuel-air mixture (depending on the type of engine) enters the cylinders. Next, the consistency is compressed (the piston moves to TDC), at this moment all valves are closed. After the fuel charge is ignited and useful energy is released to the piston, the exhaust valve opens to remove exhaust gases from the engine cylinder. This is how the gas distribution process is carried out.
We recommend: How to drain the coolant and flush the engine cooling system on a VAZ 2114
You should also take into account a number of reasons that can significantly reduce the service life of any belt. For example, engine oil getting on the timing belt as a result of leaks in the crankshaft front oil seal can quickly render the designated camshaft drive element unusable. Problems with the tension roller, jamming of the pump and other malfunctions are the reasons why the belt breaks or wears out quickly.
If signs of wear on the timing belt are noticeable or the time for its scheduled replacement is approaching, then it is not much to simply install a new element. When replacing, the belt should be set correctly. To replace and expose, you need to prepare tools; it is also better to service the car on a lift or in a garage with an inspection pit. The smallest set for this operation can be considered a jack, screwdrivers, spanners and socket wrenches, a socket wrench, preferably a wrench with a socket head, etc.
The car does not start after replacing the timing belt, timing chain or carrying out other work on the gas distribution mechanism drive. Main prerequisites, advice.
Ignition control
Electronic ignition control
How to set the ignition angle? On systems with electronic ignition control systems, this can be done using computer diagnostics that connect to the Electronic Control Unit (ECU) or the “brains” of the car. And there you can see how the engine operates in real time - what signals are received from the sensors, what engine speed, fuel consumption, injection timing, ignition timing and other input and output data.
Basically, you don’t need to change anything during operation unless you change the firmware. That is, if the machine somehow began to work incorrectly, then most likely there could be several reasons:
- An incorrect signal is received from the sensors; in this case, you can replace the supposed faulty sensor with a replacement one that is known to be working, and see if the result changes.
- The voltage in the network is incorrect and, accordingly, the sensors give the wrong signal. The input signal to the sensor is 5V, if this indicator is different, the ECU will receive incorrect input data and the engine will not be able to operate normally.
- The ECU is faulty. Quite often it happens that after going through everything possible, it turns out that your brains have flown. But don’t worry, they are inexpensive at VAZ.
see also
Comments 28
I recently changed the timing belt, everything was fine, I put a mark on the flywheel, a friend stuck a screwdriver into the crown so that the flywheel would not move, and I put on a belt, adjusted the pulleys along the way according to the marks, started it and everything sounded. By the way, without fixing the flywheel, I first lost the mark when setting the camshafts.
how much mileage do you have? I’m also worried about something. On the last Priora, the pump jammed, well, according to the valves, but on this one I don’t want to allow that to happen) now it’s 30 thousand. Now I’m wondering whether it’s worth changing now or driving a little more)
mileage 85500), it’s just that the previous owner only changed the belt at 60 thousand, but it’s better to change everything together - the belt, rollers and pump)
I also want the belt, rollers and pump all together) but at what mileage? ))
I think that up to 50-60 thousand it is pointless to carry out this work, unless of course there are no complaints about the operation of the pump and timing belt in general
I also want the belt, rollers and pump all together) but at what mileage? ))
I changed it every 50 thousand.
Thanks to all! everything was set up as in the pictures - the engine just whispers)
It is better to match the mark on the pulley than on the flywheel. Because it's more accurate
I always look at the mark on the flywheel. It is not necessary to unscrew the spark plugs: jack up the front right wheel, engage 4th gear, turn it, compare the marks on the camshafts, look through the window in the box, if there is no mark, then turn the camshafts one more revolution, look at the mark, if all the norms are set, then you will see the mark. If not, then look) The mark on the flywheel indicates more accurately. Everything is clearly visible through the window, but putting the rubber plug back is a pain.
I always look at the mark on the flywheel. It is not necessary to unscrew the spark plugs: jack up the front right wheel, engage 4th gear, turn it, compare the marks on the camshafts, look through the window in the box, if there is no mark, then turn the camshafts one more revolution, look at the mark, if all the norms are set, then you will see the mark. If not, then look) The mark on the flywheel indicates more accurately. Everything is clearly visible through the window, but putting the rubber plug back is a pain.
You shouldn’t put too much trust in the mark on the flywheel, because from the factory the flywheel can be rotated 180 degrees, as was the case for me, when replacing it, I set the marks on the flywheel and did not check the mark on the wheel, it turned out that the flywheel was rotated 180 degrees, as a result, an impact on all 16 there was no bend in the valves, but the prints remained on the pistons and valves; to calm my soul, I replaced the valves with new ones since the engine spins above 8000 and if the valve breaks at such speeds, the consequences will not be very good.