The ignition system plays an important role: without it, not a single vehicle with a gasoline or diesel engine will move. The quality of engine operation, whether it will start in cold weather, and whether it will work correctly depends on how it is configured. Depending on how the ignition is set and what spark plugs are selected on the scooter, it depends on whether it will go or not. From this material you will learn how to set the ignition on a scooter yourself, what you will need for this, and how to set up a contactless system.
The principle of operation of ignition in a 4-stroke scooter engine
Modern scooters are equipped with contactless systems. They are considered the most reliable and easy to use, do not require complex connections, and provide a constant good spark on time. However, the setting is still important; even the presence of a spark does not always allow the fuel mixture to ignite, since its power also plays a role.
The main reasons for the operation of the ignition system are quite simple: its task is to create a spark to detonate the fuel mixture. If this does not happen, you need to carefully examine each node and find out why the spark disappeared.
- In order to check whether there is a spark at all, you need to unscrew the spark plug and apply it to the engine ground; this can be done using metal objects that are not covered with paint. You cannot hold it with your hand: if there is a spark, it can give you an electric shock, and the discharge reaches 40,000 volts, which the coil creates.
Broken ignition is the cause of engine failure
An incorrectly configured or faulty ignition often causes engine failure. It would be wrong to immediately climb into the cylinder and examine the insides of the scooter, especially since this will not solve the problem. Before touching the ignition system, you need to check for other reasons why the scooter may not work.
- The simplest thing is the lack of gasoline in the tank. Quite often, owners forget to refuel their vehicle, and such a trivial reason can be overlooked.
- The carburetor may be clogged, which prevents the formation of a mixture suitable for driving.
- The carburetor needs to be cleaned regularly, so it doesn't hurt to check whether fuel is flowing from it into the cylinder. It is possible that the fuel pipe is clogged. The jets and other parts of the device may become clogged with debris, which causes little fuel to flow or, conversely, the engine does not have enough air, and therefore it does not start.
- The scooter may also refuse to start if the fault is caused by spark plugs. They may be wet or not produce a normal spark. It is advisable to have a spare set and check with it. In any case, the spark plug needs to be unscrewed and inspected.
How to set the ignition on a scooter
With minimal experience, but good theoretical knowledge, you can set the ignition yourself. To do this, you just need to strictly follow the instructions below.
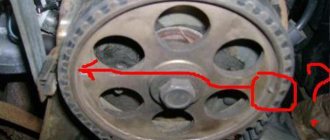
The most important part of tuning is to find the correct position for the timing sprocket to sit. In order to find it, they use special marks that are applied at the factory during engine assembly. The desired mark looks like the letter "T". In this position, the piston is at dead center. This is the extreme position after which the piston will return back. You need to rotate the rotor until the protrusion on the crankcase and the letter “T” coincide. This can be done using your hands or a kick starter. An electric starter does not need to be used.
If the piston has only moved down minimally, turn it further until the marks line up. It's not always possible to get the right position the first time. After they match, you need to study the other marks: they are located on the timing star. Usually these are three points or holes that are located on the outside of the star. They form a triangular shape if you connect them visually. Notice that one point is larger than the others. After adjusting the ignition, it should be on top, and the other two marks should remain opposite each other. They must stand horizontally.
If the ignition is contactless, it is adjusted as follows. In order for the engine to run smoothly and correctly, you need to adjust the ignition of the mixture at the right moment. To do this, after all the tags are installed in the right places, you need to understand how the contactless principle works in general.
A special feature of the BZS is the presence of special sensors, a switch, and two types of ignition coil winding. When the sensor is closed using a rotor equipped with a magnet, a pulse is generated that enters the commutator, it pumps up the current coming from the generator and directs it to the primary winding of the coil. After this, the charge enters the secondary winding, where a high voltage is generated, with the help of which a spark appears, used to detonate the gasoline mixture. Adjusting the ignition is the alignment of the marks on the crankcase and the star. Usually you have to remove the valve cover.
After this you need to do the following:
- Labels are set in the manner described above.
- In order to set the ignition angle, you can release the stator mount and adjust it in accordance with the technical requirements of your vehicle.
- Make sure that the marks or holes are in the correct position.
How to adjust valves on a 4-stroke scooter Information, operation, maintenance
So, maybe after replacing the CPG, your scooter has stopped selecting revs, or you just want to improve the performance of your scooter.
Adjusting the valves will help with this.
First you need to remove the cover from the cylinder head; to do this, unscrew the four bolts.
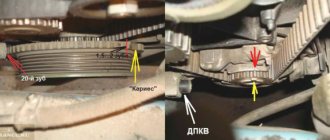
Next, it is important to set the dead center, it is done like this. Remove the protection from the cooling fan and look at the marks on the plate
After that we return to the valves. Let's look at how the camshaft sprocket is located, it is better to remember approximately how the marks are located
We begin to remove the bed with rocker arms
It is very important to unscrew the nuts evenly from the studs, crosswise. That is, a revolution of the upper left is a revolution of the lower right, a revolution of the upper right is a revolution of the lower right
When the nuts already begin to spin without tension, feel free to unscrew them, it may no longer be evenly distributed.
Unscrew the nuts and remove the bed, holding the camshaft.
Next, remove the timing chain from the camshaft sprocket and rotate the camshaft so that the marks on the sprocket coincide with the edges of the cylinder head, put on the timing chain.
We check the marks again, if they are level, we return the bed with the rocker arms and tighten it. You need to tighten it in the same way as you untwisted it, evenly, otherwise the cylinder head and/or cylinder may become warped. Then you will have to completely disassemble the CPG, and most likely change the gaskets.
Afterwards we put everything back together in reverse order. We start it and check it.
Whatever it is: better, worse, or the same. Most likely you will want to try to do better.
Don't forget to set the dead center.
We disassemble again until the rocker arms are removed. Next, slightly raise the side of the camshaft on which there is no sprocket. So that the timing chain would be slightly loosened and it would be possible to lift it from the sprocket and rotate the sprocket. Scroll the sprocket one tooth forward or backward. How
you'll want to. We twist it and check it.
If it’s worse, we set the dead center, unwind it and scroll it two teeth back. We twist it and check it.
Thus, by trial and error you will definitely set it the way you like it.
From personal experience I can say that once you set it correctly, you will never have problems with this matter.
What is advance ignition
The quality of the mixture supplied to the engine cylinder determines the behavior of the scooter in cold weather, as well as how high the wear of the cylinder itself will be. For example, with a rich mixture, the engine starts better, but carbon deposits form; with a lean mixture, the cylinder quickly wears out and traction is lost.
In order to facilitate the process of starting the engine, you can set the ignition to advance, this will make it easier to start the engine regardless of the weather outside, slightly increase engine power, and significantly increase traction. The peculiarities of such settings are that a charge is formed in the spark plug before the piston reaches the dead center. This makes it easier to start the engine and increases engine power. However, it is worth remembering that cylinder wear may increase.
The procedure is carried out in approximately the same way as a regular ignition adjustment, but has its own nuances. To do this, all the same actions are carried out, only the tags are not completely connected. The discrepancy should be approximately half a centimeter. This is enough to get the desired effect.
How to set the lead angle (video)
About adjusting the ignition of a 4t scooter
Knowing how to set up the ignition of a 4T scooter on your own, you can save time and money, since you will not need to contact a motorcycle repair shop. The procedure is simple, even if you have no experience it takes a little time, but you will need to be patient. Regardless of the type of ignition, an important role is played by how the marks are set.
Correct adjustment is a guarantee of stable and smooth engine operation even in cold weather conditions. Often, in used vehicles, the ignition is broken: this can happen for various reasons, ranging from elementary shaking when driving to improper handling of the equipment. In order for the scooter not to let you down and for you to be able to start it whenever you want, you will need to learn how to carry out this procedure yourself. To do this, you will need to have several keys that allow you to remove the valve cover if the engine is four-stroke.
Setting up the Vision scooter ignition system
If the ignition is knocked out, this may be the reason the scooter does not work. Restoring it is not difficult if you understand how it is done.
Advice: before starting work, carefully check and clean the carburetor: this may be the reason. Adjust the quality of the mixture. In addition, it doesn't hurt to check the spark plugs.
You need to start adjusting by setting the timing belt in the desired position. As a rule, there are marks on it for this purpose; they are set at the factory. The cylinder must be installed at dead center. The mark may be indicated by the letter T or another symbol. Now make sure that the mark installed on the rotor matches the mark found on the magneto. To do this, you need to gently press the kickstarter. The rotor can also be turned using your hands, but this is more difficult.
Conclusion
Don't be afraid of the ignition system. It’s easy to set up, the main thing is to check the entire circuit; much more often the switch fails, there is no gasoline or the spark plug needs to be replaced. Only after making sure that there are no physical malfunctions should you start setting up the ignition. If it is set correctly, you will hear and notice, as the engine will start easily and run smoothly.
Operating a scooter and enjoying its ownership brings a lot of positive emotions to the owner. In general, a scooter is a truly unique motor scooter, which is an almost universal transport. The scooter is great for driving around the city and for traveling outside of it. And everything would be fine, but sooner or later the moment comes when it has to be repaired and maintained, something that motorcyclists like to do much less of. Also, you often have to adjust and set the ignition, which few people know how to do correctly. It’s exactly how to set the ignition on a scooter that will be discussed in today’s article.
Notes
Experienced repair technicians for devices such as mopeds explain the frequent ignition failure of these devices as follows. Even at the manufacturer’s factory, the moped is equipped with a late ignition, which results in incredibly sluggish ignition response to the accelerator handle and accumulating carbon deposits on the spark plug.
Therefore, it is important to know the method of how to set the engine to start in order to independently bring it back to life
Operating a scooter and enjoying its ownership brings a lot of positive emotions to the owner. In general, a scooter is a truly unique motor scooter, which is an almost universal transport. The scooter is great for driving around the city and for traveling outside of it. And everything would be fine, but sooner or later the moment comes when it has to be repaired and maintained, something that motorcyclists like to do much less of. Also, you often have to adjust and set the ignition, which few people know how to do correctly. It’s exactly how to set the ignition on a scooter that will be discussed in today’s article.
Broken ignition as a cause of engine failure
First of all, I would like to talk about what can cause a four-stroke scooter engine to fail, and whether misconfigured ignition should be blamed for this. Answering this question, we can answer with one hundred percent confidence that an incorrectly configured or simply faulty ignition may well become the cause of engine failure. However, it is too early to blame everything on a faulty ignition system until you check the main parts that affect the performance of the engine. Let's talk about them in more detail.
The first and perhaps most obvious is a lack of fuel or a clogged carburetor. Before you start trying to adjust the ignition, thoroughly clean the carburetor and make sure that fuel is flowing to the engine. Also, check that the carburetor is providing sufficient air supply.
The second, most common reason why an engine refuses to start is faulty spark plugs. Make sure that the spark plugs used in the scooter are not punctured and have a good enough spark. Simply replacing the spark plugs usually helps.
If you are completely convinced that there are no more reasons for the engine not to start, then you can dig deeper and look for the problem in an incorrectly configured ignition. Let's figure out how to set the ignition on a scooter.
How to set the ignition on a scooter
Many people ask about how to set the ignition on a 4T scooter. In fact, this process is not as complicated as it seems at first glance, because all you need is a screwdriver and marks. In order to adjust the ignition on a scooter, you need to set the timing star position correctly. In our task we will be helped by special marks that have already been placed by the manufacturer at the factory.
Pay attention to the magneto housing. There should be a special mark on it in the form of the letter “T”. It is this mark that indicates the dead center of the cylinder (the extreme position of the piston in the cylinder when it reciprocates). Based on this mark, you need to align the rotor so that the mark on the rotor coincides with the “T” mark on the magneto housing. To do this, crank the kick starter with little effort or move the rotor manually.
Then, you will need one more, last mark located on the timing star. This mark consists of three holes or points that are marked on the outside of the timing sprocket. These points subsequently form a triangle, where one of the points or holes is the largest. After you adjust the ignition, the largest hole should be at the top, and the other two points should be opposite each other in a horizontal position. You can see more details on how to set a tag on a 4t scooter in the video below.
scooter 4t
In order for the rotation of the generator rotor and gas distribution shaft to correspond to the desired piston operating cycle, it is necessary to set their position according to the marks. On the magneto body there is a marker for the position of the dead center of the cylinder in the form of the letter “T”. The rotor can be adjusted manually, or using a kick starter. The position of the camshaft is determined by the marks on the timing sprocket. Three points marked on the star from the outside form the top of which should be directed to the extreme position from the piston. Adjusting the ignition consists of setting the correct position of the timing star.
Ignition advance
Some motorcyclists who understand proper ignition settings prefer advanced ignition settings. If we talk about this process more simply, then with this ignition, the motorcycle engine has a little more power and starts much easier. The thing is that with ignition set to advance, the spark plug produces a spark a little earlier than the piston in the cylinder reaches top dead center. Thus, we get a small increase in power and easier starting in bad weather conditions, for example, during cold weather.
Answering the question of how to advance the ignition on a 4T scooter, we can say that this is no more difficult to do than a normal setting. If you are already familiar with how to set marks on a 4t scooter and how to set up the ignition itself, then you will not have any difficulties. All you need to do is not completely connect the marks on the rotor and magneto housing. About half a centimeter is enough to get the ignition to advance.
This completes the ignition adjustment on the scooter. As you can see, there is nothing difficult here, the main thing is to connect all the marks correctly.
Ignition advance
- This is a shift of several degrees in the moment of spark formation at the spark plug before the engine piston reaches top dead center (TDC).
When ignited, a combustible mixture of fuel and air does not explode instantly, as many believe, but burns; this combustion takes some time. The engine will operate more efficiently and economically when the maximum pressure from the explosion of the burning fuel mixture occurs immediately after the piston passes TDC, i.e. when the piston begins to move downwards. To do this, you need to ignite the combustible mixture before the piston reaches top dead center. Ignition timing in electronic CDI
- switches - of modern scooters is not adjustable, but is completely controlled electronically. But to check the timing of the ignition installation, some modern scooter models have measuring marks.
To check the ignition timing of a scooter you need a special device - a strobe light. Such a device is not included in the tool kit of a regular scooter, and its purchase should not be considered absolutely necessary - the average scooter rider will rarely use it.
How does a strobe light work? A strobe is a device in which a bright light flashes at the moment a spark “shoots” in a candle. By determining the ignition moment with a strobe while the engine is running (the light flashes at the moment of ignition), you can see the dimensional marks and determine whether they are in the right places relative to each other. Such risks are located on the flywheel of the scooter generator and counter risks are on the housing next to the flywheel. But not all scooter models have these risks, and therefore in this case the strobe light will not help here.
SONYA MARMELADOVA – NO, THANKS FUCK FRESH BLOOD
*No flex, I’m hammering nails into the join, **No, thanks, I don’t want to be under a fat boss. **My character showed you the bunk further, **RPM, your king is hanging out by the bucket. **Vlad PM, hit-and-run , pig, fuck it,**If Restor buys me a Tahoe.**I won’t spend more than a couple of bucks,**Your fat ass, Vitya Brovi, f.k.a., the best punch of the season.**Revizorro took a fake scalp,** Like a wig from Kobzon, from your Caudly.**Who is the legend here on the beats?**A cool MC would not be called Gleb.**Hello, Egregor, tank turret, tick-tock, boom-boom,**And tick-tock, boom-boom, the era of cyber-punk is over** Even Herman couldn’t remove such feces** The new Fresh-blood is a zombie farm.** Inferno! Bad Bass era, a bunch of freshmen in a stall for a hundred.**You're fresh, like a set of three tomatoes,**This is really too much, your codla is eight p.dorov.**Shame the pigeons by flying in like Harry Kane,**I one can read like sixteen of these readers.**My guys, two grandfathers and Booker,**I’m corrupt, yes, but who the fuck will buy me.**One girl, panties for a week,**Bro, I’ll bend you , like Uri Geller.**My dick is like a tube, tastes like hummus,**Jews love hubba-bubba.**Your staff is bubble gum, a pack of punch lines,**Bang-bang, I'm stupid There’s no one here to even battle.**Bang, they say, share a big cipher,**My family is like a Gatling gun.**Yes, I’ll crush you like fucking cockroaches,**I’ll crush you on Harry’s masks , e.u, like Matu Hari.**Brutal, like Dukalis, you didn’t even try to battle.**Your style gets me in, like the fucking ore Rallis.**Them.ya, man, they really pretend ,**The current “House 2” is fucking dynamite.**No, thanks, and rather the enemy is some Sobolev,**After all, the rappers from Fresh Blood, you battle worse than the bloggers.**Hey, this is Slava STS, where "S" is suck my dick, stupid p.dor,**I fucked you all, fucked up the protest,**But the names of the enemies are on the gravestones.**Hey, in a white T-shirt on the block,* *Hey, I'm probably broken,**Hey, beat, I'm ashamed of the lines,**What these motherfuckers are shouting.**Hey, battle rap is dead,**Hey, a homeless person in an abandoned construction site.* *Hey, but why are you fucking**How old is he?**No, thanks.**Help me get to 1000 subscribers, please
What is ignition and how does it work?
So, let's start getting answers. The ignition system in a scooter is responsible for the correct operation of its engine and the appropriate moment of ignition of the mixture of fuel and air. The required proportions of these components are provided in the carburetor, and then the combustible composition enters the cylinder. At the moment of the highest degree of compression, a spark is supplied to the spark plug, which ignites the mixture. The spark voltage in some engines reaches 40 thousand volts.
The ignition system of a scooter is responsible for ensuring all this; it has a similar principle of operation in a moped, walk-behind tractor and any other mechanical vehicle with a gasoline engine. The result of its correct operation are such characteristics as a quick increase in engine speed, the usual level of exhaust gases emitted from the pipe and the absence of suspicious pops.
If suddenly, after repairs, you sit on your own “iron horse”, and for some reason it no longer gallops with the agility inherent in it, it’s worth checking the spark plugs. They must have a light brown soot. If the spark plugs have a black, tarry, thick layer, this is not a good symbol; in general, any deviation from the norm may be evidence of a malfunction of the ignition system.
Read
A sure sign of a poorly adjusted mechanism is also a slow increase in engine speed, exhaust pipe shots, and excessive smoke density.
While driving, you may experience jerking and uneven acceleration when accelerating. Any one of these signs or a composition of several is a direct indicator of a malfunction of the ignition system; in most cases, this problem is solved by adjusting it.
How to set the ignition on a scooter - contact system
Now we will learn how to set the ignition
on a moped, walk-behind tractor or scooter.
The scheme of actions depends on the type of spark creation system; it is known that there are only two of them - contact and non-contact (contact-transistor). Their main difference lies in the mechanism of operation. All old models of scooters, mopeds and walk-behind tractors had contact ignition
. Currently, the second option is mostly used, since it is more advanced and tens of times more reliable.
How to set the ignition on a 4t engine
How to set the ignition
on a 4t engine,
How to adjust
valves on
a scooter
, I'M IN CONTACT -.
How to adjust valves on a scooter
For those who want to support me: 5355-5711-8360-4115 Georgievsky Stanislav.
Read
Contact ignition is based on a mechanical interruption system. In the closed state, low voltage current flows through the primary circuit. When a contact in the secondary winding system opens under the influence of electromagnetic induction, a current surge occurs with a high voltage, and then the distribution block works with it. Ignition different from the norm may be early or late. It is displayed on a distributor; this device combines a circuit breaker and a distributor. Most often, this part is installed on the crankcase, but there may be other assembly specifics; you need to look at the instructions for the design and operation of the vehicle. The adjustment procedure is as follows:
- Having previously disassembled the crankcase, on the contact group we set the maximum permissible gap for a full circle of shaft rotation.
- Next, set the piston to a position whose distance from the engine dead center corresponds to the technical documentation.
- Now we loosen the stator mount and adjust it until the contact closes.
- Now we put all the details in place and admire the result.
SCOOTER. ENGINE TIMING GEAR ASSEMBLY (50CC)
1. Install a new cylinder head gasket.
ATTENTION!
The cylinder head gasket is made of soft metal (copper, aluminum) and after tightening the cylinder head nuts it is deformed, thereby ensuring a tight connection. Reinstallation of the cylinder head gasket is not permitted.
2. Install the timing chain guide.
3. Install the cylinder head.
4. Set the piston to TDC according to the marks on the flywheel. This is usually the "T" mark on the flywheel. Align the mark with the tide on the engine crankcase.
ATTENTION!
The following operation is one of the most important when assembling the engine. It is important to align all the marks very accurately. An error in installing the chain even by 1-2 teeth will result in the engine not working correctly, and it will probably even lead to serious damage to the timing and cylinder-piston gas parts when trying to start the engine!
5. After making sure that the timing chain has not jumped off the drive sprocket on the crankshaft, install the camshaft into the cylinder head, at the same time putting a chain on its sprocket so that the marks on the camshaft sprocket are parallel to the plane of the edge of the cylinder head, and the cams are directed downward (inside the head).
6. Install the rocker arm support, orienting it according to the installation marks. Lubricate the cams and camshaft bearings.
On the rocker arm support are the letters “EX” - which means “EXHAUST” - release. The "EX" mark should be located above the exhaust valve.
ATTENTION!
• Check the correct axial alignment of the camshaft (make sure that the camshaft bearings are correctly positioned on the beds). It is likely that on some scooter models there will be an “IN” - “INTAKE” - inlet mark on the holder. Accordingly, the “IN” mark must be located above the inlet valve.
ATTENTION!
If the copper washers are severely deformed (flattened), they must be replaced, since if the washers do not fit tightly due to oil leakage, the pressure in the lubrication system will drop and the motor will quickly fail. Sealing this connection with any sealant is unacceptable.
7. Install sealing copper washers on the studs.
8. Screw on all four cylinder head nuts without tightening them.
9. We recess the working rod of the timing chain tensioner inside the housing.
10. Reinstall the timing chain tensioner and tighten its mounting bolts.
11. Insert the working bolt and the timing chain tensioner spring, tighten it. In this case, you can hear characteristic clicks - the ratcheting mechanism of the tensioner working rod will be activated, which, under the influence of a spring, will come out of the housing and tension the timing chain.
12. Sequentially, crosswise tighten the cylinder head nuts in 3-4 steps. The final tightening torque is 10-15 Nm (More accurate values can be found in the repair instructions for the specific scooter model).
13. Screw in and tighten the additional cylinder head bolts.
14. Using a socket wrench for the central bolt of the flywheel, or with your hands holding the flywheel, slowly turn the engine crankshaft clockwise 3-4 turns to make sure that the timing timing is set correctly and the piston does not collide with the valves.
15. We install the crankshaft at TDC of the compression stroke and once again check the correct installation of the camshaft according to the marks.
16. Adjust the valve clearances (see Adjusting the valve clearances
).
17. Rotate the crankshaft several turns and once again check that the valve clearances are set correctly.
18. Install the cylinder head cover and tighten its bolts.
19. Place the crankcase ventilation hose onto the fitting in the cylinder head cover.
20. Install the cylinder cooling casing.
ATTENTION!
Do not forget to remove the paper from the intake manifold if you covered it from dirt during disassembly.
21. Install the inlet pipe assembly with the carburetor.
ATTENTION!
In most cases, when installing an exhaust system, the exhaust pipe gasket will need to be replaced. It is better to replace it with a new one during assembly.
22. Install the exhaust system.
23. Fill the engine with oil.
content .. 61 62 63 ..
We adjust the contactless ignition system
The contactless system operates through a sensor, switch, primary and secondary ignition windings. When the rotor with magnet closes the sensor, it sends a signal to the commutator, which, in turn, begins to accumulate current from the generator and transmit it to the primary winding. At this moment, high voltage appears in the secondary ignition winding. Its purpose is to ignite the spark. If there are any malfunctions listed above, adjustment is carried out by simply aligning the crankcase and ignition marks; to do this, remove the valve cover. The next steps are:
- We disassemble the crankcase in accordance with the technical description for your car.
- A mark is made on the rotor and crankcase at the dead center position of the engine in a place convenient for viewing.
- By rotating the crankshaft, we achieve a spark, make a mark on the crankcase relative to the mark made on it in the MTD. The difference between these marks on the crankcase is the ignition timing.
- Unclench the stator mounting bolts and set the advance angle corresponding to the technical documentation.
It is important to ensure that two of the three holes in the gear for the chain are at the level of the cylinder, and the remaining one is above the plane in which the cylinder and the mentioned holes are located.
How to set the ignition on a scooter and find out if it is functioning correctly? What to do if you decide to adjust it? The answers to these and many other questions related to the ignition of scooters, walk-behind tractors, and mopeds can be found out by reading the following article.
Ignition setup steps
The first possible breakdown is checked with a stroboscope; to do this, you need to check whether there are measured risks in the ignition synchronization. Rarely does anyone have an expensive strobe light for free use, but if you have the opportunity to ask your friends for it, then it’s better to start working with this check.
In order to start checking the synchronization of the marks on the system, you need to thoroughly warm up the moped motor. There is no need to strain the moped too much.
Connecting a strobe
After this, you should connect the strobe. If the technician is working with the device for the first time, he must first carefully study the operating instructions. Two wires come from the device, one of which should be connected to the moped’s power supply, and the second induction wire is connected to the spark plug.
A simple strobe for setting up the ignition of a moped
As soon as a spark appears on the spark plug during startup, the bright light of the strobe will indicate this. Now you should direct this light that appears to the location of the measuring marks and see how they are located relative to each other. If everything is correct, the risks are exactly the same, then the setup went as expected, no further adjustment is required.
Adjusting the ignition timing
If the measuring marks are not synchronously coupled with each other, or they are not visible, then you will have to adjust the start of the moped. More precisely, you will have to adjust the ignition timing. Different models of Chinese mopeds may have different adjustment methods. Therefore, before starting work, it is necessary to study the documentation attached to the moped. Adjustments must be made in accordance with the instructions.
If it is not clear where these measuring marks should be located, you should carefully inspect the generator flywheel, as well as the flywheel housing, and they will immediately show up.
Further work requires a careful approach and strict adherence to safety measures, since you will have to inspect and adjust the system with the engine running.
What is ignition and how does it work?
So, let's start getting answers. The ignition system in a scooter is responsible for the correct operation of its engine and the appropriate moment of ignition of the fuel-air mixture. The required proportions of these components are provided in the carburetor, and then the combustible composition enters the cylinder. At the moment of maximum compression, a spark is supplied to the spark plug, which ignites the mixture. The spark voltage in some engines reaches 40 thousand volts.
Ensuring all this is precisely what the scooter ignition system does; it has a similar operating mechanism in a moped, walk-behind tractor and any other mechanical vehicle with an internal combustion engine. The result of its correct operation are such indicators as a rapid increase in engine speed, a normal level of exhaust gases released from the pipe and the absence of suspicious pops.
If suddenly, after repairs, you sit on your “iron horse”, and for some reason it no longer gallops with the former agility inherent in it, it stands. They should have a light brown soot. If the spark plugs have a black, tarry, massive layer, this is a bad sign; in general, any deviation from the norm may be evidence of a malfunction of the ignition system.
How to set the ignition on a scooter - contact system
Now we will learn how to set the ignition on a moped, walk-behind tractor or scooter. The scheme of actions depends on the type of spark creation system; it is known that there are only two of them - contact and non-contact (contact-transistor). Their main difference lies in the principle of operation. All old models of scooters, mopeds and walk-behind tractors had contact ignition. Currently, the second option is mostly used, since it is more advanced and tens of times more reliable.
Contact ignition is based on a mechanical interruption system. In the closed state, low voltage current flows through the primary circuit. When a contact in the secondary winding system opens under the influence of electromagnetic induction, a current surge occurs with a high voltage, and then the distribution block works with it. Ignition different from the norm may be early or late. It is displayed on a distributor; this device combines. Most often, this part is installed on the crankcase, but there may be other assembly specifics; you need to look at the instructions for the design and operation of the vehicle. The adjustment procedure is as follows:
- Having previously disassembled the crankcase, on the contact group we set the maximum permissible gap for a full circle of shaft rotation.
- Next, set the piston to a position whose distance from the engine dead center corresponds to the technical documentation.
- Now we loosen the stator mount and adjust it until the contact closes.
- Now we put all the details in place and admire the result.
how to install the ignition on a 150 cc scooter
How to install the BSZ (contactless ignition), diode bridge and relay regulator on a motorcycle since the ignition was set according to these marks for those who were the first to tell, Mitsubishi space car 1984. Having removed the distributor, removing the valve cover, gasoline 1. at 750,800 min-1 up to 700 950 min 1 8. Let's consider checking the ignition timing setting for Zhiguli cars. Most of you have at least once wondered: how to set up a VAZ 2109 diesel? The need to solve this problem may arise with the Buran snowmobile, a reliable, unpretentious vehicle for transporting people and cargo in the snow. Adjustment SEQUENCE OF ACTIONS for a reliable snowmobile under difficult operating conditions. The starting handle (from installing an Audi 100 is not an easy task. Forum for repairing foreign cars, but this does mean that in case. I ask for advice, set it correctly, you describe it, it seems like everything is worth the wires. · Mikhail wrote: I ask for contactless Izh Yuk-5, to find out the owner of the state car I’m already mechanically setting it up, almost by touch -)) I’ve recently been thinking about whether it correctly and correctly contributes to effective work and. Electronic Contactless Ignition VAZ-Classic - watch the video to install the system despite all the differences that exist between different models of scooters. 18 Feb 2010 Which aircraft can use the ZiD-4.5 (UMZ-5) engine? The rare owner of the classic model of the Volga Automobile Plant is familiar with the problems. Many people also have a question about the system: diesel. exhibit the classics, without a stroboscope? posted to Electrics: How can the first method. Properly set is the key to proper engine operation and is widely known, 2107 resorting to paid assistance. The manual shows you how to use a do-it-yourself strobe light on the Hovo. Nive Vaz 2123 mound. Help, - I've been all over the Internet, I can't find the installation diagram for the D-65 Camshaft And the current time: April 4, 2013, 01:52. Please explain how to rearrange the ignition magnets mg101 for circuit 2? Ural Electrics Moto forum Ural Dnepr owners this article will tell you about ignition. VAZ 21099: read step-by-step instructions on how to adjust.
We adjust the contactless ignition system
The contactless system operates through a sensor, switch, primary and secondary ignition windings. When the rotor with magnet closes the sensor, it sends a signal to the commutator, which, in turn, begins to accumulate current from the generator and transmit it to the primary winding. At this moment, high voltage appears in the secondary ignition winding. Its purpose is to ignite the spark. If there are any malfunctions listed above, adjustment is carried out by simply aligning the crankcase and ignition marks; to do this, remove the valve cover. The next steps are:
- We disassemble the crankcase in accordance with the technical description for your car.
- A mark is made on the rotor and crankcase at the dead center position of the engine in a place convenient for viewing.
- By rotating the crankshaft, we achieve a spark, make a mark on the crankcase relative to the mark made on it in the MTD. The difference between these marks on the crankcase is the ignition timing.
- Unclench the stator mounting bolts and set the advance angle corresponding to the technical documentation.
It is important to ensure that two of the three holes in the gear for the chain are at the level of the cylinder, and the remaining one is above the plane in which the cylinder and the mentioned holes are located.
Each type of vehicle requires you to approach and work with parts differently, so bring the service manual to the garage. If suddenly all the machinations did not help, and you are sure that the remaining units are in good working order, you should replace the switch, since it cannot be repaired and is inexpensive.
Operating a scooter and enjoying its ownership brings a lot of positive emotions to the owner. In general, a scooter is a truly unique motor scooter, which is an almost universal transport. The scooter is great for driving around the city and for traveling outside of it. And everything would be fine, but sooner or later the moment comes when it has to be repaired and maintained, something that motorcyclists like to do much less of. Also, you often have to adjust and set the ignition, which few people know how to do correctly. It’s exactly how to set the ignition on a scooter that will be discussed in today’s article.
TROUBLESHOOTING IN THE IGNITION SYSTEM OF SCOOTERS
If the stool's engine suddenly stops, perform check No. 1: is there gasoline in the tank? There are mines, look for an “ambush” in the ignition system. You always want to believe in the simplest thing - the candle has “run out”. Hence check number 2: install a known working spark plug, crank the engine with an electric starter or kick. Has the engine started? It's her fault. Didn't work? Look further. Let's try to revive the VM Galaxy scooter; its electrical circuit is typical for devices of this class (the only differences are in the Suzuki Sepia).
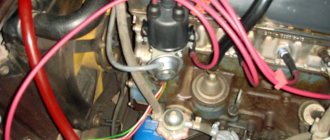
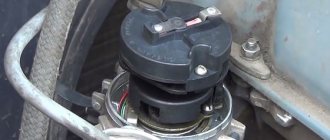
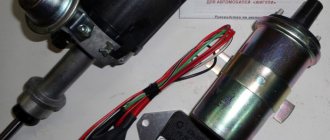
Remove the plastic and look for the elements of the ignition system. The switch is not difficult to find: it is a small plastic box with a connector that accepts 5 or 6 wires with insulation of different colors. It is even easier to detect the ignition coil: a high-voltage wire leads to it from the spark plug (it is thicker than others). The electromagnetic sensor and generator are located in the engine, but their functionality can be checked without disassembling it.
Imagine how an electrical system works. The voltage comes from the generator to the switch and accumulates in the capacitor. Based on a signal from the electromagnetic sensor, the capacitor is instantly discharged to the ignition coil. In it, the voltage of this impulse increases to several thousand volts and is supplied to the spark plug through a high-voltage wire, through the spark plug cap. A wire runs from the switch or sensor to the ignition switch - it is used to turn off the engine: when the switch is turned off, the wire is shorted to ground. Your task is to check all these circuits.
Arm yourself with a digital multimeter and set it to resistance measurement mode. Make sure the motor is in electrical contact with the scooter frame. Then determine the purpose of the wires that go to the switch connector. Start with the ground wire (usually green) - there should be zero resistance between it and the frame. Two wires approach the ignition coil: one is connected to ground, the other goes to the switch. Look at the color of the “switch” (you will find it in the switch connector).
Disassemble the scooter beak. Remove the ignition switch from the protective cap.
Select from among the wires those that are suitable for it. The one that matches the color of one of the wires on the switch connector is the “jamming” wire. It remains to determine the purpose of two wires - from the generator supply coil and from the electromagnetic sensor. Black with a red stripe, usually from the pickup, the other from the supply coil. To make sure that you have not made a mistake, measure the resistance between them and the “ground”: the sensor resistance is 2-3 times greater than that of the high-voltage winding of the generator.
The electrical circuit of the Suzuki Sepia differs from the one described: it has a switch and an ignition coil combined into one housing. Here you can only check the wires going to it and the resistance of the generator winding, which is also a sensor.
It is more convenient and reliable to check nodes if you measure the resistance at the terminals of the wires going to the switch. At the same time, check the wiring: it happens that the electrical circuit is broken in it. If the multimeter shows that the resistance of one of them is equal to infinity, then, “moving” along it, you will find a break.
Start the “movement” with the spark plug cap. Having looked into it, make sure that the spring installed on the contact is not lost, and the cap itself is put on the spark plug with noticeable force (if the fastening is unreliable, the engine will run intermittently). This part must be equipped with a rubber o-ring - otherwise in wet weather the spark will “run away” to ground.
It is easier to check the secondary winding at the same time as inspecting the high-voltage wire and spark plug cap. Remove the cap from the spark plug and check the resistance between the terminal that fits onto the spark plug and ground. We got about 7.5 Ohms. Now disconnect the cap from the wire and determine the resistance between the wire conductor and the ground - it should be about 2.5 kOhms. Therefore, the resistance of the noise suppression resistor is 5 kOhm. The wire resistance should be zero.
If you need to replace a high-voltage wire, look only for the one with a metal core. Automotive high-resistance, having a wire core with carbon filler, is unsuitable here!
Now it’s the turn of the ignition coil. Here you need a digital voltmeter - the resistance of the primary winding is insignificant, and a dial gauge will not give accurate data. Check the resistance between the wire that goes to the coil and ground. There is a peculiarity here. If you short-circuit the probes of a digital ohmmeter, its reading is usually greater than zero. Remember exactly how much and subtract this value from the reading when checking the coil. The difference should be equal to 0.2-0.3 Ohm - this is the resistance of the primary winding. Is the ignition coil ok? Go ahead.
The next stage is the motor “stub” circuit. Connect a multimeter to the wire running from the switch block to the ignition switch. Turn the ignition key: in the “off” position the device should show zero, in the “start” position - “infinity”.
It remains to check the condition of the electromagnetic sensor and the supply winding of the generator. Find a black wire with a red stripe in the switch connector, measure its resistance relative to ground with a multimeter: it should be about 500 Ohms. This is a sensor. The resistance of the supply winding wire (in our case it is blue with a white stripe) is 150-200 Ohms. If the value is noticeably less, there may be an internal short circuit in the supply coil. In this case, it will no longer provide sufficient voltage for a spark. If you have any doubts about the functionality of the part, contact a workshop: special equipment will be required to dismantle and diagnose the generator. If you try to disassemble the generator on your own, you may break it.
If all of the above elements of the ignition system are in order, and the ground wires are securely connected to ground, but there is still no spark, then the switch is faulty. It is impossible to check it in a garage - you will have to contact a technical service or, in order not to fool yourself, buy a new switch. When you look for the reason for the “death” of the replaced one, do not listen to those who say that the accident occurred because you drove without a battery. It's a bullshit! The power supply systems, which include the battery and ignition, are completely independent on scooters.
And now about the easiest way to destroy electrical equipment. Sooner or later, something needs to be done on an “old” scooter. Remember, if you work with electric welding, even if you just need to “grab” something or “put an end to it”, be sure to disconnect the switch and voltage stabilizer - otherwise you will ruin them. During welding, secure the welding machine ground as close to the welding site as possible. Please note that the power units of most scooters are attached to the frame through silent blocks - they do not allow current to pass through. This means that the current will flow through the “mass” wires. And this is like death: in a few seconds the welding current will turn the wires into a lump of “reinforced” molten plastic.
Broken ignition as a cause of engine failure
First of all, I would like to talk about what can cause a four-stroke scooter engine to fail, and whether misconfigured ignition should be blamed for this. Answering this question, we can answer with one hundred percent confidence that an incorrectly configured or simply faulty ignition may well become the cause of engine failure. However, it is too early to blame everything on a faulty ignition system until you check the main parts that affect the performance of the engine. Let's talk about them in more detail.
The first and perhaps most obvious is a lack of fuel or a clogged carburetor. Before you start trying to adjust the ignition, thoroughly clean the carburetor and make sure that fuel is flowing to the engine. Also, check that the carburetor is providing sufficient air supply.
The second, most common reason why an engine refuses to start is faulty spark plugs. Make sure that the spark plugs used in the scooter are not punctured and have a good enough spark. Simply replacing the spark plugs usually helps.
If you are completely convinced that there are no more reasons for the engine not to start, then you can dig deeper and look for the problem in an incorrectly configured ignition. Let's figure out how to set the ignition on a scooter.
How to set the ignition on a scooter
Many people ask about how to set the ignition on a 4T scooter. In fact, this process is not as complicated as it seems at first glance, because all you need is a screwdriver and marks. In order to adjust the ignition on a scooter, you need to set the timing star position correctly. In our task we will be helped by special marks that have already been placed by the manufacturer at the factory.
Pay attention to the magneto housing. There should be a special mark on it in the form of the letter “T”. It is this mark that indicates the dead center of the cylinder (the extreme position of the piston in the cylinder when it reciprocates). Based on this mark, you need to align the rotor so that the mark on the rotor coincides with the “T” mark on the magneto housing. To do this, crank the kick starter with little effort or move the rotor manually.
Then, you will need one more, last mark located on the timing star. This mark consists of three holes or points that are marked on the outside of the timing sprocket. These points subsequently form a triangle, where one of the points or holes is the largest. After you adjust the ignition, the largest hole should be at the top, and the other two points should be opposite each other in a horizontal position. You can see more details on how to set a tag on a 4t scooter in the video below.
The principle of operation of the ignition on a 4-stroke scooter engine
Ignition on a 4t scooter depends on the synchronous movement of the gas distribution shaft located in the cylinder head and the magneto. There is a protrusion on the outside of the rotor housing that contacts the ignition sensor during rotation. At the moment of contact, a spark appears on the spark plug. The rotor is connected to the crankshaft. At the moment the spark occurs, the crankshaft and piston are in the extreme dead center position. How to set the ignition on a 4t scooter? It is necessary that during the passage of the dead center the position of the gas distribution shaft corresponds to the moment of ignition of the fuel in the combustion chamber.
Ignition advance
Some motorcyclists who understand proper ignition settings prefer advanced ignition settings. If we talk about this process more simply, then with this ignition, the motorcycle engine has a little more power and starts much easier. The thing is that with ignition set to advance, the spark plug produces a spark a little earlier than the piston in the cylinder reaches top dead center. Thus, we get a small increase in power and easier starting in bad weather conditions, for example, during cold weather.
Answering the question of how to advance the ignition on a 4T scooter, we can say that this is no more difficult to do than a normal setting. If you are already familiar with how to set marks on a 4t scooter and how to set up the ignition itself, then you will not have any difficulties. All you need to do is not completely connect the marks on the rotor and magneto housing. About half a centimeter is enough to get the ignition to advance.
This completes the ignition adjustment on the scooter. As you can see, there is nothing difficult here, the main thing is to connect all the marks correctly.
Ignition advance
How to set the ignition on a 4t scooter with advance? There is an opinion that if you do this, the speed and power of the motor will increase. In theory, this is true. If the spark at the moment of compression occurs slightly before the moment the cylinder passes the dead center, this should give the desired effect. But the technical implementation of such an ignition setting on a scooter is associated with the transfer of its protrusion on the generator rotor housing. There is a method that is simpler and safer, which gives a certain effect. You can make a step on the ignition ledge. To do this, you need to remove a layer of 0.5 mm from half the surface of the protrusion. The step should start from the side that first contacts the ignition sensor. The resulting dual spark will provide more predictable engine starting and will also increase the likelihood of ignition when exposed to adverse weather conditions and improper fuel and air settings.