The causes of noise in the gearbox depend on the type of transmission. So, in manual transmissions, a hum may appear, for example, due to wear of bearings, shaft gears, springs on the rocker, or differential. As for the automatic transmission, most often it hums due to low oil level, due to problems with the torque converter and the lever linkage.
To eliminate noise in the area of the box, it first makes sense to check the oil level in it. If it is not enough, then you need to top it up or replace it. As a temporary solution, an anti-noise additive is sometimes used in the box (it will not completely remove it, but at least reduce the operating noise). To effectively eliminate hum, the box should be dismantled, checked and fully repaired. Read about all the causes of noise in the gearbox in the article, and for brief information on why various types of noise appear in the gearbox, see the table.
| Conditions under which the gearbox makes noise | Possible causes of noise |
| Mechanical transmission | |
| Humming noise at speed (while driving) |
|
| At idle |
|
| When overclocking |
|
| When releasing the clutch |
|
| On a certain gear |
|
| In low gears (first, second) |
|
| In high gears (4 or 5) |
|
| In the cold |
|
| In neutral gear |
|
| Automatic transmission | |
| When driving at speed |
|
| In the cold |
|
| At idle |
|
| When overclocking |
|
| On a certain gear |
|
| At low speed (up to approximately 40...60 km/h) |
|
Why is the gearbox noisy?
Most often, noise in the gearbox, both manual and automatic, occurs when the oil level has become lower or the gear lubricant is no longer suitable for use. The nature of the sound resembles a metallic clang, which intensifies as the vehicle speed increases. So, noise in a gearbox with a low oil level occurs:
ATF level dipstick
- when the car is moving at speed (the higher the speed, the louder the clang);
- at engine idle speed;
- during acceleration (there is a gradual increase in the volume of the hum);
- in neutral gear;
- when the engine is running cold.
The reason for the hum from the gearbox when the engine is running cold may lie in the thickness of the transmission oil and its contamination.
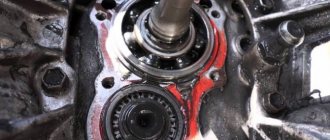
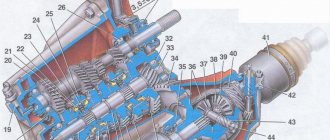
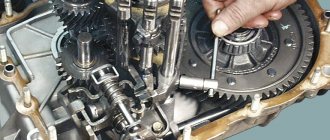
The next common reason why a gearbox hums is partial failure of the bearings of the primary or secondary shafts. In this case, the sound will resemble a metallic hum. The input (drive) shaft bearings will hum in the following situations:
- immediately after starting the engine when cold;
- when the engine is running at low speeds (at first, second, then the hum decreases);
- when coasting in a car;
- when the engine is running at high speeds.
If the bearings of the secondary (driven) shaft fail, the hum of the box will be observed:
Bearing of the input shaft of the VAZ-2110 gearbox
- when driving the car in any modes;
- when driving, but when the clutch is depressed, the noise disappears;
- The hum in the box increases as the gear and speed increase (that is, in first gear the hum is minimal, and in fifth it is the loudest).
If there is significant wear on the gears or synchronizers, a situation may also arise when the gearbox howls. The sound is reminiscent of a metallic clang, which intensifies as the engine gains speed. As a rule, the hum occurs in one specific gear. This raises additional problems:
- gears are difficult to engage with a manual transmission;
- while driving, the selected speed may “fly out”, that is, the gear selector is set to the neutral position.
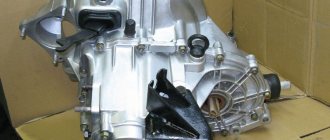
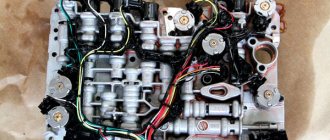
As for automatic transmissions, a hum can also occur due to bearing wear, low oil level, and gear wear. However, with an automatic transmission, a hum can also occur if it fails:
- friction pairs;
- individual parts of the torque converter.
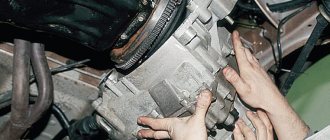
Eliminating noise
Let's look at the signs and corresponding breakdowns of the gearbox in the VAZ 2109
- the drive shaft bearing has failed;
- The gearbox runs out of oil.
- the locking mechanism has failed;
- synchronizer clutches are worn out;
- incomplete disengagement of the clutch.
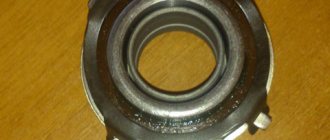
Replacing the drive shaft bearing
If you decide to repair the drive shaft bearing yourself, then for this you will need a hammer, a vice, and a bearing puller. Let's start the repair:
First you need to dismantle and disassemble your gearbox; then take the drive shaft and clamp it in a vice
Attention! The vice must have soft metal pads; the rear bearing must be pressed using a special puller; then turn the shaft over and compress the inner race of the primary bearing in the same way; Now you need to push the rear bearing all the way onto the shaft. This is done using a metal mandrel and a hammer; the same operation must be done with the inner ring of the front bearing.
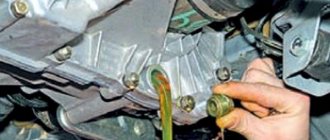
Add oil
If you decide to fix the noise problem by adding transmission fluid to the box, then prepare new manual transmission oil and some rags in advance:
- we find the dipstick for monitoring the fluid level in the box - it is located in the engine compartment on the left side, next to the battery;
- take out the dipstick and wipe it with a rag;
- then insert the dipstick back all the way and pull it out. The transmission fluid level should be somewhere between o and “Max”;
- if you see that there is less oil than necessary, then take a new one and fill it through the hole to check the level to o.
Replacing locking rings
To replace the rings of the locking mechanism, perform the following steps:
- remove and disassemble the gearbox;
- we find the blocking device;
- We see blocking synchronizers on it: you need to visually assess their condition. If fragments are visible on the rings or they themselves have expired their service life, then they need to be replaced;
- We put the box back together and put it in place.
If the hum in the manual transmission appears as a result of wear on the rings, then when they are replaced, the extraneous sounds will disappear.
Replacing the synchronizer clutch
Here you need to stock up on clutch and patience in advance:
- Having disassembled the gearbox, you need to remove the secondary shaft synchronizer;
- To get to the clutch, the synchronizer must be completely disassembled. Be careful - the parts are very small and can be easily lost. The clutch is a small ring on the inner diameter of the synchronizer;
- Having disassembled the synchronizer, check all its components for mechanical damage. If the springs are too stretched, then it is also better to replace them with new ones, but you need to buy a complete repair kit in advance;
- before installing the clutch in place, lubricate it, as well as all other synchronizer components, with engine oil;
Clutch adjustment
Incomplete disengagement of the clutch is “treated” by adjusting it:
- The clutch pedal must be pressed to the floor all the way and a meter or ruler should be placed next to it, one end of which should also be rested on the floor. Then you need to fix the value at the center of the pedal;
- now release the pedal and in the uppermost position mark the number of centimeters to it from the floor;
- then slowly press the pedal with your hand and mark the place where the clutch begins to provide resistance for further pressing;
- the amount of free play is the same distance from the pedal position until the moment the clutch begins to exert resistance;
- Now open the hood and look for the cable that connects to the pedal. There are two nuts on it, with the help of which adjustment is carried out;
Adjusting the clutch pedal cable
To increase free play, you need to unscrew the nut located inside the bracket. You also need to tighten the nut located outside; This is where the adjustment lies. If everything is correct, then the full stroke will be about 13 centimeters. If this indicator is significantly more or less, then the adjustment process should be repeated.
What kind of noise could there be in the gearbox?
The noise from the box can come from a different nature; depending on the damage, it not only operates with increased noise, but also howls or hums. Let us briefly describe the reasons why the above components lead to the gearbox howling and humming. So that you understand what to do about it and how to fix the problem.
Gearbox howls
The most common reason for noise in the gearbox resembling a howl is old, contaminated or incorrectly selected gear oil . If its level is insufficient, then as a result, the bearings and other moving parts of the box will run dry, producing significant noise. This is not only uncomfortable when driving, but also harmful to parts. Therefore, you should always monitor the oil level in the gearbox and its viscosity.
The second reason why a gearbox howls is because its bearings are worn out . They can howl due to natural wear, poor quality, a small amount of lubricant in them, or dirt that has gotten inside.
If the gearbox is noisy at idle when the clutch is released, in neutral gear and when the car is stationary, then most likely the bearing on the input shaft is noisy. If the box hums more in first or second gear, then a greater load is placed on the front bearings . Accordingly, it is necessary to diagnose the input shaft bearing.
Likewise, the input shaft bearing can make noise when the car is coasting or simply after starting the engine, and it doesn’t matter at what speed. Often the noise disappears in this case when the clutch is depressed. The reason for this is that when the clutch is depressed, the primary does not rotate, the bearing also does not rotate, and, accordingly, does not make noise.
Worn gearbox gear
If the box is noisy in 4th or 5th gear, then in this case a large load goes to the rear bearings , that is, the secondary shaft. These bearings can also make noise not only in high gears, but in any gear, including reverse. Moreover, the hum intensifies in this case with increasing gears (in the fifth gear the hum will be maximum).
Gear wear is the third reason why the gearbox howls. This noise occurs in two cases: teeth slipping and improper contact patch between them. This sound is different from noise, it is more like a metallic screeching sound. This squeal also occurs under load or during acceleration.
Often the cause of noise is the gear itself if the sound occurs in one specific gear. The gearbox makes noise when driving at speed due to banal wear of the corresponding gear on the secondary shaft. This is especially typical for gearboxes with high mileage (from 300 thousand kilometers or more) as a result of significant metal production and/or low oil level in the box.
Automatic transmission howls
In an automatic transmission, the “culprit” of the howl can be the torque converter . This knot is colloquially referred to as a "doughnut" because of its corresponding shape. The torque converter hums when changing gears and at low speeds. As driving speed increases, the noise disappears (after approximately 60 km/h). Additional signs that the donut is broken include:
- car slipping at start;
- vibration of the car when driving;
- jerking of the car during uniform movement;
- the appearance of a burnt smell from the automatic transmission;
- The speed does not rise above certain values (for example, above 2000 rpm).
In turn, torque converter malfunctions occur for the following reasons:
Torque converter with automatic transmission
- wear of individual friction discs, usually one or more pairs of them;
- wear or damage to blade blades;
- depressurization due to destruction of seals;
- wear of intermediate and support bearings (most often between the pump and the turbine);
- failure of the mechanical connection with the box shaft;
- overrunning clutch failure.
You can check the torque converter yourself, without even removing it from the automatic transmission. But it’s better not to carry out repairs yourself, but instead delegate the diagnosis and restoration of the “donut” to qualified craftsmen.
Gearbox hums
Wear of the synchronizer clutch is the main cause of gearbox hum at speed. In this case, it will be difficult to engage any gear, and often the box will hum in this particular gear. If the wear is significant, the transmission may “fly out” when the car is moving. During diagnostics, you need to pay attention to the condition of the splined connection of the couplings!
If the springs in the clutch weaken or break, this can also cause noise in the gearbox. Similarly, this happens in a certain gear, the springs of which have weakened or broken.
Gearbox is noisy
The transmission of front-wheel drive cars has a differential that distributes torque between the drive wheels. Its gears also wear out over time, and accordingly, they begin to make a metallic noise. It usually appears smoothly and drivers do not notice it. But it manifests itself most of all when the car is slipping. In this case, the drive wheels rotate unevenly, but with high torque. This puts significant stress on the differential, and it will fail faster.
You can indirectly check the wear of the differential by the sign when the car starts to twitch after moving off (rocking back and forth). If we rule out that the engine is to blame, then you need to check the condition of the differential in the gearbox.
It happens that over time the threaded fastening of the gearbox itself weakens. As a result, it begins to vibrate during operation. Vibration, which turns into continuous noise, occurs when the car is moving and intensifies as the engine speed and the speed of the car as a whole increase. For diagnostics, the car must be driven into an inspection hole to provide access to the gearbox. If the fasteners are really loose, they need to be tightened.
Eliminating noise
Let's look at the signs and corresponding breakdowns of the gearbox in the VAZ 2109
| Signs | Breakdowns |
| The transmission is noisy when driving in neutral |
|
| There is noise coming from the gearbox and periodically disappears when the gears are turned on. |
|
Replacing the drive shaft bearing
Gearbox drive shaft 2109
If you decide to repair the drive shaft bearing yourself, then for this you will need a hammer, a vice, and a bearing puller. Let's start the repair:
First you need to dismantle and disassemble your gearbox; then take the drive shaft and clamp it in a vice
Attention! The vice must have soft metal pads; the rear bearing must be pressed using a special puller; then turn the shaft over and compress the inner race of the primary bearing in the same way; Now you need to push the rear bearing all the way onto the shaft. This is done using a metal mandrel and a hammer; the same operation must be done with the inner ring of the front bearing.
Add oil
Checking the transmission fluid level in manual transmission 2109
If you decide to fix the noise problem by adding transmission fluid to the box, then prepare new manual transmission oil and some rags in advance:
- we find the dipstick for monitoring the fluid level in the box - it is located in the engine compartment on the left side, next to the battery;
- take out the dipstick and wipe it with a rag;
- then insert the dipstick back all the way and pull it out. The transmission fluid level should be somewhere between o and “Max”;
- if you see that there is less oil than necessary, then take a new one and fill it through the hole to check the level to o.
Replacing locking rings
Manual transmission synchronizer locking rings 2109
To replace the rings of the locking mechanism, perform the following steps:
- remove and disassemble the gearbox;
- we find the blocking device;
- We see blocking synchronizers on it: you need to visually assess their condition. If fragments are visible on the rings or they themselves have expired their service life, then they need to be replaced;
- We put the box back together and put it in place.
If the hum in the manual transmission appears as a result of wear on the rings, then when they are replaced, the extraneous sounds will disappear.
Replacing the synchronizer clutch
Here you need to stock up on clutch and patience in advance:
- Having disassembled the gearbox, you need to remove the secondary shaft synchronizer;
- To get to the clutch, the synchronizer must be completely disassembled. Be careful - the parts are very small and can be easily lost. The clutch is a small ring on the inner diameter of the synchronizer;
- Having disassembled the synchronizer, check all its components for mechanical damage. If the springs are too stretched, then it is also better to replace them with new ones, but you need to buy a complete repair kit in advance;
- before installing the clutch in place, lubricate it, as well as all other synchronizer components, with engine oil;
Clutch adjustment
Adjusting the clutch pedal in a VAZ 2109 car
Incomplete disengagement of the clutch is “treated” by adjusting it:
- The clutch pedal must be pressed to the floor all the way and a meter or ruler should be placed next to it, one end of which should also be rested on the floor. Then you need to fix the value at the center of the pedal;
- now release the pedal and in the uppermost position mark the number of centimeters to it from the floor;
- then slowly press the pedal with your hand and mark the place where the clutch begins to provide resistance for further pressing;
- the amount of free play is the same distance from the pedal position until the moment the clutch begins to exert resistance;
- Now open the hood and look for the cable that connects to the pedal. There are two nuts on it, with the help of which adjustment is carried out;Adjusting the clutch pedal cable
- To increase free play, you need to unscrew the nut located inside the bracket. You also need to tighten the nut located outside;
- This is where the adjustment lies. If everything is correct, then the full stroke will be about 13 centimeters. If this indicator is significantly more or less, then the adjustment process should be repeated.
Noise additives in the box
Transmission noise reduction additives can temporarily reduce the noise during operation. However, the cause of the hum will not be eliminated. Therefore, it makes sense to use additives only for preventive purposes or during pre-sale preparation of a car in order to get rid of it as quickly as possible.
Different types of additives are suitable for different problems, so when choosing one it is important to determine exactly what is humming in the box. The most popular attachments for reducing noise in manual transmissions are:
- Liqui Moly Getriebeoil-Additiv . Forms a protective film on the surface of parts due to molybdenum disulfide, and also fills microcracks. It effectively reduces noise in manual transmissions and extends the service life of the transmission.
- RVS Master TR3 and TR5 are designed for optimal heat removal during constant overheating of the unit. Which also helps reduce noise in the box.
- XADO 1Stage . This additive can be used in any transmission - mechanical, automatic and robotic. Contains boron nitride. Removes noise and vibration in the gearbox. Allows you to get to the workshop in the event of a critical loss of oil in the gearbox.
There are similar additives in automatic transmissions. Examples for automatic transmissions include:
- Liqui Moly ATF Additive . Complex additive. Removes noise and vibrations, eliminates shocks when shifting gears, restores rubber and plastic transmission parts. Can be used with ATF Dexron II and ATF Dexron III fluids.
- Tribotechnical composition Suprotek . Can be used with both automatic transmissions and CVTs. The additive is restorative, including removing vibration and noise in automatic transmissions.
- XADO Revitalizant EX120 . This is a revitalizant for the restoration of automatic transmissions and transmission oil. Eliminates shocks when shifting gears, eliminates vibration and noise.
The additive market is constantly being replenished with new compounds to replace old ones. Therefore, the lists in this case are far from complete.
Conclusion
Most often, a manual transmission is noisy because the oil level in it is low, or the oil is of the wrong viscosity or is old. In second place is bearing wear. Less commonly, wear of gears and couplings. As for automatic transmissions, similarly, most often the cause of the hum is low oil level, wear of gears and bearings, and malfunctions of hydraulic system elements. Therefore, the first thing to do when a howling or noise of a different nature appears is to check the oil level, and then look at the situation, under what conditions it occurs, how big the noise is, and so on.
In any case, it is not recommended to operate any transmission that makes a hum or shows other signs of malfunction. In this case, the box will wear out even more and its repair will cost more. The exact cause can only be found out by disassembling and troubleshooting the unit.