One of the reasons for a vehicle to pull or skid to the side when braking is a malfunction of the brake pressure regulator (also called the “sorcerer”). The most common causes of pressure regulator malfunction are brake fluid leakage, air in the brake system, damage to the rubber seal, damage to the rubber hose. In some cases, pumping air from the brake system, replacing the seal or hose will help, however, in most cases the problem can only be solved by replacement.
You can replace the sorcerer in the car yourself; for this you need a household set of tools - a wrench and pliers. The brake system of the Zhiguli is one of the most primitive in the world, and even if the driver has never done this before, then if you follow the instructions, he will have a minimum of problems during replacement (if any).
How to replace the brake pressure regulator in a VAZ 2110?
1. The first thing to do is to release the regulator drive lever; to do this, lift the bracket up. If necessary, use a screwdriver to loosen the earring bracket. All manipulations are performed with a key of 10.
2. After disconnecting the lever, carefully remove the earring bracket.
4. Unscrew the front bolt securing the bracket with the regulator.
5. We unscrew the rear bolt, which we hold the regulator on the side of the bracket, after which we remove the regulator (sorcerer), without unscrewing the drive.
6. If you need to replace drive parts, unscrew the bolt that holds the locking lever and disconnect the drive lever from the elastic lever.
7. When you connect the drive lever to the elastic lever, following the sequence, the clamp fork should fit into the groove on the elastic lever.
8. Next, install the brake pressure regulator in the same order as it was removed. Please note that the front mounting bolt is slightly longer than the rear one.
9. When replacing, it may be that the lever spring begins to protrude, thereby interfering with the installation of the regulator. To avoid problems, move the drive lever as far forward as possible beyond the protrusion.
10. Installation is complete, now crimp the earring brackets with pliers. To make sure that the system is working, pump and adjust the pressure.
Video about removing (removing) the sorcerer on a Renault Logan car:
How to tighten the handbrake on a Prior? The auto industry breaks down as always - Fix the Car!
If the handbrake on a VAZ-2112 becomes difficult to hold, then you should not change it immediately, since the cable can be adjusted. If the mileage on the car is high, the rear pads on the car may wear out. This may reduce the effectiveness of the handbrake and the entire braking system. In this case, the handbrake cable will need to be tightened.
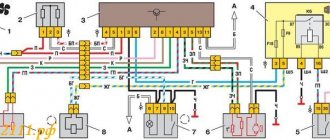
Handbrake diagram for VAZ-2112
For clarity, here is a diagram of a hand brake
1 - button that fixes the handbrake lever; 2 — hand brake lever; 3 — protective cover; 4 — handbrake rod; 5 — cable equalizer; 6 — adjusting nut; 7 - lock nut; 8 - cable; 9 — protective sheath of the cable.
In this scheme we need element number 6. It is he, and only him!
What is required for adjustment?
In order to adjust the handbrake you need a platform or lift. If there are no such devices, then you can simply hang the rear wheels on the “goats”. They can be installed under the car using a jack. It’s also worth taking two “13” keys and pliers.
Start:
- The car is installed on an overpass or “goats”. Hanging out your butt
- The lever position is set to the lowest possible position. We put the handbrake at the very bottom. Do not pay attention to the scuffs of the console; we conducted an experiment with non-standard armrests. The iron fastenings of the armrest are visible. The photo shows the editorial car
- Use a wrench to loosen the locknut. Adjusting nut
- The second wrench holds the adjusting nut.
- The adjusting nut should be tightened until the cable is tensioned. It must be remembered that the rod should be held with pliers when tensioning the cable. Tighten the adjusting nut
- After this, you should make sure that the full stroke of the handbrake lever is no more than 4 and no less than 2 clicks.
- When the stroke check is completed, the locknut is tightened. The adjustment is held with another key.
- If necessary, change the mechanism to a new one. Everything is rusty, we changed the adjustment mechanism
- After releasing the adjusted lever down, you should spin the rear wheels. When the lever is in its lowest position, the wheels should spin freely.
THIS IS INTERESTING: How to set the ignition of a VAZ 21099
If you cannot tighten the cable, then it should be replaced with a new one.
Adjusting the handbrake after tensioning
After adjusting the brakes, you need to check them again. To do this, the car should be placed on a road with a slope of at least 23%. The car should be in neutral gear in this area and with the handbrake pulled up. If the handbrake brakes hold the car in this area, then the handbrake is adjusted correctly.
What to do when adjustment does not work
There are also cases when the above actions are not enough to adjust the handbrake. This can happen, for example, when the handbrake cable is broken. This happens on the VAZ-2112, although rarely. In such situations, the cable must be replaced. The cable also needs to be replaced when:
- The tips are loose.
- The cable itself begins to stretch, which will lead to its breakage during operation. HAIKU! The old cable is very worn out! For comparison, old and new handbrake cables
- Physical wear (scuffs and cracks) of the handbrake cables. Heavy wear on the handbrake cable
- It is quite difficult for the cable to move in the casing even after lubrication.
This replacement procedure does not require contacting a service station. Although this will require some time and skills from the driver, such work can be done independently.
It should also be remembered that when replacing the cable, certain conditions must be observed. To do this, the driver will need an assistant who will pull the cable.
Why do you tighten the handbrake?
The cable acts here as a drive. If the driver pulls the handbrake lever, then at the same time he uses the cable, which spreads the pads in the rear wheel.
If the handbrake is faulty, you just need to tighten the cable or replace it with a new one. On a VAZ-2112 it’s quite easy to do this with your own hands.
Need for adjustment
You can determine that the parking brake needs adjustment when checking. It is recommended to do it every 30,000 kilometers. This procedure should be done even if the handbrake seems to be working well.
The device must also be checked in cases where it does not work. For example, a car moves when the brake lever is applied.
Adjusting the brake pressure regulator (sorcerer)
1. Place the car on the inspection ditch and press the rear part of the car several times (with a force of about 40–50 kgf) to set the rear suspension to the middle position.
2. Loosen the front bolt securing the regulator to the bracket.
3. Using the wire as a feeler gauge, adjust the bracket so that the gap between the drive lever and the lever spring is 2.0–2.1 mm.
4. To do this, move the drive lever by the protrusion. In this position, tighten the bolt.
5. If the pressure regulator is correctly adjusted, when braking from a speed of about 40 km/h on a horizontal section of the road with a hard surface, the front wheels should lock slightly earlier than the rear (this can be determined by an observer outside the car). Otherwise, increase the gap (if the rear wheels lock earlier than the front ones) or decrease it (if the rear wheels lock much later than the front ones). After this, check the adjustment again by braking and repeat if necessary.
"Chevrolet Niva"
The third state - we reduce the influence of the regulator by increasing the gap from the original one by 8 mm, that is, we set it to 24 mm. When there are two people in the car, the braking distance remains virtually unchanged - 34.3 m. However, now the rear wheels are blocked. But at full load the braking is very effective, the deceleration is easy to control and the result is a record: only 30.8 m!
In the normal position of the regulator, as the vehicle's weight increases, its braking distance decreases - this affects the more complete use of the traction weight by the rear wheels.
The best braking is at full load, when the regulator minimally limits the pressure in the rear brakes.
However, at partial load this can lead to skidding. The high center of gravity and short wheelbase of the Shnivy contribute to a significant redistribution of mass during braking, therefore, at partial load, the contribution of the rear axle to braking is small.
Why do you need a brake force regulator?
The function of the regulator is to temporarily reduce the braking force during heavy braking. The fact is that force evenly distributed on the rear and front axles can lead to a skid of the car. If the rear brakes start working a little later and weaker than the front ones, this does not happen.
Based on the above, we can conclude that the sorcerer is an element of the car’s safety system, partly preserving its stability on the road when the brake pedal is pressed in an emergency. On modern models, this function is performed by ABS. That is why there is no need today to use a technically outdated device in production.
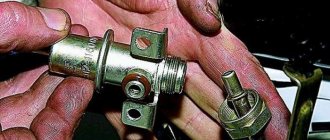
How does a sorcerer work?
The regulator itself consists of a cylinder, valve, spring and rod. The latter is connected to the rear beam, which ensures the operation of the VAZ-2109 sorcerer. Also, brake fluid circuits pass through the rear brake pressure regulator. For their mounting on the device there are 4 threaded entries. » alt=»»> How does the sorcerer regulator work on a VAZ? During emergency braking, the front of the car is pressed to the ground, and the rear is raised. This causes the regulator rod to move, which blocks the flow of fluid to the rear cylinders. A spring located under the valve prevents it from closing completely. Therefore, the rear mechanisms still work, but later and weaker than the front ones.
Possible malfunctions of the regulator
In general, there are few malfunctions that can occur in the sorcerer. These include:
- Valve jamming;
- Misalignment of position;
- Brake fluid leaks.
A deregulated sorcerer can be adjusted. You can determine the need for adjustment by the behavior of the car when you press the brake. If the regulator is set incorrectly, the car starts to toss to the side.
If the valve jams or fluid leaks, the mechanism must be replaced. Theoretically, it can be repaired. However, the process of such repairs is complex and expensive, which makes it unprofitable.
Setting the brake force regulator
Adjustment of the sorcerer should be done on an overpass or inspection hole. At the same time, the car is unloaded and driven to the work site. To perform the manipulation you will need:
- Socket wrench 13 or corresponding socket;
- Drill diameter 2 mm.
To adjust the sorcerer, use a wrench to loosen the bolt securing it to the lever bracket. Next, use a screwdriver to move the bracket until the resulting gap allows you to insert a prepared two-millimeter drill into it. After this, the bolt is tightened.
Note: the brake pressure regulator of the VAZ-2110 and previous VAZ models turns sour during operation so that it is not possible to move its bracket. In such a situation, you should pour WD-40 liquid over the rusted area, wait 15-30 minutes, and then use a hammer to move the part to the side using a soft drift.
Examination
The operation of the VAZ-2109, 2110 and other AvtoVAZ models is checked on the move, in closed areas. To do this, accelerate the car to a speed of 40 km/h and sharply press the brake. The rear wheels should lock 1/2 second later than the front wheels.
The wheels are monitored by an assistant located outside the car. If wheel locking occurs noticeably later or does not occur at all, and also if the rear axle is locked simultaneously with the front, the sorcerer adjustment procedure is repeated.
To increase the response time of the rear brakes, the gap between the adjuster and the bracket is increased; to shorten it, it is reduced accordingly.
How does the brake force regulator - sorcerer - work?
What is the "Sorcerer" for? This is a rather mysterious detail and no one has found a clear answer to this question. Perhaps this is why he was colloquially called a “sorcerer”, because he works magically. At its core, this part performs a similar function to the anti-lock braking system, preventing the wheels of the rear axle from locking during emergency braking. Its operation directly depends on the position of the rear axle relative to the car body: when braking sharply, the car nose-dives, and the rear part of the body rises, after which the “witchcraft” begins - the brake force regulator partially blocks the flow of fluid, and the rear wheels do not lock.
Of course, in ideal conditions (dry asphalt, straight road, working brake system and chassis), the brake force regulator does its job perfectly. But such conditions do not always occur.
Device Description
The design and principle of operation of this element are quite simple. At the moment when the rear part of the car body rises and the distance between the axle and the body increases, a special lever is activated, which is connected in a “sorcerer”. This lever lowers the piston, which closes the brake fluid channel, and accordingly the pressure on the rear pads decreases. The wheels do not stop rotating and, accordingly, do not skid.
The idea itself is quite clever, but, as often happens, in practice it raises doubts. After all, if when braking the brake pedal is pressed with great force, then the front wheels go into skid and the car still begins to skid. Quite often, when observing a traffic accident, you will notice that the cars with the “sorcerer” are turned backwards. Is this related to this miracle detail, which in its essence should prevent this skidding?
Signs of a malfunctioning brake force regulator
“Sorcerer”, as an element of the braking system, has a number of signs of malfunction that manifest themselves during emergency braking. Let's look at the first symptoms that call for checking the regulator:
- When braking hard, the car pulls to the side.
- Reduced braking efficiency (feels).
- “Bouncing” and jerking of the car when braking.
In such cases, it is necessary to check not only the “sorcerer”, but also other components of the brake system and chassis. But, since we are talking about the brake force regulator on the VAZ, we will consider this particular mechanism. After placing the car on a lift, pay attention to the regulator. The most common sign of its malfunction is the presence of brake fluid leaks. In case of any malfunction, the best solution is to replace the sorcerer. But, if you still decide to repair the brake force regulator, then below we have prepared brief instructions for this action.
Useful tips
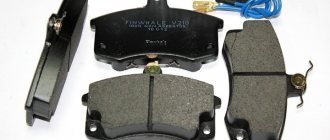
In addition to the sorcerer, the braking efficiency of the rear axle is influenced by:
- Drum wear;
- Condition and quality of the pads;
- Adjusting the handbrake cable;
- Faulty brake hoses.
Therefore, it is necessary to check all elements.
On the Internet there are tips for improving the brake system of VAZs: replacing the sorcerer with a simple tee, selecting the thickness of the sealing washers in the regulator, converting from a diagonal system to a dual-circuit front-rear axle.
But according to the Traffic Rules, it is prohibited to make any design changes to vehicle components on which safety directly depends. The best option is qualified technical service, timely identification and elimination of faults.
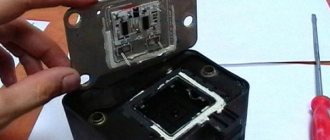
Sorcerer repair
In order to repair the brake force regulator, you need to perform a number of actions:
Thanks for subscribing!
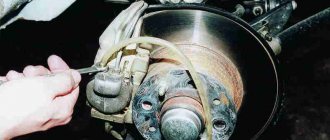
- Dismantling. We remove the entire assembly, using wrenches 10 and 13. The brake pipes are unscrewed, the brake fluid is drained and plugs are installed in the pipes. Next, the “sorcerer” body is removed, which is attached to the bottom with two nuts.
- Diagnostics and replacement of “sorcerer” parts. Carefully examine the surface of the “Sorcerer”. If necessary, replace faulty parts (sealing rubber bands) using a repair kit. A soured piston cannot be repaired and requires a complete replacement of the unit.
- Installation of the sorcerer. Reassemble and adjust the part in reverse order and bleed the brake system. Add brake fluid.
Repairing this unit is a rather dubious decision. Therefore, we strongly recommend that in case of any malfunction, you perform such an action as replacing the brake force regulator.
Removal and installation
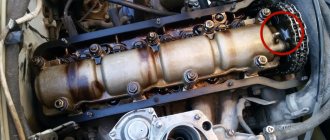
To replace the sorcerer on a VAZ 2110, you need wrenches 13 and 10. Instead of 10, a special wrench for brake fittings is very desirable; it is more gentle than a regular open-end wrench when handling soft copper nuts due to the large contact area.
Replacing a wheel bearing in a garage is not difficult if you have the necessary tools on hand. The work procedure is presented here: https://vazweb.ru/desyatka/hodovaya/zamena-stupichnogo-podshipnika.html
This type of wrench is similar to a socket wrench, but has a slot for inserting a tube into it and high jaws. You need about half a liter of brake fluid and 4 rubber plugs for the brake hoses.
Replacing and adjusting the “sorcerer” on Lada 2108,09,10
The conditions under the bottom are unfavorable for the sorcerer, so you first need to clean the dirt with a stiff brush and moisten the threaded connections with a penetrating lubricant such as WD-40. The fixing bracket is removed from the rear beam; if necessary, you can use a powerful screwdriver to loosen it.
The brake pipes are carefully unscrewed, marked for reassembly, and closed with rubber plugs. To dismantle the regulator, it is more convenient to unscrew the two nuts securing the bracket to the bottom and remove the sorcerer assembly.
During installation, the regulator fastening bolts (attention, the front bolt is longer than the rear), through elongated holes, are not fully tightened to the bracket to ensure movement during adjustment. Assembly is carried out in the reverse order; for reliability, the clamp-clamp on the beam must be crimped with pliers.
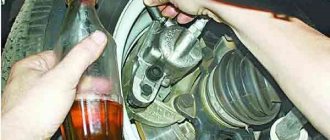
To remove air from the system, it is necessary to bleed the brakes after work. It’s easier to do this together, the process has been described many times, including for the VAZ 2110 . When replacing the sorcerer, it is enough to bleed only the rear brakes.
Adjusting the braking forces of Lada Vesta
The operating principle of the system that regulates and distributes brake fluid pressure on Lada Vesta cars is fundamentally different from previous models, and there is no “witchcraft” in it. The Lada Vesta brake pressure regulator is directly connected to the ABS system and is electronically regulated depending on the speed of each wheel.
The ABS control unit transmits signals from speed sensors and analyzes the situation. The system “understands” any skidding and allows you to distribute the braking force with maximum efficiency. The pressure is controlled by the valves in the ABS hydraulic block, and there is no need for any magic. In addition, the electronics itself detects all malfunctions and reports them to the driver using a special lamp on the dashboard.
Test results
The optimal adjustment of the “sorcerer” corresponds to the average factory settings, and a few percent can be gained only with individual correction for specific brake pads, tires, vehicle loading and road conditions. But it’s unlikely that anyone will start every trip with a test run.
It would seem that it is possible to reduce the braking distance by increasing the pressure in the rear brakes, but this threatens a loss of stability due to early blocking of the rear wheels. And today only ABS can provide maximum braking efficiency.
On a fully loaded car, depending on the position of the regulator, the spread of the braking distance is 8.3 m. The best results, as on the Niva, are with increasing pressure in the rear brakes. However, on a slippery road, even in smooth turns, early locking of the rear wheels is possible, leading to a skid. And at partial load, with the regulator position different from the base one, the braking distance only increases.