It is necessary to bleed the hydraulic brake system circuit after any depressurization caused by repair or replacement of brake cylinders, hoses, tubes, force regulator (sorcerer) or GTZ. Bleeding may also be required after the brakes overheat and fluid boils in the cylinders. Bleed the brake circuit to remove air pockets.
If you trust the experts to bleed the brakes of a VAZ 2110, the price they will charge you will be about 1,000 rubles.
It only includes pumping, and if you do the repair/replacement of the damaged unit directly at a service station, you will have to pay many times more. So, when performing such work yourself, you definitely need to know the pumping procedure, the scheme and what needs to be done in a particular case.
What to prepare for bleeding the brakes of a VAZ 2110/2111/2112
Bleeding VAZ 2110/2111/2112 brakes begins with preparing tools and materials. So, you will need:
- jack;
- a 17mm wheel wrench or a powerful wrench with such a head for removing wheels;
- wrench for 8 or 10 (depending on the type of fittings installed);
- a flat-head screwdriver or a thin mounting blade (when working on a lift);
- a thin transparent hose (for example, from a medical dropper), it is exactly equal to the diameter of the fitting;
- container for expressing liquid;
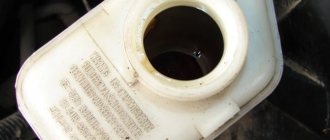
- bottle of DOT-4 brake fluid.
This set is usually enough to bleed the brakes of a VAZ 2110, the injector is 16 valves or 8, the year of manufacture of the car does not matter. Only the bleeder fittings can differ, which come with an 8 or 10 wrench. It is not advisable to use an open-end wrench to unscrew them, as it licks the edges. It is better to take a special clamping wrench with a screw, and if it is not available, a socket wrench, or a deep 8 or 10 socket with a knob.
Before bleeding the brakes on a VAZ 2110, it is advisable to buy 1-2 liters of new brake fluid; it is not recommended to use an old one or mix two fluids.
This can't be done
There is one very important point regarding brake fluid. You should pay special attention to it, since it will be difficult to predict the result if the recommendations are violated.
Do not mix different types of brake fluid. If you simply need to add it to an existing one, choose only the one that was filled in earlier. Mixing fuel fluids from different manufacturers can lead to unpredictable consequences.
If you need to top up, but you don’t know what kind of fuel fluid is currently there, there is only one way out - a complete replacement of the brake fluid.
Procedure for pumping brakes on a VAZ 2110: work plan
To properly bleed the brakes on a VAZ 2110, the car must be placed on a solid and level surface. If you don’t do this, you won’t be able to accurately monitor the liquid level in the tank and you can avoid airing the system when pumping it yourself when it’s inconvenient for one to control the level in the tank.
The order of bleeding the VAZ 2110 brakes is determined by the location of the circuits. First one swings, then the other. For front-wheel drive VAZs without ABS, the pumping scheme is standard - you need to start from the farthest point.
Sequence of pumping brakes VAZ 2110
Scheme for pumping brakes on a VAZ 2110
On VAZ-2110, 2111, 2112 the circuits are connected diagonally (right front - left rear, and vice versa). Therefore, the procedure for bleeding the VAZ 2110 brakes will be as follows:
- Rear right wheel.
- Front left wheel.
- Rear left wheel.
- Front right wheel.
In order to pump the rear brakes of a VAZ 2110 using a lift according to all the rules, before carrying out the procedure you need to fix the brake force regulator (sorcerer). It is located near the left rear wheel. The sorcerer is locked by installing a flat screwdriver or thin mounting blade between its piston rod and the thrust plate. If you are doing it in a pit, then you don’t need to do this!
You only need to block the sorcerer if the rear axle is hanging in the air. In this position, the beam stops putting pressure on the regulator. As a result, a situation with over-braking of the rear is simulated; if the sorcerer is not supported, the brake lines of the rear wheels are blocked to unlock them. If they do not hang and the beam presses on the sorcerer, it is open, the rear brakes then pump normally.
KAMAZ brake pads, installation and replacement
Installation of brake pads KAMAZ
How to properly install KAMAZ pads
KamAZ. How to rivet KamAZ pads.
how to rivet linings on Kamaz brake pads
I'm assembling a Kamaz for myself. Front brakes. (way out)
Adjusting Kamaz brakes
How to install brake ratchets on Kamaz, MAZ, ZIL
KAMAZ hub, replacing bearings, oil seals, knuckle bushings, riveting and installing pads
How to rivet brake pad linings
KB-60: CHPEK 1.2 – Riveting of truck brake pads
Riveting and installation of brake pads.
Bleeding the brakes of a VAZ 2110: order with the sorcerer
VAZ 2110 – bleeding the brakes, the video is shown using Kalina as an example, but the system is the same type. The fact that there is no sorcerer here does not bother you either; on cars equipped with an ABS system, its function is performed by electronics
Correct bleeding of the VAZ 2110 brakes is carried out with an assistant in this order:
- Open the hood, disconnect the fuel level sensor chip.
- Remove the plug from the GTZ reservoir and add fluid to the maximum.
- Lock the brake force regulator (sorcerer) if work is carried out on a lift.
- Remove the wheel whose brakes will be pumped if work is carried out without a lift or pit.
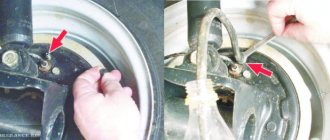
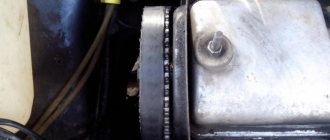
- Remove the rubber cap from the brake cylinder bleeder fitting and place a transparent tube on it.
- Place a container to collect excess liquid, pour some liquid into it and dip the end of the hose into it.
- Ask an assistant to create maximum pressure in the hydraulic circuit by pumping the brake pedal all the way 5-10 times (with pauses of 1-3 seconds between presses), then holding it depressed.
- Unscrew the fitting with a wrench, old fluid with bubbles should come out, and when it stops flowing, screw it back.
When tightening the fitting, the assistant must continue to hold the pedal depressed so as not to create a vacuum in the circuit. - Ask an assistant to release the brake pedal.
- Check the fuel fluid level in the tank; if it drops below the minimum, top it up.
- Repeat steps 7 to 10 until the flow of fuel fluid from the fitting is smooth, clean and free of bubbles.
- Tighten the fitting, put a cap on it, wipe the parts from liquid leaks, put the wheel in place and tighten it.
- Remove the other wheels one by one and bleed the brakes on the VAZ 2110, the procedure is described above.
What should you prepare for?
Using the example of installing rear disc brakes on a UAZ, you can see that such a design change requires a large number of strictly individual solutions.
In the worst case scenario, you yourself need to take measurements of some components of the rear brake system; some of the information can be found by the vehicle’s VIN code and original spare parts catalogues. Having the necessary measurements, all that remains is to select standard disc brakes from another car. Some elements will have to be selected empirically in an auto parts store, at a car dismantling station, or even ordered from a turner. There are easier ways to replace drums. Judging by the reviews, not a single driver who has replaced drum mechanisms with disc brakes regrets the time and money spent.
Replacement options
Your car model, but only with a more powerful engine or a later model year, could be equipped with rear disc brakes as standard. You need to check the interchangeability of hub assemblies, brake hose fastenings, and the alignment of the shield seats. We leave the interchangeable components, the remaining elements can be purchased at disassembly
When purchasing used elements, pay attention to the brake shield, which should not be heavily “eaten” by corrosion. Small lesions are acceptable
They must be thoroughly cleaned and painted before installation. It is better to buy brake system hoses, sealing washers and bolts new. All you have to do is remove the old drum brakes and replace them with disc system components. Most likely, the handbrake cable will have to be redone or replaced with a new one.
Your car was developed on a common basis with models that were standardly equipped with rear disc brakes. This happens if a modern car is largely a redesigned model of older cars, and therefore has many standardized parts from other cars. For example, many components of the rear beam and brake system of Daewoo Lanos/Zaz Chance were equipped with some GM models of the 90s and 2000s (Opel Vectra A, Opel Astra G, etc.). Therefore, replacing drum brakes with disc brakes sometimes does not even require replacing the hub. Despite the available parts ready for installation, DIY replacement requires knowledge of some nuances, many of which are publicly available on specialized forums.
There are no analogues ready for installation for your car, or you want to design an individual brake system by selecting the desired size of the caliper piston group, the diameter of the rear brake disc, the manufacturer of the components, etc. In this case, you will have to show technical improvisation to replace it. What elements are needed for installation, as well as how to replace the rear brakes with your own hands, we will consider further.
How to properly bleed the brakes on a VAZ 2110 yourself
Some motorists recommend bleeding the brakes alone, pumping and supporting the pressed pedal with a board/pipe/pry bar/bat/other oblong object, but this is not the most convenient option. If there is no assistant, it is better to use a gas lift of a suitable length instead, having a working force of 100 newtons. He will press the pedal as soon as the fitting opens, and thereby prevent the creation of a vacuum in the circuit.
Self-bleeding the brakes of a VAZ 2110, 8 valves or 16 – it doesn’t matter (as well as the type of power supply, carburetor or injector), is available in three ways:
- exposure to pressure;
- exposure to rarefaction;
- by gravity.
Self-pumping under pressure
On the VAZ 2110, bleeding the brakes under the influence of external pressure is possible using additional equipment. You will need:
A device for bleeding the brakes for one person (a cap with a nipple to create pressure in the system). Can be used as a special device such as a pump, compressor, inflated wheel (chamber)
- compressor, pump or tank with compressed air (a spare tire will do);
- air supply hose;
- nipple for tubeless wheel;
- TZ tank cap without sensor (from Zhiguli);
- drill of a diameter corresponding to the fitting diameter of the nipple.
Before you bleed the brakes on a VAZ 2110 yourself, you need to take the reservoir cap and drill a hole in it. The nipple should be inserted into it so that it sits there tightly. This cap must be screwed onto the GTZ tank, after adding fluid to the maximum. Then you need:
- Get to the brake fitting, remove the cap from it, put on a 8 or 10 key and a hose, immersing its end in a container (as described above).
- Connect the air supply hose to the nipple in the reservoir cap.
- Apply pressure to the tank through the nipple by pressing the compressor gun, pumping the pump or putting the hose on the spare tire.
- Unscrew the fitting to bleed air bubbles from the brake circuit.
- Wait until the fuel fluid flows through the hose in an even stream without bubbles.
- Tighten the fitting and stop the pressure supply.
- Repeat steps 3-6 for the remaining wheels.
Bleeding the brakes with vacuum
Instead of excess pressure, vacuum can be used to bleed the brakes of the VAZ 2110. To do this, you will need a large syringe (from 100 cubic meters) and a hose to connect it to the fitting. The procedure is as follows:
- Open the reservoir on the GTZ and fill in the maximum amount of liquid.
- Place the key on the fitting and connect the fitting to the syringe with a hose.
- Open the fitting and pull the syringe plunger towards you, creating a vacuum in the brake circuit.
- After filling the syringe, close the fitting and drain the fuel fluid into the container.
- Repeat the manipulations from steps 2-4 until the liquid begins to flow into the syringe in an even stream without bubbles.
- Repeat steps 2-5 for all wheels, following the order of bleeding the VAZ 2110 brakes.
This method is less efficient and consumes more fuel fluid, so it is used when pumping with pressure is not possible. It should be remembered that it is not worth reusing the pumped-out fuel fluid, due to the presence of contaminants from the circuit and atmospheric moisture in it.
Bleeding VAZ 2110 brakes by gravity
Bleeding brakes 2110 by gravity is the simplest, but most expensive method in terms of using brake fluid. All you need is hoses, drainage containers and a DOT-4 bottle. Pumping is carried out in this order:
A dropper with which it is convenient to bleed the brakes yourself
- Open the GTZ tank.
- Place the hoses on the fittings and insert their free ends into the containers under the drain.
- Unscrew the fittings on the brake cylinders.
- Start pouring fresh fuel oil into the GTZ tank, while simultaneously observing the streams from the fittings.
- When the liquid begins to flow through the hoses smoothly and without bubbles, tighten the bleeder fittings one by one.
If, as a result of pumping, the liquid in the tank does not reach the Max level, you need to top it up. If there is too much TJ, the excess must be pumped out with a syringe. It is not recommended to reuse the fuel fluid drained from the fittings; it must be disposed of.
How to bleed the brakes of a VAZ 2110 without removing the wheels
It is not necessary to remove the wheels to bleed the brake system. This is necessary to facilitate access to the fittings, but you can do without this item if:
- drive the car into a pit or overpass;
- raise it on a lift;
- use a high jack.
Since you can pump the front brakes on a VAZ 2110 purely by turning them out, this operation can be performed on any flat surface. To access the fitting for the left wheel, you need to turn the steering wheel all the way to the right, and for the right wheel, turn it all the way to the left. The gap between the wheel and the arch will be quite enough.
A pit, overpass or lift is needed to access the rear wheel fittings. You can use a jack to raise the rear end and straighten the strut spring to its highest position. The wheel will lower relative to the arch and the resulting gap will be enough to reach the fitting by hand. But since it is more convenient to unscrew 4 bolts, it is better not to “reinvent the wheel” and pump the brakes by removing the wheel.
Recommendations for performing work
The brake bleeding procedure usually involves inspecting the brake pads, discs and hoses. Brake pads must have the required minimum reserve, and microcracks are not allowed on the hoses. In the rear drums, it is necessary to maintain the adjustment of the brake pads (for an effective braking process).
A properly pumped hydraulic system produces equal force on each side of the vehicle when braking. If the car tends to change its trajectory, this indicates the presence of air in one of the sides.
Pushing to the right means there is air in the brake mechanisms on the left (and vice versa). The smaller the braking forces on one side, the greater the forces that tend to turn the car in the other direction. List of tools required for work:
- wheel wrench and jack;
- 8 key for fitting;
- rubber tube and jar;
- rags, WD fluid, pliers.
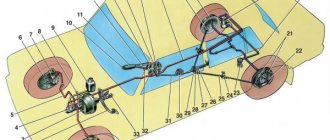
/> 1. Brake disc. 2. Front brake pad. 3. Piston O-ring. 4. Wheel cylinder piston. 5. Front brake wheel cylinder. 6. Brake hose of the front brake drive circuit. 7. Brake pad mounting pin. 8. Piston stroke limit screw. 9. O-ring. 10. Stop cup. 11. Rear brake drive piston. 12. O-ring spring. 13. Bushing. 14. Master cylinder body. 15. Front brake drive piston. 16. Seal. 17. Rod. 18. Vacuum valve. 19. Valve body return spring. 20. Valve body. 21. Diaphragm. 22. Vacuum valve body. 23. Vacuum booster housing cover. 24. Rod buffer. 25. Piston thrust plate. 26. Piston. 27. Vacuum booster valve. 28. Valve spring. 29. Valve return spring. 30. Air filter. 31. Valve pusher. 32. Pedal release spring. 33. Stop light switch tip. 34. Brake light switch. 35. Pressure regulator housing plug. 36. Pressure regulator piston. 37. Housing bushing. 38. Piston head seal. 39. Spring plate. 40. Piston spring. 41. O-ring of the pressure regulator piston. 42. Pressure regulator drive lever. 43. Rear brake pad. 44. Pad tension spring. 45. Rear brake wheel cylinder piston. 46. Piston spacer spring. 47. Wheel cylinder piston seals. 48. Brake pedal. 49. A. Vacuum cavity. 50. B. Channel connecting the vacuum cavity with the internal cavity of the valve. 51. C. Channel connecting the internal cavity of the valve with the atmospheric cavity. 52. D. Atmospheric cavity. 53. K. Hose. connecting the vacuum booster to the engine intake pipe. 54. I. The pedal is not pressed. 55. II. Braking. 56.III. The pedal is paused. 57. IV. Disinhibition.
A correctly performed bleeding procedure guarantees traffic safety and efficiency of the braking system of the VAZ 2106.
How to bleed the brakes on a VAZ-2110 if the fitting is broken
If the fitting cannot be unscrewed, screw in the fitting and the hose on top. This will allow air and old fluid to bleed off.
If the bleeder fitting is broken or the edges of the key are hopelessly licked, you need to unscrew it using an extractor or drill it with a 6 mm drill, and then install a new one. If the old one had to be removed by drilling, you need to cut an M10 thread and install a fitting under it (for example, from a Gazelle).
To bleed the brakes on a VAZ 2110, if the fitting is broken, you can use the connecting fitting (fitting) of the brake cylinder with a pipe. The procedure will be exactly the same as for normal pumping (described above), but instead of a fitting you need to unscrew a tube or hose .
Partial bleeding after replacing the brake cylinder
The repair manual recommends replacing brake parts in pairs on both sides so that the braking forces on the wheels of the same axle are equal. But if only one element of the braking system was repaired or replaced, and the level of fuel fluid in the tank did not fall below the minimum, it is permissible to limit oneself to de-airing one circuit. In this case, bleeding the VAZ 2110 brakes after replacing the brake cylinder is only possible for the rear right and front left or rear left and front right wheels.
If the level of fuel fluid in the tank drops to the bottom as a result of a breakdown or repair, it will not be possible to limit yourself to pumping one circuit. After all, there is a great risk that all 4 tubes managed to pick up bubbles. Since it is impossible to bleed the rear brakes on a VAZ 2110 without the front ones due to the diagonal connection of the circuits, when replacing cylinders or tubes in pairs on one axle, a complete de-airing procedure is required. Likewise, bleeding the front brakes of a VAZ 2110 without the rear ones is unacceptable.
Tubes to GTZ
Disconnecting the brake hose from the tube
The same nuances with removal often arise when replacing brake hoses (BL), and due to inexperience, you can roll up the edges not only on the BL, but also on the hose fitting. If the TS needs to be replaced, it’s not so bad to ruin it, but the tube still needs to be preserved.
Let's consider, for example, how the brake hose is disconnected from the tube on a VAZ 2114 car:
- remove the wheel;
- Use a metal brush to clean the connection between the hose and the tube from dirt;
- Spray from a can of VD-40 onto the TT fitting, wait some time for the impregnating oil to penetrate into the dirt:
- Use a 15mm wrench to keep the brake hose from turning, and with a 10mm wrench we begin to unscrew the pipe fitting.
When the TS is being replaced, and the connection is “dead to death” and does not give in, you should cut the hose, disconnect it first from the caliper, and in this case it is better to hold the other half with a spanner. But still, unscrewing must be done carefully, without excessive force; it is very easy to break off the tube, especially if it is old and rusty.
Tapping with a hammer helps very well to separate boiled parts; the method has been tried and tested by our fathers and grandfathers. In this case, it is better to knock on the hose fitting, but not directly with a hammer, but through a drift (nozzle). The method helps almost 100%; if it doesn’t work on the first try, the blows should be repeated. Tapping plus WD-40 will undoubtedly help, you just need to be patient. The main thing is not to rush, it’s better to spend an extra 10-15 minutes than to break the pipe.
How to bleed the main brake cylinder on a VAZ 2110
Bleeding the GTZ on a VAZ 2110 is carried out using the same methods as for wheel brake cylinders. But since in this case the fuel fluid must be replaced with a new one, preferably before pumping:
- Open the fittings.
- Blow out all the main pipes one by one with a compressor or pump to expel the remnants of the old fuel oil.
- Install the GTZ and attach the tubes to it.
- Bleed the brakes of the VAZ 2110, following one of the instructions above.
In addition to getting rid of the remnants of old fluid, purging the lines allows you to clear them of deposits. For maximum cleaning effect, you can disconnect the tubes from the cylinders and blow them out in this position. This will prevent contaminants from getting into the brake cylinders from the pipes.
When the edges are rolled up
If the edges of the brake line, hose or bleeder are already rounded, it is difficult to loosen the connection, but there are ways to help solve the problem. You can do the following:
- use a special grip wrench (plumbing pliers) to unscrew;
- to remove the brake pipe, make a cut on the side in the wrench head of the appropriate size (using a grinder), cut off two edges on top to install the wrench, secure the resulting device to the TT and unscrew the fitting;
- To “bleed” it, use a new hex head; trying to unscrew the fitting with a spanner, or even more so with an open-end wrench, is no longer acceptable here - the edges will become even worse.
To “soak” a soured connection, you should use not only WD-40, but also diesel fuel or kerosene; it is important to unscrew it not immediately, but in small jerks, then the tube or fitting will not break off. And don’t forget about heating and tapping; such methods are more effective than various cunning devices
The internal combustion engine and other components of the car operate at high temperatures, which is why there is a high risk of parts sticking, especially if the driver does not carry out regular preventative maintenance. One of the parts that may be difficult to dismantle is the brake pipe. In this article, we will look at how to unscrew the brake pipe, if it is soured, from the brake hose, caliper or cylinder. This problem is most pressing for Russian cars, but the owner of a foreign car may also encounter it, especially if the brake fluid has not been changed over a long period of operation of the car and there has been no need to unscrew the brake pipe.