Replacing the gearbox input shaft bearing may only be necessary a few times over the entire life of the vehicle.
Like the gearbox itself, it is a fairly reliable part. However, every driver still needs to know how it works, where it is located and how it is replaced. Find out the cost of replacing a bearing online in 3 minutes
Don't waste your time - use the Uremont search and get offers from nearby services with specific prices!
Get prices
Device
Needle bearings are mainly used to support the shaft. The use of thin and long rollers allows the thickness of the ring to be minimized while maintaining high load resistance.
Fastening the part has its own characteristics. During operation, the element wears out its installation location. Due to increasing play and vibrations, the part is gradually destroyed, and then it is necessary to replace it.
Symptoms of malfunctions
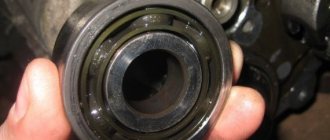
Signs of failure of this element are strongly related to the installation location. The gearbox input shaft bearing is installed on the input shaft, and behind it there is an oil seal. In various transmission models, the bearing itself can act as an oil seal. So, paired with a release valve, this part experiences almost the entire load from the car engine. To find the problem bearing, you need to dismantle the transmission. Symptoms of failure of this element are similar to how any other bearings become unusable. In case of serious breakdowns, characteristic sounds resembling a howl are heard from the gearbox. This sound can be heard when the clutch is released and the car is stationary. But the input shaft bearing can also whistle while driving. It is very rare to hear characteristic knocking sounds - they indicate complete destruction of the unit.
There are also problems with engaging or not disengaging the clutch. The reasons for this type of gearbox operation lie in this bearing. A malfunction often occurs if a part is jammed. In difficult situations, it may be necessary to replace the input shaft. Often, whistling and humming are heard when there is no lubricant in the bearing. This issue can be resolved by lubricating the part. But first you need to remove it from the gearbox. The transmission will make a howling noise if the bearings are chipped or cracked, or if one or two rollers are destroyed. If characteristic knocking noises are heard, this indicates complete failure of the part. The knock will be made in any gear. If you do not replace a worn or damaged part in time, then the element may become seriously “welded” to the shaft. As a result, you will have to change the input shaft bearing and the shaft itself.
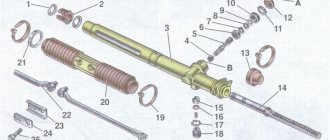
Assembly and installation of the box
Before assembly, replace the input shaft oil seal. Clean the magnet from any metal debris. Replace the magnet if it begins to crack or become less magnetic. Check the gears and synchronizers; if they are chipped, replace them. Clean the contacting surfaces of the crankcases from traces of sealant. Then follow these steps:
- Engage the shafts and insert them together into the clutch housing.
- Install forks with rods.
- Reinsert the magnet.
- Lubricate parts subject to increased friction with transmission oil.
- Apply sealant to the contacting surfaces of the crankcases and rear cover before connecting them.
After assembling the box, install it back. Before “returning”, lubricate the end of the CV joint-4 drive shaft. Screw back the clutch housing stud, and also temporarily screw in 2 guides into the front lower hole of the cylinder block and into the rear upper hole - this will make the process of installing the box easier.
Next, insert the drive shaft into the clutch. The two screwed-in studs should go into the holes in the clutch housing, and the “original” stud should go into the cylinder block. The gearbox should rest against the cylinder block. After this you can remove the pins.
Causes of breakdowns
Many different factors can influence an element to wear out and break down. Often the culprit is poor quality parts. When purchasing a product, you should not give preference to the cheapest options, but rather purchase a quality product. It is necessary to carefully inspect the unit and make sure that it is reliable and made of strong materials. Also one of the possible reasons is the way you drive the car. If the driver uses an overly aggressive style, literally pulling out the shift lever, then this does not add service life to the bearing, but seriously reduces its service life.
The conditions in which the car is operated are also important. If the car is constantly stored in a garage, if there are no overloads, then all this will have the best effect on the resource of each unit. And finally, the most popular reason why the VAZ input shaft bearing fails is ignoring the maintenance of the vehicle’s mechanisms and components. Owners of inexpensive cars who use them for work, as well as novice drivers who are just learning, can ignore maintenance.
Signs of a malfunction of the input shaft bearing of the VAZ 2107 gearbox
There are several signs that indicate a bearing is faulty:
- When the engine is running at neutral speed, extraneous noise is heard, which changes with increasing speed.
- The gearbox periodically taps while the car is moving. And the knock is present in any gear.
- Gears switch on or off spontaneously.
- The clutch does not engage due to a stuck bearing.
The problem cannot be ignored: misalignment of a faulty bearing will lead to breakage of the clutch basket. And even if misalignment does not occur, a worn part will cause rapid failure of the gearbox and/or clutch.
Bearing replacement can only be done on a removed gearbox. This is where the work begins.
How to remove the transmission?
To remove the box you need an inspection hole or a lift. Also, for work you need a standard set of tools - a wrench, sockets, wrenches and a pry bar. The dismantling process is carried out in several stages:
- First of all, disconnect the terminal on the battery. Then the neutral gear is engaged and the parking brake is released. Raise and remove the rear axle. Next, unscrew the bolts holding the cardan and the gearbox flange. After this, you can disconnect the driveshaft.
- Then unscrew the bolts and dismantle the exhaust pipe of the exhaust manifold, disconnect the oxygen sensor, and remove the starter. Next, inside the car you need to dismantle the console and gear knob.
- After this, remove the box protection and unscrew the clamps that connect the exhaust pipe to the catalyst. After this, you can dismantle the slave cylinder of the clutch system. Next, unscrew the speedometer cable, remove the boot and reverse gear cable. Now you can remove the driveshaft. Then the traverses are unscrewed (you must hold the box so that it does not fall). Finally, you can unscrew and remove the gearbox assembly.
Removing the box
After completing the preparatory stage, proceed to removing the gearbox. First, operations are carried out on top of the car according to the following instructions:
1. Remove the negative cable from the battery. 2. Remove the air purifying filter. 3. Remove the starter by first disconnecting the wires from the terminal and from the contact bolt. 4. Pull the clutch drive cable out of the clutch release fork. 4. Removing the drive cable
5. If the gearbox bearings are being replaced on Kalina 2, then 2 cables should be removed from the gear selection mechanism. In the figure they are indicated as number 1, and the mechanism as number 2.
You can remove the front wheels, this will make it easier to work. Then you should move under Kalina and do the remaining steps: 1. Remove the protective panel or mudguard on the left side. 2. Drain the oil from the box. 3. Unscrew the bolts on the lower clutch housing cover using a size 10 wrench and remove it.
Crankcase cover 4. Next, the drives are removed from the wheels. To do this, first unscrew the 2 bolts that secure the ball joint to the knuckle using a size 17 socket wrench. Perform the operation on the left and right sides.
5. Using the gearbox housing as a stop, press the left and right hinges out of the gearbox with a spatula or wide screwdriver.
Move the drives away from the gearbox by moving the shock absorber struts outward. 6. Disconnect the electrical elements from the gearbox housing: the “trick” of the reverse lock solenoid.
Speed sensor chip.
Remove the block from the reverse light switch
7. When replacing bearings in the gearbox on Kalina 1, unscrew the torque rod together with the bracket from the box. Use 2 size 19 keys. One to hold it from turning, the other to unscrew it. The same bolts fasten the clutch housings and boxes together. After unwinding, remove the rod from the box.
8. Squeeze the plastic holder of the drive damper cable and remove it from the gearbox. It is located near the oil level indicator.
9. Using a size 13 socket wrench, unscrew the bolt securing the ignition unit bracket to the clutch.
10. Next, the gearbox is disconnected from the cylinder block using the 19th head. First, unscrew the top 2 bolts. After removing them, it will be possible to move the throttle drive cable to the side along with the fastening. The first bolt, indicated in the figure by the letter “a”, is short, the second, “b” is long.
11. Place supports, preferably adjustable ones, under the gearbox and engine.
12. Next, unscrew the lower bolts connecting the cylinder block and the box. First, use a 19-size wrench to unscrew the rear one. Then use a socket wrench No. 19 for the front one.
13. Now the box is disconnected from the engine. It is necessary to remove the bracket between the engine and gearbox. First, unscrew the 2 bolts connecting the front left support cushion to the bracket.
14. Next, remove 3 nuts securing the bracket to the gearbox. After this, remove the bracket.
15. Then the 3 bolts on the rear support bracket are disconnected. Two of them are unscrewed with a socket wrench No. 19, and in the middle - No. 17.
16. Together with an assistant, move the gearbox away from the engine so that the drive shaft comes out of the clutch. If you can’t pull it out, then move the power unit to the side, release it in front of the gearbox and pull it out. Do not push the input shaft against the clutch “petals”, otherwise they can be damaged. Disassembling the box Disassembling the gearbox should begin with cleaning it. Do not allow dirt to get inside the device. Then follow the following instructions: 1. Remove the speed sensor by unscrewing the retaining nut.
Then remove from the recess.
2. To install the gearbox on a table or workbench, unscrew the connecting pin from the clutch housing. To do this, screw 2 nuts onto it and unscrew it. Place the gearbox on the table, the clutch housing should be at the bottom.
3. Next, remove the reverse lock solenoid. First, unscrew the locking plug using key No. 13. The spring and ball are pulled out of the recess.
4. Then the solenoid is dismantled using key No. 36.
5. Unscrew the reverse lighting switch located nearby using key No. 22.
6. Next, remove the clutch release drive bracket from the body. It is held on by two nuts. First, using key No. 13, unscrew the first one, which simultaneously secures the rear cover of the gearbox housing.
Then with key No. 17 - the second one. Remove the bracket.
7. Having freed the gearbox from the “external” elements, remove the rear crankcase cover. To do this, unscrew the remaining 5 nuts using a No. 13 wrench.
8. Tapping upwards on the lid with a wooden hammer or a regular one, but with a soft tip, loosen it, lift it and remove it.
9. To continue disassembly, you need to unscrew the 2 nuts on the shafts. This cannot be done on rotating shafts, so they must be stopped by simultaneously engaging two gears: 3 and 5 or 4 and 5. If the shift rod is pressed in, the third will engage. If you pull it out, it's the fourth one. 10. Next, turn on the fifth. Remove the bolt securing the fork of this gear using a No. 10 wrench.
11. Then you need to lower the fork to engage the 5th “speed”. You can use a drift.
12. Now the nuts will unscrew. First you need to open them up. If you do not intend to replace the nuts during assembly, then remember which shaft each of them belongs to. Unscrew using collar no. 32. You'll have to put in a lot of effort. 13. Using a screwdriver, lift the 5th gear gear and remove the synchronizer and fork along with it. In this case, all the elements must be removed together, pressed against each other, so that the balls do not scatter.
14. Pull out the plug and mark the relative position of the coupling and the locking ring. Then remove the gear and ring and separate them. Remove the plate from the synchronizer. 15. Using a screwdriver, remove the 5th gear bushing from the secondary shaft. 16. Press the 5th gear gear off the drive shaft using two screwdrivers.
17. Pull out the thrust ring from the driven shaft. 18. Next, remove the plate held by screws and spring washers. An impact screwdriver is used. If the washers burst, they must be replaced during assembly.
19. Next, unscrew the clamps holding the fork rods. There are 3 of them; when removing them, remove the springs and balls from the holes.
20. Remove the retaining rings of the rear bearings of the drive and driven shafts.
21. Now disconnect the gear housing and clutch. Unscrew 13 nuts and 1 bolt around the perimeter of the gearbox. 22. To separate the gearbox, insert screwdrivers into special grooves located at the junction of the crankcases, gradually lift the upper part and remove it.
23. Remove the magnet for collecting metal debris from the crankcase.
24. Remove 3 rods and speed forks. Unscrew the screw securing the 1-2 speed fork to the rod. Then slightly raise the rod and turn it counterclockwise to remove the fork from the engagement with the gear selection mechanism. Remove the assembly.
25. Unscrew the bolt connecting the second rod to the 3-4 gear fork. Pull the knot out of the hook and remove it.
26. The 5th gear fork was removed first, so all that remains is to remove the rod.
27. Next, pull out the reverse idler gear axle. Then push the gear into the gear selection system, rotate it 30°-40° and remove it.
28. Since the bearings need to be replaced, the gear selection mechanism does not need to be touched. At this point the shafts can be removed. They are pulled out at the same time.
This completes the disassembly of the gearbox. Proceed to replacing the Kalina gearbox bearings.
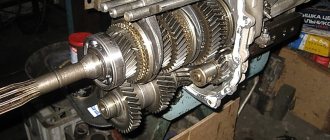
Where is the bearing located, how to dismantle it?
On domestically produced cars, the input shaft bearing is located on the secondary shaft, directly behind the oil seal. When the gearbox is completely removed from the car, take out the bell, as well as the retaining rings. There is no need to disassemble the assembly further.
In order to replace the part, you need to use a screwdriver to hook the bearing into its annular groove. Next, the input shaft is pushed forward using the bearing as a support. Then slowly pull the bearing off the shaft by tapping it with a hammer. There's no need to rush. Replacing the VAZ input shaft bearing can take from several minutes to one hour.
How to install a new element on the shaft?
A new part can be installed on the input shaft using press-fit technology. The bearing is generously lubricated with engine oil and then pressed in using a small hammer.
It is important that the tool is not only small, but also not heavy. Use a hammer to carefully and evenly hit the inner ring of the part. The shaft is pulled forward. After pressing, it is recommended to make sure that the part is working properly. A serviceable bearing rotates easily and quietly, without noise. After the replacement of the input shaft bearing (including the VAZ) has been completed, the gearbox is installed in its rightful place. All assembly work should be done in reverse order.
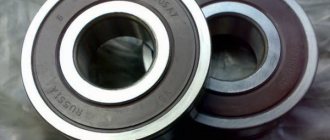
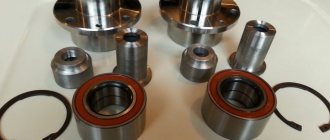
What bearings are on the Kalina manual transmission?
Before replacing the gearbox bearings on Kalina with your own hands, you need to understand their location and structure. There are 2 products attached to each of the shafts on Kalina. The front ones are roller, the rear are ball. A simplified diagram is shown in the figure.
1. Shafts To understand how to visually distinguish a ball element from a roller element, you need to consider the design of the product. It is shown schematically in the figure below.
2. Bearing design You can distinguish a roller from a ball bearing by the rolling element. In the first case they look like cylinders, in the second they look like balls. And this is what a set of four bearings for Kalina looks like.
3. Kit After diagnosing the box, proceed to replacing the box bearings on the Lada Kalina.
Useful tips
If there is no oil on the bearing, but there is no damage to its surface, then you don’t have to replace it, but simply lubricate it and install it back. This is done if for some reason the required spare part is not on hand. Lubricate the gearbox input shaft bearing (including VAZ) in two ways. The first option involves boiling the part in lithol. It is best to carry out this operation in a water bath. But there is a safer option - lubrication using the injection method. To do this, lithol is drawn into a syringe and lubricant is filled into the bearing. But you need to take into account that such a process requires more time.
How to extend the resource?
To increase the service life of the device, you must drive on smooth roads. In our country, it is problematic to comply with this condition. Keep in mind that uneven roads destroy not only the vehicle’s chassis, but also the clutch system. Therefore, regular off-road driving is also dangerous for bearings. Don't make mistakes when operating your car. When the car is stopped at a traffic light, there is no need to depress the clutch pedal and engage first gear if you do not plan to move. This should only be done at the beginning of movement, since the part operates under high load conditions. Regular lubrication will increase the service life of the device.